
User Guide
Page 4
... off the computer 2-44 2.9.1 Using the OS shut down function 2-44 2.9.2 Using the dual function power switch 2-44 Chapter 3: BIOS setup 3.1 Managing and updating your BIOS 3-1 3.1.1 ASUS Update utility 3-1 3.1.2 ASUS EZ Flash 2 utility 3-4 3.1.3 ASUS CrashFree BIOS 3 utility 3-5 3.2 BIOS setup program 3-6 3.2.1 BIOS menu screen 3-7 3.2.2 Menu bar 3-7 3.2.3 Navigation keys 3-7 3.2.4 Menu items 3-8 3.2.5 Submenu items 3-8 3.2.6 Configuration fields 3-8 3.2.7 Pop-up window 3-8 3.2.8 Scroll bar 3-8 3.2.9 General help...
... off the computer 2-44 2.9.1 Using the OS shut down function 2-44 2.9.2 Using the dual function power switch 2-44 Chapter 3: BIOS setup 3.1 Managing and updating your BIOS 3-1 3.1.1 ASUS Update utility 3-1 3.1.2 ASUS EZ Flash 2 utility 3-4 3.1.3 ASUS CrashFree BIOS 3 utility 3-5 3.2 BIOS setup program 3-6 3.2.1 BIOS menu screen 3-7 3.2.2 Menu bar 3-7 3.2.3 Navigation keys 3-7 3.2.4 Menu items 3-8 3.2.5 Submenu items 3-8 3.2.6 Configuration fields 3-8 3.2.7 Pop-up window 3-8 3.2.8 Scroll bar 3-8 3.2.9 General help...

User Guide
Page 10
ASUS websites The ASUS website provides updated information on the motherboard. • Chapter 3: BIOS setup This chapter tells how to install and configure multiple ATI® CrossFireX™ and NVIDIA® SLI™ graphics cards. • Appendix: Debug code table The Appendix lists the debug code table for product and software updates. 1. Refer to perform when installing...
ASUS websites The ASUS website provides updated information on the motherboard. • Chapter 3: BIOS setup This chapter tells how to install and configure multiple ATI® CrossFireX™ and NVIDIA® SLI™ graphics cards. • Appendix: Debug code table The Appendix lists the debug code table for product and software updates. 1. Refer to perform when installing...
User Guide
Page 21
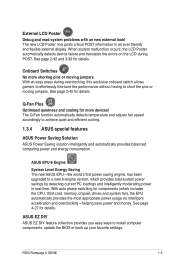
... onboard switch allows gamers to effortlessly fine-tune the performance without having to achieve quiet and efficient cooling. 1.3.4 ASUS special features ASUS Power Saving Solution ASUS Power Saving solution ...ROG Rampage II GENE 1-5 The Q-Fan function automatically detects temperature and adjusts fan speed accordingly to short the pins or moving jumpers With an easy press during POST. ASUS EZ DIY ASUS ...display. ASUS EPU-6 Engine System Level Energy Saving The new ASUS EPU-the world's first power saving engine, has been upgraded to install computer components, update the BIOS or back...
... onboard switch allows gamers to effortlessly fine-tune the performance without having to achieve quiet and efficient cooling. 1.3.4 ASUS special features ASUS Power Saving Solution ASUS Power Saving solution ...ROG Rampage II GENE 1-5 The Q-Fan function automatically detects temperature and adjusts fan speed accordingly to short the pins or moving jumpers With an easy press during POST. ASUS EZ DIY ASUS ...display. ASUS EPU-6 Engine System Level Energy Saving The new ASUS EPU-the world's first power saving engine, has been upgraded to install computer components, update the BIOS or back...

User Guide
Page 22
...It is a user-friendly BIOS update utility. ASUS Q-Connector The ASUS Q-Connector allows you to connect or disconnect chassis front panel cables in one easy step with one cable at a time, making connection quick and accurate. Profile The motherboard features the ASUS O.C. See page 3-42 ... the system chassis to conveniently store or load multiple BIOS settings. ASUS O.C. Simply launch this tool and update BIOS using C.P.R. Profile that are among the industry's highest. Simply reboot the system, and the BIOS automatically restores the CPU default settings for malicious program detection...
...It is a user-friendly BIOS update utility. ASUS Q-Connector The ASUS Q-Connector allows you to connect or disconnect chassis front panel cables in one easy step with one cable at a time, making connection quick and accurate. Profile The motherboard features the ASUS O.C. See page 3-42 ... the system chassis to conveniently store or load multiple BIOS settings. ASUS O.C. Simply launch this tool and update BIOS using C.P.R. Profile that are among the industry's highest. Simply reboot the system, and the BIOS automatically restores the CPU default settings for malicious program detection...
User Guide
Page 70
Chapter summary 3 3.1 Managing and updating your BIOS 3-1 3.2 BIOS setup program 3-6 3.3 Extreme Tweaker menu 3-9 3.4 Main menu 3-18 3.5 Advanced menu 3-22 3.6 Power menu 3-30 3.7 Boot menu 3-35 3.8 Tools menu 3-39 3.9 Exit menu 3-43 ROG Rampage II GENE
Chapter summary 3 3.1 Managing and updating your BIOS 3-1 3.2 BIOS setup program 3-6 3.3 Extreme Tweaker menu 3-9 3.4 Main menu 3-18 3.5 Advanced menu 3-22 3.6 Power menu 3-30 3.7 Boot menu 3-35 3.8 Tools menu 3-39 3.9 Exit menu 3-43 ROG Rampage II GENE
User Guide
Page 71
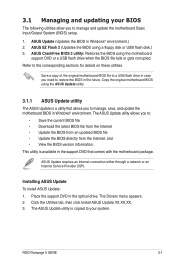
... is available in the support DVD that allows you to restore the BIOS in Windows® environment. Installing ASUS Update To install ASUS Update: 1. The Drivers menu appears. 2. ROG Rampage II GENE 3-1 Copy the original motherboard BIOS using the ASUS Update utility. 3.1.1 ASUS Update utility The ASUS Update is a utility that comes with the motherboard package. ASUS Update requires an Internet connection either through a network or an Internet Service...
... is available in the support DVD that allows you to restore the BIOS in Windows® environment. Installing ASUS Update To install ASUS Update: 1. The Drivers menu appears. 2. ROG Rampage II GENE 3-1 Copy the original motherboard BIOS using the ASUS Update utility. 3.1.1 ASUS Update utility The ASUS Update is a utility that comes with the motherboard package. ASUS Update requires an Internet connection either through a network or an Internet Service...
User Guide
Page 72
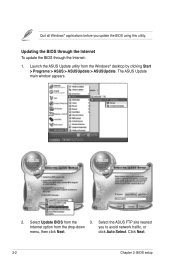
Select Update BIOS from the Windows® desktop by clicking Start > Programs > ASUS > ASUSUpdate > ASUSUpdate. click Auto Select. Click Next. 3-2 Chapter 3: BIOS setup The ASUS Update main window appears. 2. Launch the ASUS Update utility from the 3. Select the ASUS FTP site nearest Internet option from the drop‑down you update the BIOS using this utility. Updating the BIOS through the Internet To update the BIOS through the Internet: 1. Quit all Windows® applications before you to avoid network traffic, or menu, then click Next.
Select Update BIOS from the Windows® desktop by clicking Start > Programs > ASUS > ASUSUpdate > ASUSUpdate. click Auto Select. Click Next. 3-2 Chapter 3: BIOS setup The ASUS Update main window appears. 2. Launch the ASUS Update utility from the 3. Select the ASUS FTP site nearest Internet option from the drop‑down you update the BIOS using this utility. Updating the BIOS through the Internet To update the BIOS through the Internet: 1. Quit all Windows® applications before you to avoid network traffic, or menu, then click Next.

User Guide
Page 73
... Start > Programs > ASUS > ASUSUpdate > ASUSUpdate. The ASUS Update utility is capable of updating itself through a BIOS file: 1. Select Update BIOS from a file option from the drop‑down menu, then click Next. 3. Always update the utility to download. Updating the BIOS through a BIOS file To update the BIOS through the Internet. Click Next. 5. The ASUS Update main window appears. 2. RAMIIGEN.ROM RAMIIGEN ROG Rampage II GENE 3-3 From the...
... Start > Programs > ASUS > ASUSUpdate > ASUSUpdate. The ASUS Update utility is capable of updating itself through a BIOS file: 1. Select Update BIOS from a file option from the drop‑down menu, then click Next. 3. Always update the utility to download. Updating the BIOS through a BIOS file To update the BIOS through the Internet. Click Next. 5. The ASUS Update main window appears. 2. RAMIIGEN.ROM RAMIIGEN ROG Rampage II GENE 3-3 From the...

User Guide
Page 74
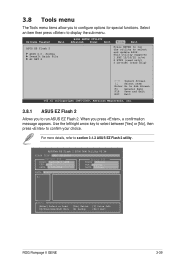
...boot failure! To update the BIOS using this utility, download the latest BIOS from the ASUS website at www.asus.com. Press to display the following. • Enter the BIOS setup program. See section 3.9 Exit Menu for details. 3-4 Chapter 3: BIOS setup 3.1.2 ASUS EZ Flash 2 utility The ASUS EZ Flash 2 ... Select the Load Setup Defaults item under the Exit menu. ASUSTek EZ Flash 2 BIOS ROM Utility V3.34 FLASH TYPE: MXIC 25L1605A Current ROM BOARD: RampageII GENE VER: 0205 DATE: 01/13/2009 Update ROM BOARD: Unknown VER: Unknown DATE: Unknown PATH: A:\ A: Note [Enter...
...boot failure! To update the BIOS using this utility, download the latest BIOS from the ASUS website at www.asus.com. Press to display the following. • Enter the BIOS setup program. See section 3.9 Exit Menu for details. 3-4 Chapter 3: BIOS setup 3.1.2 ASUS EZ Flash 2 utility The ASUS EZ Flash 2 ... Select the Load Setup Defaults item under the Exit menu. ASUSTek EZ Flash 2 BIOS ROM Utility V3.34 FLASH TYPE: MXIC 25L1605A Current ROM BOARD: RampageII GENE VER: 0205 DATE: 01/13/2009 Update ROM BOARD: Unknown VER: Unknown DATE: Unknown PATH: A:\ A: Note [Enter...
User Guide
Page 75
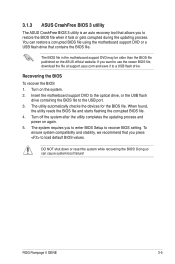
... default BIOS values. ROG Rampage II GENE 3-5 DO NOT shut down or reset the system while recovering the BIOS! The utility automatically checks the devices for the BIOS file. 3.1.3 ASUS CrashFree BIOS 3 utility The ASUS CrashFree BIOS 3 utility is an auto recovery tool that allows you to restore the BIOS file when it to a USB flash drive. The BIOS file in the motherboard...
... default BIOS values. ROG Rampage II GENE 3-5 DO NOT shut down or reset the system while recovering the BIOS! The utility automatically checks the devices for the BIOS file. 3.1.3 ASUS CrashFree BIOS 3 utility The ASUS CrashFree BIOS 3 utility is an auto recovery tool that allows you to restore the BIOS file when it to a USB flash drive. The BIOS file in the motherboard...

User Guide
Page 76
... to "Run Setup." See section 3.9 Exit Menu. • The BIOS setup screens shown in section 3.1 Managing and updating your selections from the available options using the provided utility described in this section are installing a motherboard, reconfiguring your screen. • Visit the ASUS website (www.asus.com) to ensure system compatibility and stability. Press during the...
... to "Run Setup." See section 3.9 Exit Menu. • The BIOS setup screens shown in section 3.1 Managing and updating your selections from the available options using the provided utility described in this section are installing a motherboard, reconfiguring your screen. • Visit the ASUS website (www.asus.com) to ensure system compatibility and stability. Press during the...
User Guide
Page 109
... Main ASUS EZ Flash 2 ASUS O.C. ASUSTek EZ Flash 2 BIOS ROM Utility V3.34 FLASH TYPE: MXIC 25L1605A Current ROM BOARD: RampageII GENE VER: 0208 DATE: 02/03/2009 Update ROM BOARD: Unknown VER: Unknown DATE: Unknown PATH: A:\ A: Note [Enter] Select or Load [Up/Down/Home/End] Move [Tab] Switch [B] Backup [V] Drive Info [Esc] Exit ROG Rampage II GENE...
... Main ASUS EZ Flash 2 ASUS O.C. ASUSTek EZ Flash 2 BIOS ROM Utility V3.34 FLASH TYPE: MXIC 25L1605A Current ROM BOARD: RampageII GENE VER: 0208 DATE: 02/03/2009 Update ROM BOARD: Unknown VER: Unknown DATE: Unknown PATH: A:\ A: Note [Enter] Select or Load [Up/Down/Home/End] Move [Tab] Switch [B] Backup [V] Drive Info [Esc] Exit ROG Rampage II GENE...
User Guide
Page 111
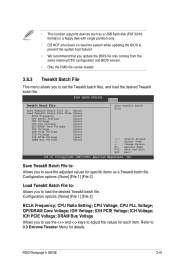
Configuration options: [None] [File 1] [File 2] BCLK Frequency; CPU PLL Voltage; IOH PCIE Voltage; CPU Voltage; ROG Rampage II GENE 3-41 IOH Voltage; BIOS SETUP UTILITY Tools TweakIt Batch File Save TweakIt Batch File to save the adjusted values for details. CPU Ratio Setting; Configuration options.... • DO NOT shut down or reset the system while updating the BIOS to prevent the system boot failure! • We recommend that you update the BIOS file only coming from the same memory/CPU configuration and BIOS version. • Only the CMO file can be loaded. 3.8.3...
Configuration options: [None] [File 1] [File 2] BCLK Frequency; CPU PLL Voltage; IOH PCIE Voltage; CPU Voltage; ROG Rampage II GENE 3-41 IOH Voltage; BIOS SETUP UTILITY Tools TweakIt Batch File Save TweakIt Batch File to save the adjusted values for details. CPU Ratio Setting; Configuration options.... • DO NOT shut down or reset the system while updating the BIOS to prevent the system boot failure! • We recommend that you update the BIOS file only coming from the same memory/CPU configuration and BIOS version. • Only the CMO file can be loaded. 3.8.3...
User Guide
Page 119
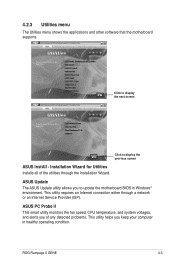
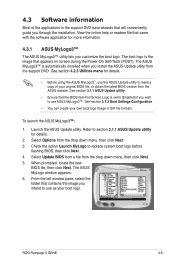
ASUS Update The ASUS Update utility allows you to display the previous screen ASUS InstAll - This utility requires an Internet connection either through the Installation Wizard. ROG Rampage II GENE 4-3 4.2.3 Utilities menu The Utilities menu shows the applications and other software that the motherboard supports. ...network or an Internet Service Provider (ISP). Click to display the next screen Click to update the motherboard BIOS in healthy operating condition. ASUS PC Probe II This smart utility monitors the fan speed, CPU temperature, and system voltages, and alerts you...
ASUS Update The ASUS Update utility allows you to display the previous screen ASUS InstAll - This utility requires an Internet connection either through the Installation Wizard. ROG Rampage II GENE 4-3 4.2.3 Utilities menu The Utilities menu shows the applications and other software that the motherboard supports. ...network or an Internet Service Provider (ISP). Click to display the next screen Click to update the motherboard BIOS in healthy operating condition. ASUS PC Probe II This smart utility monitors the fan speed, CPU temperature, and system voltages, and alerts you...
User Guide
Page 125
... the support DVD have wizards that came with the software application for details. 2. ROG Rampage II GENE 4-9 See section 3.7.2 Boot Settings Configuration. • You can create your boot logo. To launch the ASUS MyLogo3 1. Select Update BIOS from a file from the ASUS website. View the online help or readme file that will conveniently guide you install the...
... the support DVD have wizards that came with the software application for details. 2. ROG Rampage II GENE 4-9 See section 3.7.2 Boot Settings Configuration. • You can create your boot logo. To launch the ASUS MyLogo3 1. Select Update BIOS from a file from the ASUS website. View the online help or readme file that will conveniently guide you install the...
User Guide
Page 126
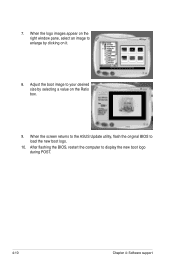
When the screen returns to the ASUS Update utility, flash the original BIOS to display the new boot logo during POST. 4-10 Chapter 4: Software support 7. After flashing the BIOS, restart the computer to load the new boot logo. 10. When the logo images appear on the right window pane, select an image to your desired size by clicking on the Ratio box. 9. Adjust the boot image to enlarge by selecting a value on it. 8.
When the screen returns to the ASUS Update utility, flash the original BIOS to display the new boot logo during POST. 4-10 Chapter 4: Software support 7. After flashing the BIOS, restart the computer to load the new boot logo. 10. When the logo images appear on the right window pane, select an image to your desired size by clicking on the Ratio box. 9. Adjust the boot image to enlarge by selecting a value on it. 8.


