
User Guide
Page 5
... 6.1.2 Installing hard disk drives 6-2 6.1.3 RAID controller selection 6-3 6.1.4 Setting the RAID item in BIOS 6-3 6.2 LSI Software RAID Configuration Utility 6-4 6.2.1 Creating a RAID set 6-5 6.2.2 Adding or viewing a RAID configuration 6-11 6.2.3 Initializing the virtual drives 6-12 6.2.4 Rebuilding failed drives 6-16 6.2.5 Checking the drives for data consistency 6-18 6.2.6 Deleting a RAID configuration 6-21 6.2.7 Selecting the boot drive from a RAID set 6-22 6.2.8 Enabling WriteCache 6-23 6.3 Intel® Matrix Storage Manager Option ROM Utility 6-24 6.3.1 Creating a RAID set...
... 6.1.2 Installing hard disk drives 6-2 6.1.3 RAID controller selection 6-3 6.1.4 Setting the RAID item in BIOS 6-3 6.2 LSI Software RAID Configuration Utility 6-4 6.2.1 Creating a RAID set 6-5 6.2.2 Adding or viewing a RAID configuration 6-11 6.2.3 Initializing the virtual drives 6-12 6.2.4 Rebuilding failed drives 6-16 6.2.5 Checking the drives for data consistency 6-18 6.2.6 Deleting a RAID configuration 6-21 6.2.7 Selecting the boot drive from a RAID set 6-22 6.2.8 Enabling WriteCache 6-23 6.3 Intel® Matrix Storage Manager Option ROM Utility 6-24 6.3.1 Creating a RAID set...
User Guide
Page 9
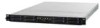
... connectors. 5. Chapter 2: Hardware setup This chapter lists the hardware setup procedures that you have to install the optional components and devices into the barebone server. 4. Chapter 6: RAID configuration This chapter provides instructions for setting up, creating and configuring RAID sets using the available utilities. 7 Chapter 7: Driver installation This chapter provides instructions for installing the necessary drivers for system integrators, and experienced users with at least basic knowledge of the server, including sections on front panel and rear panel specifications...
... connectors. 5. Chapter 2: Hardware setup This chapter lists the hardware setup procedures that you have to install the optional components and devices into the barebone server. 4. Chapter 6: RAID configuration This chapter provides instructions for setting up, creating and configuring RAID sets using the available utilities. 7 Chapter 7: Driver installation This chapter provides instructions for installing the necessary drivers for system integrators, and experienced users with at least basic knowledge of the server, including sections on front panel and rear panel specifications...

User Guide
Page 19
... PARTS AWAY ASUS RS700D-E6/PS8, RS702D-E6/PS8, RS704D-E6/PS8 1-9 ASUS Z8PH-D12 SE/QDR server boards 4. HDD tray 2 and 4-Connect to SATA1 and SATA3 ports 9. The barebone server does not include a floppy disk drive and an optical disc drive. Front I/O boards (hidden) Turn off the system power and detach the power supply before removing or replacing any of the USB ports on the front or rear panel if you need to any system component. Power supplies and power fans 2. RS704D-E6...
... PARTS AWAY ASUS RS700D-E6/PS8, RS702D-E6/PS8, RS704D-E6/PS8 1-9 ASUS Z8PH-D12 SE/QDR server boards 4. HDD tray 2 and 4-Connect to SATA1 and SATA3 ports 9. The barebone server does not include a floppy disk drive and an optical disc drive. Front I/O boards (hidden) Turn off the system power and detach the power supply before removing or replacing any of the USB ports on the front or rear panel if you need to any system component. Power supplies and power fans 2. RS704D-E6...

User Guide
Page 20
... a HW monitor event Normal status Location switch is pressed (Press the location switch again to HDD 1-10 Chapter 1: Product introduction 1.7 1.7.1 LED information Front panel LEDs Power LED Message LED Location LED LED Icon Power LED HDD Access LED Message LED Location LED LAN LEDs Display status ON OFF Blinking OFF Blinking OFF ON OFF Blinking ON 1.7.2 LAN (RJ-45) LEDs HDD Access LED LAN2 LED LAN1 LED Description System power ON No activity Read/write data into the HDD System is present SPEED LED ACT/LINK LED ACT/LINK LED Status Description OFF No link GREEN Linked...
... a HW monitor event Normal status Location switch is pressed (Press the location switch again to HDD 1-10 Chapter 1: Product introduction 1.7 1.7.1 LED information Front panel LEDs Power LED Message LED Location LED LED Icon Power LED HDD Access LED Message LED Location LED LAN LEDs Display status ON OFF Blinking OFF Blinking OFF ON OFF Blinking ON 1.7.2 LAN (RJ-45) LEDs HDD Access LED LAN2 LED LAN1 LED Description System power ON No activity Read/write data into the HDD System is present SPEED LED ACT/LINK LED ACT/LINK LED Status Description OFF No link GREEN Linked...
User Guide
Page 32
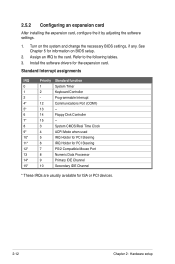
... Disk Controller 7* 15 -- 8 3 System CMOS/Real Time Clock 9* 4 ACPI Mode when used 10* 5 IRQ Holder for PCI Steering 11* 6 IRQ Holder for PCI Steering 12* 7 PS/2 Compatible Mouse Port 13 8 Numeric Data Processor 14* 9 Primary IDE Channel 15* 10 Secondary IDE Channel * These IRQs are usually available for information on the system and change the necessary BIOS settings, if any. 2.5.2 Configuring an expansion card After installing the expansion card, configure...
... Disk Controller 7* 15 -- 8 3 System CMOS/Real Time Clock 9* 4 ACPI Mode when used 10* 5 IRQ Holder for PCI Steering 11* 6 IRQ Holder for PCI Steering 12* 7 PS/2 Compatible Mouse Port 13 8 Numeric Data Processor 14* 9 Primary IDE Channel 15* 10 Secondary IDE Channel * These IRQs are usually available for information on the system and change the necessary BIOS settings, if any. 2.5.2 Configuring an expansion card After installing the expansion card, configure...
User Guide
Page 73
... a time if the device supports multi-sector transfer feature. When set to [Disabled], the data transfer from and to [Auto] enables the LBA mode if the device supports this mode, and if the device was not previously formatted with LBA mode disabled. The BIOS automatically detects the values opposite the dimmed items (Device, Vendor, Size, LBA Mode, Block Mode, PIO Mode, Async DMA, Ultra DMA, and S.M.A.R.T. Configuration options: [Disabled] [Enabled] ASUS RS700D-E6/PS8, RS702D-E6/PS8, RS704D-E6/PS8 5-9 monitoring).
... a time if the device supports multi-sector transfer feature. When set to [Disabled], the data transfer from and to [Auto] enables the LBA mode if the device supports this mode, and if the device was not previously formatted with LBA mode disabled. The BIOS automatically detects the values opposite the dimmed items (Device, Vendor, Size, LBA Mode, Block Mode, PIO Mode, Async DMA, Ultra DMA, and S.M.A.R.T. Configuration options: [Disabled] [Enabled] ASUS RS700D-E6/PS8, RS702D-E6/PS8, RS704D-E6/PS8 5-9 monitoring).

User Guide
Page 74
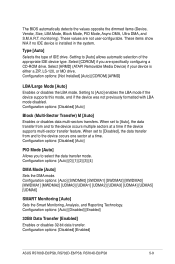
...Matrix Storage Technology configuration from the Serial ATA hard disk drives, set this item to use the Advanced Host Controller Interface (AHCI), set this item to [AHCI]. Main BIOS SETUP UTILITY IDE Configuration SATA Configuration Configure SATA as [Enhanced] [IDE] Hard Disk Write Protect [Disabled] IDE Detect Time Out (Sec) [35] Options Disabled Compatible Enhanced SATA Configuration [Enhanced] Configuration options: [Disabled] [Compatible] [Enhanced] Configure SATA as Parallel ATA physical storage devices, keep the default setting [IDE]. • If you want to [RAID...
...Matrix Storage Technology configuration from the Serial ATA hard disk drives, set this item to use the Advanced Host Controller Interface (AHCI), set this item to [AHCI]. Main BIOS SETUP UTILITY IDE Configuration SATA Configuration Configure SATA as [Enhanced] [IDE] Hard Disk Write Protect [Disabled] IDE Detect Time Out (Sec) [35] Options Disabled Compatible Enhanced SATA Configuration [Enhanced] Configuration options: [Disabled] [Compatible] [Enhanced] Configure SATA as Parallel ATA physical storage devices, keep the default setting [IDE]. • If you want to [RAID...
User Guide
Page 77
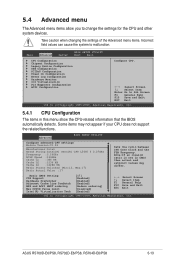
.... Incorrect field values can cause the system to change the settings for the CPU and other system devices. 5.4 Advanced menu The Advanced menu items allow you to malfunction. ASUS RS700D-E6/PS8, RS702D-E6/PS8, RS704D-E6/PS8 5-13 Main Advanced Server BIOS SETUP UTILITY Boot Exit CPU Configuration Chipset Configuration Legacy Device Configuration USB Configuration PCIPnP Configuration Power On Configuration Event Log Configuration Hardware Monitor I/O Virtualization PCI Exppress Configuration ACPI Configuration Configure CPU. ←→ Select Screen ↑↓ Select Item...
.... Incorrect field values can cause the system to change the settings for the CPU and other system devices. 5.4 Advanced menu The Advanced menu items allow you to malfunction. ASUS RS700D-E6/PS8, RS702D-E6/PS8, RS704D-E6/PS8 5-13 Main Advanced Server BIOS SETUP UTILITY Boot Exit CPU Configuration Chipset Configuration Legacy Device Configuration USB Configuration PCIPnP Configuration Power On Configuration Event Log Configuration Hardware Monitor I/O Virtualization PCI Exppress Configuration ACPI Configuration Configure CPU. ←→ Select Screen ↑↓ Select Item...
User Guide
Page 86
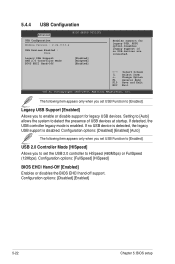
...you to [Enabled]. 5.4.4 USB Configuration Advanced BIOS SETUP UTILITY USB Configuration Module Version - 2.24.3-13.4 USB Devices Enabled : None Legacy USB Support USB 2.0 Controller Mode BIOS EHCI Hand-Off [Enabled] [HiSpeed] [Enabled] Enables support for legacy USB devices. If detected, the USB controller legacy mode is disabled. USB 2.0 Controller Mode [HiSpeed] Allows you set the USB 2.0 controller to [Enabled]. Change Option F1 General Help F10 Save and Exit ESC Exit v02.61 (C)Copyright 1985-2009, American Megatrends, Inc. If no USB devices are connected. ←...
...you to [Enabled]. 5.4.4 USB Configuration Advanced BIOS SETUP UTILITY USB Configuration Module Version - 2.24.3-13.4 USB Devices Enabled : None Legacy USB Support USB 2.0 Controller Mode BIOS EHCI Hand-Off [Enabled] [HiSpeed] [Enabled] Enables support for legacy USB devices. If detected, the USB controller legacy mode is disabled. USB 2.0 Controller Mode [HiSpeed] Allows you set the USB 2.0 controller to [Enabled]. Change Option F1 General Help F10 Save and Exit ESC Exit v02.61 (C)Copyright 1985-2009, American Megatrends, Inc. If no USB devices are connected. ←...

User Guide
Page 94
... port number Base Address, IRQ Serial Port Mode Flow Control Redirection After BIOS POST Terminal Type [COM2] [2F8h, 3] [57600 8,n,1] [Hardware] [Disabled] [VT-UTF8] Remote Access [Enabled] Enables or disables the remote access feature. Configuration options: [Disabled] [Enabled] The following items appear only when Remote Access is not user-configurable and changes with the configuration of Serial port number. 5-30 Chapter 5: BIOS setup Main Advanced Server BIOS SETUP UTILITY Boot Exit Remote Access Configuration IPMI configuration including server monitoring and event log...
... port number Base Address, IRQ Serial Port Mode Flow Control Redirection After BIOS POST Terminal Type [COM2] [2F8h, 3] [57600 8,n,1] [Hardware] [Disabled] [VT-UTF8] Remote Access [Enabled] Enables or disables the remote access feature. Configuration options: [Disabled] [Enabled] The following items appear only when Remote Access is not user-configurable and changes with the configuration of Serial port number. 5-30 Chapter 5: BIOS setup Main Advanced Server BIOS SETUP UTILITY Boot Exit Remote Access Configuration IPMI configuration including server monitoring and event log...

User Guide
Page 97
...self tests (POST) while booting to decrease the time needed to boot the system. ←→ Select Screen ↑↓ Select Item +- Configuration options: [Disabled] [Enabled] ASUS RS700D-E6/PS8, RS702D-E6/PS8, RS704D-E6/PS8 5-33 Configuration options: [Disabled] [Enabled] Set this item allows the BIOS to skip some power on state for the key to use the ASUS MyLogo2™ feature. Quick Boot [Enabled] Enabling this item to [Enabled] to be pressed when error occurs. 5.6.3 Boot Settings Configuration BIOS SETUP UTILITY Boot Boot Settings Configuration Quick Boot Full...
...self tests (POST) while booting to decrease the time needed to boot the system. ←→ Select Screen ↑↓ Select Item +- Configuration options: [Disabled] [Enabled] ASUS RS700D-E6/PS8, RS702D-E6/PS8, RS704D-E6/PS8 5-33 Configuration options: [Disabled] [Enabled] Set this item allows the BIOS to skip some power on state for the key to use the ASUS MyLogo2™ feature. Quick Boot [Enabled] Enabling this item to [Enabled] to be pressed when error occurs. 5.6.3 Boot Settings Configuration BIOS SETUP UTILITY Boot Boot Settings Configuration Quick Boot Full...
User Guide
Page 99
... Server Power Boot Tools Exit Supervisor Password : Installed User Password : Not Installed Change Supervisor Password User Access Level Change User Password Password Check [Full Access] [Setup] to the Setup utility. User Access Level [Full Access] This item allows you to select the access restriction to the Setup items. Configuration options: [No Access] [View Only] [Limited] [Full Access] No Access prevents user access to change the user password. Select the Change User Password item and press . 2. Configuration options: [Setup] [Always] ASUS RS700D-E6/PS8, RS702D-E6/PS8...
... Server Power Boot Tools Exit Supervisor Password : Installed User Password : Not Installed Change Supervisor Password User Access Level Change User Password Password Check [Full Access] [Setup] to the Setup utility. User Access Level [Full Access] This item allows you to select the access restriction to the Setup items. Configuration options: [No Access] [View Only] [Limited] [Full Access] No Access prevents user access to change the user password. Select the Change User Password item and press . 2. Configuration options: [Setup] [Always] ASUS RS700D-E6/PS8, RS702D-E6/PS8...

User Guide
Page 102
... the surviving drive as a single drive but at a sustained data transfer rate, double that supports the following SATA RAID solutions: • LSI MegaRAID software RAID Configuration Utility (default) with RAID 0, RAID 1, and RAID 10 support (for both Linux and Windows OS). • Intel Matrix Storage Manager with the Intel® ICH10R southbridge controller that of a single disk alone, thus improving data access and storage. RAID 5 stripes both RAID 0 and RAID 1 configurations. If one drive to a second drive. Two hard disks perform the...
... the surviving drive as a single drive but at a sustained data transfer rate, double that supports the following SATA RAID solutions: • LSI MegaRAID software RAID Configuration Utility (default) with RAID 0, RAID 1, and RAID 10 support (for both Linux and Windows OS). • Intel Matrix Storage Manager with the Intel® ICH10R southbridge controller that of a single disk alone, thus improving data access and storage. RAID 5 stripes both RAID 0 and RAID 1 configurations. If one drive to a second drive. Two hard disks perform the...

User Guide
Page 104
... BIOS Version A.08.09161344R Management Menu Configure Initialize Objects Rebuild Check Consistency Configure VD(s) Use Cursor Keys to enter the utility. 6.2 LSI Software RAID Configuration Utility The LSI MegaRAID software RAID configuration utility allows you to navigate through the setup menu options or execute commands. The keys on the legend box vary according to select an option from the Management Menu and then press . During POST, the LSI MegaRAID software RAID configuration utility automatically detects the installed SATA hard disk drives and displays any existing RAID...
... BIOS Version A.08.09161344R Management Menu Configure Initialize Objects Rebuild Check Consistency Configure VD(s) Use Cursor Keys to enter the utility. 6.2 LSI Software RAID Configuration Utility The LSI MegaRAID software RAID configuration utility allows you to navigate through the setup menu options or execute commands. The keys on the legend box vary according to select an option from the Management Menu and then press . During POST, the LSI MegaRAID software RAID configuration utility automatically detects the installed SATA hard disk drives and displays any existing RAID...

User Guide
Page 106
... 6: RAID configuration Select all the drives required for the RAID set , and then press . When selected, the drive indicator changes from READY to the SATA ports. Press to configure array setting. 4. ARRAY SELECTION MENU Management Menu Configure Initialize Objects Rebuild Check Consistency PORT # 0 ONLIN A00-00 1 ONLIN A00-01 2 READY 3 READY Port # 1 DISK 77247MB HDS728080PLA380 PF20A60A SPACE-Sel,ENTER-EndArray,F10-Configure,F2-Drive Info,F3-Virtual Drives,F4-HSP • The information of the selected hard disk drive displays...
... 6: RAID configuration Select all the drives required for the RAID set , and then press . When selected, the drive indicator changes from READY to the SATA ports. Press to configure array setting. 4. ARRAY SELECTION MENU Management Menu Configure Initialize Objects Rebuild Check Consistency PORT # 0 ONLIN A00-00 1 ONLIN A00-01 2 READY 3 READY Port # 1 DISK 77247MB HDS728080PLA380 PF20A60A SPACE-Sel,ENTER-EndArray,F10-Configure,F2-Drive Info,F3-Virtual Drives,F4-HSP • The information of the selected hard disk drive displays...
User Guide
Page 111
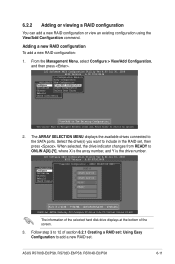
...hard disk drive displays at the bottom of section 6.2.1 Creating a RAID set , then press . LSI Software RAID Configuration Utility Ver A.60 Jul 30, 2008 BIOS Version A.08.09161344R View/Add Configuration - Select the drive(s) you want to the SATA ports. The ARRAY SELECTION MENU displays the available drives connected to include in the RAID set : Using Easy Configuration to 12 of the screen. 3. Adding a new RAID configuration To add a new RAID configuration: 1. ASUS RS700D-E6/PS8, RS702D-E6/PS8, RS704D-E6/PS8 6-11 From the Management Menu, select Configure > View/Add...
...hard disk drive displays at the bottom of section 6.2.1 Creating a RAID set , then press . LSI Software RAID Configuration Utility Ver A.60 Jul 30, 2008 BIOS Version A.08.09161344R View/Add Configuration - Select the drive(s) you want to the SATA ports. The ARRAY SELECTION MENU displays the available drives connected to include in the RAID set : Using Easy Configuration to 12 of the screen. 3. Adding a new RAID configuration To add a new RAID configuration: 1. ASUS RS700D-E6/PS8, RS702D-E6/PS8, RS704D-E6/PS8 6-11 From the Management Menu, select Configure > View/Add...

User Guide
Page 114
... Configure Virtual Drive Initialize Physical Drive Objects Rebuild Check Consistency Select VD Press ENTER To Select A VD, To Delete A VD 6-14 Chapter 6: RAID configuration Using the Objects command To initialize the virtual drives using the Objects command 1. From the Management Menu, select Objects > Virtual Drive, and then press . LSI Software RAID Configuration Utility Ver A.60 Jul 30, 2008 BIOS Version A.08.09161344R Objects Management MAednaupter Configure Virtual Drive Initialize Physical Drive Objects Rebuild Check Consistency Change VD Parameters Use Cursor Keys...
... Configure Virtual Drive Initialize Physical Drive Objects Rebuild Check Consistency Select VD Press ENTER To Select A VD, To Delete A VD 6-14 Chapter 6: RAID configuration Using the Objects command To initialize the virtual drives using the Objects command 1. From the Management Menu, select Objects > Virtual Drive, and then press . LSI Software RAID Configuration Utility Ver A.60 Jul 30, 2008 BIOS Version A.08.09161344R Objects Management MAednaupter Configure Virtual Drive Initialize Physical Drive Objects Rebuild Check Consistency Change VD Parameters Use Cursor Keys...

User Guide
Page 124
... The RAID BIOS setup screens shown in this section are connected to create RAID 0, RAID 1, RAID 10 (RAID 1+0), and RAID 5 set(s) from Serial ATA hard disk drives that are for RAID configuration. 6-24 Chapter 6: RAID configuration Reset Disks to display the utility main menu. Physical Disks: Port Drive Model 0 ST3160812AS 1 ST3160812AS 2 ST3160812AS 3 ST3160812AS [ DISK/VOLUME INFORMATION ] * = Data is Encrypted Serial # 9LS0HJA4 9LS0F4HL 3LS0JYL8 9LS0BJ5H Size 149.0GB 149.0GB 149.0GB 149.0GB Type/Status(Vol ID) Non-RAID Disk Non-RAID Disk Non-RAID Disk Non-RAID Disk [↑...
... The RAID BIOS setup screens shown in this section are connected to create RAID 0, RAID 1, RAID 10 (RAID 1+0), and RAID 5 set(s) from Serial ATA hard disk drives that are for RAID configuration. 6-24 Chapter 6: RAID configuration Reset Disks to display the utility main menu. Physical Disks: Port Drive Model 0 ST3160812AS 1 ST3160812AS 2 ST3160812AS 3 ST3160812AS [ DISK/VOLUME INFORMATION ] * = Data is Encrypted Serial # 9LS0HJA4 9LS0F4HL 3LS0JYL8 9LS0BJ5H Size 149.0GB 149.0GB 149.0GB 149.0GB Type/Status(Vol ID) Non-RAID Disk Non-RAID Disk Non-RAID Disk Non-RAID Disk [↑...
User Guide
Page 136
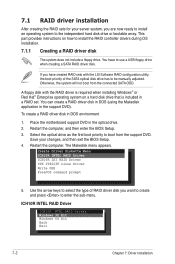
... Linux Driver Write DMI FreeDOS command prompt 5. 7.1 RAID driver installation After creating the RAID sets for your changes, and then exit the BIOS Setup. 4. Save your server system, you have to boot from the connected SATA ODD. This part provides instructions on a hard disk drive that is required when installing Windows® or Red Hat® Enterprise operating system on how to enter the sub-menu. Restart the computer, and then enter the BIOS Setup. 3. Use the arrow keys...
... Linux Driver Write DMI FreeDOS command prompt 5. 7.1 RAID driver installation After creating the RAID sets for your changes, and then exit the BIOS Setup. 4. Save your server system, you have to boot from the connected SATA ODD. This part provides instructions on a hard disk drive that is required when installing Windows® or Red Hat® Enterprise operating system on how to enter the sub-menu. Restart the computer, and then enter the BIOS Setup. 3. Use the arrow keys...
User Guide
Page 140
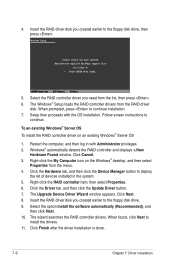
... continue. Insert the RAID driver disk you created earlier to display the list of devices installed in with the OS installation. Click the Hardware tab, and then click the Device Manager button to the floppy disk drive, then press . Windows Setup Please insert the disk labeled Manufacturer-supplied hardware support disk into Drive A: * Press ENTER when ready. Right-click the RAID controller item, then select Properties. 6. The Windows® Setup loads the RAID controller drivers from the menu. 4. Restart the...
... continue. Insert the RAID driver disk you created earlier to display the list of devices installed in with the OS installation. Click the Hardware tab, and then click the Device Manager button to the floppy disk drive, then press . Windows Setup Please insert the disk labeled Manufacturer-supplied hardware support disk into Drive A: * Press ENTER when ready. Right-click the RAID controller item, then select Properties. 6. The Windows® Setup loads the RAID controller drivers from the menu. 4. Restart the...


