
Pundit-R User Manual
Page 4
... 42 2.11.2 Power supply specifications 43 2.12 Connecting devices 44 Chapter 3: Starting up 3.1 Installing an operating system 48 3.2 Powering up 49 3.3 Using the system 49 3.3.1 PCMCIA card slot 49 3.3.2 Storage card slot 50 3.3.3 Optical drive 50 3.4 Support CD information 51 3.4.1 Running the support CD 51 3.4.2 Drivers menu 51 3.4.3 Utilities 52 3.4.4 ASUS contact information 53...
... 42 2.11.2 Power supply specifications 43 2.12 Connecting devices 44 Chapter 3: Starting up 3.1 Installing an operating system 48 3.2 Powering up 49 3.3 Using the system 49 3.3.1 PCMCIA card slot 49 3.3.2 Storage card slot 50 3.3.3 Optical drive 50 3.4 Support CD information 51 3.4.1 Running the support CD 51 3.4.2 Drivers menu 51 3.4.3 Utilities 52 3.4.4 ASUS contact information 53...
Pundit-R User Manual
Page 7
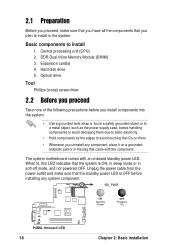
... safety • Before installing devices into the system, carefully read all cables are correctly connected and the power cables are connected. • If the power supply is incorrectly replaced. Ersatz nur durch denselben oder einem vom Hersteller empfohlenem ähnljchen Typ. Entsorgung gebrauchter ..., contact a qualified service technician or your retailer. Safety information Electrical safety • To prevent electrical shock hazard, disconnect the power cable from the electrical outlet before the signal cables are not damaged. Place the product on a stable surface. • If...
... safety • Before installing devices into the system, carefully read all cables are correctly connected and the power cables are connected. • If the power supply is incorrectly replaced. Ersatz nur durch denselben oder einem vom Hersteller empfohlenem ähnljchen Typ. Entsorgung gebrauchter ..., contact a qualified service technician or your retailer. Safety information Electrical safety • To prevent electrical shock hazard, disconnect the power cable from the electrical outlet before the signal cables are not damaged. Place the product on a stable surface. • If...
Pundit-R User Manual
Page 10
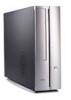
... and plug • Serial ATA signal cable • Serial ATA power cable 3. Optional component(s) • Security port with : • ASUS P4R8L motherboard • CPU fan and heatsink assembly • PCMCIA slot • 4-in-1 storage card reader • PCI riser card • 200W power supply unit 2. System package contents Check your retailer immediately if any...
... and plug • Serial ATA signal cable • Serial ATA power cable 3. Optional component(s) • Security port with : • ASUS P4R8L motherboard • CPU fan and heatsink assembly • PCMCIA slot • 4-in-1 storage card reader • PCI riser card • 200W power supply unit 2. System package contents Check your retailer immediately if any...

Pundit-R User Manual
Page 14
..., modem, or other devices. 8. DVI port. 1.4 Rear panel The system rear panel includes the power socket and several I/O ports that conforms with S-Video interface. 4. Power supply unit. USB 2.0 ports 2.0. TV-out port. This green 6-pin connector is a 11 200W power supply unit. 7 3. Ethernet LAN port . Voltage selector. PCI slots. This port connects a flat panel or...
..., modem, or other devices. 8. DVI port. 1.4 Rear panel The system rear panel includes the power socket and several I/O ports that conforms with S-Video interface. 4. Power supply unit. USB 2.0 ports 2.0. TV-out port. This green 6-pin connector is a 11 200W power supply unit. 7 3. Ethernet LAN port . Voltage selector. PCI slots. This port connects a flat panel or...
Pundit-R User Manual
Page 16
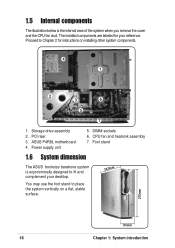
... 4. Foot stand 1.6 System dimension The ASUS booksize barebone system is the internal view of the system when you remove the cover and the CPU fan duct. You may use the foot ... system components. 4 1 2 3 6 5 7 1. Storage drive assembly 2. DIMM sockets 6. The installed components are labeled for instructions on a flat, stable surface. 357mm 275mm 91mm 16 Chapter 1: System introduction Power supply unit 5. Proceed to Chapter 2 for your desktop.
... 4. Foot stand 1.6 System dimension The ASUS booksize barebone system is the internal view of the system when you remove the cover and the CPU fan duct. You may use the foot ... system components. 4 1 2 3 6 5 7 1. Storage drive assembly 2. DIMM sockets 6. The installed components are labeled for instructions on a flat, stable surface. 357mm 275mm 91mm 16 Chapter 1: System introduction Power supply unit 5. Proceed to Chapter 2 for your desktop.
Pundit-R User Manual
Page 18
...install components into the system. • Use a grounded wrist strap or touch a safely grounded object or to a metal object, such as the power supply case, before installing any component, place it on them due to static electricity. • Hold components by the edges to avoid touching the ICs... on a grounded antistatic pad or in the bag that came with an onboard standby power LED. Central processing unit (CPU) 2. Unplug the power cable from the power outlet and make sure that you have all the components that you uninstall any system component. When lit,...
...install components into the system. • Use a grounded wrist strap or touch a safely grounded object or to a metal object, such as the power supply case, before installing any component, place it on them due to static electricity. • Hold components by the edges to avoid touching the ICs... on a grounded antistatic pad or in the bag that came with an onboard standby power LED. Central processing unit (CPU) 2. Unplug the power cable from the power outlet and make sure that you have all the components that you uninstall any system component. When lit,...

Pundit-R User Manual
Page 27
... the socket such that have been tested and qualified for the latest QVL. 2.6.4 Installing a DIMM • Make sure to unplug the power supply before installing the DIMM(s) to avoid damaging the memory module(s). Follow these steps to both the motherboard and the components. • Re-...install the CPU fan and heatsink assembly before adding or removing DIMMs or other system components. Visit the ASUS website (www.asus.com) for use with this motherboard. Locate the DIMM sockets in the motherboard. 2. Unlock a DIMM socket by pressing the retaining ...
... the socket such that have been tested and qualified for the latest QVL. 2.6.4 Installing a DIMM • Make sure to unplug the power supply before installing the DIMM(s) to avoid damaging the memory module(s). Follow these steps to both the motherboard and the components. • Re-...install the CPU fan and heatsink assembly before adding or removing DIMMs or other system components. Visit the ASUS website (www.asus.com) for use with this motherboard. Locate the DIMM sockets in the motherboard. 2. Unlock a DIMM socket by pressing the retaining ...
Pundit-R User Manual
Page 33
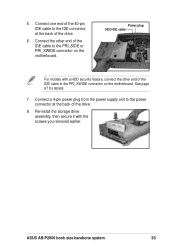
Connect a 4-pin power plug from the power supply unit to the IDE connector at the back of the drive. 6. Connect one end of the 40-pin IDE cable to the power connector at the back of the drive. 8. 5. ASUS AB-P2800 book size barebone system 33 Power plug HDD IDE cable 7 5 For models with the screws you...
Connect a 4-pin power plug from the power supply unit to the IDE connector at the back of the drive. 6. Connect one end of the 40-pin IDE cable to the power connector at the back of the drive. 8. 5. ASUS AB-P2800 book size barebone system 33 Power plug HDD IDE cable 7 5 For models with the screws you...

Pundit-R User Manual
Page 34
... from the PSU to the 4-pin (male) plug of the SATA power cable. Connect a 4-pin plug (female) from the power supply unit (PSU) to the power connector at the back of the drive. 4-pin (male) 15-pin Serial ATA power cable 34 Chapter 2: Basic installation Follow steps 1 to the SATA connector on the motherboard. Connect...
... from the PSU to the 4-pin (male) plug of the SATA power cable. Connect a 4-pin plug (female) from the power supply unit (PSU) to the power connector at the back of the drive. 4-pin (male) 15-pin Serial ATA power cable 34 Chapter 2: Basic installation Follow steps 1 to the SATA connector on the motherboard. Connect...
Pundit-R User Manual
Page 37
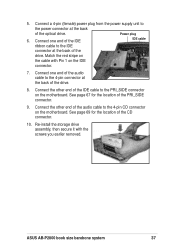
... connector on the motherboard. Connect one end of the IDE IDE cable ribbon cable to the 4-pin connector at the back of the PRI_SIDE connector. 9. 5. Power plug 6. See page 69 for the location of the drive. 8. Connect the other end of the audio cable to the... power connector at the back of the CD connector. 10. See page 67 for the location of the drive. ASUS AB-P2800 book size barebone system 37 Connect a 4-pin (female) power plug from the power supply unit to the 4-pin CD connector on the IDE connector...
... connector on the motherboard. Connect one end of the IDE IDE cable ribbon cable to the 4-pin connector at the back of the PRI_SIDE connector. 9. 5. Power plug 6. See page 69 for the location of the drive. 8. Connect the other end of the audio cable to the... power connector at the back of the CD connector. 10. See page 67 for the location of the drive. ASUS AB-P2800 book size barebone system 37 Connect a 4-pin (female) power plug from the power supply unit to the 4-pin CD connector on the IDE connector...

Pundit-R User Manual
Page 42
... set the switch to 115V. The voltage selector is 200-240V, set to the voltage supply in a 230V environment will seriously damage the system! 42 Chapter 2: Basic installation 2.11 Power supply unit information The system comes with a 200W power supply unit (PSU). 2.11.1 Voltage selector The PSU has a 115V/230V voltage selector switch located beside...
... set the switch to 115V. The voltage selector is 200-240V, set to the voltage supply in a 230V environment will seriously damage the system! 42 Chapter 2: Basic installation 2.11 Power supply unit information The system comes with a 200W power supply unit (PSU). 2.11.1 Voltage selector The PSU has a 115V/230V voltage selector switch located beside...

Pundit-R User Manual
Page 43
...Over-Voltage Protection (OVP) Output Voltage +5V +12V +3.3V Maximum Voltage 6.5V 15.6V 4.3V The power supply will shut down or automatically recover when the fault condition is removed ASUS AB-P2800 book size barebone system 43 at 230Vac, maximum load 90A max. at 115Vac 2A max. 2....11.2 Power supply specifications Input Characteristics Input Voltage Range Range 1 Range 2 Input Frequency Range Maximum Input ...
...Over-Voltage Protection (OVP) Output Voltage +5V +12V +3.3V Maximum Voltage 6.5V 15.6V 4.3V The power supply will shut down or automatically recover when the fault condition is removed ASUS AB-P2800 book size barebone system 43 at 230Vac, maximum load 90A max. at 115Vac 2A max. 2....11.2 Power supply specifications Input Characteristics Input Voltage Range Range 1 Range 2 Input Frequency Range Maximum Input ...
Pundit-R User Manual
Page 66
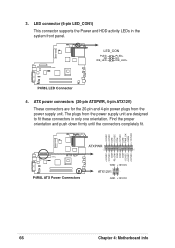
... to fit these connectors in the system front panel. P4R8L ® LED_CON PLEDNC IDE_LED- LED connector (6-pin LED_CON1) This connector supports the Power and HDD activity LEDs in only one orientation. Find the proper orientation and push down firmly until the connectors completely fit. +3.3VDC +3.3VDC ...0VDC COM PWR_OK +5VSB +12.0VDC +3.3VDC -12.0VDC COM PS_ON# COM COM COM -5.0VDC +5.0VDC +5.0VDC P4R8L ® ATX12V P4R8L ATX Power Connectors ATXPWR GND +12V DC ATX12V1 GND +12V DC 66 Chapter 4: Motherboard info The plugs from the power supply unit are for the 20-pin and 4-pin...
... to fit these connectors in the system front panel. P4R8L ® LED_CON PLEDNC IDE_LED- LED connector (6-pin LED_CON1) This connector supports the Power and HDD activity LEDs in only one orientation. Find the proper orientation and push down firmly until the connectors completely fit. +3.3VDC +3.3VDC ...0VDC COM PWR_OK +5VSB +12.0VDC +3.3VDC -12.0VDC COM PS_ON# COM COM COM -5.0VDC +5.0VDC +5.0VDC P4R8L ® ATX12V P4R8L ATX Power Connectors ATXPWR GND +12V DC ATX12V1 GND +12V DC 66 Chapter 4: Motherboard info The plugs from the power supply unit are for the 20-pin and 4-pin...
Pundit-R User Manual
Page 89
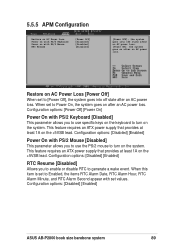
... Restore on AC Power Loss Power on with PS/2 Keyboard Power on with PS/2 Mouse RTC Resume [Power Off] [Disabled] [Disabled] [Disabled] [Power OFF]: the system goes into off state after an AC power loss. This feature requires an ATX power supply that provides at ...least 1A on after an AC power loss. Configuration options: [Disabled] [Enabled] Power On with PS/2 Mouse [Disabled] This parameter allows you to enable or disable RTC to [Power Off], the system goes into off state after an AC power loss. Configuration options: [Disabled] [Enabled] ASUS...
... Restore on AC Power Loss Power on with PS/2 Keyboard Power on with PS/2 Mouse RTC Resume [Power Off] [Disabled] [Disabled] [Disabled] [Power OFF]: the system goes into off state after an AC power loss. This feature requires an ATX power supply that provides at ...least 1A on after an AC power loss. Configuration options: [Disabled] [Enabled] Power On with PS/2 Mouse [Disabled] This parameter allows you to enable or disable RTC to [Power Off], the system goes into off state after an AC power loss. Configuration options: [Disabled] [Enabled] ASUS...


