Asus P4-P5N9300 Support Question
Asus P4-P5N9300 Support Question
Find answers below for this question about Asus P4-P5N9300.Need a Asus P4-P5N9300 manual? We have 1 online manual for this item!
Question posted by kartsulehtinen on February 17th, 2016
Bigger Power Supply?
if I want to go with faster graphics card, I need bigger power supply that 200W.Is there any about 400W power supply that fits in this p4p5n9300 case.
Current Answers


Related Asus P4-P5N9300 Manual Pages
User Manual - Page 7

... broken, do not try to or from the system.
• If the power supply is protected by Macrovision. Contact a qualified service technician or your dealer immediately.
... temperature extremes. vii Safety information
Electrical safety
• To prevent electric shock hazard, disconnect the power cable from the electric outlet before the signal cables are not damaged. Place the product on ...
User Manual - Page 8

...on the front and rear panel, and internal components. 2. Chapter 2: Starting up This chapter helps you power up the system and install drivers and utilities from the support CD. 3. How this guide
Audience
This guide...with hardware knowledge of personal computers. Dispose of ASUS P2-P5N9300/P4-P5N9300.
Chapter 3: Motherboard information This chapter gives information about the ASUS P2...
User Manual - Page 10

... Guide
If any of the items is damaged or missing, contact your P2-P5N9300/P4-P5N9300 system package for P4-P5N9300 only) 3. They are not included in -1 storage card reader • PCIE raiser card • 200W power supply unit 2. Remote control (for P4-P5N9300 only)
Optional items are purchased separately.
Infrared card (for the following items. Standard items 1. ASUS VGA...
User Manual - Page 12

... graphics controller, Serial ATA, USB 2.0, and eight-channel high-definition audio CODEC.
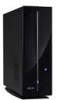
1.2 Front panel
The illustrations below show the front panels of P2-P5N9300
1 2
3 4 5
6
7
8
9
10
12
11
Front panel (close)
Front panel (open)
1-2
Chapter 1: System introduction
1.1 Welcome! Front panel of the P2-P5N9300 and P4-P5N9300.
The system comes in a stylish casing and powered...
User Manual - Page 13

...in -1 card reader. Microphone port (pink). USB / eSATA port. �T�h�i�s�p��o�r�t�c�o�n��n�e�c�t�s��to an IEEE 1394 device such as a digital camrecorder.
10. USB 2.0 ports 10 and 11. ASUS P2-P5N9300/P4-P5N9300
1-3 Front panel of P4-P5N9300
3 4
2
13...
User Manual - Page 14

... your area. Power connector.
2. Center/Subwoofer port (orange). This IR card supports a remote control.
1.3 Rear panel
The illustration below shows the rear panel of the P2-P5N9300 and P4-P5N9300.
2 1
86 4
7 53
10
9
12
11
14 15 16
13 17
18
Rear panel
1. This port connects to the center/ subwoofer speakers.
4. If the voltage supply in...
User Manual - Page 16

.... This port is for a High-Definition Multimedia Interface (HDMI) connector, and is HDCP compliant allowing playback of the ASUS P2-P5N9300/P4-P5N9300 when you remove the chassis cover. ASUS VGA card (optional). 18. Power supply unit
4. DIMM slots 7. LGA775 socket
1-6
Chapter 1: System introduction ASUS motherboard 6. 13. This port is the internal view of HD DVD...
User Manual - Page 17

ASUS P2-P5N9300/P4-P5N9300
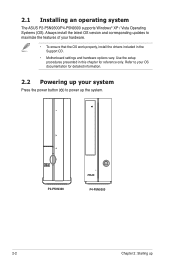
Starting up the system and install drivers and utilities from the Support CD.
Chapter 2
This chapter helps you power up
User Manual - Page 18
... your hardware.
• To ensure that the OS work properly, install the drivers included in this chapter for reference only. Refer to power up
P2-P5N9300
P4-P5N9300
2-2
Chapter 2: Starting up the system. Use the setup procedures presented in the Support CD.
• Motherboard settings and hardware options vary. 2.1 Installing an operating system
...
User Manual - Page 35

...the BIOS setup program, then reenter data. Removing the cap will cause system boot failure. ASUS P2-P5N9300/P4-P5N9300
3-3 Except when clearing the RTC RAM, never remove the cap on pins 2-3 for about 5-10 ...seconds, then move the jumper again to pins 1-2.
3. Turn OFF the computer and unplug the power cord.
2. If the steps above do not help, remove the onboard battery and move the cap ...
User Manual - Page 36

... up the computer from S1 sleep mode (CPU stopped, DRAM refreshed, system running in sleep mode.
3-4
Chapter 3: Motherboard info Otherwise, the system would not power up feature requires a power supply that can provide 500mA on the +5VSB lead for each USB port. 2. Set these jumpers to +5V to CPU, DRAM in slow refresh...
User Manual - Page 37

... wake-up the computer by pressing a key on the +5VSB lead, and a corresponding setting in the BIOS.
4. ASUS P2-P5N9300/P4-P5N9300
3-5 This feature requires an ATX power supply that can supply at least 1A on the keyboard (the default is the Space Bar). 3. Keyboard power (3-pin KBPWR) This jumper allows you are using a 4-pin CPU fan.
User Manual - Page 40

... NOT forget to fit these connectors in the system front panel.
6. The system may become unstable or may not boot up if the power is inadequate.
• Ensure that you use a PSU with a higher power output when configuring a system with more power-consuming devices. The plugs from the power supply are for ATX power supply plugs. LED connector...
User Manual - Page 53

... from a file option from the Windows® desktop by clicking Start > Programs > ASUS > ASUSUpdate...want to complete the update process. 4.
Launch the ASUS Update utility from the dropdown menu, then click Next.
3.
Locate the BIOS file from the Open window, then click Open.
4. Click Next.
5. The ASUS Update main window appears.
2. P5N78L.ROM
P5N78L
ASUS P2-P5N9300/P4-P5N9300...
User Manual - Page 55

... items Menu bar Configuration fields
General help
Phoenix-AwardBIOS CMOS Setup Utility
Main Advanced Power Boot Tools Exit
System Time 15 : 30 : 36 System Date Thu, Oct 30 2008
Select Menu Item Specific Help
SATA 1 SATA 2 ESATA 3 HDD SMART Monitoring
[None] [None] [None] [Disabled]
Change the internal time. ASUS P2-P5N9300/P4-P5N9300
4-13
User Manual - Page 59

...user-configurable. Configuration options: [Disabled] [Auto]
SATA 1 [Auto] Allows you have the correct configuration information supplied by the drive manufacturer. Configuration options: [CHS] [LBA] [Large] [Auto]
Before configuring a hard disk..., and Transfer Mode). ASUS P2-P5N9300/P4-P5N9300
4-17 4.3.3 SATA 1-2
While entering Setup, the BIOS automatically detects the presence of SATA devices.
User Manual - Page 72
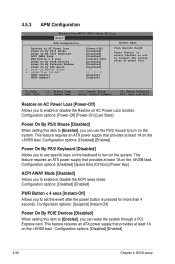
... system. Configuration options: [Disabled] [Enabled]
4-30
Chapter 4: BIOS setup Configuration options: [Power-Off] [Power-On] [Last State]
Power On By PS/2 Mouse [Disabled] When setting this item to [Enabled], you can wake the system through a PCI Express card. This feature requires an ATX power supply that provides at least 1A on the +5VSB lead. This feature...
User Manual - Page 73

...[Disabled] [Enabled]
WDRT Support [Enabled] Configuration options: [Disabled] [Enabled]
ASUS P2-P5N9300/P4-P5N9300
4-31 Power On By RTC Alarm [Disabled] Allows you to enable or disable RTC to the seconds ... alarm:
1. Turning an external modem off causes an initialization string that turns the system power on the first try. Configuration options: [Disabled] [Enabled]
Date (of Month) Alarm...
User Manual - Page 75

...or if the fan is too slow. Phoenix-AwardBIOS CMOS Setup Utility
Main Advanced Power Boot
Boot Device Priority Boot Settings Configuration Security
Tools
Exit
Select Menu
Item Specific ... the system boot options. Configuration options: [Removable] [Hard Disk] [CDROM] [Disabled]
ASUS P2-P5N9300/P4-P5N9300
4-33 CPU Fan Speed Warning [600 RPM]
Allows you to set this item to [Disabled], the...
User Manual - Page 79

... EZ Flash 2
Allows you to confirm your choice.
Phoenix-AwardBIOS CMOS Setup Utility
Main Advanced Power
ASUS EZ Flash 2 Express Gate
Boot
Tools
Exit
Select Menu Item Specific Help
Press [Enter]... Select [Tab] Switch
[S] Save
[Esc] Exit
[Up/Down/Home/End] Move
ASUS P2-P5N9300/P4-P5N9300
4-37 4.7 Tools menu
The Tools menu items allow you to display the submenu. Select an item then...
Similar Questions

Need Power Supply For Asus Cm1730. Do You Sell This Or Have Genetic
(Posted by leehm 3 years ago)

Compatible With Gtx950 Without Needing To Buy A New Power Suply?
Is it compatible with a GTX950 without needing to buy a new power suply or any other parto???
Is it compatible with a GTX950 without needing to buy a new power suply or any other parto???
(Posted by pigo9 8 years ago)

Will Not Power Up
When power button is pushed nothing happens. Both the indicator lights are off as well. I have check...
When power button is pushed nothing happens. Both the indicator lights are off as well. I have check...
(Posted by drlegault 10 years ago)
Power Supply
is the power supply a generic one or a custom one?
is the power supply a generic one or a custom one?
(Posted by flyingmrcomment 10 years ago)

Can I Fit Into This T3-m3n8200 Barebone A Graphic Card Asus Gt 640 ?
Hello, Can i fit into this T3-M3N8200 barebone a graphic card Asus GT 640 ? or perhaps a Asus GT 62...
Hello, Can i fit into this T3-M3N8200 barebone a graphic card Asus GT 640 ? or perhaps a Asus GT 62...
(Posted by lfpernel 11 years ago)