User Guide
Page 1
P8B-M Motherboard
P8B-M Motherboard
User Guide
Page 3
Contents Notices...vii Safety information viii About this guide ix P8B-M specifications summary xi Chapter 1: Product introduction 1.1 Welcome 1-3 1.2 Package contents 1-3 1.3 Serial number label 1-4 1.4 Special features 1-4 1.4.1 Product highlights 1-4 1.4.2 Innovative ASUS features 1-6 Chapter 2: Hardware information 2.1 Before you proceed 2-3 2.2 Motherboard overview 2-5 2.2.1 Placement direction 2-5 2.2.2 Screw holes 2-5 2.2.3 Motherboard layout 2-6 2.2.4 Layout contents 2-7 2.3 Central Processing Unit (CPU 2-9 2.3.1 Installing the CPU 2-9 2.3.2 Installing the...
Contents Notices...vii Safety information viii About this guide ix P8B-M specifications summary xi Chapter 1: Product introduction 1.1 Welcome 1-3 1.2 Package contents 1-3 1.3 Serial number label 1-4 1.4 Special features 1-4 1.4.1 Product highlights 1-4 1.4.2 Innovative ASUS features 1-6 Chapter 2: Hardware information 2.1 Before you proceed 2-3 2.2 Motherboard overview 2-5 2.2.1 Placement direction 2-5 2.2.2 Screw holes 2-5 2.2.3 Motherboard layout 2-6 2.2.4 Layout contents 2-7 2.3 Central Processing Unit (CPU 2-9 2.3.1 Installing the CPU 2-9 2.3.2 Installing the...
User Guide
Page 15
... the list below. 1.2 Package contents Check your retailer. Cables SATA 3G cable 4 - Before you for buying an ASUS® P8B-M motherboard! Optional items ASMB5-iKVM Description Remote Management solution provides KVM over IP solution. The motherboard delivers a host of new features and latest technologies, making it , check the items in the long line of...
... the list below. 1.2 Package contents Check your retailer. Cables SATA 3G cable 4 - Before you for buying an ASUS® P8B-M motherboard! Optional items ASMB5-iKVM Description Remote Management solution provides KVM over IP solution. The motherboard delivers a host of new features and latest technologies, making it , check the items in the long line of...

User Guide
Page 16
... and single-threaded workloads. The Intel® EM64T feature allows your problems. P8B-M xxS2xxxxxxxx Made in China 合格 1.4 Special features 1.4.1 Product highlights Latest processor technology This motherboard supports the latest Intel® Xeon® E3-1200/Core™ i3-...-level parallelism on today's multi-threaded software. 1.3 Serial number label Before requesting support from the ASUS Technical Support team, you must take note of the motherboard's serial number containing 12 characters xxS2xxxxxxxx shown as the figure below power, temperature and current limits...
... and single-threaded workloads. The Intel® EM64T feature allows your problems. P8B-M xxS2xxxxxxxx Made in China 合格 1.4 Special features 1.4.1 Product highlights Latest processor technology This motherboard supports the latest Intel® Xeon® E3-1200/Core™ i3-...-level parallelism on today's multi-threaded software. 1.3 Serial number label Before requesting support from the ASUS Technical Support team, you must take note of the motherboard's serial number containing 12 characters xxS2xxxxxxxx shown as the figure below power, temperature and current limits...
User Guide
Page 17
...to PCIe 1.0 devices. Furthermore, the supply voltage for the memory is backward compatible with a host of current bus systems. USB 2.0 technology The motherboard implements the Universal Serial Bus (USB) 2.0 specification, dramatically increasing the connection speed from 1.8 V for DDR2 to just 1.5V for twice the... thinner, more flexible cables with dual Gigabit LAN controllers and ports which makes it an ideal memory solution. ASUS P8B-M 1-5 This voltage reduction limits the power consumption and heat generation of server and workstation applications. DDR3 memory support The...
...to PCIe 1.0 devices. Furthermore, the supply voltage for the memory is backward compatible with a host of current bus systems. USB 2.0 technology The motherboard implements the Universal Serial Bus (USB) 2.0 specification, dramatically increasing the connection speed from 1.8 V for DDR2 to just 1.5V for twice the... thinner, more flexible cables with dual Gigabit LAN controllers and ports which makes it an ideal memory solution. ASUS P8B-M 1-5 This voltage reduction limits the power consumption and heat generation of server and workstation applications. DDR3 memory support The...

User Guide
Page 20
Chapter summary 2 2.1 Before you proceed 2-3 2.2 Motherboard overview 2-5 2.3 Central Processing Unit (CPU 2-9 2.4 System memory 2-15 2.5 Expansion slots 2-17 2.6 Jumpers 2-21 2.7 Connectors 2-27 ASUS P8B-M
Chapter summary 2 2.1 Before you proceed 2-3 2.2 Motherboard overview 2-5 2.3 Central Processing Unit (CPU 2-9 2.4 System memory 2-15 2.5 Expansion slots 2-17 2.6 Jumpers 2-21 2.7 Connectors 2-27 ASUS P8B-M
User Guide
Page 21
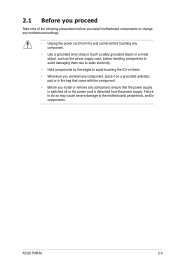
ASUS P8B-M 2-3 Failure to do so may cause severe damage to avoid touching the ICs on them. • Whenever you uninstall any component, place it on a grounded antistatic pad or in the bag that came with the component. • Before you install motherboard components or change any motherboard... the wall socket before handling components to avoid damaging them due to static electricity. • Hold components by the edges to the motherboard, peripherals, and/or components. 2.1 Before you proceed Take note of the following precautions before you install or remove any component. &#...
ASUS P8B-M 2-3 Failure to do so may cause severe damage to avoid touching the ICs on them. • Whenever you uninstall any component, place it on a grounded antistatic pad or in the bag that came with the component. • Before you install motherboard components or change any motherboard... the wall socket before handling components to avoid damaging them due to static electricity. • Hold components by the edges to the motherboard, peripherals, and/or components. 2.1 Before you proceed Take note of the following precautions before you install or remove any component. &#...
User Guide
Page 23
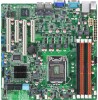
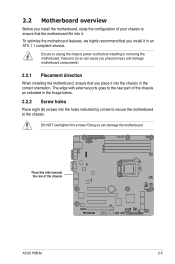
... the configuration of the chassis ASUS P8B-M 2-5 Failure to do so can damage the motherboard. Place this side towards the rear of your chassis to the rear part of the chassis as indicated in the image below. 2.2.2 Screw holes Place ...eight (8) screws into the chassis in an ATX 1.1 compliant chassis. To optimize the motherboard features, we highly recommend that you install it in the correct orientation. The edge with external ports goes to ensure that the...
... the configuration of the chassis ASUS P8B-M 2-5 Failure to do so can damage the motherboard. Place this side towards the rear of your chassis to the rear part of the chassis as indicated in the image below. 2.2.2 Screw holes Place ...eight (8) screws into the chassis in an ATX 1.1 compliant chassis. To optimize the motherboard features, we highly recommend that you install it in the correct orientation. The edge with external ports goes to ensure that the...
User Guide
Page 27
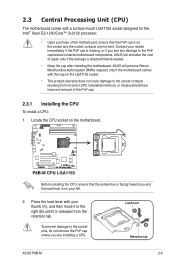
...Locate the CPU socket on the motherboard. Press the load lever with the cap on the LGA1155 socket. • The product warranty does not cover damage to the PnP cap/socket contacts/motherboard components. Load lever A B Retention tab ASUS P8B-M 2-9 Contact your retailer immediately... if the PnP cap is shipment/transit-related. • Keep the cap after installing the motherboard. Before installing the CPU, ensure that the ...
...Locate the CPU socket on the motherboard. Press the load lever with the cap on the LGA1155 socket. • The product warranty does not cover damage to the PnP cap/socket contacts/motherboard components. Load lever A B Retention tab ASUS P8B-M 2-9 Contact your retailer immediately... if the PnP cap is shipment/transit-related. • Keep the cap after installing the motherboard. Before installing the CPU, ensure that the ...

User Guide
Page 31
Disconnect the CPU fan cable from the connector on the motherboard labeled CPU_FAN1. A B A A B B A 4. Rotate each fastener B counterclockwise. 3. DO NOT forget to plug this connector. 2.3.3 Uninstalling the CPU heatsink and fan To uninstall ...you fail to connect the CPU fan connector! Connect the CPU fan cable to disengage the heatsink and fan assembly from the motherboard. Pull up two fasteners at a time in a diagonal sequence to the connector on the motherboard. 2. Carefully remove the heatsink and fan assembly from the motherboard. 3. ASUS P8B-M 2-13
Disconnect the CPU fan cable from the connector on the motherboard labeled CPU_FAN1. A B A A B B A 4. Rotate each fastener B counterclockwise. 3. DO NOT forget to plug this connector. 2.3.3 Uninstalling the CPU heatsink and fan To uninstall ...you fail to connect the CPU fan connector! Connect the CPU fan cable to disengage the heatsink and fan assembly from the motherboard. Pull up two fasteners at a time in a diagonal sequence to the connector on the motherboard. 2. Carefully remove the heatsink and fan assembly from the motherboard. 3. ASUS P8B-M 2-13

User Guide
Page 33
2.4 System memory 2.4.1 Overview The motherboard comes with ECC DDR3 DIMMs into the DIMM sockets using the memory configurations in this section. ASUS P8B-M 2-15 A DDR3 module has the same physical dimensions as a DDR2 DIMM but is recommended that you obtain memory modules from slot A1 and B1 (orange). &#...
2.4 System memory 2.4.1 Overview The motherboard comes with ECC DDR3 DIMMs into the DIMM sockets using the memory configurations in this section. ASUS P8B-M 2-15 A DDR3 module has the same physical dimensions as a DDR2 DIMM but is recommended that you obtain memory modules from slot A1 and B1 (orange). &#...
User Guide
Page 35
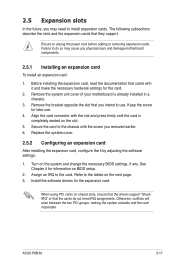
...the power cord before adding or removing expansion cards. 2.5 Expansion slots In the future, you may cause you physical injury and damage motherboard components. 2.5.1 Installing an expansion card To install an expansion card: 1. Otherwise, conflicts will arise between the two PCI groups, making... the system unstable and the card inoperable. ASUS P8B-M 2-17 Remove the bracket opposite the slot that they support. The following subsections describe the slots and the expansion cards that you...
...the power cord before adding or removing expansion cards. 2.5 Expansion slots In the future, you may cause you physical injury and damage motherboard components. 2.5.1 Installing an expansion card To install an expansion card: 1. Otherwise, conflicts will arise between the two PCI groups, making... the system unstable and the card inoperable. ASUS P8B-M 2-17 Remove the bracket opposite the slot that they support. The following subsections describe the slots and the expansion cards that you...

User Guide
Page 37
PCI slot PCIe x8 slot (x4 link) PCIe x16 slot (x16 link) PCIe x8 slot (x4 link) 2.5.7 Installing ASMB5 management card Follow the steps below to install an optional ASMB5 management card on the motherboard. 2. Orient and press the ASMB5 management card in place. ASUS P8B-M 2-19 Locate the BMC_FW header on your motherboard. 1.
PCI slot PCIe x8 slot (x4 link) PCIe x16 slot (x16 link) PCIe x8 slot (x4 link) 2.5.7 Installing ASMB5 management card Follow the steps below to install an optional ASMB5 management card on the motherboard. 2. Orient and press the ASMB5 management card in place. ASUS P8B-M 2-19 Locate the BMC_FW header on your motherboard. 1.
User Guide
Page 61
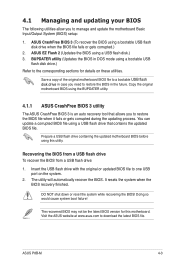
... using a USB flash drive that allows you to a bootable USB flash disk drive in DOS mode using this motherboard. It resets the system when the BIOS recovery finished. ASUS P8B-M 4-3 Recovering the BIOS from a USB flash drive To recover the BIOS from a USB flash drive: 1. ...the BIOS file fails or gets corrupted.) 2. ASUS CrashFree BIOS 3 (To recover the BIOS using a USB flash disk.) 3. Prepare a USB flash drive containing the updated motherboard BIOS before using a bootable USB flash disk drive.) Refer to manage and update the motherboard Basic Input/Output System (BIOS) setup: ...
... using a USB flash drive that allows you to a bootable USB flash disk drive in DOS mode using this motherboard. It resets the system when the BIOS recovery finished. ASUS P8B-M 4-3 Recovering the BIOS from a USB flash drive To recover the BIOS from a USB flash drive: 1. ...the BIOS file fails or gets corrupted.) 2. ASUS CrashFree BIOS 3 (To recover the BIOS using a USB flash disk.) 3. Prepare a USB flash drive containing the updated motherboard BIOS before using a bootable USB flash disk drive.) Refer to manage and update the motherboard Basic Input/Output System (BIOS) setup: ...
User Guide
Page 63
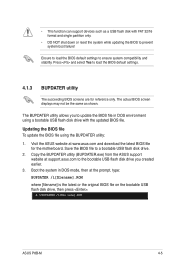
... you created earlier. 3. Save the BIOS file to prevent system boot failure! • This function can support devices such as shown. A:\>BUPDATER /i[file name].ROM ASUS P8B-M 4-5 Updating the BIOS file To update the BIOS file using a bootable USB flash disk drive with FAT 32/16 format and single partition only. •... compatibility and stability. Ensure to load the BIOS default settings to load the BIOS default settings. 4.1.3 BUPDATER utility The succeeding BIOS screens are for the motherboard.
... you created earlier. 3. Save the BIOS file to prevent system boot failure! • This function can support devices such as shown. A:\>BUPDATER /i[file name].ROM ASUS P8B-M 4-5 Updating the BIOS file To update the BIOS file using a bootable USB flash disk drive with FAT 32/16 format and single partition only. •... compatibility and stability. Ensure to load the BIOS default settings to load the BIOS default settings. 4.1.3 BUPDATER utility The succeeding BIOS screens are for the motherboard.
User Guide
Page 65
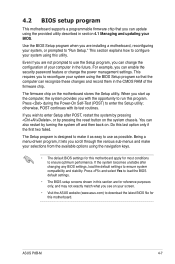
...ASUS website (www.asus.com) to download the latest BIOS file for this motherboard... apply for most conditions to reconfigure your system using the navigation keys. • The default BIOS settings for reference purposes only, and may not exactly match what you see on the motherboard... stability. If you are installing a motherboard, reconfiguring your system, or prompted to...possible. Even if you are for this motherboard. This requires you can change the power...motherboard supports a programmable firmware chip that the computer ...
...ASUS website (www.asus.com) to download the latest BIOS file for this motherboard... apply for most conditions to reconfigure your system using the navigation keys. • The default BIOS settings for reference purposes only, and may not exactly match what you see on the motherboard... stability. If you are installing a motherboard, reconfiguring your system, or prompted to...possible. Even if you are for this motherboard. This requires you can change the power...motherboard supports a programmable firmware chip that the computer ...
User Guide
Page 83
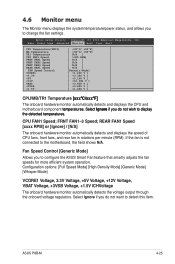
...186;�C�/x�x�x��º�F�] The onboard hardware monitor automatically detects and displays the CPU and motherboard component temperatures. CPU FAN1 Speed; REAR FAN1 Speed [xxxx RPM] or [Ignore] / [N/A] The onboard hardware monitor ...(RPM). Copyright (C) 2010 American Megatrends, Inc. Select Ignore if you to detect this item. ASUS P8B-M 4-25 Fan Speed Control [Generic Mode] Allows you do not wish to the motherboard, the field shows N/A. Configuration options: [Full Speed Mode] [High Density Mode] [Generic Mode]...
...186;�C�/x�x�x��º�F�] The onboard hardware monitor automatically detects and displays the CPU and motherboard component temperatures. CPU FAN1 Speed; REAR FAN1 Speed [xxxx RPM] or [Ignore] / [N/A] The onboard hardware monitor ...(RPM). Copyright (C) 2010 American Megatrends, Inc. Select Ignore if you to detect this item. ASUS P8B-M 4-25 Fan Speed Control [Generic Mode] Allows you do not wish to the motherboard, the field shows N/A. Configuration options: [Full Speed Mode] [High Density Mode] [Generic Mode]...

User Guide
Page 89
...support (for Windows OS only). 5.1.1 RAID definitions RAID 0 (Data striping) optimizes two identical hard disk drives to select the RAID configuration utility. ASUS P8B-M 5-3 Use four new hard disk drives or use an existing drive and a new drive for this setup. Use two new drives or use...configuration provides data protection and increases fault tolerance to choose between LSI MegaRAID and Intel® Rapid RAID. 5.1 Setting up RAID The motherboard comes with the Intel® C204 controller that of a single disk alone, thus improving data access and storage. Two hard disks perform...
...support (for Windows OS only). 5.1.1 RAID definitions RAID 0 (Data striping) optimizes two identical hard disk drives to select the RAID configuration utility. ASUS P8B-M 5-3 Use four new hard disk drives or use an existing drive and a new drive for this setup. Use two new drives or use...configuration provides data protection and increases fault tolerance to choose between LSI MegaRAID and Intel® Rapid RAID. 5.1 Setting up RAID The motherboard comes with the Intel® C204 controller that of a single disk alone, thus improving data access and storage. Two hard disks perform...
User Guide
Page 91
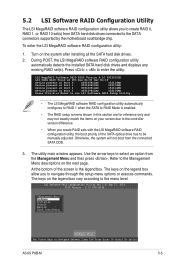
... displays any existing RAID set (s) from SATA hard disk drives connected to the SATA connectors supported by the motherboard southbridge chip. Press + to Navigate Between Items And Press Enter To Select An Option ASUS P8B-M 5-5 LSI Software RAID Configuration Utility Ver C.05 Sep 17, 2010 BIOS Version A.10.09231523R Management Menu Configure Initialize...
... displays any existing RAID set (s) from SATA hard disk drives connected to the SATA connectors supported by the motherboard southbridge chip. Press + to Navigate Between Items And Press Enter To Select An Option ASUS P8B-M 5-5 LSI Software RAID Configuration Utility Ver C.05 Sep 17, 2010 BIOS Version A.10.09231523R Management Menu Configure Initialize...
User Guide
Page 123
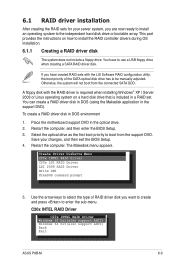
... drive. 2. C20x INTEL RAID Driver C20x INTEL RAID Driver Windows 32 bit(also support AHCI) Windows 64 bit(also support AHCI) Back Exit ASUS P8B-M 6-3 Select the optical drive as the first boot priority to the independent hard disk drive or bootable array. If you have to install the...174; XP / Server 2003 or Linux operating system on how to use a USB floppy drive when creating a SATA RAID driver disk. Place the motherboard support DVD in the support DVD). Restart the computer. 6.1 RAID driver installation After creating the RAID sets for your changes, and then exit the ...
... drive. 2. C20x INTEL RAID Driver C20x INTEL RAID Driver Windows 32 bit(also support AHCI) Windows 64 bit(also support AHCI) Back Exit ASUS P8B-M 6-3 Select the optical drive as the first boot priority to the independent hard disk drive or bootable array. If you have to install the...174; XP / Server 2003 or Linux operating system on how to use a USB floppy drive when creating a SATA RAID driver disk. Place the motherboard support DVD in the support DVD). Restart the computer. 6.1 RAID driver installation After creating the RAID sets for your changes, and then exit the ...


