
User Guide
Page 13
P7H55-M PRO specifications summary Back Panel I/O Ports 1 x PS/2 Keyboard port (purple) 1 x HDMI Output 1 x DVI-D Output 1 x D-Sub Output 1 x Optical S/PDIF Out 1 x RJ45 port 6 x USB 2.0/1.1 ports 8-channel Audio I/O Internal I/O Connectors 3 x USB connectors support additional 6 USB..., PnP, DMI 2.0, WfM 2.0, SM BIOS 2.5, ACPI 2.0a, Multi-language BIOS, ASUS EZ Flash 2, ASUS CrashFree BIOS 3 Manageability WfM 2.0, DMI 2.0, WOL by PME, WOR by PME, PXE Support DVD Contents Drivers ASUS Utilities ASUS Update Anti-virus software (OEM version) Form Factor uATX Form Factor, 9.6"x 9.6" (24...
P7H55-M PRO specifications summary Back Panel I/O Ports 1 x PS/2 Keyboard port (purple) 1 x HDMI Output 1 x DVI-D Output 1 x D-Sub Output 1 x Optical S/PDIF Out 1 x RJ45 port 6 x USB 2.0/1.1 ports 8-channel Audio I/O Internal I/O Connectors 3 x USB connectors support additional 6 USB..., PnP, DMI 2.0, WfM 2.0, SM BIOS 2.5, ACPI 2.0a, Multi-language BIOS, ASUS EZ Flash 2, ASUS CrashFree BIOS 3 Manageability WfM 2.0, DMI 2.0, WOL by PME, WOR by PME, PXE Support DVD Contents Drivers ASUS Utilities ASUS Update Anti-virus software (OEM version) Form Factor uATX Form Factor, 9.6"x 9.6" (24...
User Guide
Page 39
Refer to the table on the next page for information on BIOS setup. 2. Refer to Chapter 3 for details. ASUS P7H55-M PRO 2-19 Before installing the expansion card, read the documentation that you intend to the chassis with it by adjusting the software settings. 1. Remove ...the cards do so may need IRQ assignments. Remove the system unit cover (if your motherboard is completely seated on shared slots, ensure that the drivers support "Share IRQ" or that they support. Otherwise, conflicts will arise between the two PCI groups, making the system unstable and the card inoperable....
Refer to the table on the next page for information on BIOS setup. 2. Refer to Chapter 3 for details. ASUS P7H55-M PRO 2-19 Before installing the expansion card, read the documentation that you intend to the chassis with it by adjusting the software settings. 1. Remove ...the cards do so may need IRQ assignments. Remove the system unit cover (if your motherboard is completely seated on shared slots, ensure that the drivers support "Share IRQ" or that they support. Otherwise, conflicts will arise between the two PCI groups, making the system unstable and the card inoperable....
User Guide
Page 44
... then restart the system to adjust the monitor resolution from the Windows® Display Settings menu. • Due to the Intel® driver issue, some resolution options that features desktop extension on monitor overscan/underscan problem • Playback of Blu-Ray Discs The speed and bandwidth of...system and press F8 to monitor overscan or underscan. Using the CPU/Memory of the onboard VGA, DVI-D, and HDMI ports. Following is valid. • Due to the Intel® VGA driver issue, the Windows® Display Settings menu may offer some monitor resolution settings will upgrade the ...
... then restart the system to adjust the monitor resolution from the Windows® Display Settings menu. • Due to the Intel® driver issue, some resolution options that features desktop extension on monitor overscan/underscan problem • Playback of Blu-Ray Discs The speed and bandwidth of...system and press F8 to monitor overscan or underscan. Using the CPU/Memory of the onboard VGA, DVI-D, and HDMI ports. Following is valid. • Due to the Intel® VGA driver issue, the Windows® Display Settings menu may offer some monitor resolution settings will upgrade the ...

User Guide
Page 45
ASUS P7H55-M PRO 2-25 Move the Horizontal Scaling and Vertical Scaling sliders and then click Apply. Or you can click Display > General Settings > Scaling > Customize Aspect Ratio. Click Apply. 4. From the Windows® notification area, double-click the Intel(R) Graphics Media Accelerator Driver icon and click Graphics Properties. 3. Click Display > General Settings and select a Resolution. Chapter 2 Troubleshooting on monitor overscan / underscan problem 1. Install Intel Graphics Accelerator Driver from the motherboard support DVD. 2.
ASUS P7H55-M PRO 2-25 Move the Horizontal Scaling and Vertical Scaling sliders and then click Apply. Or you can click Display > General Settings > Scaling > Customize Aspect Ratio. Click Apply. 4. From the Windows® notification area, double-click the Intel(R) Graphics Media Accelerator Driver icon and click Graphics Properties. 3. Click Display > General Settings and select a Resolution. Chapter 2 Troubleshooting on monitor overscan / underscan problem 1. Install Intel Graphics Accelerator Driver from the motherboard support DVD. 2.

User Guide
Page 69
... you want the SATA hard disk drives to configure your storage devices. Configuration options: [0] [5] [10] [15] [20] [25] [30] [35] Chapter 3 ASUS P7H55-M PRO 3-13 The AHCI allows the onboard storage driver to enable advanced Serial ATA features that increases storage performance on random workloads by allowing the drive to display the submenu...
... you want the SATA hard disk drives to configure your storage devices. Configuration options: [0] [5] [10] [15] [20] [25] [30] [35] Chapter 3 ASUS P7H55-M PRO 3-13 The AHCI allows the onboard storage driver to enable advanced Serial ATA features that increases storage performance on random workloads by allowing the drive to display the submenu...

User Guide
Page 97
... item to install Click to obtain the corresponding software manuals Click an icon to install. Click an item to open drivers to display the ASUS contact information. ASUS P7H55-M PRO 4-1 Refer to avail all motherboard features. Click the Contact tab to use the devices. Chapter 4 Chapter...only. Double-click the ASSETUP.EXE to change at www.asus.com for better compatibility and system stability. 4.2 Support DVD information The support DVD that comes with the motherboard package contains the drivers, software applications, and utilities that the motherboard supports. The...
... item to install Click to obtain the corresponding software manuals Click an icon to install. Click an item to open drivers to display the ASUS contact information. ASUS P7H55-M PRO 4-1 Refer to avail all motherboard features. Click the Contact tab to use the devices. Chapter 4 Chapter...only. Double-click the ASSETUP.EXE to change at www.asus.com for better compatibility and system stability. 4.2 Support DVD information The support DVD that comes with the motherboard package contains the drivers, software applications, and utilities that the motherboard supports. The...

User Guide
Page 102
...when you to easily overclock without applying • GPU Boost is enabled, ASUS EPU will not be set up the best O.C. Setting a high voltage... adjustments using TurboV. • Refer to the software manual in ASUS TurboV will not be saved to BIOS settings and will be kept...• EPU cannot run on the next system boot. Install the ASUS TurboV utility from the motherboard support DVD. • For advanced overclock ...Undoes all changes made in the support DVD or visit the ASUS website at www.asus.com for different scenarios. settings for detailed software configuration. 4-6 ...
...when you to easily overclock without applying • GPU Boost is enabled, ASUS EPU will not be set up the best O.C. Setting a high voltage... adjustments using TurboV. • Refer to the software manual in ASUS TurboV will not be saved to BIOS settings and will be kept...• EPU cannot run on the next system boot. Install the ASUS TurboV utility from the motherboard support DVD. • For advanced overclock ...Undoes all changes made in the support DVD or visit the ASUS website at www.asus.com for different scenarios. settings for detailed software configuration. 4-6 ...
User Guide
Page 103
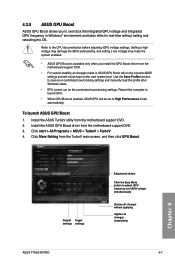
...iGPU frequency and iGPU voltage simultaneously Undoes all changes without exiting and rebooting the OS. Chapter 4 Default Target settings settings ASUS P7H55-M PRO Adjustment sliders Click the Easy Mode button to save your customized overclocking settings and manually load the profile after Windows ...on the customized overclocking settings. Install the ASUS TurboV utility from the TurboV main screen, and then click GPU Boost. To launch ASUS GPU Boost 1. Click More Setting from the motherboard support DVD. 2. Install the ASUS GPU Boost driver from the motherboard support DVD. •...
...iGPU frequency and iGPU voltage simultaneously Undoes all changes without exiting and rebooting the OS. Chapter 4 Default Target settings settings ASUS P7H55-M PRO Adjustment sliders Click the Easy Mode button to save your customized overclocking settings and manually load the profile after Windows ...on the customized overclocking settings. Install the ASUS TurboV utility from the TurboV main screen, and then click GPU Boost. To launch ASUS GPU Boost 1. Click More Setting from the motherboard support DVD. 2. Install the ASUS GPU Boost driver from the motherboard support DVD. •...

User Guide
Page 105
... ASUS P7H55-M PRO 4-9 Launching EPU After installing EPU from : • Turbo Mode • Medium Power Saving Mode • High Performance Mode • Max. It detects the current computer loading and intelligently adjusts the power in the support DVD or visit the ASUS website at www.asus.com...software manual in real-time. With auto phase switching for detailed software configuration. 4.3.7 ASUS EPU ASUS EPU is available only when you install the GPU Boost driver from the support DVD. ASUS EPU provides you use an Intel® Clarkdale CPU and install the GPU Boost...
... ASUS P7H55-M PRO 4-9 Launching EPU After installing EPU from : • Turbo Mode • Medium Power Saving Mode • High Performance Mode • Max. It detects the current computer loading and intelligently adjusts the power in the support DVD or visit the ASUS website at www.asus.com...software manual in real-time. With auto phase switching for detailed software configuration. 4.3.7 ASUS EPU ASUS EPU is available only when you install the GPU Boost driver from the support DVD. ASUS EPU provides you use an Intel® Clarkdale CPU and install the GPU Boost...

User Guide
Page 107
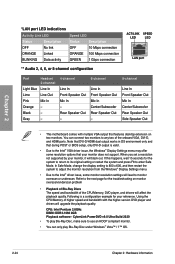
... plug and play convenience. Realtek HD Audio Manager for Windows XP Configuration options Control settings window Information button Exit button Minimize button Chapter 4 Information button ASUS P7H55-M PRO 4-11 4.3.9 Realtek® High Definition Audio utility The Realtek® audio CODEC provides 8-channel audio capability to display the Realtek HD Audio Manager. Follow...
... plug and play convenience. Realtek HD Audio Manager for Windows XP Configuration options Control settings window Information button Exit button Minimize button Chapter 4 Information button ASUS P7H55-M PRO 4-11 4.3.9 Realtek® High Definition Audio utility The Realtek® audio CODEC provides 8-channel audio capability to display the Realtek HD Audio Manager. Follow...


