User Guide
Page 9
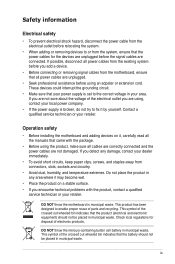
... , contact your local power company. • If the power supply is set to the correct voltage in municipal waste. Operation safety • Before installing the motherboard and adding devices on it may become wet. • Place the product on a stable surface. • If you add a device. • Before connecting ... your retailer. Contact a qualified service technician or your dealer immediately. • To avoid short circuits, keep paper clips, screws, and staples away from the motherboard, ensure that all the manuals that the battery should not be placed in your retailer.
... , contact your local power company. • If the power supply is set to the correct voltage in municipal waste. Operation safety • Before installing the motherboard and adding devices on it may become wet. • Place the product on a stable surface. • If you add a device. • Before connecting ... your retailer. Contact a qualified service technician or your dealer immediately. • To avoid short circuits, keep paper clips, screws, and staples away from the motherboard, ensure that all the manuals that the battery should not be placed in your retailer.
User Guide
Page 49
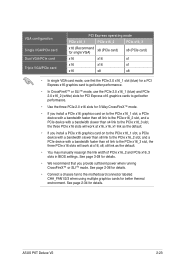
... for better thermal environment. See page 2-36 for details. • Connect a chassis fan to the motherboard connector labeled CHA_FAN1/2/3 when using multiple graphics cards for details. VGA configuration Single VGA/PCIe card Dual VGA...x16_3 slot, the three PCIe x16 slots will work at x16, x8, x8 link as the default. • You may manually reassign the link width of PCIe x16_2 and PCIe x16_3 slots in BIOS settings. See page 3-28 for 3-Way CrossFireX™... default. • If you provide sufficient power when running CrossFireX™ or SLI™ mode. ASUS P6T Deluxe V2 2-23
... for better thermal environment. See page 2-36 for details. • Connect a chassis fan to the motherboard connector labeled CHA_FAN1/2/3 when using multiple graphics cards for details. VGA configuration Single VGA/PCIe card Dual VGA...x16_3 slot, the three PCIe x16 slots will work at x16, x8, x8 link as the default. • You may manually reassign the link width of PCIe x16_2 and PCIe x16_3 slots in BIOS settings. See page 3-28 for 3-Way CrossFireX™... default. • If you provide sufficient power when running CrossFireX™ or SLI™ mode. ASUS P6T Deluxe V2 2-23

User Guide
Page 57
... connect Serial ATA boot/data hard disk drives to these connectors, set to section 4.4.3 Intel RAID configurations or the manual bundled in the BIOS to [AHCI]. If you can create a RAID 0, 1, 5, and 10 configuration with the...See section 3.3.6 Storage Configuration for details. • Before creating a RAID set the Configure SATA as item in the motherboard support DVD. • You must install the Windows® XP Service Pack 1 before using Serial ATA hard disk ...are using Windows® XP or later version. • When using these connectors. 4. ASUS P6T Deluxe V2 2-31
... connect Serial ATA boot/data hard disk drives to these connectors, set to section 4.4.3 Intel RAID configurations or the manual bundled in the BIOS to [AHCI]. If you can create a RAID 0, 1, 5, and 10 configuration with the...See section 3.3.6 Storage Configuration for details. • Before creating a RAID set the Configure SATA as item in the motherboard support DVD. • You must install the Windows® XP Service Pack 1 before using Serial ATA hard disk ...are using Windows® XP or later version. • When using these connectors. 4. ASUS P6T Deluxe V2 2-31
User Guide
Page 87
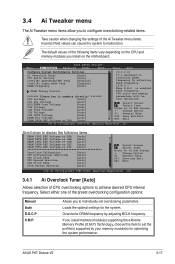
...you install memory module(s) supporting the eXtreme Memory Profile (X.M.P.) Technology, choose this item to set overclocking parameters. If you install on the motherboard. 3.4 Ai Tweaker menu The Ai Tweaker menu items allow you to individually set the profile(s) supported by adjusting BCLK frequency. The default....61 (C)Copyright 1985-2008, American Megatrends, Inc. 3.4.1 Ai Overclock Tuner [Auto] Allows selection of the preset overclocking configuration options: Manual Auto D.O.C.P X.M.P. Overclocks DRAM frequency by your memory module(s) for the system. ASUS P6T Deluxe V2 3-17
...you install memory module(s) supporting the eXtreme Memory Profile (X.M.P.) Technology, choose this item to set overclocking parameters. If you install on the motherboard. 3.4 Ai Tweaker menu The Ai Tweaker menu items allow you to individually set the profile(s) supported by adjusting BCLK frequency. The default....61 (C)Copyright 1985-2008, American Megatrends, Inc. 3.4.1 Ai Overclock Tuner [Auto] Allows selection of the preset overclocking configuration options: Manual Auto D.O.C.P X.M.P. Overclocks DRAM frequency by your memory module(s) for the system. ASUS P6T Deluxe V2 3-17

User Guide
Page 88
... [Disabled] [Enabled] The following sub-item vary depending on the DIMMs you set to select a DRAM O.C. Use the and keys to [Manual], [D.O.C.P.] or [X.M.P.]. You can also type the desired value using the numeric keypad. profile, which applies different settings to adjust the ratio between CPU... Core Clock and BCLK Frequency. DIMM or 1600MHz DIMM, install only one DIMM on the motherboard. Profile [DDR3-1339MHz] This item appears only when you to 500. 3-18 Chapter 3: BIOS setup Configuration options: [High Performance] [High...
... [Disabled] [Enabled] The following sub-item vary depending on the DIMMs you set to select a DRAM O.C. Use the and keys to [Manual], [D.O.C.P.] or [X.M.P.]. You can also type the desired value using the numeric keypad. profile, which applies different settings to adjust the ratio between CPU... Core Clock and BCLK Frequency. DIMM or 1600MHz DIMM, install only one DIMM on the motherboard. Profile [DDR3-1339MHz] This item appears only when you to 500. 3-18 Chapter 3: BIOS setup Configuration options: [High Performance] [High...
User Guide
Page 143
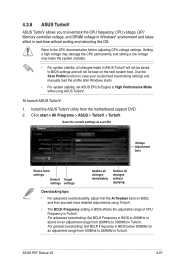
... and rebooting the OS. ASUS P6T Deluxe V2 4-27 Install the ASUS TurboV utility from 200MHz to 500MHz in ASUS TurboV will not be saved...customized overclocking settings and manually load the profile after Windows starts. • For system stability, set ASUS EPU 6-Engine to ...the CPU documentation before adjusting CPU voltage settings. Save the current settings as a profile Voltage Adjustment bars Shows more detailed adjustments using ASUS TurboV. For general overclocking: Set BCLK Frequency in BIOS below 200MHz for an adjustment range from the motherboard...
... and rebooting the OS. ASUS P6T Deluxe V2 4-27 Install the ASUS TurboV utility from 200MHz to 500MHz in ASUS TurboV will not be saved...customized overclocking settings and manually load the profile after Windows starts. • For system stability, set ASUS EPU 6-Engine to ...the CPU documentation before adjusting CPU voltage settings. Save the current settings as a profile Voltage Adjustment bars Shows more detailed adjustments using ASUS TurboV. For general overclocking: Set BCLK Frequency in BIOS below 200MHz for an adjustment range from the motherboard...
User Guide
Page 156
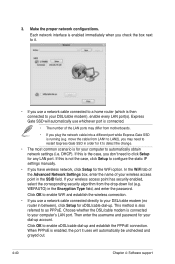
... is also referred to enable xDSL/cable dial-up account. DHCP). If this is not the case, click Setup to configure the static IP settings manually. • If you don't need to restart Express Gate SSD in the Encryption Type field, and enter the password. In the WiFi tab of the... Advanced Network Settings box, enter the name of the LAN ports may differ from motherboards. • If you may need to your computer to detect the change. • The most common scenario is running (e.g. 3.
... is also referred to enable xDSL/cable dial-up account. DHCP). If this is not the case, click Setup to configure the static IP settings manually. • If you don't need to restart Express Gate SSD in the Encryption Type field, and enter the password. In the WiFi tab of the... Advanced Network Settings box, enter the name of the LAN ports may differ from motherboards. • If you may need to your computer to detect the change. • The most common scenario is running (e.g. 3.
User Guide
Page 174
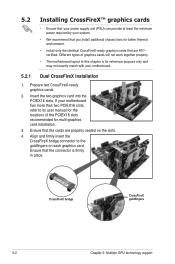
...that the cards are ATI®certified. If your motherboard. 5.2.1 Dual CrossFireX installation 1. CrossFireX bridge CrossFireX goldfingers 5-2 Chapter 5: Multiple GPU technology support Align and firmly insert the CrossFireX bridge connector to its user manual for the locations of this chapter is firmly in place.... Ensure that are properly seated on each graphics card. Different types of graphics cards will not work together properly. • The motherboard layout of the PCIEX16 ...
...that the cards are ATI®certified. If your motherboard. 5.2.1 Dual CrossFireX installation 1. CrossFireX bridge CrossFireX goldfingers 5-2 Chapter 5: Multiple GPU technology support Align and firmly insert the CrossFireX bridge connector to its user manual for the locations of this chapter is firmly in place.... Ensure that are properly seated on each graphics card. Different types of graphics cards will not work together properly. • The motherboard layout of the PCIEX16 ...
User Guide
Page 175
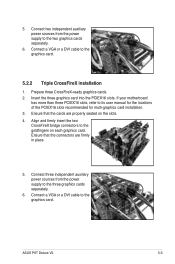
...the connectors are properly seated on each graphics card. Connect three independent auxiliary power sources from the power supply to its user manual for the locations of the PCIEX16 slots recommended for multi-graphics card installation. 3. Prepare three CrossFireX-ready graphics cards. 2....to the graphics card. Ensure that the cards are firmly in place. 5. If your motherboard has more than three PCIEX16 slots, refer to the two graphics cards separately. 6. ASUS P6T Deluxe V2 5-3 Connect two independent auxiliary power sources from the power supply to the graphics card....
...the connectors are properly seated on each graphics card. Connect three independent auxiliary power sources from the power supply to its user manual for the locations of the PCIEX16 slots recommended for multi-graphics card installation. 3. Prepare three CrossFireX-ready graphics cards. 2....to the graphics card. Ensure that the cards are firmly in place. 5. If your motherboard has more than three PCIEX16 slots, refer to the two graphics cards separately. 6. ASUS P6T Deluxe V2 5-3 Connect two independent auxiliary power sources from the power supply to the graphics card....


