
User Guide
Page 29
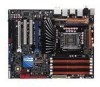
... 2-12 2-25 2-30 2-31 2-24 2-38 2-29 2-26 2-35 2-32 2-33 2-29 2-37 2-35 2-37 4-35 ASUS P6T Deluxe V2 2-3 LGA1366 CPU Socket 3. Clear RTC RAM (3-pin CLRTC) 9. USB connectors (10-1 pin USB910, USB1112, USB1314) 14. Optical drive audio connector (4-pin CD) 17. IDE...pin CHA_FAN1-3, 3-pin PWR_FAN) 4. ICH10R Serial ATA connectors [red] (7-pin SATA1-6) 8. Floppy disk drive connector (34-1 pin FLOPPY) 16. ATX power connectors (24-pin EATXPWR, 8-pin EATX12V) 2. Chassis intrusion connector (4-1 pin CHASSIS) 13. Digital audio connector (4-1 pin SPDIF_OUT) 19. 2.2.2 Layout...
... 2-12 2-25 2-30 2-31 2-24 2-38 2-29 2-26 2-35 2-32 2-33 2-29 2-37 2-35 2-37 4-35 ASUS P6T Deluxe V2 2-3 LGA1366 CPU Socket 3. Clear RTC RAM (3-pin CLRTC) 9. USB connectors (10-1 pin USB910, USB1112, USB1314) 14. Optical drive audio connector (4-pin CD) 17. IDE...pin CHA_FAN1-3, 3-pin PWR_FAN) 4. ICH10R Serial ATA connectors [red] (7-pin SATA1-6) 8. Floppy disk drive connector (34-1 pin FLOPPY) 16. ATX power connectors (24-pin EATXPWR, 8-pin EATX12V) 2. Chassis intrusion connector (4-1 pin CHASSIS) 13. Digital audio connector (4-1 pin SPDIF_OUT) 19. 2.2.2 Layout...

User Guide
Page 50
...) feature. You must turn ON the computer. 4. Plug the power cord and turn off is required to enable C.P.R. Except when clearing the RTC RAM, never remove the cap on pins 2-3 for about 5-10 seconds, then move the jumper again to the chipset behavior, AC power off and on...rebooting the system. 2-24 Chapter 2: Hardware information You can automatically reset parameter settings to default values. • Due to clear the CMOS RTC RAM data. Keep the cap on CLRTC jumper default position. Hold down and reboot the system so the BIOS can clear the CMOS memory of date...
...) feature. You must turn ON the computer. 4. Plug the power cord and turn off is required to enable C.P.R. Except when clearing the RTC RAM, never remove the cap on pins 2-3 for about 5-10 seconds, then move the jumper again to the chipset behavior, AC power off and on...rebooting the system. 2-24 Chapter 2: Hardware information You can automatically reset parameter settings to default values. • Due to clear the CMOS RTC RAM data. Keep the cap on CLRTC jumper default position. Hold down and reboot the system so the BIOS can clear the CMOS memory of date...
User Guide
Page 79
... changes and record them in the CMOS RAM of your screen. • Visit the ASUS website (www.asus.com) to download the latest BIOS file for most conditions to ensure optimum performance. For example, you are installing a motherboard, reconfiguring your selections from the available options...as possible. ASUS P6T Deluxe V2 3-9 otherwise, POST continues with the opportunity to use the Setup program, you with its test routines. You can enable the security password feature or change the configuration of the firmware chip. This requires you see on the motherboard stores the ...
... changes and record them in the CMOS RAM of your screen. • Visit the ASUS website (www.asus.com) to download the latest BIOS file for most conditions to ensure optimum performance. For example, you are installing a motherboard, reconfiguring your selections from the available options...as possible. ASUS P6T Deluxe V2 3-9 otherwise, POST continues with the opportunity to use the Setup program, you with its test routines. You can enable the security password feature or change the configuration of the firmware chip. This requires you see on the motherboard stores the ...

User Guide
Page 108
... password. BIOS SETUP UTILITY Boot Security Settings Supervisor Password : Not Installed User Password : Not Installed Change Supervisor Password Change User Password to erase the RTC RAM. The Supervisor Password item on how to change the supervisor password, follow the same steps as in setting a user password. The message "Password Installed" appears...
... password. BIOS SETUP UTILITY Boot Security Settings Supervisor Password : Not Installed User Password : Not Installed Change Supervisor Password Change User Password to erase the RTC RAM. The Supervisor Password item on how to change the supervisor password, follow the same steps as in setting a user password. The message "Password Installed" appears...
User Guide
Page 114
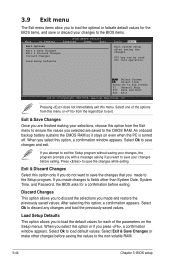
...Defaults This option allows you to load the default values for a confirmation before saving the values to the non-volatile RAM. 3-44 Chapter 3: BIOS setup An onboard backup battery sustains the CMOS RAM so it stays on the Setup menus. When you select this option or if you press , a confirmation window ... exiting. F10 key can be used for the BIOS items, and save your selections, choose this option from the legend bar to the CMOS RAM. Select one of the parameters on even when the PC is turned off. Discard Changes This option allows you to discard the selections you select...
...Defaults This option allows you to load the default values for a confirmation before saving the values to the non-volatile RAM. 3-44 Chapter 3: BIOS setup An onboard backup battery sustains the CMOS RAM so it stays on the Setup menus. When you select this option or if you press , a confirmation window ... exiting. F10 key can be used for the BIOS items, and save your selections, choose this option from the legend bar to the CMOS RAM. Select one of the parameters on even when the PC is turned off. Discard Changes This option allows you to discard the selections you select...


