P5VD2-MX/P5V-VM DH English Edition User''s Manual
Page 5
... USB Configuration 2-27 2.5 Power menu 2-28 2.5.1 ACPI Suspend Type 2-28 2.5.2 ACPI APIC Supp 2-28 2.5.3 APM Configuration 2-28 2.5.4 Hardware Monitor 2-31 2.6 Boot menu 2-33 2.6.1 Boot Device Priority 2-33 2.6.2 Removable Drives 2-33 2.6.3 Hard Disk Drives 2-34 2.6.4 Boot Settings Configuration 2-34 2.6.5 Security 2-36 2.7 Exit menu 2-38 Chapter 3: Software support 3.1 Installing an operating system 3-2 3.2 Support CD information 3-2 3.2.1 Running the support CD 3-2 3.2.2 Drivers menu 3-3 3.2.3 Utilities menu 3-4 3.2.4 Make Disk menu 3-5 3.2.5 Manuals menu 3-5 3.2.6 ASUS...
... USB Configuration 2-27 2.5 Power menu 2-28 2.5.1 ACPI Suspend Type 2-28 2.5.2 ACPI APIC Supp 2-28 2.5.3 APM Configuration 2-28 2.5.4 Hardware Monitor 2-31 2.6 Boot menu 2-33 2.6.1 Boot Device Priority 2-33 2.6.2 Removable Drives 2-33 2.6.3 Hard Disk Drives 2-34 2.6.4 Boot Settings Configuration 2-34 2.6.5 Security 2-36 2.7 Exit menu 2-38 Chapter 3: Software support 3.1 Installing an operating system 3-2 3.2 Support CD information 3-2 3.2.1 Running the support CD 3-2 3.2.2 Drivers menu 3-3 3.2.3 Utilities menu 3-4 3.2.4 Make Disk menu 3-5 3.2.5 Manuals menu 3-5 3.2.6 ASUS...
P5VD2-MX/P5V-VM DH English Edition User''s Manual
Page 10
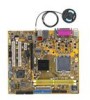
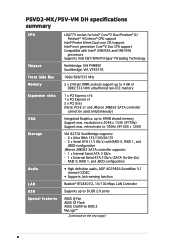
...be used simultaneously) Integrated Graphics, up to 64MB shared memory Support max. refresh rate to 2048 x 1536 (@75Hz) Support max. P5VD2-MX/P5V-VM DH specifications summary CPU Chipset Front Side Bus Memory Expansion slots VGA Storage Audio LAN USB Special features LGA775 socket for Intel® Core™2 Duo/Pentium® D/ Pentium® 4/Celeron® CPU support Intel® Presler 65nm Dual core CPU support Intel® next generation Core™2 Duo CPU support Compatible with RAID 0, RAID 1, and JBOD configuration JMicron JMB363 SATA controller supports: - 1 x Internal Serial...
...be used simultaneously) Integrated Graphics, up to 64MB shared memory Support max. refresh rate to 2048 x 1536 (@75Hz) Support max. P5VD2-MX/P5V-VM DH specifications summary CPU Chipset Front Side Bus Memory Expansion slots VGA Storage Audio LAN USB Special features LGA775 socket for Intel® Core™2 Duo/Pentium® D/ Pentium® 4/Celeron® CPU support Intel® Presler 65nm Dual core CPU support Intel® next generation Core™2 Duo CPU support Compatible with RAID 0, RAID 1, and JBOD configuration JMicron JMB363 SATA controller supports: - 1 x Internal Serial...
P5VD2-MX/P5V-VM DH English Edition User''s Manual
Page 15
... CPU. PCI Express™ interface The motherboard fully supports PCI Express, the latest I /O provides smart setup and hot-plug functions. Intel® 65nm dual-core processors utilize the latest package technologies for high-speed data retrieval and saves. ASUS P5VD2-MX/P5V-VM DH 1-3 Intel® 65nm Dual-Core CPU support This motherboard supports Intel® Pentium® D/Pentium® 4/Celeron® dual-core processors built on the 65-nanometer (nm) process technology with existing PCI specifications. With new Intel® Core™ microarchitecture technology...
... CPU. PCI Express™ interface The motherboard fully supports PCI Express, the latest I /O provides smart setup and hot-plug functions. Intel® 65nm dual-core processors utilize the latest package technologies for high-speed data retrieval and saves. ASUS P5VD2-MX/P5V-VM DH 1-3 Intel® 65nm Dual-Core CPU support This motherboard supports Intel® Pentium® D/Pentium® 4/Celeron® dual-core processors built on the 65-nanometer (nm) process technology with existing PCI specifications. With new Intel® Core™ microarchitecture technology...
P5VD2-MX/P5V-VM DH English Edition User''s Manual
Page 16
... introduction USB 2.0 technology The motherboard implements the Universal Serial Bus (USB) 2.0 specification, dramatically increasing the connection speed from the support CD in case when the BIOS codes and data are corrupted. See pages 1-25 and 1-33 for details. 6-channel high definition audio Onboard is fully-compliant with Intel® High Definition Audio standard (192 KHz, 24-bit audio). The S/PDIF technology turns your network or broadband connection with USB 1.1. See details on USB 2.0. S/PDIF digital sound ready The motherboard supports...
... introduction USB 2.0 technology The motherboard implements the Universal Serial Bus (USB) 2.0 specification, dramatically increasing the connection speed from the support CD in case when the BIOS codes and data are corrupted. See pages 1-25 and 1-33 for details. 6-channel high definition audio Onboard is fully-compliant with Intel® High Definition Audio standard (192 KHz, 24-bit audio). The S/PDIF technology turns your network or broadband connection with USB 1.1. See details on USB 2.0. S/PDIF digital sound ready The motherboard supports...
P5VD2-MX/P5V-VM DH English Edition User''s Manual
Page 17
... level of the motherboard BIOS allows automatic re-setting to the BIOS default settings in either AP or wirelesss client mode. ASUS P5VD2-MX/P5V-VM DH 1-5 Users will save the extra WiFi-AP cost. feature of versitility for your PC, enabling it to create a complete wireless home network in case the system hangs due to overclocking. eliminates the need to use a DOS-based utility or boot from anywhere...
... level of the motherboard BIOS allows automatic re-setting to the BIOS default settings in either AP or wirelesss client mode. ASUS P5VD2-MX/P5V-VM DH 1-5 Users will save the extra WiFi-AP cost. feature of versitility for your PC, enabling it to create a complete wireless home network in case the system hangs due to overclocking. eliminates the need to use a DOS-based utility or boot from anywhere...
P5VD2-MX/P5V-VM DH English Edition User''s Manual
Page 25
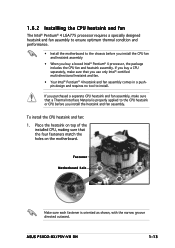
Place the heatsink on the motherboard. To install the CPU heatsink and fan: 1. 1.6.2 Installling the CPU heatsink and fan The Intel® Pentium® 4 LGA775 processor requires a specially designed heatsink and fan assembly to ensure optimum thermal condition and performance. • Install the motherboard to install. ASUS P5VD2-MX/P5V-VM DH 1-13 Fastener Motherboard hole Make sure each fastener is properly applied to the CPU heatsink or CPU before you install the CPU fan and heatsink assembly...
Place the heatsink on the motherboard. To install the CPU heatsink and fan: 1. 1.6.2 Installling the CPU heatsink and fan The Intel® Pentium® 4 LGA775 processor requires a specially designed heatsink and fan assembly to ensure optimum thermal condition and performance. • Install the motherboard to install. ASUS P5VD2-MX/P5V-VM DH 1-13 Fastener Motherboard hole Make sure each fastener is properly applied to the CPU heatsink or CPU before you install the CPU fan and heatsink assembly...
P5VD2-MX/P5V-VM DH English Edition User''s Manual
Page 36
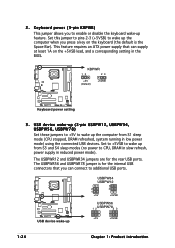
...; USBPW56 1 2 USBPW782 3 USB device wake-up the computer from S3 and S4 sleep modes (no power to additional USB ports. This feature requires an ATX power supply that you can supply at least 1A on the keyboard (the default is for the rear USB ports. The USBPWR12 and USBPWR34 jumpers are for the internal USB connectors that can connect to CPU, DRAM in slow refresh, power supply in the BIOS. 2. Set this jumper to pins 2-3 (+5VSB) to wake up the...
...; USBPW56 1 2 USBPW782 3 USB device wake-up the computer from S3 and S4 sleep modes (no power to additional USB ports. This feature requires an ATX power supply that you can supply at least 1A on the keyboard (the default is for the rear USB ports. The USBPWR12 and USBPWR34 jumpers are for the internal USB connectors that can connect to CPU, DRAM in slow refresh, power supply in the BIOS. 2. Set this jumper to pins 2-3 (+5VSB) to wake up the...
P5VD2-MX/P5V-VM DH English Edition User''s Manual
Page 50
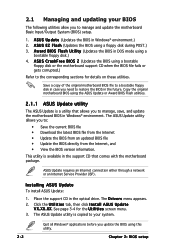
... through a network or an Internet Service Provider (ISP). 2.1 Managing and updating your system. A w a r d B I O S F l a s h U t i l i t y (Updates the BIOS in Windows® environment. Copy the original motherboard BIOS using the ASUS Update or Award BIOS Flash utilities. 2.1.1 ASUS Update utility The ASUS Update is available in the support CD that allows you to the corresponding sections for the U t i l i t i e s screen menu. 3. Installing ASUS Update To install ASUS Update: 1. Click the U t i l i t i e s tab, then click I O S 2 (Updates the BIOS using this utility...
... through a network or an Internet Service Provider (ISP). 2.1 Managing and updating your system. A w a r d B I O S F l a s h U t i l i t y (Updates the BIOS in Windows® environment. Copy the original motherboard BIOS using the ASUS Update or Award BIOS Flash utilities. 2.1.1 ASUS Update utility The ASUS Update is available in the support CD that allows you to the corresponding sections for the U t i l i t i e s screen menu. 3. Installing ASUS Update To install ASUS Update: 1. Click the U t i l i t i e s tab, then click I O S 2 (Updates the BIOS using this utility...

P5VD2-MX/P5V-VM DH English Edition User''s Manual
Page 62
...] ..... [ ] SATA 2 [None] HDD SMART Monitoring [Disabled] Select Menu Item Specific Help Specifies the capacity and physical size of the selected item. 2-14 Chapter 2: BIOS setup Installed Memory 256MB ↑↓ :Move ENTER:Accept ESC:Abort F1:Help ESC: Exit ↑↓ : Select Item -/+: Change Value F5: Setup Defaults →←: Select Menu Enter: Select SubMenu F10: Save and Exit Pop-up window with the configuration options for that item. Phoenix-Award BIOS CMOS Setup Utility Main Advanced Power Boot...
...] ..... [ ] SATA 2 [None] HDD SMART Monitoring [Disabled] Select Menu Item Specific Help Specifies the capacity and physical size of the selected item. 2-14 Chapter 2: BIOS setup Installed Memory 256MB ↑↓ :Move ENTER:Accept ESC:Abort F1:Help ESC: Exit ↑↓ : Select Item -/+: Change Value F5: Setup Defaults →←: Select Menu Enter: Select SubMenu F10: Save and Exit Pop-up window with the configuration options for that item. Phoenix-Award BIOS CMOS Setup Utility Main Advanced Power Boot...
P5VD2-MX/P5V-VM DH English Edition User''s Manual
Page 68
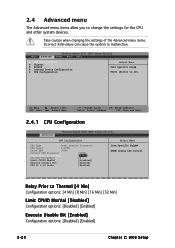
... Select Menu -/+: Change Value F5: Setup Defaults Enter: Select SubMenu F10: Save and Exit 2.4.1 CPU Configuration Advanced Phoenix-Award BIOS CMOS Setup Utility CPU Configuration CPU Type Intel Genuine Processor CPU Speed 3.20GHz Cache RAM 1024K Current FSB Frequency 200MHz Delay Prior to Thermal [4 Min] Thermal Management TM 1 Limit CPUID MaxVal [Disabled] Execute Disable Bit [Enabled] CPU L1 & L2 Cache [Enabled] Select Menu Item Specific Help DRAM timing and control Delay Prior to change the settings for the CPU and other system devices. 2.4 Advanced menu The...
... Select Menu -/+: Change Value F5: Setup Defaults Enter: Select SubMenu F10: Save and Exit 2.4.1 CPU Configuration Advanced Phoenix-Award BIOS CMOS Setup Utility CPU Configuration CPU Type Intel Genuine Processor CPU Speed 3.20GHz Cache RAM 1024K Current FSB Frequency 200MHz Delay Prior to Thermal [4 Min] Thermal Management TM 1 Limit CPUID MaxVal [Disabled] Execute Disable Bit [Enabled] CPU L1 & L2 Cache [Enabled] Select Menu Item Specific Help DRAM timing and control Delay Prior to change the settings for the CPU and other system devices. 2.4 Advanced menu The...

P5VD2-MX/P5V-VM DH English Edition User''s Manual
Page 73
... Audio controller. Configuration options: [Enabled] [Disabled] ASUS P5VD2-MX/P5V-VM DH 2-25 Configuration options: [Auto] [Disabled] Onboard LAN [Enabled] Enables or disables the onboard LAN controller. 2.4.4 Onboard Devices Configuration Advanced Phoenix-Award BIOS CMOS Setup Utility Onboard Device Configuration JMicron RAID controller SATA Controller SATA Controller Mode Ex-SATA/PCI-E*1 Option HDA Controller Onboard LAN Onboard LAN Boot ROM Serial Port1 Address Parallel Port Address Parallel Port Mode ECP Mode Use DMA [IDE] [Enabled] [IDE] [Ex-SATA] [Auto] [Enabled] [Disabled...
... Audio controller. Configuration options: [Enabled] [Disabled] ASUS P5VD2-MX/P5V-VM DH 2-25 Configuration options: [Auto] [Disabled] Onboard LAN [Enabled] Enables or disables the onboard LAN controller. 2.4.4 Onboard Devices Configuration Advanced Phoenix-Award BIOS CMOS Setup Utility Onboard Device Configuration JMicron RAID controller SATA Controller SATA Controller Mode Ex-SATA/PCI-E*1 Option HDA Controller Onboard LAN Onboard LAN Boot ROM Serial Port1 Address Parallel Port Address Parallel Port Mode ECP Mode Use DMA [IDE] [Enabled] [IDE] [Ex-SATA] [Auto] [Enabled] [Disabled...
P5VD2-MX/P5V-VM DH English Edition User''s Manual
Page 76
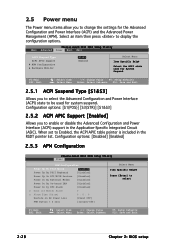
...;: Select Menu -/+: Change Value Enter: Select SubMenu F5: Setup Defaults F10: Save and Exit 2-28 Chapter 2: BIOS setup Phoenix-Award BIOS CMOS Setup Utility Main Advanced Power Boot Exit ACPI Suspend Type ACPI APIC support APM Configuration Hardware Monitor [S1&S3] Enabled Select Menu Item Specific Help Select the ACPI state used for the Advanced Configuration and Power Interface (ACPI) and the Advanced Power Management (APM). 2.5 Power menu The Power menu items allow you to display the configuration options. Select an item then press to change the settings for...
...;: Select Menu -/+: Change Value Enter: Select SubMenu F5: Setup Defaults F10: Save and Exit 2-28 Chapter 2: BIOS setup Phoenix-Award BIOS CMOS Setup Utility Main Advanced Power Boot Exit ACPI Suspend Type ACPI APIC support APM Configuration Hardware Monitor [S1&S3] Enabled Select Menu Item Specific Help Select the ACPI state used for the Advanced Configuration and Power Interface (ACPI) and the Advanced Power Management (APM). 2.5 Power menu The Power menu items allow you to display the configuration options. Select an item then press to change the settings for...

P5VD2-MX/P5V-VM DH English Edition User''s Manual
Page 77
.... Power On By On-board LAN [Disabled] Allows you to enable or disable RTC to generate a wake event. Turning an external modem off and then back on while the computer is off mode. Configuration options: [Min=0] [Max=31] ASUS P5VD2-MX/P5V-VM DH 2-29 This feature requires an ATX power supply that turns the system power on. When this item and press to display the Date of Month Alarm pop-up menu. Configuration options: [Disabled] [Enabled...
.... Power On By On-board LAN [Disabled] Allows you to enable or disable RTC to generate a wake event. Turning an external modem off and then back on while the computer is off mode. Configuration options: [Min=0] [Max=31] ASUS P5VD2-MX/P5V-VM DH 2-29 This feature requires an ATX power supply that turns the system power on. When this item and press to display the Date of Month Alarm pop-up menu. Configuration options: [Disabled] [Enabled...
P5VD2-MX/P5V-VM DH English Edition User''s Manual
Page 79
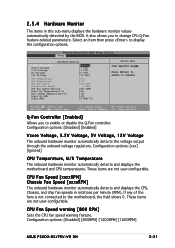
...] ASUS P5VD2-MX/P5V-VM DH 2-31 Configuration options: [Disabled] [Enabled] Vcore Voltage, 3.3V Voltage, 5V Voltage, 12V Voltage The onboard hardware monitor automatically detects the voltage output through the onboard voltage regulators. These items are not user-configurable. 2.5.4 Hardware Monitor The items in rotations per minute (RPM). Phoenix-Award BIOS CMOS Setup Utility Power Hardware Monitor Q-Fan Controller Vcore Voltage 3.3V Voltage 5V Voltage 12V Voltage [Enabled] [1.56V] [3.30V] [5.05V] [11.58V] CPU Temperature M/B Temperature CPU Fan Speed Chassis Fan Speed...
...] ASUS P5VD2-MX/P5V-VM DH 2-31 Configuration options: [Disabled] [Enabled] Vcore Voltage, 3.3V Voltage, 5V Voltage, 12V Voltage The onboard hardware monitor automatically detects the voltage output through the onboard voltage regulators. These items are not user-configurable. 2.5.4 Hardware Monitor The items in rotations per minute (RPM). Phoenix-Award BIOS CMOS Setup Utility Power Hardware Monitor Q-Fan Controller Vcore Voltage 3.3V Voltage 5V Voltage 12V Voltage [Enabled] [1.56V] [3.30V] [5.05V] [11.58V] CPU Temperature M/B Temperature CPU Fan Speed Chassis Fan Speed...
P5VD2-MX/P5V-VM DH English Edition User''s Manual
Page 81
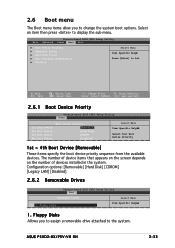
... to Set. Phoenix-Award BIOS CMOS Setup Utility Main Advanced Power Boot Exit Boot Device Priority Removable Drives Hard Disk Drives Boot Settings Configuration Security Select Menu Item Specific Help Press [Enter] to display the sub-menu. The number of device items that appears on the screen depends on the number of devices installed in the system. Configuration options: [Removable] [Hard Disk] [CDROM] [Legacy LAN] [Disabled] 2.6.2 Removable Drives Phoenix-Award BIOS CMOS Setup Utility Boot Removable Drives Select Menu 1. Floppy Disks Allows you to change the system boot options. F1...
... to Set. Phoenix-Award BIOS CMOS Setup Utility Main Advanced Power Boot Exit Boot Device Priority Removable Drives Hard Disk Drives Boot Settings Configuration Security Select Menu Item Specific Help Press [Enter] to display the sub-menu. The number of device items that appears on the screen depends on the number of devices installed in the system. Configuration options: [Removable] [Hard Disk] [CDROM] [Legacy LAN] [Disabled] 2.6.2 Removable Drives Phoenix-Award BIOS CMOS Setup Utility Boot Removable Drives Select Menu 1. Floppy Disks Allows you to change the system boot options. F1...
P5VD2-MX/P5V-VM DH English Edition User''s Manual
Page 86
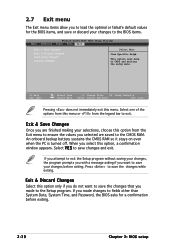
If you made to the Setup program. Exit & Save Changes Once you are saved to the CMOS RAM. If you attempt to exit the Setup program without saving your changes to the BIOS items. Phoenix-Award BIOS CMOS Setup Utility Main Advanced Power Boot Exit Exit & Save Changes Exit & Discard Changes Load Setup Default Discard Changes Select Menu Item Specific Help This option save changes and exit. An onboard backup battery sustains the CMOS RAM so it stays on even...
If you made to the Setup program. Exit & Save Changes Once you are saved to the CMOS RAM. If you attempt to exit the Setup program without saving your changes to the BIOS items. Phoenix-Award BIOS CMOS Setup Utility Main Advanced Power Boot Exit Exit & Save Changes Exit & Discard Changes Load Setup Default Discard Changes Select Menu Item Specific Help This option save changes and exit. An onboard backup battery sustains the CMOS RAM so it stays on even...
P5VD2-MX/P5V-VM DH English Edition User''s Manual
Page 90
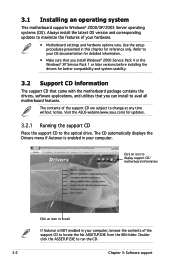
...(www.asus.com) for reference only. 3.1 Installing an operating system This motherboard supports Windows® 2000/XP/2003 Server operating systems (OS). The contents of your computer. The CD automatically displays the Drivers menu if Autorun is NOT enabled in your hardware. • Motherboard settings and hardware options vary. Doubleclick the ASSETUP.EXE to locate the file ASSETUP.EXE from the BIN folder. Use the setup...
...(www.asus.com) for reference only. 3.1 Installing an operating system This motherboard supports Windows® 2000/XP/2003 Server operating systems (OS). The contents of your computer. The CD automatically displays the Drivers menu if Autorun is NOT enabled in your hardware. • Motherboard settings and hardware options vary. Doubleclick the ASSETUP.EXE to locate the file ASSETUP.EXE from the BIN folder. Use the setup...
P5VD2-MX/P5V-VM DH English Edition User''s Manual
Page 100
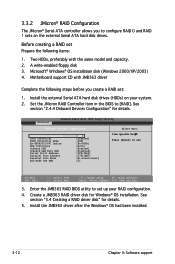
... →←: Select Menu -/+: Change Value F5: Setup Defaults Enter: Select SubMenu F10: Save and Exit 3. Install the JMB363 driver after the Windows® OS had been installed. 3-12 Chapter 3: Software support Advanced Phoenix-Award BIOS CMOS Setup Utility Onboard Devices Configuration Select Menu JMicron RAID controller SATA Controller SATA Controller Mode Ex-SATA/PCI-E*1 Option HDA Controller Onboard LAN Onboard LAN Boot ROM Serial Port1 Address Parallel Port Address Parallel Port Mode ECP Mode Use DMA [IDE] [Enabled] [IDE] [Ex-SATA] [Auto] [Enabled] [Disabled] [3F8/IRQ4...
... →←: Select Menu -/+: Change Value F5: Setup Defaults Enter: Select SubMenu F10: Save and Exit 3. Install the JMB363 driver after the Windows® OS had been installed. 3-12 Chapter 3: Software support Advanced Phoenix-Award BIOS CMOS Setup Utility Onboard Devices Configuration Select Menu JMicron RAID controller SATA Controller SATA Controller Mode Ex-SATA/PCI-E*1 Option HDA Controller Onboard LAN Onboard LAN Boot ROM Serial Port1 Address Parallel Port Address Parallel Port Mode ECP Mode Use DMA [IDE] [Enabled] [IDE] [Ex-SATA] [Auto] [Enabled] [Disabled] [3F8/IRQ4...
P5VD2-MX/P5V-VM DH English Edition User''s Manual
Page 105
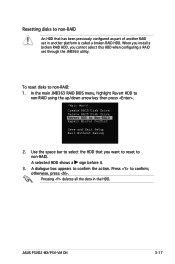
... main JMB363 RAID BIOS menu, highlight Revert HDD to non‑RAID using the up/down arrow key then press . [Main Menu] Create RAID Disk Drive Delete RAID Disk Drive Revert HDD to confirm; ASUS P5VD2-MX/P5V-VM DH 3-17 A selected HDD shows a sign before it. 3. Press to Non-RAID Repair Mirror Conflict Save and Exit Setup Exit Without Saving 2. Resetting disks to non-RAID An HDD that you cannot select this HDD when configuring a RAID set in the HDD. When you install a broken RAID HDD...
... main JMB363 RAID BIOS menu, highlight Revert HDD to non‑RAID using the up/down arrow key then press . [Main Menu] Create RAID Disk Drive Delete RAID Disk Drive Revert HDD to confirm; ASUS P5VD2-MX/P5V-VM DH 3-17 A selected HDD shows a sign before it. 3. Press to Non-RAID Repair Mirror Conflict Save and Exit Setup Exit Without Saving 2. Resetting disks to non-RAID An HDD that you cannot select this HDD when configuring a RAID set in the HDD. When you install a broken RAID HDD...
P5VD2-MX/P5V-VM DH English Edition User''s Manual
Page 108
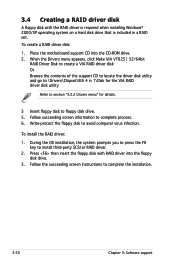
... key to complete process. 6. To create a RAID driver disk: 1. To install the RAID driver: 1. When the Drivers menu appears, click Make VIA VT8251 32/64bit RAID Driver Disk to create a VIA RAID driver disk Or Browse the contents of the support CD to locate the driver disk utility and go to \Drivers\Chipset\EIA 4 in a RAID set. Write-protect the floppy disk to floppy disk drive. 5. Follow the succeeding screen instructions to complete the installation. 3-20 Chapter 3: Software support 3.4 Creating a RAID driver disk A floppy disk with RAID driver into the CD-ROM drive...
... key to complete process. 6. To create a RAID driver disk: 1. To install the RAID driver: 1. When the Drivers menu appears, click Make VIA VT8251 32/64bit RAID Driver Disk to create a VIA RAID driver disk Or Browse the contents of the support CD to locate the driver disk utility and go to \Drivers\Chipset\EIA 4 in a RAID set. Write-protect the floppy disk to floppy disk drive. 5. Follow the succeeding screen instructions to complete the installation. 3-20 Chapter 3: Software support 3.4 Creating a RAID driver disk A floppy disk with RAID driver into the CD-ROM drive...


