
User Manual
Page 4
Contents 1.11 Software support 1-29 1.11.1 Installing an operating system 1-29 1.11.2 Support DVD information 1-29 Chapter 2: BIOS information 2.1 Managing and updating your BIOS 2-1 2.1.1 ASUS Update utility 2-1 2.1.2 ASUS EZ Flash 2 utility 2-2 2.1.3 ASUS CrashFree BIOS 3 utility 2-3 2.2 BIOS setup program 2-4 2.2.1 BIOS menu screen 2-5 2.2.2 Menu bar 2-5 2.2.3 Navigation keys 2-6 2.2.4 Menu items 2-6 2.2.5 Submenu items 2-6 2.2.6 Configuration fields 2-6 2.2.7 Pop-up window 2-6 2.2.8 Scroll bar 2-6 2.2.9 General help 2-6 2.3 Main menu 2-7 2.3.1 System Time 2-7 2.3.2 ...
Contents 1.11 Software support 1-29 1.11.1 Installing an operating system 1-29 1.11.2 Support DVD information 1-29 Chapter 2: BIOS information 2.1 Managing and updating your BIOS 2-1 2.1.1 ASUS Update utility 2-1 2.1.2 ASUS EZ Flash 2 utility 2-2 2.1.3 ASUS CrashFree BIOS 3 utility 2-3 2.2 BIOS setup program 2-4 2.2.1 BIOS menu screen 2-5 2.2.2 Menu bar 2-5 2.2.3 Navigation keys 2-6 2.2.4 Menu items 2-6 2.2.5 Submenu items 2-6 2.2.6 Configuration fields 2-6 2.2.7 Pop-up window 2-6 2.2.8 Scroll bar 2-6 2.2.9 General help 2-6 2.3 Main menu 2-7 2.3.1 System Time 2-7 2.3.2 ...

User Manual
Page 10
...2 ASUS Turbo Key 1 x PS/2 keyboard port 1 x PS/2 mouse port 1 x COM port 1 x LPT port 1 x VGA port 1 x LAN (RJ-45) port 4 x USB 2.0/1.1 ports 6-channel audio I/O ports 2 x USB 2.0 connectors supports additional 4 USB 2.0 ports 1 x IDE connector 4 x Serial ATA connectors 1 x High definition front panel audio connector 1 x System panel connector 1 x Internal speaker connector 1 x CD audio in connector 1 x S/PDIF output connector 1 x CPU fan connector 1 x 24-pin EATX power connector 1 x 4-pin ATX 12V power connector 8Mb Flash ROM, AMI BIOS, PnP, DMI v2.0, WfM 2.0, ACPI v2.0a, SM BIOS v2.5 Drivers...
...2 ASUS Turbo Key 1 x PS/2 keyboard port 1 x PS/2 mouse port 1 x COM port 1 x LPT port 1 x VGA port 1 x LAN (RJ-45) port 4 x USB 2.0/1.1 ports 6-channel audio I/O ports 2 x USB 2.0 connectors supports additional 4 USB 2.0 ports 1 x IDE connector 4 x Serial ATA connectors 1 x High definition front panel audio connector 1 x System panel connector 1 x Internal speaker connector 1 x CD audio in connector 1 x S/PDIF output connector 1 x CPU fan connector 1 x 24-pin EATX power connector 1 x 4-pin ATX 12V power connector 8Mb Flash ROM, AMI BIOS, PnP, DMI v2.0, WfM 2.0, ACPI v2.0a, SM BIOS v2.5 Drivers...

User Manual
Page 12
.../s technology This motherboard supports hard drives based on your favorite photo into the audio I/O jacks. It is enhanced with the next-generation Intel® Graphics Media Acceleratior X4500. ASUS CrashFree BIOS 3 ASUS CrashFree BIOS 3 is a highly integrated Gb LAN controller. Gigabit LAN solution The onboard LAN controller is an auto-recovery tool that automatically detects peripherals plugged into a 256-color boot logo for a more colorful and vivid image on the Serial ATA (SATA) 3Gb/s storage specifications...
.../s technology This motherboard supports hard drives based on your favorite photo into the audio I/O jacks. It is enhanced with the next-generation Intel® Graphics Media Acceleratior X4500. ASUS CrashFree BIOS 3 ASUS CrashFree BIOS 3 is a highly integrated Gb LAN controller. Gigabit LAN solution The onboard LAN controller is an auto-recovery tool that automatically detects peripherals plugged into a 256-color boot logo for a more colorful and vivid image on the Serial ATA (SATA) 3Gb/s storage specifications...

User Manual
Page 23
.... Install a 64-bit Windows® OS when you want to operate with CL=4 will automatically downgrade to run at a higher frequency, see section 2.4 Advanced menu for manual memory frequency adjustment. • Some old-version DDR2-800 DIMMs may operate at DDR2-667. To operate at the vendor-marked or at DDR2-667 by default setting. ASUS P5QPL-AM 1-13 For effective use of memory, we...
.... Install a 64-bit Windows® OS when you want to operate with CL=4 will automatically downgrade to run at a higher frequency, see section 2.4 Advanced menu for manual memory frequency adjustment. • Some old-version DDR2-800 DIMMs may operate at DDR2-667. To operate at the vendor-marked or at DDR2-667 by default setting. ASUS P5QPL-AM 1-13 For effective use of memory, we...

User Manual
Page 29
... opposite the slot that you removed earlier. 6. Keep the screw for the expansion card. Assign an IRQ to the chassis with the PCI Express specifications. 1.8.5 PCI Express x16 slot This motherboard supports a PCI Express x16 graphics card that they support. Replace the system cover. 1.8.2 Configuring an expansion card After installing the expansion card, configure it and make the necessary hardware settings for information on the system and change the necessary BIOS settings, if any. Install the software drivers for later use .
... opposite the slot that you removed earlier. 6. Keep the screw for the expansion card. Assign an IRQ to the chassis with the PCI Express specifications. 1.8.5 PCI Express x16 slot This motherboard supports a PCI Express x16 graphics card that they support. Replace the system cover. 1.8.2 Configuring an expansion card After installing the expansion card, configure it and make the necessary hardware settings for information on the system and change the necessary BIOS settings, if any. Install the software drivers for later use .

User Manual
Page 31
... ATX power supply that can wake up feature. ASUS P5QPL-AM 1-21 Set to +5VSB to wake up the computer from S3 and S4 sleep modes (no power to CPU, DRAM in slow refresh, power supply in reduced power mode). USB device wake-up (3-pin USBPW1-4, 3-pin USBPW5-8) Set these jumpers to +5V to enable or disable the keyboard wake-up the computer by pressing a key on the +5VSB lead, and a corresponding setting in low power mode) using the connected USB devices. When you set this jumper to pins...
... ATX power supply that can wake up feature. ASUS P5QPL-AM 1-21 Set to +5VSB to wake up the computer from S3 and S4 sleep modes (no power to CPU, DRAM in slow refresh, power supply in reduced power mode). USB device wake-up (3-pin USBPW1-4, 3-pin USBPW5-8) Set these jumpers to +5V to enable or disable the keyboard wake-up the computer by pressing a key on the +5VSB lead, and a corresponding setting in low power mode) using the connected USB devices. When you set this jumper to pins...

User Manual
Page 39
... OS version and corresponding updates to change at www.asus.com for better compatibility and system stability. 1.11.2 Support DVD information The Support DVD that comes with the motherboard package contains the drivers, software applications, and utilities that you can install to locate the file ASSETUP.EXE from the BIN folder. The following screen is enabled in your computer, browse the contents of your hardware. • Motherboard settings and hardware options...
... OS version and corresponding updates to change at www.asus.com for better compatibility and system stability. 1.11.2 Support DVD information The Support DVD that comes with the motherboard package contains the drivers, software applications, and utilities that you can install to locate the file ASSETUP.EXE from the BIN folder. The following screen is enabled in your computer, browse the contents of your hardware. • Motherboard settings and hardware options...

User Manual
Page 41
... and updating your BIOS Save a copy of the updating process: ASUS P5QPL-AM 2-1 Copy the original motherboard BIOS using this utility. Installing ASUS Update To install ASUS Update: 1. From the dropdown list, select any of the original motherboard BIOS file to launch the ASUS Update utility. 2. Place the support DVD in case you update the BIOS using the ASUS Update utility. 2.1.1 ASUS Update utility The ASUS Update is a utility that allows you to complete the installation. From the Windows® desktop, click Start > Programs > ASUS > ASUSUpdate > ASUSUpdate to a USB flash disk...
... and updating your BIOS Save a copy of the updating process: ASUS P5QPL-AM 2-1 Copy the original motherboard BIOS using this utility. Installing ASUS Update To install ASUS Update: 1. From the dropdown list, select any of the original motherboard BIOS file to launch the ASUS Update utility. 2. Place the support DVD in case you update the BIOS using the ASUS Update utility. 2.1.1 ASUS Update utility The ASUS Update is a utility that allows you to complete the installation. From the Windows® desktop, click Start > Programs > ASUS > ASUSUpdate > ASUSUpdate to a USB flash disk...
User Manual
Page 43
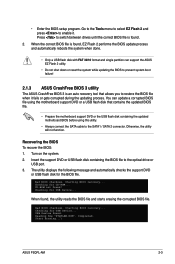
... BIOS file using the motherboard support DVD or a USB flash disk that allows you to switch between drives until the correct BIOS file is an auto recovery tool that contains the updated BIOS file. • Prepare the motherboard support DVD or the USB flash disk containing the updated motherboard BIOS before using this utility. • Always connect the SATA cable to the SATA1 / SATA 2 connector. You can support the ASUS EZ Flash 2 utility. • Do not shut down or reset the system while updating the BIOS to prevent system boot failure! 2.1.3 ASUS CrashFree BIOS 3 utility The ASUS...
... BIOS file using the motherboard support DVD or a USB flash disk that allows you to switch between drives until the correct BIOS file is an auto recovery tool that contains the updated BIOS file. • Prepare the motherboard support DVD or the USB flash disk containing the updated motherboard BIOS before using this utility. • Always connect the SATA cable to the SATA1 / SATA 2 connector. You can support the ASUS EZ Flash 2 utility. • Do not shut down or reset the system while updating the BIOS to prevent system boot failure! 2.1.3 ASUS CrashFree BIOS 3 utility The ASUS...

User Manual
Page 45
... For changing the basic system configuration. ASUS P5QPL-AM 2-5 Primary IDE Master :[Not Detected] Primary IDE Slave :[Not Detected] SATA 1 :[Not Detected] SATA 2 :[Not Detected] SATA 3 :[Not Detected] SATA 4 :[Not Detected] Storage Configuration System Information Use [+] or [-] to ensure system compatibility and stability. For changing the system boot configuration. For configuring options for special functions. For selecting the exit options and loading default settings. Submenu items Navigation keys 2.2.2 Menu bar The menu bar on the keyboard until...
... For changing the basic system configuration. ASUS P5QPL-AM 2-5 Primary IDE Master :[Not Detected] Primary IDE Slave :[Not Detected] SATA 1 :[Not Detected] SATA 2 :[Not Detected] SATA 3 :[Not Detected] SATA 4 :[Not Detected] Storage Configuration System Information Use [+] or [-] to ensure system compatibility and stability. For changing the system boot configuration. For configuring options for special functions. For selecting the exit options and loading default settings. Submenu items Navigation keys 2.2.2 Menu bar The menu bar on the keyboard until...

User Manual
Page 46
... BIOS SETUP UTILITY Power Boot Tools Exit Suspend Mode ACPI Version Features ACPI APIC support APM Configuration Hardware Monitor [Auto] [Disabled] [EDniOsapabtbilloendesd] Enabled Use [ENTER], [TAB] or [SHIFT-TAB] to display the other items (Advanced, Power, Boot, Tools, and Exit) on the menu bar have their respective menu items. 2.2.5 Submenu items A solid triangle before each item on the menu bar displays the specific items for that particular menu. Select Screen Select Item +- Use the navigation keys to configure system Time. Use...
... BIOS SETUP UTILITY Power Boot Tools Exit Suspend Mode ACPI Version Features ACPI APIC support APM Configuration Hardware Monitor [Auto] [Disabled] [EDniOsapabtbilloendesd] Enabled Use [ENTER], [TAB] or [SHIFT-TAB] to display the other items (Advanced, Power, Boot, Tools, and Exit) on the menu bar have their respective menu items. 2.2.5 Submenu items A solid triangle before each item on the menu bar displays the specific items for that particular menu. Select Screen Select Item +- Use the navigation keys to configure system Time. Use...
User Manual
Page 47
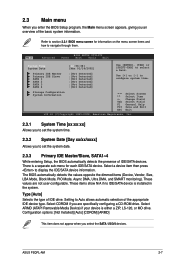
Use [+] or [-] to display the IDE/SATA device information. Select a device item then press to configure system time. These values are specifically configuring a CD-ROM drive. Configuration options: [Not Installed] [Auto] [CDROM] [ARMD] This item does not appear when you are not user-configurable. 2.3 Main menu When you enter the BIOS Setup program, the Main menu screen appears, giving you an overview of IDE/SATA devices. ASUS P5QPL-AM 2-7 Change Field Tab Select Field F1 General Help F10 Save and Exit ESC...
Use [+] or [-] to display the IDE/SATA device information. Select a device item then press to configure system time. These values are specifically configuring a CD-ROM drive. Configuration options: [Not Installed] [Auto] [CDROM] [ARMD] This item does not appear when you are not user-configurable. 2.3 Main menu When you enter the BIOS Setup program, the Main menu screen appears, giving you an overview of IDE/SATA devices. ASUS P5QPL-AM 2-7 Change Field Tab Select Field F1 General Help F10 Save and Exit ESC...

User Manual
Page 48
... Configuration option: [Auto] SMART Monitoring [Auto] Sets the Smart Monitoring, Analysis, and Reporting Technology. Configuration options: [Disabled] [Compatible] [Enhanced] Enhanced Mode Support On [S-ATA] Set Serial ATA, Parallel ATA or both as native mode. When set to [Disabled], the data transfer from and to set or change the configurations for detecting ATA/ATAPI devices. Configuration options: [Auto] [Disabled] [Enabled] 32Bit Data Transfer [Enabled] Enables or disables 32-bit data transfer. ATA/IDE Configuration [Enhanced] Allows you want to set the ATA/IDE configuration...
... Configuration option: [Auto] SMART Monitoring [Auto] Sets the Smart Monitoring, Analysis, and Reporting Technology. Configuration options: [Disabled] [Compatible] [Enhanced] Enhanced Mode Support On [S-ATA] Set Serial ATA, Parallel ATA or both as native mode. When set to [Disabled], the data transfer from and to set or change the configurations for detecting ATA/ATAPI devices. Configuration options: [Auto] [Disabled] [Enabled] 32Bit Data Transfer [Enabled] Enables or disables 32-bit data transfer. ATA/IDE Configuration [Enhanced] Allows you want to set the ATA/IDE configuration...
User Manual
Page 49
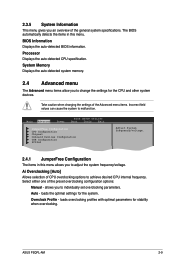
... menu. loads the optimal settings for stability when overclocking. ASUS P5QPL-AM 2-9 Overclock Profile - BIOS Information Displays the auto-detected BIOS information. Processor Displays the auto-detected CPU specification. Ai Overclocking [Auto] Allows selection of the preset overclocking configuration options: Manual - Select either one of CPU overclocking options to adjust the system frequency/voltage. Main Advanced Power BIOS SETUP UTILITY Boot Tools Exit JumperFree Configuration CPU Configuration Chipset Onboard Devices Configuration USB Configuration PCIPnP...
... menu. loads the optimal settings for stability when overclocking. ASUS P5QPL-AM 2-9 Overclock Profile - BIOS Information Displays the auto-detected BIOS information. Processor Displays the auto-detected CPU specification. Ai Overclocking [Auto] Allows selection of the preset overclocking configuration options: Manual - Select either one of CPU overclocking options to adjust the system frequency/voltage. Main Advanced Power BIOS SETUP UTILITY Boot Tools Exit JumperFree Configuration CPU Configuration Chipset Onboard Devices Configuration USB Configuration PCIPnP...

User Manual
Page 52
... you installed an Intel® CPU that supports the Enhanced Intel® SpeedStep® Technology (EIST). Configuration options: [Disabled] [Enabled] Configure DRAM Timing by SPD [Enabled] Allows you to change the advanced chipset settings. Protect Audio Video Path Mode [Lite] This item is not user- Configuration options: [Disabled] [Enabled, 32MB] [Enabled, 64MB] [Enabled, 128MB] GTT Graphics Memory Size [No VT mode, 2MB] This item is not user- Intel(R) SpeedStep(TM) Tech [Enabled] Allows you to enabled or disable the remapping of system memory used...
... you installed an Intel® CPU that supports the Enhanced Intel® SpeedStep® Technology (EIST). Configuration options: [Disabled] [Enabled] Configure DRAM Timing by SPD [Enabled] Allows you to change the advanced chipset settings. Protect Audio Video Path Mode [Lite] This item is not user- Configuration options: [Disabled] [Enabled, 32MB] [Enabled, 64MB] [Enabled, 128MB] GTT Graphics Memory Size [No VT mode, 2MB] This item is not user- Intel(R) SpeedStep(TM) Tech [Enabled] Allows you to enabled or disable the remapping of system memory used...
User Manual
Page 53
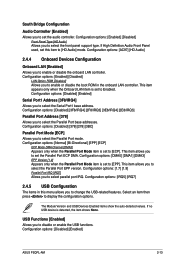
... Audio] Allows you to display the configuration options. The Module Version and USB Devices Enabled items show the auto-detected values. South Bridge Configuration Audio Controller [Enabled] Allows you to set the Parallel Port ECP DMA. This item allows you to set to Enabled. Configuration options: [Disabled] [378] [278] [3BC] Parallel Port Mode [ECP] Allows you to enable or disable the boot ROM in this item to select the Serial Port1 base address. If no USB device is set the audio controller. Configuration options: [Enabled] [Disabled] LAN Option ROM [Disabled...
... Audio] Allows you to display the configuration options. The Module Version and USB Devices Enabled items show the auto-detected values. South Bridge Configuration Audio Controller [Enabled] Allows you to set the Parallel Port ECP DMA. This item allows you to set to Enabled. Configuration options: [Disabled] [378] [278] [3BC] Parallel Port Mode [ECP] Allows you to enable or disable the boot ROM in this item to select the Serial Port1 base address. If no USB device is set the audio controller. Configuration options: [Enabled] [Disabled] LAN Option ROM [Disabled...

User Manual
Page 54
Configuration options: [Enabled] [Disabled] Legacy USB Support [Auto] Allows you to set the maximum time that the BIOS waits for the USB storage device to initialize. If detected, the USB controller legacy mode is disabled. USB Mass Storage Device Configuration USB Mass Storage Reset Delay [20 Sec] Allows you to enable or disable support for Legacy USB storage devices, including USB flash drives and USB hard drives. The menu includes setting IRQ and DMA channel resources for either PCI/PnP or legacy ISA devices, and setting the memory size block for legacy ISA devices. Plug and Play ...
Configuration options: [Enabled] [Disabled] Legacy USB Support [Auto] Allows you to set the maximum time that the BIOS waits for the USB storage device to initialize. If detected, the USB controller legacy mode is disabled. USB Mass Storage Device Configuration USB Mass Storage Reset Delay [20 Sec] Allows you to enable or disable support for Legacy USB storage devices, including USB flash drives and USB hard drives. The menu includes setting IRQ and DMA channel resources for either PCI/PnP or legacy ISA devices, and setting the memory size block for legacy ISA devices. Plug and Play ...
User Manual
Page 55
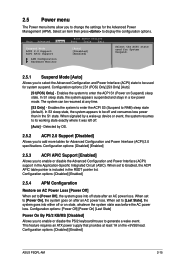
... tables for the Advanced Power Management (APM). When set to [Power Off], the system goes into either off . [Auto] - Select an item then press to RAM) sleep state (default). Enables the system to enter the ACPI S3 (Suspend to display the configuration options. Configuration options: [Disabled] [Enabled] 2.5.3 ACPI APIC Support [Enabled] Allows you to enable or disabe the PS/2 keyboard/mouse to generate a wake event. This feature requires an ATX power supply that provides at any...
... tables for the Advanced Power Management (APM). When set to [Power Off], the system goes into either off . [Auto] - Select an item then press to RAM) sleep state (default). Enables the system to enter the ACPI S3 (Suspend to display the configuration options. Configuration options: [Disabled] [Enabled] 2.5.3 ACPI APIC Support [Enabled] Allows you to enable or disabe the PS/2 keyboard/mouse to generate a wake event. This feature requires an ATX power supply that provides at any...
User Manual
Page 57
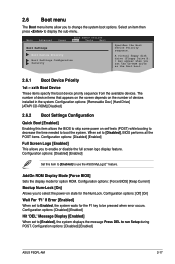
.... Configuration options: [Disabled] [Enabled] Set this item allows the BIOS to skip some power on the number of devices installed in the system. Configuration options: [Force BIOS] [Keep Current] Bootup Num-Lock [On] Allows you set to [Enabled], the system displays the message Press DEL to enable or disable the full screen logo display feature. Configuration options: [Removable Dev.] [Hard Drive] [ATAPI CD-ROM] [Disabled] 2.6.2 Boot Settings Configuration Quick Boot [Enabled] Enabling this item to [Enabled] to Enabled, the system waits for the NumLock. device. 2.6.1 Boot...
.... Configuration options: [Disabled] [Enabled] Set this item allows the BIOS to skip some power on the number of devices installed in the system. Configuration options: [Force BIOS] [Keep Current] Bootup Num-Lock [On] Allows you set to [Enabled], the system displays the message Press DEL to enable or disable the full screen logo display feature. Configuration options: [Removable Dev.] [Hard Drive] [ATAPI CD-ROM] [Disabled] 2.6.2 Boot Settings Configuration Quick Boot [Enabled] Enabling this item to [Enabled] to Enabled, the system waits for the NumLock. device. 2.6.1 Boot...

User Manual
Page 59
... to select and update BIOS. When you to run ASUS EZ Flash 2. Main Advanced Power BIOS SETUP UTILITY Boot Tools Exit ASUS EZ Flash 2 AI NET 2 Press ENTER to configure options for user password when accessing the Setup utility. Password Check [Setup] When set to [Setup], BIOS checks for special functions. When set to [Always], BIOS checks for details. 2.7.2 AI NET 2 Check Atheros LAN cable [Disabled] Enables or disables checking of the Atheros LAN cable during the Power-On Self‑Test (POST). This utility supports 1.FAT 12...
... to select and update BIOS. When you to run ASUS EZ Flash 2. Main Advanced Power BIOS SETUP UTILITY Boot Tools Exit ASUS EZ Flash 2 AI NET 2 Press ENTER to configure options for user password when accessing the Setup utility. Password Check [Setup] When set to [Setup], BIOS checks for special functions. When set to [Always], BIOS checks for details. 2.7.2 AI NET 2 Check Atheros LAN cable [Disabled] Enables or disables checking of the Atheros LAN cable during the Power-On Self‑Test (POST). This utility supports 1.FAT 12...


