
User Manual
Page 1
Motherboard P5Q-E Series
Motherboard P5Q-E Series

User Manual
Page 3
Contents Contents...iii Notices...viii Safety information ix About this guide x P5Q-E Series specifications summary xii Chapter 1: Product introduction 1.1 Welcome 1-1 1.2 Package contents 1-1 1.3 Special features 1-2 1.3.1 Product highlights 1-2 1.3.2 ASUS unique features 1-3 1.3.3 ASUS intelligent performance and overclocking features 1-7 Chapter 2: Hardware information 2.1 Before you proceed 2-1 2.2 Motherboard overview 2-2 2.2.1 Motherboard layout 2-2 2.2.2 Layout contents 2-3 2.2.3 Placement direction 2-4 2.2.4 Screw holes 2-4 2.3 Central Processing Unit (CPU 2-5 2.3.1 ...
Contents Contents...iii Notices...viii Safety information ix About this guide x P5Q-E Series specifications summary xii Chapter 1: Product introduction 1.1 Welcome 1-1 1.2 Package contents 1-1 1.3 Special features 1-2 1.3.1 Product highlights 1-2 1.3.2 ASUS unique features 1-3 1.3.3 ASUS intelligent performance and overclocking features 1-7 Chapter 2: Hardware information 2.1 Before you proceed 2-1 2.2 Motherboard overview 2-2 2.2.1 Motherboard layout 2-2 2.2.2 Layout contents 2-3 2.2.3 Placement direction 2-4 2.2.4 Screw holes 2-4 2.3 Central Processing Unit (CPU 2-5 2.3.1 ...

User Manual
Page 9
...or removing devices to or from the system, ensure that the power cables for disposal of electronic products. Operation safety • Before installing the motherboard and adding devices on a stable surface. • If you add a device. • Before connecting or removing signal cables from connectors, ...in any damage, contact your dealer immediately. • To avoid short circuits, keep paper clips, screws, and staples away from the motherboard, ensure that came with the product, contact a qualified service technician or your power supply is broken, do not try to the correct...
...or removing devices to or from the system, ensure that the power cables for disposal of electronic products. Operation safety • Before installing the motherboard and adding devices on a stable surface. • If you add a device. • Before connecting or removing signal cables from connectors, ...in any damage, contact your dealer immediately. • To avoid short circuits, keep paper clips, screws, and staples away from the motherboard, ensure that came with the product, contact a qualified service technician or your power supply is broken, do not try to the correct...

User Manual
Page 10
...to perform when installing system components. It includes description of the switches, jumpers, and connectors on ASUS hardware and software products. ASUS websites The ASUS website provides updated information on the motherboard. • Chapter 3: BIOS setup This chapter tells how to the following parts: • ... information and for product and software updates. 1. Refer to the ASUS contact information. 2. Detailed descriptions of the BIOS parameters are not part of the support DVD that comes with the motherboard package and the software. • Appendix: CPU features The Appendix...
...to perform when installing system components. It includes description of the switches, jumpers, and connectors on ASUS hardware and software products. ASUS websites The ASUS website provides updated information on the motherboard. • Chapter 3: BIOS setup This chapter tells how to the following parts: • ... information and for product and software updates. 1. Refer to the ASUS contact information. 2. Detailed descriptions of the BIOS parameters are not part of the support DVD that comes with the motherboard package and the software. • Appendix: CPU features The Appendix...

User Manual
Page 15
This chapter describes the motherboard features and the new technologies it supports. 1Product introduction
This chapter describes the motherboard features and the new technologies it supports. 1Product introduction

User Manual
Page 17
... technologies, making it , check the items in the long line of the above items is damaged or missing, contact your motherboard package for buying an ASUS® P5Q-E Series motherboard! Before you for the following items. Motherboard ASUS P5Q-E Series Cables 1 x 2-port Serial ATA power cables 4 x Serial ATA signal cables 1 x Ultra DMA 133/100/66 cable Accessories...
... technologies, making it , check the items in the long line of the above items is damaged or missing, contact your motherboard package for buying an ASUS® P5Q-E Series motherboard! Before you for the following items. Motherboard ASUS P5Q-E Series Cables 1 x 2-port Serial ATA power cables 4 x Serial ATA signal cables 1 x Ultra DMA 133/100/66 cable Accessories...
User Manual
Page 18
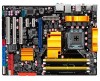
...Easily backup photos, videos and other entertainment contents to safeguard consumers' health while minimizing the impact on the environment. This motherboard also supports Intel® CPUs in the LGA775 package. This is one of the memory accesses. It especially includes Intel...optimizes the use of creating environment-friendly and recyclable products/packagings to external devices. 1.3 Special features 1.3.1 Product highlights Green ASUS This motherboard and its packaging comply with the European Union's Restriction on the use of available memory bandwidth and reduces the latency ...
...Easily backup photos, videos and other entertainment contents to safeguard consumers' health while minimizing the impact on the environment. This motherboard also supports Intel® CPUs in the LGA775 package. This is one of the memory accesses. It especially includes Intel...optimizes the use of creating environment-friendly and recyclable products/packagings to external devices. 1.3 Special features 1.3.1 Product highlights Green ASUS This motherboard and its packaging comply with the European Union's Restriction on the use of available memory bandwidth and reduces the latency ...

User Manual
Page 19
... WiFi-AP cost. WiFi-AP Solo can provide these functions even when the PC is in OS. ASUS 8-Phase Power Design Longer life & higher efficiency! ASUS P5Q-E Series 1-3 It's a unique motherboard built-in sleep mode, so users can utilize the most popular Instant Messengers (IM) like MSN, ... home network in touch with friends, or quickly check on ) MOSFETs for details. 1.3.2 ASUS unique features ASUS Express Gate Taking only 5 seconds to go online from WAN to operating temperature, ASUS' 8-phase VRM design leads the industry with lower hysteresis loss, and high quality Japanese-made...
... WiFi-AP cost. WiFi-AP Solo can provide these functions even when the PC is in OS. ASUS 8-Phase Power Design Longer life & higher efficiency! ASUS P5Q-E Series 1-3 It's a unique motherboard built-in sleep mode, so users can utilize the most popular Instant Messengers (IM) like MSN, ... home network in touch with friends, or quickly check on ) MOSFETs for details. 1.3.2 ASUS unique features ASUS Express Gate Taking only 5 seconds to go online from WAN to operating temperature, ASUS' 8-phase VRM design leads the industry with lower hysteresis loss, and high quality Japanese-made...

User Manual
Page 20
... most appropriate power usage via intelligent acceleration and overclocking - ASUS Power Saving Solution ASUS Power Saving solution intelligently and automatically provides balanced computing power and energy consumption. ASUS EPU-6 Engine The new ASUS EPU-the world's first power saving engine, has been ...PC loadings and intelligently moderating power in real-time. ASUS Quiet Thermal Solution ASUS Quiet Thermal solution makes system more stable and enhances the overclocking capability. The motherboard uses a special design on this motherboard is a fan-less and zero-noise cooling solution ...
... most appropriate power usage via intelligent acceleration and overclocking - ASUS Power Saving Solution ASUS Power Saving solution intelligently and automatically provides balanced computing power and energy consumption. ASUS EPU-6 Engine The new ASUS EPU-the world's first power saving engine, has been ...PC loadings and intelligently moderating power in real-time. ASUS Quiet Thermal Solution ASUS Quiet Thermal solution makes system more stable and enhances the overclocking capability. The motherboard uses a special design on this motherboard is a fan-less and zero-noise cooling solution ...
User Manual
Page 22
... the BIOS file or buying a replacement BIOS chip. See page 2-25 for details. ASUS Q-Shield The specially designed ASUS Q-Shield does without having to install. Profile that allows users to the motherboard. The technology saves users the hassle of two BIOS chips, a main BIOS and a... backup BIOS. With better electric conductivity, it ideally protects your motherboard against static electricity and shields it convenient and easy to short the pins or moving jumpers! ASUS Q-Connector ASUS Q-Connector allows you to easily connect or disconnect the chassis front panel cables to...
... the BIOS file or buying a replacement BIOS chip. See page 2-25 for details. ASUS Q-Shield The specially designed ASUS Q-Shield does without having to install. Profile that allows users to the motherboard. The technology saves users the hassle of two BIOS chips, a main BIOS and a... backup BIOS. With better electric conductivity, it ideally protects your motherboard against static electricity and shields it convenient and easy to short the pins or moving jumpers! ASUS Q-Connector ASUS Q-Connector allows you to easily connect or disconnect the chassis front panel cables to...

User Manual
Page 23
...the system hangs due to overclocking, C.P.R. feature of booting the BIOS. ASUS P5Q-E Series 1-7 ASUS MyLogo3™ This feature allows you to launch the utility and update the BIOS without the hassle of the motherboard BIOS allows automatic re-setting to the BIOS default settings in Windows ...environment without entering the OS. When the system hangs due to overclocking. ASUS EZ Flash 2 EZ Flash 2 is a user-friendly BIOS ...
...the system hangs due to overclocking, C.P.R. feature of booting the BIOS. ASUS P5Q-E Series 1-7 ASUS MyLogo3™ This feature allows you to launch the utility and update the BIOS without the hassle of the motherboard BIOS allows automatic re-setting to the BIOS default settings in Windows ...environment without entering the OS. When the system hangs due to overclocking. ASUS EZ Flash 2 EZ Flash 2 is a user-friendly BIOS ...

User Manual
Page 25
It includes description of the jumpers and connectors on the motherboard. 2 Hardware information This chapter lists the hardware setup procedures that you have to perform when installing system components.
It includes description of the jumpers and connectors on the motherboard. 2 Hardware information This chapter lists the hardware setup procedures that you have to perform when installing system components.

User Manual
Page 26
Chapter summary 2 2.1 Before you proceed 2-1 2.2 Motherboard overview 2-2 2.3 Central Processing Unit (CPU 2-5 2.4 System memory 2-11 2.5 Expansion slots 2-18 2.6 Jumpers 2-22 2.7 Onboard switches 2-24 2.8 Connectors 2-25 2.9 Starting up for the first time 2-40 2.10 Turning off the computer 2-41 ASUS P5Q-E Series
Chapter summary 2 2.1 Before you proceed 2-1 2.2 Motherboard overview 2-2 2.3 Central Processing Unit (CPU 2-5 2.4 System memory 2-11 2.5 Expansion slots 2-18 2.6 Jumpers 2-22 2.7 Onboard switches 2-24 2.8 Connectors 2-25 2.9 Starting up for the first time 2-40 2.10 Turning off the computer 2-41 ASUS P5Q-E Series

User Manual
Page 27
ASUS P5Q-E Series 2-1 2.1 Before you proceed Take note of the following precautions before you install motherboard components or change any motherboard settings. • Unplug the power cord from the wall socket before touching any component. • Use a grounded wrist strap or touch a safely ... the power supply case, before handling components to avoid damaging them due to static electricity. • Hold components by the edges to the motherboard, peripherals, and/or components. Failure to do so may cause severe damage to avoid touching the ICs on them. • Whenever you uninstall...
ASUS P5Q-E Series 2-1 2.1 Before you proceed Take note of the following precautions before you install motherboard components or change any motherboard settings. • Unplug the power cord from the wall socket before touching any component. • Use a grounded wrist strap or touch a safely ... the power supply case, before handling components to avoid damaging them due to static electricity. • Hold components by the edges to the motherboard, peripherals, and/or components. Failure to do so may cause severe damage to avoid touching the ICs on them. • Whenever you uninstall...
User Manual
Page 28
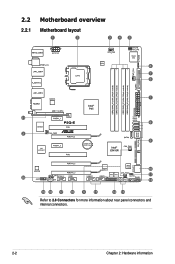
2.2 Motherboard overview 2.2.1 Motherboard layout Refer to 2.8 Connectors for more information about rear panel connectors and internal connectors. 2-2 Chapter 2: Hardware information
2.2 Motherboard overview 2.2.1 Motherboard layout Refer to 2.8 Connectors for more information about rear panel connectors and internal connectors. 2-2 Chapter 2: Hardware information

User Manual
Page 30
DO NOT overtighten the screws! Place this side towards the rear of the chassis as indicated in the image below. 2.2.4 Screw holes Place nine (9) screws into the chassis in the correct orientation. 2.2.3 Placement direction When installing the motherboard, make sure that you place it into the holes indicated by circles to secure the motherboard to the rear part of the chassis 2-4 Chapter 2: Hardware information Doing so can damage the motherboard. The edge with external ports goes to the chassis.
DO NOT overtighten the screws! Place this side towards the rear of the chassis as indicated in the image below. 2.2.4 Screw holes Place nine (9) screws into the chassis in the correct orientation. 2.2.3 Placement direction When installing the motherboard, make sure that you place it into the holes indicated by circles to secure the motherboard to the rear part of the chassis 2-4 Chapter 2: Hardware information Doing so can damage the motherboard. The edge with external ports goes to the chassis.
User Manual
Page 31
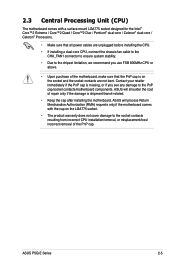
... contacts resulting from incorrect CPU installation/removal, or misplacement/loss/ incorrect removal of the PnP cap. ASUS will process Return Merchandise Authorization (RMA) requests only if the motherboard comes with a surface mount LGA775 socket designed for the Intel® Core™2 Extreme / Core...; Make sure that the PnP cap is shipment/transit-related. • Keep the cap after installing the motherboard. ASUS P5Q-E Series 2-5 ASUS will shoulder the cost of the motherboard, make sure that all power cables are not bent. Contact your retailer immediately if the PnP cap is ...
... contacts resulting from incorrect CPU installation/removal, or misplacement/loss/ incorrect removal of the PnP cap. ASUS will process Return Merchandise Authorization (RMA) requests only if the motherboard comes with a surface mount LGA775 socket designed for the Intel® Core™2 Extreme / Core...; Make sure that the PnP cap is shipment/transit-related. • Keep the cap after installing the motherboard. ASUS P5Q-E Series 2-5 ASUS will shoulder the cost of the motherboard, make sure that all power cables are not bent. Contact your retailer immediately if the PnP cap is ...

User Manual
Page 32
... the load lever in the direction of the arrow to the left . 2. Lift the load plate with your thumb (A), then move it is on the motherboard. To prevent damage to remove (4B). 3 PnP cap Load plate 4A 2-6 Chapter 2: Hardware information Locate the CPU socket on your thumb and forefinger to a 100...
... the load lever in the direction of the arrow to the left . 2. Lift the load plate with your thumb (A), then move it is on the motherboard. To prevent damage to remove (4B). 3 PnP cap Load plate 4A 2-6 Chapter 2: Hardware information Locate the CPU socket on your thumb and forefinger to a 100...
User Manual
Page 34
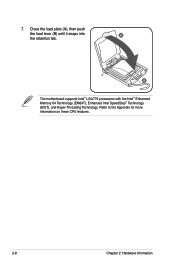
Refer to the Appendix for more information on these CPU features. 2-8 Chapter 2: Hardware information 7. Close the load plate (A), then push the load lever (B) until it snaps into A the retention tab. B The motherboard supports Intel® LGA775 processors with the Intel® Enhanced Memory 64 Technology (EM64T), Enhanced Intel SpeedStep® Technology (EIST), and Hyper-Threading Technology.
Refer to the Appendix for more information on these CPU features. 2-8 Chapter 2: Hardware information 7. Close the load plate (A), then push the load lever (B) until it snaps into A the retention tab. B The motherboard supports Intel® LGA775 processors with the Intel® Enhanced Memory 64 Technology (EM64T), Enhanced Intel SpeedStep® Technology (EIST), and Hyper-Threading Technology.
User Manual
Page 35
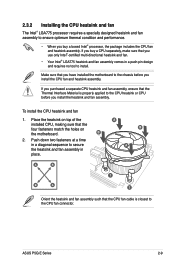
...assembly. B 2. A B A B A B A 1 1 Orient the heatsink and fan assembly such that the four fasteners match the holes on the motherboard. ASUS P5Q-E Series 2-9 2.3.2 Installing the CPU heatsink and fan The Intel® LGA775 processor requires a specially designed heatsink and fan assembly to ensure optimum thermal condition... fan. • Your Intel® LGA775 heatsink and fan assembly comes in place. Make sure that you have installed the motherboard to install. If you install the heatsink and fan assembly. Push down two fasteners at a time in a diagonal sequence to...
...assembly. B 2. A B A B A B A 1 1 Orient the heatsink and fan assembly such that the four fasteners match the holes on the motherboard. ASUS P5Q-E Series 2-9 2.3.2 Installing the CPU heatsink and fan The Intel® LGA775 processor requires a specially designed heatsink and fan assembly to ensure optimum thermal condition... fan. • Your Intel® LGA775 heatsink and fan assembly comes in place. Make sure that you have installed the motherboard to install. If you install the heatsink and fan assembly. Push down two fasteners at a time in a diagonal sequence to...


