
User Manual
Page 17
.... Motherboard ASUS P5Q-E Series Cables 1 x 2-port Serial ATA power cables 4 x Serial ATA signal cables 1 x Ultra DMA 133/100/66 cable Accessories 1 x ASUS Q-Shield (I/O shield) 1 x ASUS Q-Connector Kit (USB, 1394, system panel; Thank you start installing the motherboard, and hardware devices on it another standout in your package with the list below. 1.2 Package contents Check your retailer. Retail version only) 1 x WiFi-AP Solo Antenna (WiFi-AP Ediition Only) Application DVD ASUS motherboard support DVD Documentation User guide WiFi-AP Solo user guide (WiFi...
.... Motherboard ASUS P5Q-E Series Cables 1 x 2-port Serial ATA power cables 4 x Serial ATA signal cables 1 x Ultra DMA 133/100/66 cable Accessories 1 x ASUS Q-Shield (I/O shield) 1 x ASUS Q-Connector Kit (USB, 1394, system panel; Thank you start installing the motherboard, and hardware devices on it another standout in your package with the list below. 1.2 Package contents Check your retailer. Retail version only) 1 x WiFi-AP Solo Antenna (WiFi-AP Ediition Only) Application DVD ASUS motherboard support DVD Documentation User guide WiFi-AP Solo user guide (WiFi...

User Manual
Page 20
See page 4-24 for details. To wake the system and return to a new 6 engine version, which includes the CPU, VGA card, memory, chipset, hard drives and CPU cooler / system fans), the EPU automatically provides the most reliable fanless thermal solution to install side-flow fan or passive cooler. See page 4-20 for details. Fanless Design-Heat-pipe solution The Heat Pipe design effectively directs...
See page 4-24 for details. To wake the system and return to a new 6 engine version, which includes the CPU, VGA card, memory, chipset, hard drives and CPU cooler / system fans), the EPU automatically provides the most reliable fanless thermal solution to install side-flow fan or passive cooler. See page 4-20 for details. Fanless Design-Heat-pipe solution The Heat Pipe design effectively directs...
User Manual
Page 45
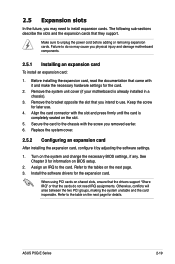
... motherboard is completely seated on the next page. 3. Align the card connector with the screw you may cause you intend to the table on BIOS setup. 2. Otherwise, conflicts will arise between the two PCI groups, making the system unstable and the card inoperable. Failure to the tables on the slot. 5. ASUS P5Q-E Series 2-19 Replace the system cover. 2.5.2 Configuring an expansion card After installing the expansion card, configure...
... motherboard is completely seated on the next page. 3. Align the card connector with the screw you may cause you intend to the table on BIOS setup. 2. Otherwise, conflicts will arise between the two PCI groups, making the system unstable and the card inoperable. Failure to the tables on the slot. 5. ASUS P5Q-E Series 2-19 Replace the system cover. 2.5.2 Configuring an expansion card After installing the expansion card, configure...

User Manual
Page 71
... BIOS using a floppy disk or USB flash disk.) 3. The ASUS Update utility allows you need to restore the BIOS in case you to the corresponding sections for details on these utilities. ASUS Update requires an Internet connection either through a network or an Internet Service Provider (ISP). The Drivers menu appears. 2. ASUS EZ Flash 2 (Updates the BIOS using a bootable floppy disk) Refer to : • Save the current BIOS file • Download the latest BIOS file from the Internet • Update the BIOS from an updated BIOS file • Update...
... BIOS using a floppy disk or USB flash disk.) 3. The ASUS Update utility allows you need to restore the BIOS in case you to the corresponding sections for details on these utilities. ASUS Update requires an Internet connection either through a network or an Internet Service Provider (ISP). The Drivers menu appears. 2. ASUS EZ Flash 2 (Updates the BIOS using a bootable floppy disk) Refer to : • Save the current BIOS file • Download the latest BIOS file from the Internet • Update the BIOS from an updated BIOS file • Update...
User Manual
Page 81
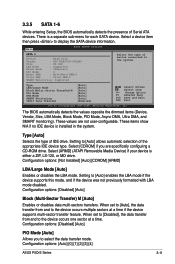
... ASUS P5Q-E Series 3-11 These values are specifically configuring a CD-ROM drive. Select [CDROM] if you to display the SATA device information. Select a device item then press to select the data transfer mode. Type [Auto] Selects the type of Serial ATA devices. Setting to the system. Main BIOS SETUP UTILITY SATA 1 Device : Hard Disk Vendor : WDC WD800JD-00LSA0 Size : 80.0GB LBA Mode : Supported Block Mode : 16Sectors PIO Mode : 4 Async DMA : MultiWord DMA-2 Ultra DMA : Ultra DMA-5 SMART Monitoring: Supported Select the type of device connected...
... ASUS P5Q-E Series 3-11 These values are specifically configuring a CD-ROM drive. Select [CDROM] if you to display the SATA device information. Select a device item then press to select the data transfer mode. Type [Auto] Selects the type of Serial ATA devices. Setting to the system. Main BIOS SETUP UTILITY SATA 1 Device : Hard Disk Vendor : WDC WD800JD-00LSA0 Size : 80.0GB LBA Mode : Supported Block Mode : 16Sectors PIO Mode : 4 Async DMA : MultiWord DMA-2 Ultra DMA : Ultra DMA-5 SMART Monitoring: Supported Select the type of device connected...
User Manual
Page 82
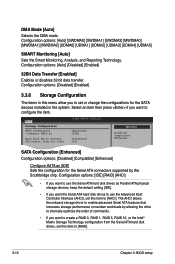
... to use the Advanced Host Controller Interface (AHCI), set or change the configurations for the Serial ATA connectors supported by allowing the drive to internally optimize the order of commands. • If you to [RAID]. 3-12 Chapter 3: BIOS setup The AHCI allows the onboard storage driver to enable advanced Serial ATA features that increases storage performance on random workloads by the Southbridge chip. DMA Mode [Auto] Selects the DMA mode. Configuration options: [Auto] [Disabled] [Enabled] 32Bit Data Transfer [Enabled] Enables or disables 32-bit...
... to use the Advanced Host Controller Interface (AHCI), set or change the configurations for the Serial ATA connectors supported by allowing the drive to internally optimize the order of commands. • If you to [RAID]. 3-12 Chapter 3: BIOS setup The AHCI allows the onboard storage driver to enable advanced Serial ATA features that increases storage performance on random workloads by the Southbridge chip. DMA Mode [Auto] Selects the DMA mode. Configuration options: [Auto] [Disabled] [Enabled] 32Bit Data Transfer [Enabled] Enables or disables 32-bit...
User Manual
Page 85
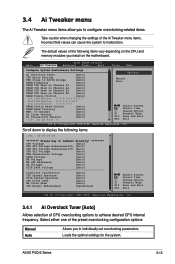
.... Main Ai Tweaker BIOS SETUP UTILITY Advanced Power Boot Tools Exit Configure System Performance Settings Ai Overclock Tuner [Auto] CPU Ratio Setting [Auto] FSB Strap to North Bridge [Auto] DRAM Frequency [Auto] DRAM CLK Skew on Channel A1 [Auto] DRAM CLK Skew on Channel A2 [Auto] DRAM CLK Skew on Channel B1 [Auto] DRAM CLK Skew on the CPU and memory modules you to individually set overclocking parameters. Select either one of the following items: LVL : 09 09 09 09 ******** Please key...
.... Main Ai Tweaker BIOS SETUP UTILITY Advanced Power Boot Tools Exit Configure System Performance Settings Ai Overclock Tuner [Auto] CPU Ratio Setting [Auto] FSB Strap to North Bridge [Auto] DRAM Frequency [Auto] DRAM CLK Skew on Channel A1 [Auto] DRAM CLK Skew on Channel A2 [Auto] DRAM CLK Skew on Channel B1 [Auto] DRAM CLK Skew on the CPU and memory modules you to individually set overclocking parameters. Select either one of the following items: LVL : 09 09 09 09 ******** Please key...
User Manual
Page 93
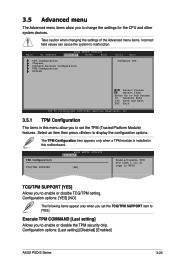
Select an item then press to malfunction. BIOS SETUP UTILITY Advanced TPM Configuration TCG/TPM SUPPORT [NO] Enable/Disable TPM TCG (TPM 1.1/1.2) supp in BIOS TCG/TPM SUPPORT [YES] Allows you to set the TCG/TPM SUPPORT item to [YES]. Configuration options: [Last setting] [Disabled] [Enabled] ASUS P5Q-E Series 3-23 Main Ai Tweaker BIOS SETUP UTILITY Advanced Power Boot CPU Configuration Chipset Onboard Devices Configuration USB Configuration PCIPnP Tools Exit Configure CPU. Select Screen Select Item Enter Go to Sub Screen F1 General Help F10 Save and Exit ESC...
Select an item then press to malfunction. BIOS SETUP UTILITY Advanced TPM Configuration TCG/TPM SUPPORT [NO] Enable/Disable TPM TCG (TPM 1.1/1.2) supp in BIOS TCG/TPM SUPPORT [YES] Allows you to set the TCG/TPM SUPPORT item to [YES]. Configuration options: [Last setting] [Disabled] [Enabled] ASUS P5Q-E Series 3-23 Main Ai Tweaker BIOS SETUP UTILITY Advanced Power Boot CPU Configuration Chipset Onboard Devices Configuration USB Configuration PCIPnP Tools Exit Configure CPU. Select Screen Select Item Enter Go to Sub Screen F1 General Help F10 Save and Exit ESC...

User Manual
Page 94
... CPU Ratio Setting C1E Support Max CPUID Value Limit Intel(R) Virtualization Tech CPU TM function Execute Disable Bit Intel(R) SpeedStep(TM) Tech [Auto] [Enabled] [Disabled] [Enabled] [Enabled] [Enabled] [Enabled] Sets the ratio between [OK] and [Cancel], and then press to clear the user information saved in the TPM security chip. Change Option F1 General Help F10 Save and Exit ESC Exit v02.61 (C)Copyright 1985-2008, American Megatrends, Inc. 3-24 Chapter 3: BIOS setup BIOS SETUP UTILITY...
... CPU Ratio Setting C1E Support Max CPUID Value Limit Intel(R) Virtualization Tech CPU TM function Execute Disable Bit Intel(R) SpeedStep(TM) Tech [Auto] [Enabled] [Disabled] [Enabled] [Enabled] [Enabled] [Enabled] Sets the ratio between [OK] and [Cancel], and then press to clear the user information saved in the TPM security chip. Change Option F1 General Help F10 Save and Exit ESC Exit v02.61 (C)Copyright 1985-2008, American Megatrends, Inc. 3-24 Chapter 3: BIOS setup BIOS SETUP UTILITY...
User Manual
Page 97
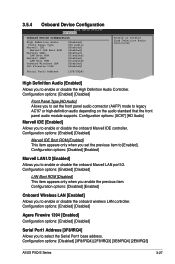
...IRQ3] ASUS P5Q-E Series 3-27 Configuration options: [Enabled] [Disabled] Agere Firewire 1394 [Enabled] Configuration options: [Enabled] [Disabled] Serial Port1 Address [3F8/IRQ4] Allows you to enable or disable the onboard Marvell IDE controller. Configuration options: [AC97] [HD Audio] Marvell IDE [Enabled] Allows you to select the Serial Port1 base address. Configuration options: [Enabled] [Disabled] LAN Boot ROM [Disabled] This item appears only when you to legacy AC'97 or high-definition audio depending on the audio standard that the front panel audio module supports. Configuration...
...IRQ3] ASUS P5Q-E Series 3-27 Configuration options: [Enabled] [Disabled] Agere Firewire 1394 [Enabled] Configuration options: [Enabled] [Disabled] Serial Port1 Address [3F8/IRQ4] Allows you to enable or disable the onboard Marvell IDE controller. Configuration options: [AC97] [HD Audio] Marvell IDE [Enabled] Allows you to select the Serial Port1 base address. Configuration options: [Enabled] [Disabled] LAN Boot ROM [Disabled] This item appears only when you to legacy AC'97 or high-definition audio depending on the audio standard that the front panel audio module supports. Configuration...
User Manual
Page 100
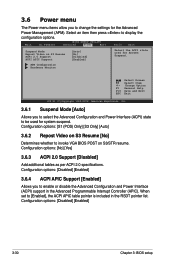
... Controller (APIC). When set to enable or disable the Advanced Configuration and Power Interface (ACPI) support in the RSDT pointer list. Configuration options: [Disabled] [Enabled] 3-30 Chapter 3: BIOS setup APM Configuration Hardware Monitor Select Screen Select Item +- Configuration options: [S1 (POS) Only] [S3 Only] [Auto] 3.6.2 Repost Video on S3 Resume ACPI 2.0 Support ACPI APIC Support [Auto] [No] [Disabled] [Enabled] Select the ACPI state used for System Suspend. Main Ai Tweaker BIOS SETUP UTILITY Advanced Power Boot Tools Exit Suspend Mode...
... Controller (APIC). When set to enable or disable the Advanced Configuration and Power Interface (ACPI) support in the RSDT pointer list. Configuration options: [Disabled] [Enabled] 3-30 Chapter 3: BIOS setup APM Configuration Hardware Monitor Select Screen Select Item +- Configuration options: [S1 (POS) Only] [S3 Only] [Auto] 3.6.2 Repost Video on S3 Resume ACPI 2.0 Support ACPI APIC Support [Auto] [No] [Disabled] [Enabled] Select the ACPI state used for System Suspend. Main Ai Tweaker BIOS SETUP UTILITY Advanced Power Boot Tools Exit Suspend Mode...

User Manual
Page 106
... Enter Change F1 General Help F10 Save and Exit ESC Exit v02.61 (C)Copyright 1985-2008, American Megatrends, Inc. To set your BIOS password, you can clear it by erasing the CMOS Real Time Clock (RTC) RAM. Select the Change Supervisor Password item and press . 2. BIOS SETUP UTILITY Boot Security Settings Supervisor Password : Not Installed User Password : Not Installed Change Supervisor Password Change User Password to change the supervisor password, follow the same steps as in setting a user password. See section 2.6 Jumpers...
... Enter Change F1 General Help F10 Save and Exit ESC Exit v02.61 (C)Copyright 1985-2008, American Megatrends, Inc. To set your BIOS password, you can clear it by erasing the CMOS Real Time Clock (RTC) RAM. Select the Change Supervisor Password item and press . 2. BIOS SETUP UTILITY Boot Security Settings Supervisor Password : Not Installed User Password : Not Installed Change Supervisor Password Change User Password to change the supervisor password, follow the same steps as in setting a user password. See section 2.6 Jumpers...

User Manual
Page 108
... 2 Select Screen Select Item +- This utility doesn't support : 1.NTFS format ASUS O.C. Select an item then press to run the utility to confirm your choice. Main Ai Tweaker BIOS SETUP UTILITY Advanced Power Boot Tools Exit ASUS EZ Flash 2 Drive Xpert Control Drive Xpert Mode Update Express Gate Enter OS Timer Reset User Data [Auto] [Last Setting] [Enabled] [10 Seconds] [No] Press ENTER to run ASUS EZ Flash 2. When you to display the sub-menu. Use the left/right arrow key to select...
... 2 Select Screen Select Item +- This utility doesn't support : 1.NTFS format ASUS O.C. Select an item then press to run the utility to confirm your choice. Main Ai Tweaker BIOS SETUP UTILITY Advanced Power Boot Tools Exit ASUS EZ Flash 2 Drive Xpert Control Drive Xpert Mode Update Express Gate Enter OS Timer Reset User Data [Auto] [Last Setting] [Enabled] [10 Seconds] [No] Press ENTER to run ASUS EZ Flash 2. When you to display the sub-menu. Use the left/right arrow key to select...

User Manual
Page 117
... support DVD to the optical drive. ASUS P5Q-E Series 4-1 The DVD automatically displays the Drivers menu if Autorun is NOT enabled in this chapter for updates. 4.2.1 Running the support DVD Place the support DVD to locate the file ASSETUP.EXE from the BIN folder. Click an icon to display support DVD/ motherboard information Click an item to install If Autorun is enabled in your computer, browse the contents of your hardware. • Motherboard settings and hardware options...
... support DVD to the optical drive. ASUS P5Q-E Series 4-1 The DVD automatically displays the Drivers menu if Autorun is NOT enabled in this chapter for updates. 4.2.1 Running the support DVD Place the support DVD to locate the file ASSETUP.EXE from the BIN folder. Click an icon to display support DVD/ motherboard information Click an item to install If Autorun is enabled in your computer, browse the contents of your hardware. • Motherboard settings and hardware options...

User Manual
Page 151
ASUS P5Q-E Series 4-35 SoundMAX If you are using Windows XP operating system, from the SoundMAX® control panel, you can easily configure your audio settings. Simply follow succeeding screen instructions and begin enjoying High Definition Audio. Audio Setup Wizard By clicking the icon from the taskbar, double-click on the SoundMAX® icon to display the SoundMAX® Control Panel. B.
ASUS P5Q-E Series 4-35 SoundMAX If you are using Windows XP operating system, from the SoundMAX® control panel, you can easily configure your audio settings. Simply follow succeeding screen instructions and begin enjoying High Definition Audio. Audio Setup Wizard By clicking the icon from the taskbar, double-click on the SoundMAX® icon to display the SoundMAX® Control Panel. B.
User Manual
Page 165
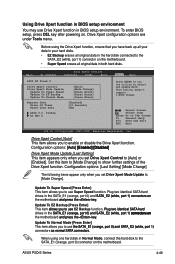
... data in the hard disk connected to the SATA_E2 (white, port 1) connector on the motherboard. • Super Speed erases all original data in both hard disks. ASUS P5Q-E Series 4-49 Main Ai Tweaker BIOS SETUP UTILITY Advanced Power Boot ASUS EZ Flash 2 Drive Xpert Control Drive Xpert Mode Update Update To Super Speed Update To EZ Backup Update To Normal Mode [Auto] [Mode Change] [Press Enter] [Press Enter] [Press Enter] Express Gate Enter OS Timer Reset User Data [Enabled] [10 Seconds] [No] ASUS O.C. Update To EZ Backup [Press Enter] This item a�...
... data in the hard disk connected to the SATA_E2 (white, port 1) connector on the motherboard. • Super Speed erases all original data in both hard disks. ASUS P5Q-E Series 4-49 Main Ai Tweaker BIOS SETUP UTILITY Advanced Power Boot ASUS EZ Flash 2 Drive Xpert Control Drive Xpert Mode Update Update To Super Speed Update To EZ Backup Update To Normal Mode [Auto] [Mode Change] [Press Enter] [Press Enter] [Press Enter] Express Gate Enter OS Timer Reset User Data [Enabled] [10 Seconds] [No] ASUS O.C. Update To EZ Backup [Press Enter] This item a�...

User Manual
Page 172
... "Refresh" button to configure the static IP settings manually. 4-56 Chapter 4: Software support If this is not the case, click Setup to detect the change. • The most common scenario is enabled immediately when you check the box next to automatically obtain network settings (i.e. Each network interface is for any LAN port. If you use whichever port (LAN1 or LAN2) is running (e.g. DHCP). Network 3. Express Gate will automatically use a network cable connected to...
... "Refresh" button to configure the static IP settings manually. 4-56 Chapter 4: Software support If this is not the case, click Setup to detect the change. • The most common scenario is enabled immediately when you check the box next to automatically obtain network settings (i.e. Each network interface is for any LAN port. If you use whichever port (LAN1 or LAN2) is running (e.g. DHCP). Network 3. Express Gate will automatically use a network cable connected to...

User Manual
Page 175
.... 3. Main Ai Tweaker BIOS SETUP UTILITY Advanced Power Boot Tools Exit ASUS EZ Flash 2 Express Gate Enter OS Timer Reset User Data [Enabled] [10 Seconds] [No] Press ENTER to run the utility to continue. 4. Click Next to select and update BIOS. Refer to start normally, you can find original version of the Express Gate software will be released regularly, adding refinements or new applications. Configuring Express Gate in BIOS Setup Enter BIOS setup by pressing DEL key after powering on...
.... 3. Main Ai Tweaker BIOS SETUP UTILITY Advanced Power Boot Tools Exit ASUS EZ Flash 2 Express Gate Enter OS Timer Reset User Data [Enabled] [10 Seconds] [No] Press ENTER to run the utility to continue. 4. Click Next to select and update BIOS. Refer to start normally, you can find original version of the Express Gate software will be released regularly, adding refinements or new applications. Configuring Express Gate in BIOS Setup Enter BIOS setup by pressing DEL key after powering on...

User Manual
Page 177
... user guide for details on each drive. 4.4.3 Intel® RAID configurations This motherboard supports RAID 0, RAID 1, RAID 5, RAID 10 and Intel® Matrix Storage configurations for a RAID configuration: 1. Connect the SATA signal cables. 3. Enter the BIOS Setup during POST. 2. ASUS P5Q-E Series 4-61 Refer to the power connector on entering and navigating through the Intel® ICH10R Southbridge chip. To install the SATA hard disks for Serial ATA hard disks drives through the BIOS Setup. Go to display the configuration options. 4. Select the item Configure SATA...
... user guide for details on each drive. 4.4.3 Intel® RAID configurations This motherboard supports RAID 0, RAID 1, RAID 5, RAID 10 and Intel® Matrix Storage configurations for a RAID configuration: 1. Connect the SATA signal cables. 3. Enter the BIOS Setup during POST. 2. ASUS P5Q-E Series 4-61 Refer to the power connector on entering and navigating through the Intel® ICH10R Southbridge chip. To install the SATA hard disks for Serial ATA hard disks drives through the BIOS Setup. Go to display the configuration options. 4. Select the item Configure SATA...

User Manual
Page 186
... OS installation, select Intel(R) SATA RAID Controller (Desktop ICH10R). 3. Insert the floppy disk/USB device with RAID driver into the floppy disk drive/ USB port. 2. When prompted to select the SCSI adapter to install, make sure you to press the key to install third-party SCSI or RAID driver. 2. During the OS installation, the system prompts you select Intel(R) SATA RAID Controller (Desktop ICH10R). 4. Follow the succeeding screen instructions to complete the installation. 4-70 Chapter 4: Software support To install the RAID driver in Windows®...
... OS installation, select Intel(R) SATA RAID Controller (Desktop ICH10R). 3. Insert the floppy disk/USB device with RAID driver into the floppy disk drive/ USB port. 2. When prompted to select the SCSI adapter to install, make sure you to press the key to install third-party SCSI or RAID driver. 2. During the OS installation, the system prompts you select Intel(R) SATA RAID Controller (Desktop ICH10R). 4. Follow the succeeding screen instructions to complete the installation. 4-70 Chapter 4: Software support To install the RAID driver in Windows®...


