
User Guide
Page 1
P5N-D Motherboard
P5N-D Motherboard

User Guide
Page 3
... Notices...vii Safety information viii About this guide ix P5N-D specifications summary xi Chapter 1: Product introduction 1.1 Welcome 1-1 1.2 Package contents 1-1 1.3 Special features 1-2 1.3.1 Product highlights 1-2 1.3.2 ASUS AI Lifestyle unique features 1-4 1.3.3 ASUS Intelligent Performance and Overclocking features 1-6 Chapter 2: Hardware information 2.1 Before you proceed 2-1 2.2 Motherboard overview 2-2 2.2.1 Placement direction 2-2 2.2.2 Screw holes 2-2 2.2.3 Motherboard layout 2-3 2.2.4 Layout contents 2-4 2.3 Central Processing Unit (CPU 2-6 2.3.1 Installing...
... Notices...vii Safety information viii About this guide ix P5N-D specifications summary xi Chapter 1: Product introduction 1.1 Welcome 1-1 1.2 Package contents 1-1 1.3 Special features 1-2 1.3.1 Product highlights 1-2 1.3.2 ASUS AI Lifestyle unique features 1-4 1.3.3 ASUS Intelligent Performance and Overclocking features 1-6 Chapter 2: Hardware information 2.1 Before you proceed 2-1 2.2 Motherboard overview 2-2 2.2.1 Placement direction 2-2 2.2.2 Screw holes 2-2 2.2.3 Motherboard layout 2-3 2.2.4 Layout contents 2-4 2.3 Central Processing Unit (CPU 2-6 2.3.1 Installing...
User Guide
Page 8
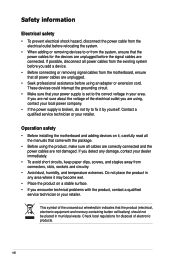
... in any damage, contact your dealer immediately. • To avoid short circuits, keep paper clips, screws, and staples away from the motherboard, ensure that all power cables from the existing system before you are not damaged. If you are not sure about the voltage of the... removing signal cables from connectors, slots, sockets and circuitry. • Avoid dust, humidity, and temperature extremes. Operation safety • Before installing the motherboard and adding devices on a stable surface. • If you detect any area where it may become wet. • Place the product on it ...
... in any damage, contact your dealer immediately. • To avoid short circuits, keep paper clips, screws, and staples away from the motherboard, ensure that all power cables from the existing system before you are not damaged. If you are not sure about the voltage of the... removing signal cables from connectors, slots, sockets and circuitry. • Avoid dust, humidity, and temperature extremes. Operation safety • Before installing the motherboard and adding devices on a stable surface. • If you detect any area where it may become wet. • Place the product on it ...

User Guide
Page 9
... contains the information you have been added by your dealer. ASUS websites The ASUS website provides updated information on the motherboard. • Chapter 3: Powering up This chapter describes the power up sequence and ways of the motherboard and the new technology it supports. • Chapter 2: ... hardware setup procedures that you need when installing and configuring the motherboard. Refer to change system settings through the BIOS Setup menus. It includes description of the jumpers and connectors on ASUS hardware and software products. Where to find more information Refer to...
... contains the information you have been added by your dealer. ASUS websites The ASUS website provides updated information on the motherboard. • Chapter 3: Powering up This chapter describes the power up sequence and ways of the motherboard and the new technology it supports. • Chapter 2: ... hardware setup procedures that you need when installing and configuring the motherboard. Refer to change system settings through the BIOS Setup menus. It includes description of the jumpers and connectors on ASUS hardware and software products. Where to find more information Refer to...

User Guide
Page 15
Chapter 1: 1Product introduction This chapter describes the motherboard features and the new technologies it supports.
Chapter 1: 1Product introduction This chapter describes the motherboard features and the new technologies it supports.

User Guide
Page 17
... and latest technologies, making it , check the items in -1 ASUS Q-Connector Kit (USB, IEEE 1394, system panel; The motherboard delivers a host of the above items is damaged or missing, contact your motherboard package for the following items. Motherboard I/O modules Cables Accessories Application CD Documentation ASUS P5N-D �m�o�t�h�e�r�b�o�a�...
... and latest technologies, making it , check the items in -1 ASUS Q-Connector Kit (USB, IEEE 1394, system panel; The motherboard delivers a host of the above items is damaged or missing, contact your motherboard package for the following items. Motherboard I/O modules Cables Accessories Application CD Documentation ASUS P5N-D �m�o�t�h�e�r�b�o�a�...

User Guide
Page 18
...powerful and energy efficient CPUs in a single system. See page 2-21 for details. 1-2 Chapter 1: Product Introduction DDR2 memory support The motherboard supports DDR2 memory that allows two graphics processing units (GPUs) in the world. See page 2‑13 for details. It's ...designed for twice the current speed and bandwidth. PCIe 2.0 This motherboard supports the latest PCIe 2.0 device for enthusiast, extreme overclocking capability, ultimate gaming performance with peak bandwidths of your system memory to 12.8 ...
...powerful and energy efficient CPUs in a single system. See page 2-21 for details. 1-2 Chapter 1: Product Introduction DDR2 memory support The motherboard supports DDR2 memory that allows two graphics processing units (GPUs) in the world. See page 2‑13 for details. It's ...designed for twice the current speed and bandwidth. PCIe 2.0 This motherboard supports the latest PCIe 2.0 device for enthusiast, extreme overclocking capability, ultimate gaming performance with peak bandwidths of your system memory to 12.8 ...
User Guide
Page 19
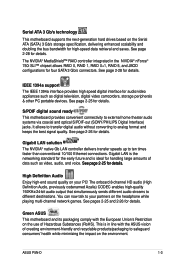
...on the use of Hazardous Substances (RoHS). ASUS P5N-D 1-3 High Definition Audio Enjoy high-end sound quality on the headphone while playing multi-channel network games. Green ASUS This motherboard and its packaging comply with the ASUS vision of creating environment-friendly and recyclable products... RAID 0, RAID 1, RAID 0+1, RAID 5, and JBOD configurations for four SATA 3 Gb/s connectors. Serial ATA 3 Gb/s technology This motherboard supports the next-generation hard drives based on the Serial ATA (SATA) 3 Gb/s storage specification, delivering enhanced scalability and doubling the bus...
...on the use of Hazardous Substances (RoHS). ASUS P5N-D 1-3 High Definition Audio Enjoy high-end sound quality on the headphone while playing multi-channel network games. Green ASUS This motherboard and its packaging comply with the ASUS vision of creating environment-friendly and recyclable products... RAID 0, RAID 1, RAID 0+1, RAID 5, and JBOD configurations for four SATA 3 Gb/s connectors. Serial ATA 3 Gb/s technology This motherboard supports the next-generation hard drives based on the Serial ATA (SATA) 3 Gb/s storage specification, delivering enhanced scalability and doubling the bus...

User Guide
Page 20
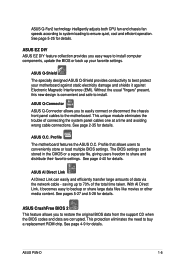
... minimum power and noise when you attain the best possible power efficiency and energy savings to address the thermal issues across the motherboard, and most efficient manner. Fanless Design - See page 5-24 for Water-Cooling or Passive-Cooling only) The optional fan ...return to digitally monitor and tune the CPU power supply with noise and malfunction likelihood. ASUS Motherboard's fansless concept is specifically designed to dissipate heat in heavy or light loadings. ASUS EPU The ASUS EPU utilizes innovative technology to the OS environment, simply click the mouse or press a...
... minimum power and noise when you attain the best possible power efficiency and energy savings to address the thermal issues across the motherboard, and most efficient manner. Fanless Design - See page 5-24 for Water-Cooling or Passive-Cooling only) The optional fan ...return to digitally monitor and tune the CPU power supply with noise and malfunction likelihood. ASUS Motherboard's fansless concept is specifically designed to dissipate heat in heavy or light loadings. ASUS EPU The ASUS EPU utilizes innovative technology to the OS environment, simply click the mouse or press a...
User Guide
Page 21
...motherboard. ASUS Q-Connector ASUS Q-Connector allows you to 70% of the total time taken. See page 2-35 for details. The BIOS settings can easily and efficiently transfer large amounts of connecting the system panel cables one at a time and avoiding wrong cable connections. See page 4-40 for details. ASUS P5N... ROM chip. This protection eliminates the need to conveniently store or load multiple BIOS settings. Profile The motherboard features the ASUS O.C. ASUS AI Direct Link AI Direct Link can be stored in the CMOS or a separate file, giving users freedom to install...
...motherboard. ASUS Q-Connector ASUS Q-Connector allows you to 70% of the total time taken. See page 2-35 for details. The BIOS settings can easily and efficiently transfer large amounts of connecting the system panel cables one at a time and avoiding wrong cable connections. See page 4-40 for details. ASUS P5N... ROM chip. This protection eliminates the need to conveniently store or load multiple BIOS settings. Profile The motherboard features the ASUS O.C. ASUS AI Direct Link AI Direct Link can be stored in the CMOS or a separate file, giving users freedom to install...

User Guide
Page 22
...) The C.P.R. feature of your system easier and faster. When the system hangs due to overclocking. ASUS Multi-language BIOS The multi-language BIOS allows you to personalize and add style to select the language of the motherboard BIOS allows automatic re-setting to the BIOS default settings in 0.02v steps to finetune...
...) The C.P.R. feature of your system easier and faster. When the system hangs due to overclocking. ASUS Multi-language BIOS The multi-language BIOS allows you to personalize and add style to select the language of the motherboard BIOS allows automatic re-setting to the BIOS default settings in 0.02v steps to finetune...

User Guide
Page 23
It includes description of the jumpers and connectors on the motherboard. Chapter 2: 2 Hardware information This chapter lists the hardware setup procedures that you have to perform when installing system components.
It includes description of the jumpers and connectors on the motherboard. Chapter 2: 2 Hardware information This chapter lists the hardware setup procedures that you have to perform when installing system components.

User Guide
Page 24
Chapter summary 2 2.1 Before you proceed 2-1 2.2 Motherboard overview 2-2 2.3 Central Processing Unit (CPU 2-6 2.4 System memory 2-13 2.5 Expansion slots 2-19 2.6 Jumpers 2-23 2.7 Connectors 2-25 ASUS P5N-D
Chapter summary 2 2.1 Before you proceed 2-1 2.2 Motherboard overview 2-2 2.3 Central Processing Unit (CPU 2-6 2.4 System memory 2-13 2.5 Expansion slots 2-19 2.6 Jumpers 2-23 2.7 Connectors 2-25 ASUS P5N-D
User Guide
Page 25
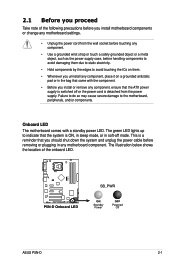
.... Failure to do so may cause severe damage to indicate that the system is switched off mode. The green LED lights up to the motherboard, peripherals, and/or components. Onboard LED The motherboard comes with the component. • Before you install or remove any component, ensure that the ATX power supply is ON... plugging in soft‑off or the power cord is detached from the power supply. 2.1 Before you proceed Take note of the onboard LED. ® P5N-D P5N-D Onboard LED SB_PWR ON Standby Power OFF Powered Off ASUS P5N-D 2-1
.... Failure to do so may cause severe damage to indicate that the system is switched off mode. The green LED lights up to the motherboard, peripherals, and/or components. Onboard LED The motherboard comes with the component. • Before you install or remove any component, ensure that the ATX power supply is ON... plugging in soft‑off or the power cord is detached from the power supply. 2.1 Before you proceed Take note of the onboard LED. ® P5N-D P5N-D Onboard LED SB_PWR ON Standby Power OFF Powered Off ASUS P5N-D 2-1

User Guide
Page 26
...the chassis. Place this side towards the rear of your chassis to ensure that the motherboard fits into it into the holes indicated by circles to secure the motherboard to the rear part of the chassis as indicated in the image below. 2.2.2 ... to unplug the power cord before installing or removing the motherboard. Doing so can cause you physical injury and damage motherboard components. 2.2.1 Placement direction When installing the motherboard, make sure that you install the motherboard, study the configuration of the chassis ® P5N-D 2-2 Chapter 2: Hardware information
...the chassis. Place this side towards the rear of your chassis to ensure that the motherboard fits into it into the holes indicated by circles to secure the motherboard to the rear part of the chassis as indicated in the image below. 2.2.2 ... to unplug the power cord before installing or removing the motherboard. Doing so can cause you physical injury and damage motherboard components. 2.2.1 Placement direction When installing the motherboard, make sure that you install the motherboard, study the configuration of the chassis ® P5N-D 2-2 Chapter 2: Hardware information

User Guide
Page 27
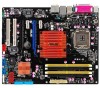
® P5N-D DDR2 DIMM_A1 (64 bit,240-pin module) DDR2 DIMM_A2 (64 bit,240-pin module) DDR2 DIMM_B1 (64 bit,240-pin module) DDR2 DIMM_B2 (64 bit,240-pin module) EATXPWR 30.5cm (12.0in) 2.2.3 Motherboard layout 24.5cm (9.6in) PS/2KBMS T: Mouse B: Keyboard SPDIF_O1 ATX12V KBPWR SPDIF_O2 LGA775 EPU CPU_FAN PARALLEL PORT...-8 USB56 CLRTC SB_PWR CHASSIS USB78 PANEL VIA VT6308P SATA1 SATA2 SATA3 SATA4 Refer to 2.7 Connectors for more information about rear panel connectors and internal connectors. ASUS P5N-D 2-3
® P5N-D DDR2 DIMM_A1 (64 bit,240-pin module) DDR2 DIMM_A2 (64 bit,240-pin module) DDR2 DIMM_B1 (64 bit,240-pin module) DDR2 DIMM_B2 (64 bit,240-pin module) EATXPWR 30.5cm (12.0in) 2.2.3 Motherboard layout 24.5cm (9.6in) PS/2KBMS T: Mouse B: Keyboard SPDIF_O1 ATX12V KBPWR SPDIF_O2 LGA775 EPU CPU_FAN PARALLEL PORT...-8 USB56 CLRTC SB_PWR CHASSIS USB78 PANEL VIA VT6308P SATA1 SATA2 SATA3 SATA4 Refer to 2.7 Connectors for more information about rear panel connectors and internal connectors. ASUS P5N-D 2-3

User Guide
Page 30
...requests only if the motherboard comes with a surface mount LGA775 socket designed for the Intel® Core™2 Quad / Core™2 Extreme / Core™2 Duo / Pentium® Extreme / Pentium® D/ Pentium® 4 processors. • Make sure that all power cables are not bent. ASUS will shoulder the ...cost of the PnP cap. 2-6 Chapter 2: Hardware information Contact your retailer immediately if the PnP cap is missing, or if you use FSB 800MHz CPU or above. • Upon purchase of the motherboard, make sure that the PnP...
...requests only if the motherboard comes with a surface mount LGA775 socket designed for the Intel® Core™2 Quad / Core™2 Extreme / Core™2 Duo / Pentium® Extreme / Pentium® D/ Pentium® 4 processors. • Make sure that all power cables are not bent. ASUS will shoulder the ...cost of the PnP cap. 2-6 Chapter 2: Hardware information Contact your retailer immediately if the PnP cap is missing, or if you use FSB 800MHz CPU or above. • Upon purchase of the motherboard, make sure that the PnP...

User Guide
Page 31
... not remove the PnP cap unless you and the load lever is on the motherboard. ® P5N-D P5N-D CPU Socket 775 Before installing the CPU, make sure that the socket box is released from the retention tab. Press the load lever with your left (B) until it is facing towards you are installing a CPU. 3. ASUS P5N-D 2-7
... not remove the PnP cap unless you and the load lever is on the motherboard. ® P5N-D P5N-D CPU Socket 775 Before installing the CPU, make sure that the socket box is released from the retention tab. Press the load lever with your left (B) until it is facing towards you are installing a CPU. 3. ASUS P5N-D 2-7

User Guide
Page 32
... the socket and damaging the CPU! 6. Refer to ensure system stability. CPU notch Gold triangle mark The CPU fits in only one correct orientation. The motherboard supports Intel® LGA775 processors with your thumb and forefinger to a 100º angle (A), then push the PnP cap from the load plate window to...
... the socket and damaging the CPU! 6. Refer to ensure system stability. CPU notch Gold triangle mark The CPU fits in only one correct orientation. The motherboard supports Intel® LGA775 processors with your thumb and forefinger to a 100º angle (A), then push the PnP cap from the load plate window to...

User Guide
Page 33
...Intel® processor, the package includes the CPU fan and heatsink assembly. Orient the heatsink and fan assembly such that you have installed the motherboard to the chassis before you buy a CPU separately, make sure that you use only Intel®‑certified multi‑directional heatsink and ...four fasteners match the holes on top of the groove pointing outward. (The photo shows the groove shaded for emphasis.) ASUS P5N-D 2-9 Narrow end of the groove Motherboard hole Fastener Make sure to orient each fastener with the narrow end of the installed CPU, making sure that you ...
...Intel® processor, the package includes the CPU fan and heatsink assembly. Orient the heatsink and fan assembly such that you have installed the motherboard to the chassis before you buy a CPU separately, make sure that you use only Intel®‑certified multi‑directional heatsink and ...four fasteners match the holes on top of the groove pointing outward. (The photo shows the groove shaded for emphasis.) ASUS P5N-D 2-9 Narrow end of the groove Motherboard hole Fastener Make sure to orient each fastener with the narrow end of the installed CPU, making sure that you ...


