
User Guide
Page 5
... HDD SMART Monitoring [Disabled 4-18 4.3.8 Installed Memory [xxx MB 4-18 4.3.9 Usable Memory [XXX MB 4-18 4.4 Advanced menu 4-19 4.4.1 JumperFree Configuration 4-19 Voltage Control 4-20 4.4.2 AI NET2 4-22 4.4.3 CPU Configuration 4-23 4.4.4 Chipset 4-24 4.4.5 PCIPnP 4-26 4.4.6 Onboard Device Configuration 4-27 4.4.7 USB Configuration 4-29 4.5 Power menu 4-30 4.5.1 ACPI Suspend Type [S1&S3 4-30 4.5.2 ACPI APIC Support [Enabled 4-30 4.5.3 APM Configuration 4-31 4.5.4 Hardware Monitor 4-33 4.6 Boot menu 4-35 4.6.1 Boot Device Priority 4-35 4.6.2 Removable Drives 4-35 4.6.3 Hard...
... HDD SMART Monitoring [Disabled 4-18 4.3.8 Installed Memory [xxx MB 4-18 4.3.9 Usable Memory [XXX MB 4-18 4.4 Advanced menu 4-19 4.4.1 JumperFree Configuration 4-19 Voltage Control 4-20 4.4.2 AI NET2 4-22 4.4.3 CPU Configuration 4-23 4.4.4 Chipset 4-24 4.4.5 PCIPnP 4-26 4.4.6 Onboard Device Configuration 4-27 4.4.7 USB Configuration 4-29 4.5 Power menu 4-30 4.5.1 ACPI Suspend Type [S1&S3 4-30 4.5.2 ACPI APIC Support [Enabled 4-30 4.5.3 APM Configuration 4-31 4.5.4 Hardware Monitor 4-33 4.6 Boot menu 4-35 4.6.1 Boot Device Priority 4-35 4.6.2 Removable Drives 4-35 4.6.3 Hard...
User Guide
Page 6
... card setup 6-2 6.2.1 Installing SLI-ready graphics cards 6-2 6.2.2 Installing the device drivers 6-5 6.2.3 Enabling the multi-GPU feature in Windows 6-5 Appendix: CPU features1 A.1 Intel® EM64T A-1 A.2 Enhanced Intel SpeedStep® Technology (EIST A-1 A.2.1 System requirements A-1 A.2.2 Using the EIST A-2 A.3 Intel® Hyper-Threading Technology A-3 vi 5.2.3 Utilities menu 5-3 5.2.4 Make disk menu 5-5 5.2.5 Manual menu 5-6 5.2.6 ASUS Contact information 5-6 5.2.7 Other information 5-7 5.3 Software information 5-9 5.3.1 ASUS MyLogo2 5-9 5.3.2 Audio configurations...
... card setup 6-2 6.2.1 Installing SLI-ready graphics cards 6-2 6.2.2 Installing the device drivers 6-5 6.2.3 Enabling the multi-GPU feature in Windows 6-5 Appendix: CPU features1 A.1 Intel® EM64T A-1 A.2 Enhanced Intel SpeedStep® Technology (EIST A-1 A.2.1 System requirements A-1 A.2.2 Using the EIST A-2 A.3 Intel® Hyper-Threading Technology A-3 vi 5.2.3 Utilities menu 5-3 5.2.4 Make disk menu 5-5 5.2.5 Manual menu 5-6 5.2.6 ASUS Contact information 5-6 5.2.7 Other information 5-7 5.3 Software information 5-9 5.3.1 ASUS MyLogo2 5-9 5.3.2 Audio configurations...
User Guide
Page 43
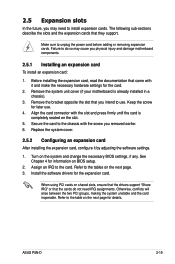
... and the card inoperable. ASUS P5N-D 2-19 Keep the screw for information on the slot. 5. Install the software drivers for the card. 2. When using PCI cards on the system and change the necessary BIOS settings, if any. Before installing the expansion card, read the documentation that you intend to unplug the power cord before adding or removing expansion cards. Replace the system cover. 2.5.2 Configuring an expansion card After installing the expansion card, configure it and...
... and the card inoperable. ASUS P5N-D 2-19 Keep the screw for information on the slot. 5. Install the software drivers for the card. 2. When using PCI cards on the system and change the necessary BIOS settings, if any. Before installing the expansion card, read the documentation that you intend to unplug the power cord before adding or removing expansion cards. Replace the system cover. 2.5.2 Configuring an expansion card After installing the expansion card, configure it and...

User Guide
Page 51
...the floppy disk drive. IDE connector (40-1 pin PRI_EIDE) The onboard IDE connector is removed to PIN 1. ® P5N-D P5N-D IDE connector Drive jumper setting Single device Cable-Select or Master Two devices Cable-Select Master Slave Mode of device(s) - There are three connectors on the IDE ribbon cable to prevent incorrect cable connection when using a FDD cable with a covered Pin 5. ® P5N-D FLOPPY PIN 1 NOTE: Orient the red markings on the connector is for the provided floppy disk drive (FDD) signal cable. Floppy disk drive connector (34-1 pin FLOPPY) This connector is...
...the floppy disk drive. IDE connector (40-1 pin PRI_EIDE) The onboard IDE connector is removed to PIN 1. ® P5N-D P5N-D IDE connector Drive jumper setting Single device Cable-Select or Master Two devices Cable-Select Master Slave Mode of device(s) - There are three connectors on the IDE ribbon cable to prevent incorrect cable connection when using a FDD cable with a covered Pin 5. ® P5N-D FLOPPY PIN 1 NOTE: Orient the red markings on the connector is for the provided floppy disk drive (FDD) signal cable. Floppy disk drive connector (34-1 pin FLOPPY) This connector is...

User Guide
Page 52
...), Power Management (PM) Implementation Algorithm, Hot Swap and smart setup. 2-28 Chapter 2: Hardware information Serial ATA connectors (7-pin SATA1-4) These connectors are for the Serial ATA signal cables for Ultra DMA 133/100/66 IDE devices. This prevents incorrect insertion when you connect the IDE cable. • Use the 80-conductor IDE cable for Serial ATA hard disk drives. If you installed Serial ATA hard disk drives, you intend to create a Serial ATA RAID set using these connectors is removed to [Disabled] by default...
...), Power Management (PM) Implementation Algorithm, Hot Swap and smart setup. 2-28 Chapter 2: Hardware information Serial ATA connectors (7-pin SATA1-4) These connectors are for the Serial ATA signal cables for Ultra DMA 133/100/66 IDE devices. This prevents incorrect insertion when you connect the IDE cable. • Use the 80-conductor IDE cable for Serial ATA hard disk drives. If you installed Serial ATA hard disk drives, you intend to create a Serial ATA RAID set using these connectors is removed to [Disabled] by default...

User Guide
Page 53
... connect a 1394 cable to the USB connectors. Doing so will damage the motherboard! ASUS P5N-D 2-29 These USB connectors comply with huge graphics cards. You can connect the USB cable to ASUS Q-Connector (USB, blue) first, and then install the Q-Connector (USB) to the USB connector onboard. Connect the right-angle side of SATA signal cable to the SATA device, or connect the right‑angle side of the system chassis. Right-angle side 4. USB connectors (10-1 pin USB56, USB78) These connectors are for USB 2.0 ports...
... connect a 1394 cable to the USB connectors. Doing so will damage the motherboard! ASUS P5N-D 2-29 These USB connectors comply with huge graphics cards. You can connect the USB cable to ASUS Q-Connector (USB, blue) first, and then install the Q-Connector (USB) to the USB connector onboard. Connect the right-angle side of SATA signal cable to the SATA device, or connect the right‑angle side of the system chassis. Right-angle side 4. USB connectors (10-1 pin USB56, USB78) These connectors are for USB 2.0 ports...
User Guide
Page 67
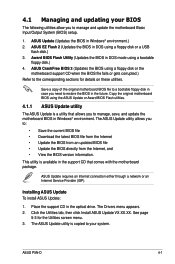
... BIOS in Windows® environment. See page 5-3 for details on these utilities. ASUS Update (Updates the BIOS in the optical drive. Save a copy of the original motherboard BIOS file to a bootable floppy disk in the support CD that allows you to the corresponding sections for the Utilities screen menu. 3. ASUS Update requires an Internet connection either through a network or an Internet Service Provider (ISP). Installing ASUS Update To install ASUS Update: 1. ASUS CrashFree BIOS 2 (Updates the BIOS using a bootable floppy disk.) 4. This utility is available in case...
... BIOS in Windows® environment. See page 5-3 for details on these utilities. ASUS Update (Updates the BIOS in the optical drive. Save a copy of the original motherboard BIOS file to a bootable floppy disk in the support CD that allows you to the corresponding sections for the Utilities screen menu. 3. ASUS Update requires an Internet connection either through a network or an Internet Service Provider (ISP). Installing ASUS Update To install ASUS Update: 1. ASUS CrashFree BIOS 2 (Updates the BIOS using a bootable floppy disk.) 4. This utility is available in case...

User Guide
Page 79
...] HDD SMART Monitoring [Disabled] Select Menu Item Specific Help Specifies the capacity and physical size of the selected item. ASUS P5N-D 4-13 Installed Memory 512MB Usable Memory ↑↓ :Mov5e12MENBTER:Accept ESC:Abort F1:Help ESC: Exit ↑↓ : Select Item -/+: Change Value →←: Select Menu Enter: Select SubMenu F5: Setup Defaults F10: Save and Exit Pop-up window with the configuration options for that item. 4.2.7 Pop-up window Select a menu...
...] HDD SMART Monitoring [Disabled] Select Menu Item Specific Help Specifies the capacity and physical size of the selected item. ASUS P5N-D 4-13 Installed Memory 512MB Usable Memory ↑↓ :Mov5e12MENBTER:Accept ESC:Abort F1:Help ESC: Exit ↑↓ : Select Item -/+: Change Value →←: Select Menu Enter: Select SubMenu F5: Setup Defaults F10: Save and Exit Pop-up window with the configuration options for that item. 4.2.7 Pop-up window Select a menu...

User Guide
Page 81
... sub-menu. Main Phoenix-Award BIOS CMOS Setup Utility Primary IDE Master Select Menu PIO Mode UDMA Mode Primary IDE Master Access Mode Capacity [Auto] [Auto] [Auto] [Auto] 82 GB Item Specific Help Set a PIO mode for the IDE device. Configuration options: [Disable] [Auto] Primary IDE Master/Slave [Auto] Select [Auto] to display the IDE device information. Configuration options: [None] [Auto] [Manual] ASUS P5N-D 4-15 Cylinder Head Sector Transfer Mode 39420 16 255 UDMA 5 F1:Help ESC: Exit ↑↓ : Select Item -/+: Change Value →←: Select Menu Enter: Select...
... sub-menu. Main Phoenix-Award BIOS CMOS Setup Utility Primary IDE Master Select Menu PIO Mode UDMA Mode Primary IDE Master Access Mode Capacity [Auto] [Auto] [Auto] [Auto] 82 GB Item Specific Help Set a PIO mode for the IDE device. Configuration options: [Disable] [Auto] Primary IDE Master/Slave [Auto] Select [Auto] to display the IDE device information. Configuration options: [None] [Auto] [Manual] ASUS P5N-D 4-15 Cylinder Head Sector Transfer Mode 39420 16 255 UDMA 5 F1:Help ESC: Exit ↑↓ : Select Item -/+: Change Value →←: Select Menu Enter: Select...

User Guide
Page 83
Main Phoenix-Award BIOS CMOS Setup Utility SATA 1 Extended IDE Drive Access Mode [Auto] [Auto] Capacity 80 GB Cylinder 0 Head 0 Landing Zone 0 Sector 0 Select Menu Item Specific Help Selects the type of Serial ATA devices. Incorrect settings may cause the system to fail to configure a hard disk drive, make sure you have the correct configuration information supplied by the drive manufacturer. This item is not configurable. 4.3.6 SATA1/2/3/4 While entering Setup, the BIOS automatically detects the presence of fixed disk connected to the system...
Main Phoenix-Award BIOS CMOS Setup Utility SATA 1 Extended IDE Drive Access Mode [Auto] [Auto] Capacity 80 GB Cylinder 0 Head 0 Landing Zone 0 Sector 0 Select Menu Item Specific Help Selects the type of Serial ATA devices. Incorrect settings may cause the system to fail to configure a hard disk drive, make sure you have the correct configuration information supplied by the drive manufacturer. This item is not configurable. 4.3.6 SATA1/2/3/4 While entering Setup, the BIOS automatically detects the presence of fixed disk connected to the system...

User Guide
Page 93
... 0/1 controller . Configuration options: [Disabled] [Enabled] SATA Port 1, 2 [Enabled] Allows you to edit. 4.4.6 Onboard Device Configuration Advanced Phoenix-Award BIOS CMOS Setup Utility Onboard Device Configuration IDE Function Setup NVRAID Configuration �H�D �Au�d� io E�na�bl�ed�] Front Panel Support Type [HD Audio] Onboard nVidia LAN [Enabled] Onboard LAN Boot ROM [Disabled] �O�n�bo�a�rd��13�94 E�n�ab�l�ed�] Serial Port1...
... 0/1 controller . Configuration options: [Disabled] [Enabled] SATA Port 1, 2 [Enabled] Allows you to edit. 4.4.6 Onboard Device Configuration Advanced Phoenix-Award BIOS CMOS Setup Utility Onboard Device Configuration IDE Function Setup NVRAID Configuration �H�D �Au�d� io E�na�bl�ed�] Front Panel Support Type [HD Audio] Onboard nVidia LAN [Enabled] Onboard LAN Boot ROM [Disabled] �O�n�bo�a�rd��13�94 E�n�ab�l�ed�] Serial Port1...

User Guide
Page 94
... CMOS Setup Utility Serial-ATA Configuration Select Menu RAID Enabled [Disabled] x SATA1 RAID Disabled x SATA2 RAID Disabled x SATA3 RAID Disabled x SATA4 RAID Disabled Item Specific Help Disable/Enable nVIDIA RAID feature. Configuration options: [AC97] [HD Audio] Onboard nVidia LAN [Enabled] Enables or disables the onboard NVIDIA® LAN controller. Configuration options: [Disabled] [Enabled] SATA1/2/3/4 RAID [Disabled] Enables or disables the RAID function of the first to fourth SATA master drive. Configuration options: [Disabled] [Enabled] IDE Prefetch Mode...
... CMOS Setup Utility Serial-ATA Configuration Select Menu RAID Enabled [Disabled] x SATA1 RAID Disabled x SATA2 RAID Disabled x SATA3 RAID Disabled x SATA4 RAID Disabled Item Specific Help Disable/Enable nVIDIA RAID feature. Configuration options: [AC97] [HD Audio] Onboard nVidia LAN [Enabled] Enables or disables the onboard NVIDIA® LAN controller. Configuration options: [Disabled] [Enabled] SATA1/2/3/4 RAID [Disabled] Enables or disables the RAID function of the first to fourth SATA master drive. Configuration options: [Disabled] [Enabled] IDE Prefetch Mode...

User Guide
Page 96
Phoenix-AwardBIOS CMOS Setup Utility Main Advanced Power Boot Tools Exit ACPI Suspend Type ACPI APIC support APM Configuration Hardware Monitor [S1&S3] Enabled Select Menu Item Specific Help Select the ACPI state used for system suspend. F1:Help Select Item ESC: Exit →←: Select Menu -/+: Change Value Enter: Select SubMenu F5: Setup Defaults F10: Save and Exit 4.5.1 ACPI Suspend Type [S1&S3] Allows you to select the Advanced Configuration and Power Interface (ACPI) state to be...
Phoenix-AwardBIOS CMOS Setup Utility Main Advanced Power Boot Tools Exit ACPI Suspend Type ACPI APIC support APM Configuration Hardware Monitor [S1&S3] Enabled Select Menu Item Specific Help Select the ACPI state used for system suspend. F1:Help Select Item ESC: Exit →←: Select Menu -/+: Change Value Enter: Select SubMenu F5: Setup Defaults F10: Save and Exit 4.5.1 ACPI Suspend Type [S1&S3] Allows you to select the Advanced Configuration and Power Interface (ACPI) state to be...

User Guide
Page 97
... by PCI/PCIE devices and the NVIDIA® onboard LAN. Configuration options: [Suspend] [Instant-Off] Power Up On PCI/PCIE Devices [Disabled] Allows you to enable or disable the Restore on the first try. Turning an external modem off and then back on while the computer is set to wake up the computer when the external modem receives a call while the computer is in Soft-off mode. Configuration options: [Disabled] [Enabled] ASUS P5N-D 4-31 Power...
... by PCI/PCIE devices and the NVIDIA® onboard LAN. Configuration options: [Suspend] [Instant-Off] Power Up On PCI/PCIE Devices [Disabled] Allows you to enable or disable the Restore on the first try. Turning an external modem off and then back on while the computer is set to wake up the computer when the external modem receives a call while the computer is in Soft-off mode. Configuration options: [Disabled] [Enabled] ASUS P5N-D 4-31 Power...

User Guide
Page 99
...performance level of the CPU Q-Fan. Phoenix-Award BIOS CMOS Setup Utility Power Hardware Monitor Select Menu CPU Q-Fan Control [Disabled] x CPU Q-Fan Profile Performance Chassis Q-Fan Control [Disabled] x Chassis Q-Fan Profile Performance Vcore Voltage [ 1.34V] 3.3V Voltage [ 3.20V] 5V Voltage [ 4.83V] 12V Voltage [11.52V] Item Specific Help Press [Enter] to enable or disable CPU Temperature 48ºC M/B Temperature 36ºC CPU Fan Speed 2667 RPM CHA_FAN1 Speed 0 RPM CHA_FAN2 Speed 0 RPM PWR_FAN Speed 0 RPM CPU Fan Speed Warning [600 RPM] F1...
...performance level of the CPU Q-Fan. Phoenix-Award BIOS CMOS Setup Utility Power Hardware Monitor Select Menu CPU Q-Fan Control [Disabled] x CPU Q-Fan Profile Performance Chassis Q-Fan Control [Disabled] x Chassis Q-Fan Profile Performance Vcore Voltage [ 1.34V] 3.3V Voltage [ 3.20V] 5V Voltage [ 4.83V] 12V Voltage [11.52V] Item Specific Help Press [Enter] to enable or disable CPU Temperature 48ºC M/B Temperature 36ºC CPU Fan Speed 2667 RPM CHA_FAN1 Speed 0 RPM CHA_FAN2 Speed 0 RPM PWR_FAN Speed 0 RPM CPU Fan Speed Warning [600 RPM] F1...

User Guide
Page 101
... screen depends on the number of devices installed in the system. ASUS P5N-D 4-35 4.6 Boot menu The Boot menu items allow you to assign a removable drive attached to the system. Floppy Disks Select Menu Item Specific Help 1. Configuration options: [Removable] [Hard Disk] [CDROM] [Disabled] 4.6.2 Removable Drives Phoenix-Award BIOS CMOS Setup Utility Boot Removable Drives 1. Floppy Disks Allows you to display the sub-menu. Phoenix-Award BIOS CMOS Setup Utility Main Advanced Power Boot Tools Exit Boot Device Priority Removable Drives Hard Disk Drives CDROM Drives Boot...
... screen depends on the number of devices installed in the system. ASUS P5N-D 4-35 4.6 Boot menu The Boot menu items allow you to assign a removable drive attached to the system. Floppy Disks Select Menu Item Specific Help 1. Configuration options: [Removable] [Hard Disk] [CDROM] [Disabled] 4.6.2 Removable Drives Phoenix-Award BIOS CMOS Setup Utility Boot Removable Drives 1. Floppy Disks Allows you to display the sub-menu. Phoenix-Award BIOS CMOS Setup Utility Main Advanced Power Boot Tools Exit Boot Device Priority Removable Drives Hard Disk Drives CDROM Drives Boot...
User Guide
Page 109
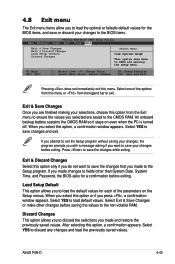
...; : Select Item -/+: Change Value →←: Select Menu Enter: Select SubMenu F5: Setup Defaults F10: Save and Exit Pressing does not immediately exit this option, a confirmation appears. If you attempt to exit the Setup program without saving your changes to the BIOS items. Phoenix-AwardBIOS CMOS Setup Utility Main Advanced Power Boot Tools Exit Exit & Save Changes Exit & Discard Changes Load Setup Default Discard Changes Select Menu Item Specific Help This option save or...
...; : Select Item -/+: Change Value →←: Select Menu Enter: Select SubMenu F5: Setup Defaults F10: Save and Exit Pressing does not immediately exit this option, a confirmation appears. If you attempt to exit the Setup program without saving your changes to the BIOS items. Phoenix-AwardBIOS CMOS Setup Utility Main Advanced Power Boot Tools Exit Exit & Save Changes Exit & Discard Changes Load Setup Default Discard Changes Select Menu Item Specific Help This option save or...
User Guide
Page 142
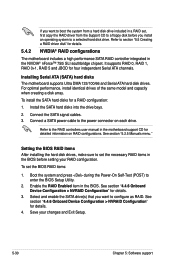
Connect a SATA power cable to enter the BIOS Setup Utility. 2. See section "4.4.6 Onboard Device Configuration > NVRAID Configuration" for a RAID configuration: 1. To install the SATA hard disks for details. 3. To set , first copy the RAID driver from a hard disk drive included in a RAID set the BIOS RAID items: 1. Select and enable the SATA drive(s) that you want to boot the system from the Support CD to a floppy disk before setting your changes and Exit Setup. 5-30 Chapter 5: Software support It supports RAID 0, RAID 1, RAID 0+1, RAID 5 and JBOD for detailed ...
Connect a SATA power cable to enter the BIOS Setup Utility. 2. See section "4.4.6 Onboard Device Configuration > NVRAID Configuration" for a RAID configuration: 1. To install the SATA hard disks for details. 3. To set , first copy the RAID driver from a hard disk drive included in a RAID set the BIOS RAID items: 1. Select and enable the SATA drive(s) that you want to boot the system from the Support CD to a floppy disk before setting your changes and Exit Setup. 5-30 Chapter 5: Software support It supports RAID 0, RAID 1, RAID 0+1, RAID 5 and JBOD for detailed ...
User Guide
Page 149
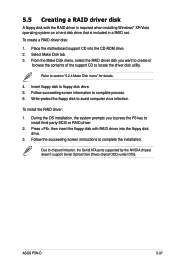
.... 4. ASUS P5N-D 5-37 From the Make Disk menu, select the RAID driver disk you to press the F6 key to locate the driver disk utility. During the OS installation, the system prompts you want to create or browse the contents of the support CD to install third-party SCSI or RAID driver. 2. To install the RAID driver: 1. Refer to floppy disk drive. 5. Follow succeeding screen information to chipset limitation, the Serial ATA ports supported by the NVIDIA chipset doesn't support Serial...
.... 4. ASUS P5N-D 5-37 From the Make Disk menu, select the RAID driver disk you to press the F6 key to locate the driver disk utility. During the OS installation, the system prompts you want to create or browse the contents of the support CD to install third-party SCSI or RAID driver. 2. To install the RAID driver: 1. Refer to floppy disk drive. 5. Follow succeeding screen information to chipset limitation, the Serial ATA ports supported by the NVIDIA chipset doesn't support Serial...

User Guide
Page 157
... Settings icon on your graphics card package to install the device drivers. ASUS P5N-D 6-5 From the pop-up menu, select nView Desktop Manager then click nView Properties. Download the latest driver from the NVIDIA website (www.nvidia. 6.2.2 Installing the device drivers Refer to the documentation that your graphics cards and the device drivers, enable the Multi‑Graphics Processing Unit (GPU) feature in Windows® After installing your PCI Express graphics card driver supports the NVIDIA SLI technology. Click Properties to display...
... Settings icon on your graphics card package to install the device drivers. ASUS P5N-D 6-5 From the pop-up menu, select nView Desktop Manager then click nView Properties. Download the latest driver from the NVIDIA website (www.nvidia. 6.2.2 Installing the device drivers Refer to the documentation that your graphics cards and the device drivers, enable the Multi‑Graphics Processing Unit (GPU) feature in Windows® After installing your PCI Express graphics card driver supports the NVIDIA SLI technology. Click Properties to display...


