N4L-VM DH User's Manual English Edition
Page 5
... 4-34 4.6.1 Boot Device Priority 4-34 4.6.2 Boot Settings Configuration 4-35 4.6.3 Security 4-36 4.7 Exit menu 4-38 Chapter 5: Software support 5.1 Installing an operating system 5-1 5.2 Support CD information 5-1 5.2.1 Running the support CD 5-1 5.2.2 Drivers menu 5-2 5.2.3 Utilities menu 5-4 5.2.4 Make Disk menu 5-5 5.2.5 Manuals menu 5-6 5.2.6 ASUS Contact information 5-6 5.2.7 Other information 5-7 5.3 Software information 5-9 5.3.1 ASUS MyLogo 5-9 5.3.2 Audio configurations 5-11 5.3.3 ASUS PC Probe II 5-18 5.3.4 Intel...
... 4-34 4.6.1 Boot Device Priority 4-34 4.6.2 Boot Settings Configuration 4-35 4.6.3 Security 4-36 4.7 Exit menu 4-38 Chapter 5: Software support 5.1 Installing an operating system 5-1 5.2 Support CD information 5-1 5.2.1 Running the support CD 5-1 5.2.2 Drivers menu 5-2 5.2.3 Utilities menu 5-4 5.2.4 Make Disk menu 5-5 5.2.5 Manuals menu 5-6 5.2.6 ASUS Contact information 5-6 5.2.7 Other information 5-7 5.3 Software information 5-9 5.3.1 ASUS MyLogo 5-9 5.3.2 Audio configurations 5-11 5.3.3 ASUS PC Probe II 5-18 5.3.4 Intel...
N4L-VM DH User's Manual English Edition
Page 19
...features, including Native Command Queuing (NCQ), Power Management (PM) Implementation Algorithm, and Hot Swap. See page 4-32 for details. ASUS MyLogo™ This feature allows you to personalize and add style to 16 devices with lower pin count and reduced voltage requirements. The...3 Gb/s technology through the JMicron Serial ATA interfaces. feature of the current Serial ATA products with customizable boot logos. When the system hangs due to overclocking. ASUS N4L-VM DH 1-5 See page 5-9 for each parameter. Simply shut down and reboot the system, and the BIOS automatically...
...features, including Native Command Queuing (NCQ), Power Management (PM) Implementation Algorithm, and Hot Swap. See page 4-32 for details. ASUS MyLogo™ This feature allows you to personalize and add style to 16 devices with lower pin count and reduced voltage requirements. The...3 Gb/s technology through the JMicron Serial ATA interfaces. feature of the current Serial ATA products with customizable boot logos. When the system hangs due to overclocking. ASUS N4L-VM DH 1-5 See page 5-9 for each parameter. Simply shut down and reboot the system, and the BIOS automatically...

N4L-VM DH User's Manual English Edition
Page 43
...can automatically reset parameter settings to default values. Remove the onboard battery. 3. Plug the power cord and turn ON the computer. 6. N4L-VM DH ® N4L-VM DH Clear RTC RAM CLRTC 12 23 Normal (Default) Clear CMOS • Make sure to re-enter your previous BIOS settings after you ... Recall) feature. The onboard button cell battery powers the RAM data in CMOS. Reinstall the battery. 5. Removing the cap will cause system boot failure! ASUS N4L-VM DH 2-21 Clear RTC RAM (CLRTC) This jumper allows you clear the CMOS. • You do not need to clear the RTC when ...
...can automatically reset parameter settings to default values. Remove the onboard battery. 3. Plug the power cord and turn ON the computer. 6. N4L-VM DH ® N4L-VM DH Clear RTC RAM CLRTC 12 23 Normal (Default) Clear CMOS • Make sure to re-enter your previous BIOS settings after you ... Recall) feature. The onboard button cell battery powers the RAM data in CMOS. Reinstall the battery. 5. Removing the cap will cause system boot failure! ASUS N4L-VM DH 2-21 Clear RTC RAM (CLRTC) This jumper allows you clear the CMOS. • You do not need to clear the RTC when ...

N4L-VM DH User's Manual English Edition
Page 55
EATXPWR ATX12V +3 Volts +12 Volts +12V DC GND +12 Volts +5V Standby Power OK N4L-VM DH Ground +12V DC GND +5 Volts Ground ® +5 Volts Ground N4L-VM DH ATX power connectors +3 Volts +3 Volts Ground +5 Volts +5 Volts +5 Volts -5 Volts Ground Ground Ground PSON# Ground -12 Volts +3 ...fit these connectors in only one orientation. otherwise, the system will not boot. • Use of a PSU with a higher power output is inadequate. • Visit www.asus.com for ATX power supply plugs. ASUS N4L-VM DH 2-33 The power supply plugs are for the latest power requirements table...
EATXPWR ATX12V +3 Volts +12 Volts +12V DC GND +12 Volts +5V Standby Power OK N4L-VM DH Ground +12V DC GND +5 Volts Ground ® +5 Volts Ground N4L-VM DH ATX power connectors +3 Volts +3 Volts Ground +5 Volts +5 Volts +5 Volts -5 Volts Ground Ground Ground PSON# Ground -12 Volts +3 ...fit these connectors in only one orientation. otherwise, the system will not boot. • Use of a PSU with a higher power output is inadequate. • Visit www.asus.com for ATX power supply plugs. ASUS N4L-VM DH 2-33 The power supply plugs are for the latest power requirements table...

N4L-VM DH User's Manual English Edition
Page 64
Chapter summary 4 4.1 Managing and updating your BIOS 4-1 4.2 BIOS setup program 4-11 4.3 Main menu 4-14 4.4 Advanced menu 4-18 4.5 Power menu 4-29 4.6 Boot menu 4-34 4.7 Exit menu 4-38 ASUS N4L-VM DH
Chapter summary 4 4.1 Managing and updating your BIOS 4-1 4.2 BIOS setup program 4-11 4.3 Main menu 4-14 4.4 Advanced menu 4-18 4.5 Power menu 4-29 4.6 Boot menu 4-34 4.7 Exit menu 4-38 ASUS N4L-VM DH
N4L-VM DH User's Manual English Edition
Page 68
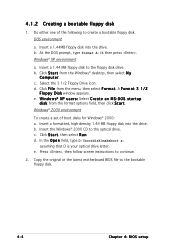
... disk to create a bootable floppy disk. Windows® 2000 environment To create a set of the following to the floppy disk drive. Do either one of boot disks for Windows® 2000: a. b. DOS environment a. Insert a 1.44MB floppy disk into the drive. b. Click F i l e from the menu, then select F o r m a t. Insert the Windows® 2000...
... disk to create a bootable floppy disk. Windows® 2000 environment To create a set of the following to the floppy disk drive. Do either one of boot disks for Windows® 2000: a. b. DOS environment a. Insert a 1.44MB floppy disk into the drive. b. Click F i l e from the menu, then select F o r m a t. Insert the Windows® 2000...

N4L-VM DH User's Manual English Edition
Page 69
...! • A "Floppy not found ! Make sure that contains the BIOS file to go through the long process of booting from a floppy disk and using EZ Flash: 1. ASUS N4L-VM DH 4-5 Save the BIOS file to N 4 L - Checking for floppy... Insert the floppy disk that you to update the BIOS without having to the floppy disk drive...
...! • A "Floppy not found ! Make sure that contains the BIOS file to go through the long process of booting from a floppy disk and using EZ Flash: 1. ASUS N4L-VM DH 4-5 Save the BIOS file to N 4 L - Checking for floppy... Insert the floppy disk that you to update the BIOS without having to the floppy disk drive...
N4L-VM DH User's Manual English Edition
Page 70
...] is any user-assigned filename not more than eight alphanumeric characters for the main filename and three alphanumeric characters for reference only. Version 1.19(ASUS V2.07(03.11.24BB)) Copyright (C) 2002 American Megatrends, Inc. Reading flash ..... The actual BIOS screen displays may not be same as ...backup when the BIOS fails or gets corrupted during the updating process. Boot the system in DOS environment using a bootable floppy disk with the updated BIOS file. This utility also allows you to save the file. &#...
...] is any user-assigned filename not more than eight alphanumeric characters for the main filename and three alphanumeric characters for reference only. Version 1.19(ASUS V2.07(03.11.24BB)) Copyright (C) 2002 American Megatrends, Inc. Reading flash ..... The actual BIOS screen displays may not be same as ...backup when the BIOS fails or gets corrupted during the updating process. Boot the system in DOS environment using a bootable floppy disk with the updated BIOS file. This utility also allows you to save the file. &#...
N4L-VM DH User's Manual English Edition
Page 71
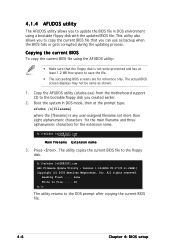
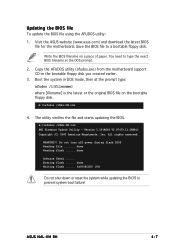
... ...... ASUS N4L-VM DH 4-7 Save the BIOS file to the bootable floppy disk you created earlier. 3. Write the BIOS filename on the bootable floppy disk. Copy the AFUDOS utility (afudos.exe) from the motherboard support CD to a bootable floppy disk. A:\>afudos /iN4L-VM.rom 4. done Advance Check ...... Boot the...] is the latest or the original BIOS file on a piece of paper. Visit the ASUS website (www.asus.com) and download the latest BIOS file for the motherboard. You need to prevent system boot failure! The utility verifies the file and starts updating the BIOS. A:\>afudos /iN4L...
... ...... ASUS N4L-VM DH 4-7 Save the BIOS file to the bootable floppy disk you created earlier. 3. Write the BIOS filename on the bootable floppy disk. Copy the AFUDOS utility (afudos.exe) from the motherboard support CD to a bootable floppy disk. A:\>afudos /iN4L-VM.rom 4. done Advance Check ...... Boot the...] is the latest or the original BIOS file on a piece of paper. Visit the ASUS website (www.asus.com) and download the latest BIOS file for the motherboard. You need to prevent system boot failure! The utility verifies the file and starts updating the BIOS. A:\>afudos /iN4L...

N4L-VM DH User's Manual English Edition
Page 73
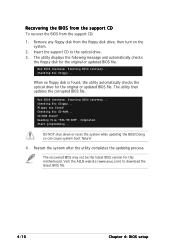
...BIOS recovery... Reading file "N4L-VM.ROM". Completed. You can cause system boot failure! 4. Checking for the original or updated BIOS file. When found ! Starting BIOS recovery... DO NOT shut down or reset the system while updating the BIOS! 4.1.5 ASUS CrashFree BIOS 2 utility The ASUS CrashFree BIOS 2 is an... a floppy disk: 1. Bad BIOS checksum. Floppy found , the utility reads the BIOS file and starts flashing the corrupted BIOS file. ASUS N4L-VM DH 4-9 Insert the floppy disk with the original or updated BIOS file to the floppy disk drive. 3. V M . Restart the system ...
...BIOS recovery... Reading file "N4L-VM.ROM". Completed. You can cause system boot failure! 4. Checking for the original or updated BIOS file. When found ! Starting BIOS recovery... DO NOT shut down or reset the system while updating the BIOS! 4.1.5 ASUS CrashFree BIOS 2 utility The ASUS CrashFree BIOS 2 is an... a floppy disk: 1. Bad BIOS checksum. Floppy found , the utility reads the BIOS file and starts flashing the corrupted BIOS file. ASUS N4L-VM DH 4-9 Insert the floppy disk with the original or updated BIOS file to the floppy disk drive. 3. V M . Restart the system ...
N4L-VM DH User's Manual English Edition
Page 74
...... Visit the ASUS website (www.asus.com) to the optical drive. 3. Bad BIOS checksum. Doing so can cause system boot failure! 4. Recovering the BIOS from the support CD To recover the BIOS from the floppy disk drive, then turn on the system. 2. Checking for the original or updated BIOS file. Reading file "N4L-VM.ROM...
...... Visit the ASUS website (www.asus.com) to the optical drive. 3. Bad BIOS checksum. Doing so can cause system boot failure! 4. Recovering the BIOS from the support CD To recover the BIOS from the floppy disk drive, then turn on the system. 2. Checking for the original or updated BIOS file. Reading file "N4L-VM.ROM...

N4L-VM DH User's Manual English Edition
Page 76
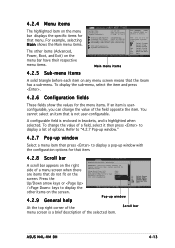
...menu items Navigation keys 4.2.2 Menu bar The menu bar on top of the screen has the following main items: Main Advanced Power Boot Exit For changing the basic system configuration For changing the advanced system settings For changing the advanced power management (APM) configuration For ... the desired item is highlighted. 4.2.3 Navigation keys At the bottom right corner of the navigation keys differ from one screen to select items in ] [ST320410A] [ASUS CD-S520/A] [Not Detected] [Not Detected] Use [ENTER], [TAB] or [SHIFT-TAB] to configure the System Time. Use [+] or [-] to select ...
...menu items Navigation keys 4.2.2 Menu bar The menu bar on top of the screen has the following main items: Main Advanced Power Boot Exit For changing the basic system configuration For changing the advanced system settings For changing the advanced power management (APM) configuration For ... the desired item is highlighted. 4.2.3 Navigation keys At the bottom right corner of the navigation keys differ from one screen to select items in ] [ST320410A] [ASUS CD-S520/A] [Not Detected] [Not Detected] Use [ENTER], [TAB] or [SHIFT-TAB] to configure the System Time. Use [+] or [-] to select ...
N4L-VM DH User's Manual English Edition
Page 77
...Item +- Plug And Play O/S PCI Latency Timer Allocate IRQ to malfunction. Scroll bar ASUS N4L-VM DH 4-13 Press the Up/Down arrow keys or / keys to display the other items (Advanced, Power, Boot, and Exit) on the menu bar have their respective menu items. Main Advanced PowBeIrOS ... highlighted item on the menu bar displays the specific items for that is not user-configurable. Primary IDE Master [ST320410A] Primary IDE Slave [ASUS CD-S520/A] Secondary IDE Master[Not Detected] Secondary IDE Slave [Not Detected] IDE Configuration System Information Use [+] or [-] to display a ...
...Item +- Plug And Play O/S PCI Latency Timer Allocate IRQ to malfunction. Scroll bar ASUS N4L-VM DH 4-13 Press the Up/Down arrow keys or / keys to display the other items (Advanced, Power, Boot, and Exit) on the menu bar have their respective menu items. Main Advanced PowBeIrOS ... highlighted item on the menu bar displays the specific items for that is not user-configurable. Primary IDE Master [ST320410A] Primary IDE Slave [ASUS CD-S520/A] Secondary IDE Master[Not Detected] Secondary IDE Slave [Not Detected] IDE Configuration System Information Use [+] or [-] to display a ...

N4L-VM DH User's Manual English Edition
Page 78
Main Advanced BIOS SETUP UTILITY Power Boot Exit System Time System Date Legacy Diskette A Primary IDE Master Primary IDE Slave Secondary IDE Master Secondary IDE Slave [10:55:25] [Mon 02/27/... setup IDE Configuration System Information Select Screen Select Item +- Configuration options: [Disabled] [360K, 5.25 in.] [1.2M , 5.25 in.] [720K , 3.5 in.] [1.44M, 3.5 in.] [2.88M, 3.5 in ] [ST320410A] [ASUS CD-S520/A] [Not Detected] [Not Detected] Use [ENTER], [TAB] or [SHIFT-TAB] to select a field. Use [+] or [-] to navigate through them. Change Field Tab Select...
Main Advanced BIOS SETUP UTILITY Power Boot Exit System Time System Date Legacy Diskette A Primary IDE Master Primary IDE Slave Secondary IDE Master Secondary IDE Slave [10:55:25] [Mon 02/27/... setup IDE Configuration System Information Select Screen Select Item +- Configuration options: [Disabled] [360K, 5.25 in.] [1.2M , 5.25 in.] [720K , 3.5 in.] [1.44M, 3.5 in.] [2.88M, 3.5 in ] [ST320410A] [ASUS CD-S520/A] [Not Detected] [Not Detected] Use [ENTER], [TAB] or [SHIFT-TAB] to select a field. Use [+] or [-] to navigate through them. Change Field Tab Select...

N4L-VM DH User's Manual English Edition
Page 82
... can cause the system to the default. M a n u a l - Take caution when changing the settings of the preset overclocking configiuration options. Main Advanced BIOS SETUP UTILITY Power Boot Exit Jumperfree Configuration CPU Configuration Chipset Onboard Devices Configuration PCIPnP USB Configuration Adjust system frequency/voltage Select Screen Select Item Enter Go to Sub Screen...
... can cause the system to the default. M a n u a l - Take caution when changing the settings of the preset overclocking configiuration options. Main Advanced BIOS SETUP UTILITY Power Boot Exit Jumperfree Configuration CPU Configuration Chipset Onboard Devices Configuration PCIPnP USB Configuration Adjust system frequency/voltage Select Screen Select Item Enter Go to Sub Screen...
N4L-VM DH User's Manual English Edition
Page 84
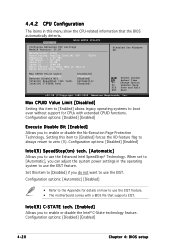
... (Max:10, Min:6) Ratio Actual Value : 10 T2300 Disabled for details on how to use the EIST feature. Configuration options: [Automatic] [Disabled] • Refer to boot even without support for CPUs with a BIOS file that the BIOS automatically detects. When set to [Automatic], you to use the Enhanced Intel SpeedStep®...
... (Max:10, Min:6) Ratio Actual Value : 10 T2300 Disabled for details on how to use the EIST feature. Configuration options: [Automatic] [Disabled] • Refer to boot even without support for CPUs with a BIOS file that the BIOS automatically detects. When set to [Automatic], you to use the Enhanced Intel SpeedStep®...

N4L-VM DH User's Manual English Edition
Page 85
North Bridge Configuration South Bridge Configuration Select Screen Select Item +- ASUS N4L-VM DH 4-21 Change Option F1 General Help F10 Save and Exit ESC Exit v02.58 (C)Copyright 1985-2005, American Megatrends, Inc. Change... American Megatrends, Inc. North Bridge Configuration Advanced BIOS SETUP UTILITY North Bridge Chipset Configuration Configure DRAM Timing by SPD [Enabled] Memory Hole [Disabled] Boot Graphic Adapter Priority [PEG/PCI] Internal Graphics Mode Select [Enabled, 8MB] Graphic Memory Type [Auto] Options Disabled Compatible Enhanced PEG Port Configuration PEG...
North Bridge Configuration South Bridge Configuration Select Screen Select Item +- ASUS N4L-VM DH 4-21 Change Option F1 General Help F10 Save and Exit ESC Exit v02.58 (C)Copyright 1985-2005, American Megatrends, Inc. Change... American Megatrends, Inc. North Bridge Configuration Advanced BIOS SETUP UTILITY North Bridge Chipset Configuration Configure DRAM Timing by SPD [Enabled] Memory Hole [Disabled] Boot Graphic Adapter Priority [PEG/PCI] Internal Graphics Mode Select [Enabled, 8MB] Graphic Memory Type [Auto] Options Disabled Compatible Enhanced PEG Port Configuration PEG...

N4L-VM DH User's Manual English Edition
Page 86
... Clocks] Memory Hole [Disabled] Sets or disables the software memory remapping around the memory hole. When disabled, you to use as primary boot device. Configuration options: [Disabled] [15MB - 16MB] Boot Graphic Adapter Priority [PEG/PCI] Allows selection of system memory pre-allocated by SPD [Enabled] When this item is enabled, the DRAM...
... Clocks] Memory Hole [Disabled] Sets or disables the software memory remapping around the memory hole. When disabled, you to use as primary boot device. Configuration options: [Disabled] [15MB - 16MB] Boot Graphic Adapter Priority [PEG/PCI] Allows selection of system memory pre-allocated by SPD [Enabled] When this item is enabled, the DRAM...
N4L-VM DH User's Manual English Edition
Page 88
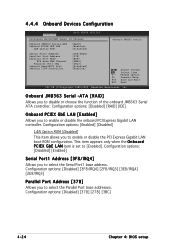
...] Select Screen Select Item +- Configuration options: [Enabled] [Disabled] LAN Option ROM [Disabled] This item allows you to enable or disable the PCI Express Gigabit LAN boot ROM configuration. Configuration options: [Disabled] [RAID] [IDE] Onboard PCIEX GbE LAN [Enabled] Allows you to enable or disable the onboard PCI Express Gigabit LAN controller...
...] Select Screen Select Item +- Configuration options: [Enabled] [Disabled] LAN Option ROM [Disabled] This item allows you to enable or disable the PCI Express Gigabit LAN boot ROM configuration. Configuration options: [Disabled] [RAID] [IDE] Onboard PCIEX GbE LAN [Enabled] Allows you to enable or disable the onboard PCI Express Gigabit LAN controller...

N4L-VM DH User's Manual English Edition
Page 90
Take caution when changing the settings of PCI clocks for boot. The menu includes setting IRQ and DMA channel resources for either PCI/PnP or legacy ISA devices, and setting the memory size block for an ... Megatrends, Inc. Configuration options: [Disabled] [Enabled] 4-26 Chapter 4: BIOS setup 4.4.5 PCI PnP The PCI PnP menu items allow you to change the advanced settings for boot if your system has a Plug and Play operating system. YES: Lets the operating system configure Plug and Play (PnP) devices not required for PCI/PnP...
Take caution when changing the settings of PCI clocks for boot. The menu includes setting IRQ and DMA channel resources for either PCI/PnP or legacy ISA devices, and setting the memory size block for an ... Megatrends, Inc. Configuration options: [Disabled] [Enabled] 4-26 Chapter 4: BIOS setup 4.4.5 PCI PnP The PCI PnP menu items allow you to change the advanced settings for boot if your system has a Plug and Play operating system. YES: Lets the operating system configure Plug and Play (PnP) devices not required for PCI/PnP...


