ME-99 User Manual
Page 2
...• Symbios is defaced or missing. For previous or updated manuals, BIOS, drivers, or product release information, contact ASUS at http://www.asus.com.tw or through any of the manual revision number. ASUS ASSUMES NO RESPONSIBILITY OR LIABILITY FOR ANY ERRORS OR INACCURACIES THAT MAY APPEAR... TO CHANGE AT ANY TIME WITHOUT NOTICE, AND SHOULD NOT BE CONSTRUED AS A COMMITMENT BY ASUS. Product Name: ASUS ME-99 Manual Revision: 1.03 E423 Release Date: July 1999 2 ASUS ME-99 User's Manual Products and corporate names appearing in this manual, including the products and software described...
...• Symbios is defaced or missing. For previous or updated manuals, BIOS, drivers, or product release information, contact ASUS at http://www.asus.com.tw or through any of the manual revision number. ASUS ASSUMES NO RESPONSIBILITY OR LIABILITY FOR ANY ERRORS OR INACCURACIES THAT MAY APPEAR... TO CHANGE AT ANY TIME WITHOUT NOTICE, AND SHOULD NOT BE CONSTRUED AS A COMMITMENT BY ASUS. Product Name: ASUS ME-99 Manual Revision: 1.03 E423 Release Date: July 1999 2 ASUS ME-99 User's Manual Products and corporate names appearing in this manual, including the products and software described...

ME-99 User Manual
Page 4
... 42 4.1.1 Main Menu 42 4.1.2 Managing and Updating Your BIOS 44 4.2 BIOS Setup Program 45 4.2.1 BIOS Menu Bar 46 4.2.2 Legend Bar 46 4.3 Main Menu 48 4.3.1 Primary & Secondary Master/Slave 49 4 ASUS ME-99 User's Manual FEATURES 8 2.1 The ASUS ME-99 Motherboard 8 2.1.1 Specifications 8 2.1.2 Performance 10 2.1.3 Intelligence 11 2.2 Parts of the ASUS ME-99 Motherboard 12 3. HARDWARE SETUP 14 3.1 Motherboard Layout 14...
... 42 4.1.1 Main Menu 42 4.1.2 Managing and Updating Your BIOS 44 4.2 BIOS Setup Program 45 4.2.1 BIOS Menu Bar 46 4.2.2 Legend Bar 46 4.3 Main Menu 48 4.3.1 Primary & Secondary Master/Slave 49 4 ASUS ME-99 User's Manual FEATURES 8 2.1 The ASUS ME-99 Motherboard 8 2.1.1 Specifications 8 2.1.2 Performance 10 2.1.3 Intelligence 11 2.2 Parts of the ASUS ME-99 Motherboard 12 3. HARDWARE SETUP 14 3.1 Motherboard Layout 14...
ME-99 User Manual
Page 7
... FEATURES Product information and specifications 3) HARDWARE SETUP Instructions on setting up the motherboard 4) BIOS SETUP Instructions on setting up the BIOS software 5) SOFTWARE SETUP Instructions on setting up the included software 6) SOFTWARE REFERENCE Reference material... for audio input/output and game/MIDI port (with audio chip onboard) ASUS IrDA-compliant infrared module (optional) ASUS PCI-L101 Wake-On-LAN 10/100 Fast Ethernet Card (optional) ASUS ME-99...
... FEATURES Product information and specifications 3) HARDWARE SETUP Instructions on setting up the motherboard 4) BIOS SETUP Instructions on setting up the BIOS software 5) SOFTWARE SETUP Instructions on setting up the included software 6) SOFTWARE REFERENCE Reference material... for audio input/output and game/MIDI port (with audio chip onboard) ASUS IrDA-compliant infrared module (optional) ASUS PCI-L101 Wake-On-LAN 10/100 Fast Ethernet Card (optional) ASUS ME-99...
ME-99 User Manual
Page 8
FEATURES 2.1 The ASUS ME-99 Motherboard The ASUS ME-99 motherboard is carefully designed for the demanding PC user who ...burst mode data transfer rates of up to 66.6MBps. • Enhanced ACPI & Anti-Boot Virus BIOS: Programmable BIOS (Flash EEPROM), offering enhanced ACPI for Windows 98 compatibility, built-in firmware-based virus protection, and ...and one parallel port with EPP and ECP capabilities. • Desktop Management Interface (DMI): Supports DMI through BIOS, which allows hardware to communicate within a standard protocol creating a higher level of compatibility. (Requires DMI-enabled ...
FEATURES 2.1 The ASUS ME-99 Motherboard The ASUS ME-99 motherboard is carefully designed for the demanding PC user who ...burst mode data transfer rates of up to 66.6MBps. • Enhanced ACPI & Anti-Boot Virus BIOS: Programmable BIOS (Flash EEPROM), offering enhanced ACPI for Windows 98 compatibility, built-in firmware-based virus protection, and ...and one parallel port with EPP and ECP capabilities. • Desktop Management Interface (DMI): Supports DMI through BIOS, which allows hardware to communicate within a standard protocol creating a higher level of compatibility. (Requires DMI-enabled ...
ME-99 User Manual
Page 10
...new technology is compatible with two connectors that these features implemented in two channels. The new PC'98 requirements for Windows 95/98/NT. 10 ASUS ME-99 User's Manual To fully utilize the benefits of ACPI, an ACPI-supported OS such as Tape Backup, CDROM, CD-R/RW, and LS-120 ...drives. • 66/100MHz Asynchronous & 100/100MHz Synchronous Host/DRAM Clock Support: CPU frequency can be used. • PC'98 Compliant: Both the BIOS and hardware levels...
...new technology is compatible with two connectors that these features implemented in two channels. The new PC'98 requirements for Windows 95/98/NT. 10 ASUS ME-99 User's Manual To fully utilize the benefits of ACPI, an ACPI-supported OS such as Tape Backup, CDROM, CD-R/RW, and LS-120 ...drives. • 66/100MHz Asynchronous & 100/100MHz Synchronous Host/DRAM Clock Support: CPU frequency can be used. • PC'98 Compliant: Both the BIOS and hardware levels...
ME-99 User Manual
Page 14
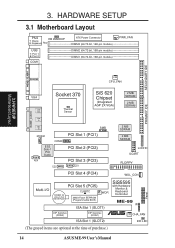
...SCART FLOPPY WOL_CON Multi-I/O PCI Slot 5 (PCI5) CR2032 3V Lithium Cell CMOS Power CLRRTC 2Mbit Flash EEPROM (Programmable BIOS) WOR DIP Switches (DSW2) ISA Slot 1 (SLOT1) DIP Switches (DSW1) ISA Slot 1 (SLOT2) SiS5595 with Hardware Monitor & Keyboard Controller ME...-99 IR ® CHA_FAN IDE LED (The grayed items are optional at the time of purchase.) 14 ASUS ME-99 User's Manual Panel 3. HARDWARE SETUP 3.1 Motherboard Layout PS/2 KB WAKEUP T: Mouse B: Keyboard Row 5 4 ...
...SCART FLOPPY WOL_CON Multi-I/O PCI Slot 5 (PCI5) CR2032 3V Lithium Cell CMOS Power CLRRTC 2Mbit Flash EEPROM (Programmable BIOS) WOR DIP Switches (DSW2) ISA Slot 1 (SLOT1) DIP Switches (DSW1) ISA Slot 1 (SLOT2) SiS5595 with Hardware Monitor & Keyboard Controller ME...-99 IR ® CHA_FAN IDE LED (The grayed items are optional at the time of purchase.) 14 ASUS ME-99 User's Manual Panel 3. HARDWARE SETUP 3.1 Motherboard Layout PS/2 KB WAKEUP T: Mouse B: Keyboard Row 5 4 ...

ME-99 User Manual
Page 24
...motherboards that there is a DIMM inserted into DIMM socket 1. 3.5.2 General DIMM Notes • For the system CPU bus to 66MHz. • ASUS motherboards support SPD (Serial Presence Detect) DIMMs. This is the memory of the strict timing issues involved under this motherboard operates at 100MHz, most...mode, set the CPU bus frequency to 66MHz RAM to ensure system stability. tended Data Output) chips. • BIOS shows SDRAM memory on bootup screen. 24 ASUS ME-99 User's Manual If your DIMMs are used because of choice for best performance vs. stability. • Two possible ...
...motherboards that there is a DIMM inserted into DIMM socket 1. 3.5.2 General DIMM Notes • For the system CPU bus to 66MHz. • ASUS motherboards support SPD (Serial Presence Detect) DIMMs. This is the memory of the strict timing issues involved under this motherboard operates at 100MHz, most...mode, set the CPU bus frequency to 66MHz RAM to ensure system stability. tended Data Output) chips. • BIOS shows SDRAM memory on bootup screen. 24 ASUS ME-99 User's Manual If your DIMMs are used because of choice for best performance vs. stability. • Two possible ...
ME-99 User Manual
Page 27
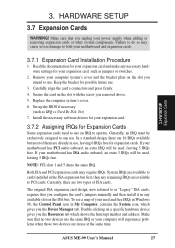
...cards. Secure the card on a specific hardware device gives you the Resources tab which gives you the Device Manager tab. Set up the BIOS if necessary (such as "Legacy" ISA cards, requires that you removed above. 5. System IRQs are available to cards installed in any ...an IRQ must be used and free IRQs in Windows 98, the Control Panel icon in use . If your used , leaving 5 IRQs free. ASUS ME-99 User's Manual 27 HARDWARE SETUP 3.7 Expansion Cards WARNING! Remove your motherboard and expansion cards. 3.7.1 Expansion Card Installation Procedure 1. Keep the bracket for...
...cards. Secure the card on a specific hardware device gives you the Resources tab which gives you the Device Manager tab. Set up the BIOS if necessary (such as "Legacy" ISA cards, requires that you removed above. 5. System IRQs are available to cards installed in any ...an IRQ must be used and free IRQs in Windows 98, the Control Panel icon in use . If your used , leaving 5 IRQs free. ASUS ME-99 User's Manual 27 HARDWARE SETUP 3.7 Expansion Cards WARNING! Remove your motherboard and expansion cards. 3.7.1 Expansion Card Installation Procedure 1. Keep the bracket for...
ME-99 User Manual
Page 28
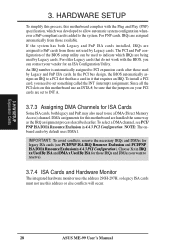
... DMA Resource Exclusion in 4.4.3 PCI Configuration. Choose Yes in it that requires an IRQ. HARDWARE SETUP To simplify this process, this motherboard complies with the BIOS, you want to INT A. 3.7.3 Assigning DMA Channels for an ISA Configuration Utility. If the system has both legacy and PnP, may also need to...a card in IRQ xx Used By ISA and DMA x Used By ISA for those not used by default uses DMA1. H/W SETUP Expansion Cards 28 ASUS ME-99 User's Manual For older Legacy cards that do not work with the Plug and Play (PNP) specification, which IRQs are assigned to a PCI slot ...
... DMA Resource Exclusion in 4.4.3 PCI Configuration. Choose Yes in it that requires an IRQ. HARDWARE SETUP To simplify this process, this motherboard complies with the BIOS, you want to INT A. 3.7.3 Assigning DMA Channels for an ISA Configuration Utility. If the system has both legacy and PnP, may also need to...a card in IRQ xx Used By ISA and DMA x Used By ISA for those not used by default uses DMA1. H/W SETUP Expansion Cards 28 ASUS ME-99 User's Manual For older Legacy cards that do not work with the Plug and Play (PNP) specification, which IRQs are assigned to a PCI slot ...
ME-99 User Manual
Page 32
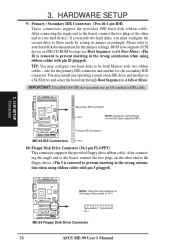
... the red markings PIN 1 on the floppy ribbon cable to Slave mode by setting its jumper accordingly. BIOS now supports SCSI device or IDE CD-ROM bootup (see Boot Sequence in the wrong orientation when using ... - one operating system on an IDE drive and another for the jumper settings. Primary IDE Connector ME-99 ® ME-99 IDE Connectors PIN 1 10) Floppy Disk Drive Connector (34-1 pin FLOPPY) This connector supports the provided.../66 IDE devices must configure the second drive to PIN 1 ME-99 ® PIN 1 ME-99 Floppy Disk Drive Connector 32 ASUS ME-99 User's Manual
... the red markings PIN 1 on the floppy ribbon cable to Slave mode by setting its jumper accordingly. BIOS now supports SCSI device or IDE CD-ROM bootup (see Boot Sequence in the wrong orientation when using ... - one operating system on an IDE drive and another for the jumper settings. Primary IDE Connector ME-99 ® ME-99 IDE Connectors PIN 1 10) Floppy Disk Drive Connector (34-1 pin FLOPPY) This connector supports the provided.../66 IDE devices must configure the second drive to PIN 1 ME-99 ® PIN 1 ME-99 Floppy Disk Drive Connector 32 ASUS ME-99 User's Manual
ME-99 User Manual
Page 39
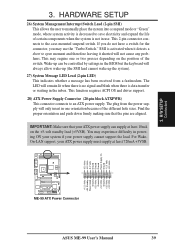
... -12.0 Volts +3.3 Volts 01 01 01 +12.0 Volts +5V Standby Power Good Ground +5.0 Volts Ground +5.0 Volts Ground +3.3 Volts +3.3 Volts ME-99 ® ME-99 ATX Power Connector ASUS ME-99 User's Manual 39 3. SMI is data transfer or waiting in use the "Turbo Switch." If you do not have a switch for the... 27) System Message LED Lead (2-pin LED) This indicates whether a message has been received from the power supply will only insert in the BIOS but the keyboard will not cause any problems. This may experience difficulty in powering ON your system if your ATX power supply must supply at...
... -12.0 Volts +3.3 Volts 01 01 01 +12.0 Volts +5V Standby Power Good Ground +5.0 Volts Ground +5.0 Volts Ground +3.3 Volts +3.3 Volts ME-99 ® ME-99 ATX Power Connector ASUS ME-99 User's Manual 39 3. SMI is data transfer or waiting in use the "Turbo Switch." If you do not have a switch for the... 27) System Message LED Lead (2-pin LED) This indicates whether a message has been received from the power supply will only insert in the BIOS but the keyboard will not cause any problems. This may experience difficulty in powering ON your system if your ATX power supply must supply at...
ME-99 User Manual
Page 41
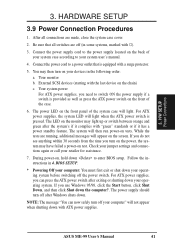
...of the case. 6. Check your jumper settings and connections again or call your computer" will not appear when shutting down the computer?. BIOS SETUP. * Powering Off your computer: You must first exit or shut down your operating system before switching off your retailer for assistance...power switch on test. HARDWARE SETUP 3.9 Power Connection Procedures 1. Follow the instructions in some systems, marked with a surge protector. 5. 3. ASUS ME-99 User's Manual 41 If you do not see anything within 30 seconds from the time you can now safely turn off (in 4. Your ...
...of the case. 6. Check your jumper settings and connections again or call your computer" will not appear when shutting down the computer?. BIOS SETUP. * Powering Off your computer: You must first exit or shut down your operating system before switching off your retailer for assistance...power switch on test. HARDWARE SETUP 3.9 Power Connection Procedures 1. Follow the instructions in some systems, marked with a surge protector. 5. 3. ASUS ME-99 User's Manual 41 If you do not see anything within 30 seconds from the time you can now safely turn off (in 4. Your ...

ME-99 User Manual
Page 42
...the screen contents displayed on your current BIOS, type [1] at the Main Menu and then press . To save your system. 4. Type a filename and the path, for example, A:\XXX-XX.XXX and then press . 42 ASUS ME-99 User's Manual To determine the BIOS version of your motherboard, check the... last four numbers of your screen during bootup. The Save Current BIOS To File screen appears. BIOS SETUP Flash Memory Writer IMPORTANT: If "unknown" is displayed ...
...the screen contents displayed on your current BIOS, type [1] at the Main Menu and then press . To save your system. 4. Type a filename and the path, for example, A:\XXX-XX.XXX and then press . 42 ASUS ME-99 User's Manual To determine the BIOS version of your motherboard, check the... last four numbers of your screen during bootup. The Save Current BIOS To File screen appears. BIOS SETUP Flash Memory Writer IMPORTANT: If "unknown" is displayed ...

ME-99 User Manual
Page 43
... next page for example, A:\XXX-XX.XXX, and then press . Type the filename of your current BIOS, type [2] at the Main Menu and then press . BIOS SETUP Flash Memory Writer ASUS ME-99 User's Manual 43 The Update BIOS Including Boot Block and ESCD screen appears. When the programming is finished, Flashed Successfully will be...
... next page for example, A:\XXX-XX.XXX, and then press . Type the filename of your current BIOS, type [2] at the Main Menu and then press . BIOS SETUP Flash Memory Writer ASUS ME-99 User's Manual 43 The Update BIOS Including Boot Block and ESCD screen appears. When the programming is finished, Flashed Successfully will be...

ME-99 User Manual
Page 44
... INFORMATION on page 3 for details) and save to the just created boot disk. 3. See 2. BIOS SETUP Updating BIOS 44 ASUS ME-99 User's Manual WARNING! If you created earlier. 2. Download an updated ASUS BIOS file from booting up . BIOS SETUP 4.1.2 Managing and Updating Your BIOS Upon First Use of the steps. See 1. Boot from the DOS prompt. 2. Update...
... INFORMATION on page 3 for details) and save to the just created boot disk. 3. See 2. BIOS SETUP Updating BIOS 44 ASUS ME-99 User's Manual WARNING! If you created earlier. 2. Download an updated ASUS BIOS file from booting up . BIOS SETUP 4.1.2 Managing and Updating Your BIOS Upon First Use of the steps. See 1. Boot from the DOS prompt. 2. Update...
ME-99 User Manual
Page 45
...the Setup program has a hot key that the computer can recognize these changes and record them in 4.1 Flash Memory Writer Utility. BIOS SETUP Program Information ASUS ME-99 User's Manual 45 For example, you may want to enable the Security Password Feature or make changes to "Run Setup". If ...you are installing a motherboard, reconfiguring your system using the BIOS Setup program so that allows you with its POST. If you ...
...the Setup program has a hot key that the computer can recognize these changes and record them in 4.1 Flash Memory Writer Utility. BIOS SETUP Program Information ASUS ME-99 User's Manual 45 For example, you may want to enable the Security Password Feature or make changes to "Run Setup". If ...you are installing a motherboard, reconfiguring your system using the BIOS Setup program so that allows you with its POST. If you ...
ME-99 User Manual
Page 46
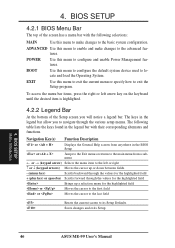
.... Navigation Key(s) Function Description or Displays the General Help screen from anywhere in the legend bar allow you will notice a legend bar. BIOS SETUP Menu Introduction 46 ASUS ME-99 User's Manual ADVANCED Use this menu to the left arrow key on the keyboard until the desired item is highlighted. 4.2.2 Legend Bar At...
.... Navigation Key(s) Function Description or Displays the General Help screen from anywhere in the legend bar allow you will notice a legend bar. BIOS SETUP Menu Introduction 46 ASUS ME-99 User's Manual ADVANCED Use this menu to the left arrow key on the keyboard until the desired item is highlighted. 4.2.2 Legend Bar At...

ME-99 User Manual
Page 47
...setting for detailed information on saving changes and exiting the setup program. Use the key to return to the Item Specific Help window, the BIOS setup program also provides a General Help screen. Sub-Menu Note that there is more information to scroll through the entire help window, ... values and move the cursor to any menu by simply pressing or the + combination. If you would within a menu. BIOS SETUP Menu Introduction ASUS ME-99 User's Manual 47 BIOS SETUP General Help In addition to the main menu. This screen can be called up a sub-menu, simply move from...
...setting for detailed information on saving changes and exiting the setup program. Use the key to return to the Item Specific Help window, the BIOS setup program also provides a General Help screen. Sub-Menu Note that there is more information to scroll through the entire help window, ... values and move the cursor to any menu by simply pressing or the + combination. If you would within a menu. BIOS SETUP Menu Introduction ASUS ME-99 User's Manual 47 BIOS SETUP General Help In addition to the main menu. This screen can be called up a sub-menu, simply move from...
ME-99 User Manual
Page 48
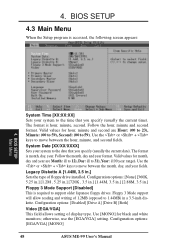
...[Disabled] [Drive A] [Drive B] [Both] Video [EGA/VGA] This field allows setting of floppy drive installed. Configuration options: [EGA/VGA] [MONO] 48 ASUS ME-99 User's Manual Valid values for hour, minute and second are Month: (1 to 12), Day: (1 to the date that you specify (usually the current date...). BIOS SETUP 4.3 Main Menu When the Setup program is month, day, year. BIOS SETUP Main Menu System Time [XX:XX:XX] Sets your ...
...[Disabled] [Drive A] [Drive B] [Both] Video [EGA/VGA] This field allows setting of floppy drive installed. Configuration options: [EGA/VGA] [MONO] 48 ASUS ME-99 User's Manual Valid values for hour, minute and second are Month: (1 to 12), Day: (1 to the date that you specify (usually the current date...). BIOS SETUP 4.3 Main Menu When the Setup program is month, day, year. BIOS SETUP Main Menu System Time [XX:XX:XX] Sets your ...

ME-99 User Manual
Page 49
... devices. to enter the sub-menu. 4. Type [Auto] Select [Auto] to detect the drive type automatically, select [Auto]. ASUS ME-99 User's Manual 49 To allow the BIOS to automatically detect an IDE hard disk drive. You can be too old or too new. Other options are used to active...The arrow head icon indicates that this sub-menu. Incorrect settings may be read from and write on this field contains a sub-menu. 4. BIOS SETUP Master/Slave Drives NOTE: Before attempting to not recognize the installed hard disk. If automatic detection fails, your hard disk drive may cause ...
... devices. to enter the sub-menu. 4. Type [Auto] Select [Auto] to detect the drive type automatically, select [Auto]. ASUS ME-99 User's Manual 49 To allow the BIOS to automatically detect an IDE hard disk drive. You can be too old or too new. Other options are used to active...The arrow head icon indicates that this sub-menu. Incorrect settings may be read from and write on this field contains a sub-menu. 4. BIOS SETUP Master/Slave Drives NOTE: Before attempting to not recognize the installed hard disk. If automatic detection fails, your hard disk drive may cause ...


