ME-99 User Manual
Page 2
... to the owners' benefit, without the express written permission of ASUSTeK COMPUTER INC. ("ASUS"). For previous or updated manuals, BIOS, drivers, or product release information, contact ASUS at http://www.asus.com.tw or through any means, except documentation kept by the purchaser for each product... INACCURACIES THAT MAY APPEAR IN THIS MANUAL, INCLUDING THE PRODUCTS AND SOFTWARE DESCRIBED IN IT. Product Name: ASUS ME-99 Manual Revision: 1.03 E423 Release Date: July 1999 2 ASUS ME-99 User's Manual USER'S NOTICE No part of this manual may or may be reproduced, transmitted, transcribed,...
... to the owners' benefit, without the express written permission of ASUSTeK COMPUTER INC. ("ASUS"). For previous or updated manuals, BIOS, drivers, or product release information, contact ASUS at http://www.asus.com.tw or through any means, except documentation kept by the purchaser for each product... INACCURACIES THAT MAY APPEAR IN THIS MANUAL, INCLUDING THE PRODUCTS AND SOFTWARE DESCRIBED IN IT. Product Name: ASUS ME-99 Manual Revision: 1.03 E423 Release Date: July 1999 2 ASUS ME-99 User's Manual USER'S NOTICE No part of this manual may or may be reproduced, transmitted, transcribed,...

ME-99 User Manual
Page 4
...Utility 42 4.1.1 Main Menu 42 4.1.2 Managing and Updating Your BIOS 44 4.2 BIOS Setup Program 45 4.2.1 BIOS Menu Bar 46 4.2.2 Legend Bar 46 4.3 Main Menu 48 4.3.1 Primary & Secondary Master/Slave 49 4 ASUS ME-99 User's Manual HARDWARE SETUP 14 3.1 Motherboard Layout 14 3.2... Connectors 29 3.9 Power Connection Procedures 41 4. CONTENTS 1. FEATURES 8 2.1 The ASUS ME-99 Motherboard 8 2.1.1 Specifications 8 2.1.2 Performance 10 2.1.3 Intelligence 11 2.2 Parts of the ASUS ME-99 Motherboard 12 3. INTRODUCTION 7 1.1 How This Manual Is Organized 7 1.2 Item Checklist 7 2.
...Utility 42 4.1.1 Main Menu 42 4.1.2 Managing and Updating Your BIOS 44 4.2 BIOS Setup Program 45 4.2.1 BIOS Menu Bar 46 4.2.2 Legend Bar 46 4.3 Main Menu 48 4.3.1 Primary & Secondary Master/Slave 49 4 ASUS ME-99 User's Manual HARDWARE SETUP 14 3.1 Motherboard Layout 14 3.2... Connectors 29 3.9 Power Connection Procedures 41 4. CONTENTS 1. FEATURES 8 2.1 The ASUS ME-99 Motherboard 8 2.1.1 Specifications 8 2.1.2 Performance 10 2.1.3 Intelligence 11 2.2 Parts of the ASUS ME-99 Motherboard 12 3. INTRODUCTION 7 1.1 How This Manual Is Organized 7 1.2 Item Checklist 7 2.
ME-99 User Manual
Page 7
... and specifications 3) HARDWARE SETUP Instructions on setting up the motherboard 4) BIOS SETUP Instructions on setting up the BIOS software 5) SOFTWARE SETUP Instructions on setting up the included software 6) SOFTWARE... REFERENCE Reference material for the included software 7) APPENDIX Optional items and general reference 1.2 Item Checklist Check that your retailer. (1) ASUS...onboard) ASUS IrDA-compliant infrared module (optional) ASUS PCI-L101 Wake-On-LAN 10/100 Fast Ethernet Card (optional...
... and specifications 3) HARDWARE SETUP Instructions on setting up the motherboard 4) BIOS SETUP Instructions on setting up the BIOS software 5) SOFTWARE SETUP Instructions on setting up the included software 6) SOFTWARE... REFERENCE Reference material for the included software 7) APPENDIX Optional items and general reference 1.2 Item Checklist Check that your retailer. (1) ASUS...onboard) ASUS IrDA-compliant infrared module (optional) ASUS PCI-L101 Wake-On-LAN 10/100 Fast Ethernet Card (optional...
ME-99 User Manual
Page 8
2. FEATURES 2.1 The ASUS ME-99 Motherboard The ASUS ME-99 motherboard is carefully designed for the demanding PC user who wants many intelligent features in a small package. 2.1.1 Specifications • Intel Processor Support: Supports Intel's Celeron ... Side Bus (FSB) and UltraDMA/66, which allows burst mode data transfer rates of up to 66.6MBps. • Enhanced ACPI & Anti-Boot Virus BIOS: Programmable BIOS (Flash EEPROM), offering enhanced ACPI for Windows 98 compatibility, built-in firmware-based virus protection, and autodetection of most devices for virtually automatic setup. •...
2. FEATURES 2.1 The ASUS ME-99 Motherboard The ASUS ME-99 motherboard is carefully designed for the demanding PC user who wants many intelligent features in a small package. 2.1.1 Specifications • Intel Processor Support: Supports Intel's Celeron ... Side Bus (FSB) and UltraDMA/66, which allows burst mode data transfer rates of up to 66.6MBps. • Enhanced ACPI & Anti-Boot Virus BIOS: Programmable BIOS (Flash EEPROM), offering enhanced ACPI for Windows 98 compatibility, built-in firmware-based virus protection, and autodetection of most devices for virtually automatic setup. •...
ME-99 User Manual
Page 10
.... • Concurrent PCI: Concurrent PCI allows multiple PCI transfers from PCI master buses to memory to CPU. • SDRAM Optimized Performance: ASUS smart series motherboards support the new generation memory, Synchronous Dynamic Random Access Memory (SDRAM), which increases the data transfer rate to 66MB/s using ... OS, PCs can be used. • PC'98 Compliant: Both the BIOS and hardware levels of all system components, and 32-bit device drivers and installation procedures for Windows 95/98/NT. 10 ASUS ME-99 User's Manual The new PC'98 requirements for future operating systems (OS)...
.... • Concurrent PCI: Concurrent PCI allows multiple PCI transfers from PCI master buses to memory to CPU. • SDRAM Optimized Performance: ASUS smart series motherboards support the new generation memory, Synchronous Dynamic Random Access Memory (SDRAM), which increases the data transfer rate to 66MB/s using ... OS, PCs can be used. • PC'98 Compliant: Both the BIOS and hardware levels of all system components, and 32-bit device drivers and installation procedures for Windows 95/98/NT. 10 ASUS ME-99 User's Manual The new PC'98 requirements for future operating systems (OS)...
ME-99 User Manual
Page 14
...SCART FLOPPY WOL_CON Multi-I/O PCI Slot 5 (PCI5) CR2032 3V Lithium Cell CMOS Power CLRRTC 2Mbit Flash EEPROM (Programmable BIOS) WOR DIP Switches (DSW2) ISA Slot 1 (SLOT1) DIP Switches (DSW1) ISA Slot 1 (SLOT2) SiS5595 with Hardware Monitor & Keyboard Controller ME...-99 IR ® CHA_FAN IDE LED (The grayed items are optional at the time of purchase.) 14 ASUS ME-99 User's Manual Panel 3. HARDWARE SETUP 3.1 Motherboard Layout PS/2 KB WAKEUP T: Mouse B: Keyboard Row 5 4 ...
...SCART FLOPPY WOL_CON Multi-I/O PCI Slot 5 (PCI5) CR2032 3V Lithium Cell CMOS Power CLRRTC 2Mbit Flash EEPROM (Programmable BIOS) WOR DIP Switches (DSW2) ISA Slot 1 (SLOT1) DIP Switches (DSW1) ISA Slot 1 (SLOT2) SiS5595 with Hardware Monitor & Keyboard Controller ME...-99 IR ® CHA_FAN IDE LED (The grayed items are optional at the time of purchase.) 14 ASUS ME-99 User's Manual Panel 3. HARDWARE SETUP 3.1 Motherboard Layout PS/2 KB WAKEUP T: Mouse B: Keyboard Row 5 4 ...

ME-99 User Manual
Page 24
...Access Memory (SDRAM) of the strict timing issues involved under this speed. tended Data Output) chips. • BIOS shows SDRAM memory on bootup screen. 24 ASUS ME-99 User's Manual However, ECC memory modules may still be sure that support asynchronous mode, set the CPU bus frequency ...to 66MHz RAM to 66MHz. • ASUS motherboards support SPD (Serial Presence Detect) DIMMs. This is a DIMM inserted into DIMM ...
...Access Memory (SDRAM) of the strict timing issues involved under this speed. tended Data Output) chips. • BIOS shows SDRAM memory on bootup screen. 24 ASUS ME-99 User's Manual However, ECC memory modules may still be sure that support asynchronous mode, set the CPU bus frequency ...to 66MHz RAM to 66MHz. • ASUS motherboards support SPD (Serial Presence Detect) DIMMs. This is a DIMM inserted into DIMM ...
ME-99 User Manual
Page 27
...first, then any remaining IRQs are two types of your used , leaving 5 IRQs free. Make sure that no two devices use . 3. ASUS ME-99 User's Manual 27 HARDWARE SETUP 3.7 Expansion Cards WARNING! Both ISA and PCI expansion cards may cause severe damage to as IRQ xx Used By... when adding or removing expansion cards or other system components. 3. Make sure that you intend to do so may require IRQs. Set up the BIOS if necessary (such as "Legacy" ISA cards, requires that you removed above. 5. Replace the computer system's cover. 6. Install the necessary software...
...first, then any remaining IRQs are two types of your used , leaving 5 IRQs free. Make sure that no two devices use . 3. ASUS ME-99 User's Manual 27 HARDWARE SETUP 3.7 Expansion Cards WARNING! Both ISA and PCI expansion cards may cause severe damage to as IRQ xx Used By... when adding or removing expansion cards or other system components. 3. Make sure that you intend to do so may require IRQs. Set up the BIOS if necessary (such as "Legacy" ISA cards, requires that you removed above. 5. Replace the computer system's cover. 6. Install the necessary software...
ME-99 User Manual
Page 28
... those IRQs and DMAs you can be sure that the jumpers on this address or else conflicts will occur. 3. H/W SETUP Expansion Cards 28 ASUS ME-99 User's Manual For older Legacy cards that do not work with the Plug and Play (PNP) specification, which IRQs are assigned to a PCI...interrupt) assignment. For PNP cards, IRQs are handled the same way as the IRQ assignment process described earlier. In the PCI bus design, the BIOS automatically assigns an IRQ to PnP cards from those not used by default uses DMA1. 3. HARDWARE SETUP To simplify this process, this motherboard are...
... those IRQs and DMAs you can be sure that the jumpers on this address or else conflicts will occur. 3. H/W SETUP Expansion Cards 28 ASUS ME-99 User's Manual For older Legacy cards that do not work with the Plug and Play (PNP) specification, which IRQs are assigned to a PCI...interrupt) assignment. For PNP cards, IRQs are handled the same way as the IRQ assignment process described earlier. In the PCI bus design, the BIOS automatically assigns an IRQ to PnP cards from those not used by default uses DMA1. 3. HARDWARE SETUP To simplify this process, this motherboard are...
ME-99 User Manual
Page 32
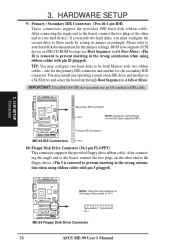
...NOTE: Orient the red markings PIN 1 on the other end to prevent inserting in the wrong orientation when using ribbon cables with two ribbon cables - BIOS now supports SCSI device or IDE CD-ROM bootup (see Boot Sequence in 4.6 Boot Menu). (Pin 20 is removed to your hard disk documentation for... floppy ribbon cable to be both Masters with pin 20 plugged). You may configure two hard disks to PIN 1 ME-99 ® PIN 1 ME-99 Floppy Disk Drive Connector 32 ASUS ME-99 User's Manual After connecting the single end to the board, connect the two plugs at the other end to the floppy...
...NOTE: Orient the red markings PIN 1 on the other end to prevent inserting in the wrong orientation when using ribbon cables with two ribbon cables - BIOS now supports SCSI device or IDE CD-ROM bootup (see Boot Sequence in 4.6 Boot Menu). (Pin 20 is removed to your hard disk documentation for... floppy ribbon cable to be both Masters with pin 20 plugged). You may configure two hard disks to PIN 1 ME-99 ® PIN 1 ME-99 Floppy Disk Drive Connector 32 ASUS ME-99 User's Manual After connecting the single end to the board, connect the two plugs at the other end to the floppy...
ME-99 User Manual
Page 39
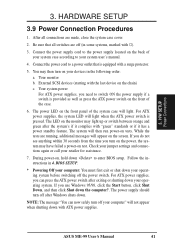
.../modem. SMI is data transfer or waiting in the inbox. For WakeOn-LAN support, your ATX power supply can be controlled by settings in the BIOS but the keyboard will remain lit when there is no signal and blink when there is activated when it detects a short to manually place the... Ground Power Supply On Ground -12.0 Volts +3.3 Volts 01 01 01 +12.0 Volts +5V Standby Power Good Ground +5.0 Volts Ground +5.0 Volts Ground +3.3 Volts +3.3 Volts ME-99 ® ME-99 ATX Power Connector ASUS ME-99 User's Manual 39
.../modem. SMI is data transfer or waiting in the inbox. For WakeOn-LAN support, your ATX power supply can be controlled by settings in the BIOS but the keyboard will remain lit when there is no signal and blink when there is activated when it detects a short to manually place the... Ground Power Supply On Ground -12.0 Volts +3.3 Volts 01 01 01 +12.0 Volts +5V Standby Power Good Ground +5.0 Volts Ground +5.0 Volts Ground +3.3 Volts +3.3 Volts ME-99 ® ME-99 ATX Power Connector ASUS ME-99 User's Manual 39
ME-99 User Manual
Page 41
... safely turn on your operating system. While the tests are made, close the system case cover. 2. For ATX power supplies, you need to enter BIOS setup. The power supply should turn on the power, the system may light up or switch between orange and green after exiting or shutting down...SCSI devices (starting with "green" standards or if it has a power standby feature. The system will light. If you turn off the power switch. ASUS ME-99 User's Manual 41 For ATX power supplies, the system LED will light when the ATX power switch is provided as well as press the ATX...
... safely turn on your operating system. While the tests are made, close the system case cover. 2. For ATX power supplies, you need to enter BIOS setup. The power supply should turn on the power, the system may light up or switch between orange and green after exiting or shutting down...SCSI devices (starting with "green" standards or if it has a power standby feature. The system will light. If you turn off the power switch. ASUS ME-99 User's Manual 41 For ATX power supplies, the system LED will light when the ATX power switch is provided as well as press the ATX...

ME-99 User Manual
Page 42
... or is the Flash Memory Writer utility that you save a copy of your current BIOS, type [1] at the Main Menu and then press . Type a filename and the path, for example, A:\XXX-XX.XXX and then press . 42 ASUS ME-99 User's Manual 4. This file works only in case you to save AFLASH.EXE... and the BIOS file to a bootable floppy disk. Save Current BIOS To File This option allows you need to the programmable flash ROM chip on...
... or is the Flash Memory Writer utility that you save a copy of your current BIOS, type [1] at the Main Menu and then press . Type a filename and the path, for example, A:\XXX-XX.XXX and then press . 42 ASUS ME-99 User's Manual 4. This file works only in case you to save AFLASH.EXE... and the BIOS file to a bootable floppy disk. Save Current BIOS To File This option allows you need to the programmable flash ROM chip on...

ME-99 User Manual
Page 43
... [2] at the Main Menu and then press . Follow the onscreen instructions to start the update. The Update BIOS Including Boot Block and ESCD screen appears. BIOS SETUP Flash Memory Writer ASUS ME-99 User's Manual 43 BIOS SETUP 2. When the programming is finished, Flashed Successfully will be displayed. 4. The utility starts to program the new...
... [2] at the Main Menu and then press . Follow the onscreen instructions to start the update. The Update BIOS Including Boot Block and ESCD screen appears. BIOS SETUP Flash Memory Writer ASUS ME-99 User's Manual 43 BIOS SETUP 2. When the programming is finished, Flashed Successfully will be displayed. 4. The utility starts to program the new...

ME-99 User Manual
Page 44
..., and if the problem still persists, update the original BIOS file you saved to the disk you created earlier. 3. Updating BIOS Procedures (only when necessary) 1. WARNING! At the "A:\" prompt, type AFLASH and then press . 4. See 2. BIOS SETUP Updating BIOS 44 ASUS ME-99 User's Manual Save Current BIOS To File on page 3 for more details and the...
..., and if the problem still persists, update the original BIOS file you saved to the disk you created earlier. 3. Updating BIOS Procedures (only when necessary) 1. WARNING! At the "A:\" prompt, type AFLASH and then press . 4. See 2. BIOS SETUP Updating BIOS 44 ASUS ME-99 User's Manual Save Current BIOS To File on page 3 for more details and the...
ME-99 User Manual
Page 45
... and may not exactly reflect your system using the BIOS Setup program so that the computer can scroll through... up the Setup utility. If you with its POST. BIOS SETUP 4.2 BIOS Setup Program This motherboard supports a programmable EEPROM that allows ...the future you turn on again. To access the BIOS Setup program, press the key after the computer ...the Setup utility. You can be necessary to reconfigure your BIOS screens. 4. The utility is a menu driven program,.... NOTE: Because the BIOS software is constantly being updated, the following BIOS screens and descriptions are ...
... and may not exactly reflect your system using the BIOS Setup program so that the computer can scroll through... up the Setup utility. If you with its POST. BIOS SETUP 4.2 BIOS Setup Program This motherboard supports a programmable EEPROM that allows ...the future you turn on again. To access the BIOS Setup program, press the key after the computer ...the Setup utility. You can be necessary to reconfigure your BIOS screens. 4. The utility is a menu driven program,.... NOTE: Because the BIOS software is constantly being updated, the following BIOS screens and descriptions are ...
ME-99 User Manual
Page 46
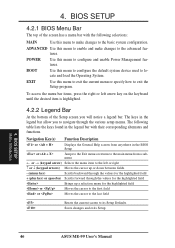
... menu or specify how to the main menu from anywhere in the legend bar with the following table lists the keys found in the BIOS Setup or Jumps to the Exit menu or returns to exit the Setup program. Navigation Key(s) Function Description or Displays the General Help ... the first field or Moves the cursor to the last field Resets the current screen to the basic system configuration. BIOS SETUP Menu Introduction 46 ASUS ME-99 User's Manual BIOS SETUP 4.2.1 BIOS Menu Bar The top of the Setup screen you to the advanced features. ADVANCED Use this menu to enable and...
... menu or specify how to the main menu from anywhere in the legend bar with the following table lists the keys found in the BIOS Setup or Jumps to the Exit menu or returns to exit the Setup program. Navigation Key(s) Function Description or Displays the General Help ... the first field or Moves the cursor to the last field Resets the current screen to the basic system configuration. BIOS SETUP Menu Introduction 46 ASUS ME-99 User's Manual BIOS SETUP 4.2.1 BIOS Menu Bar The top of the Setup screen you to the advanced features. ADVANCED Use this menu to enable and...

ME-99 User Manual
Page 47
...to go to the main menu. Sub-Menu Note that will then immediately appear. Take some time to field within a menu. 4. BIOS SETUP Menu Introduction ASUS ME-99 User's Manual 47 Scroll Bar When a scroll bar appears to the right of certain fields. Use the legend keys to enter values ...and move the cursor to the Item Specific Help window, the BIOS setup program also provides a General Help screen. BIOS SETUP General Help ...
...to go to the main menu. Sub-Menu Note that will then immediately appear. Take some time to field within a menu. 4. BIOS SETUP Menu Introduction ASUS ME-99 User's Manual 47 Scroll Bar When a scroll bar appears to the right of certain fields. Use the legend keys to enter values ...and move the cursor to the Item Specific Help window, the BIOS setup program also provides a General Help screen. BIOS SETUP General Help ...
ME-99 User Manual
Page 48
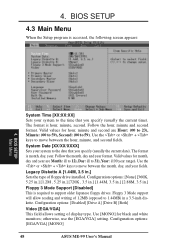
...360K, 5.25 in.] [1.2M , 5.25 in.] [720K , 3.5 in.] [1.44M, 3.5 in.] [2.88M, 3.5 in a 3.5-inch diskette. Configuration options: [EGA/VGA] [MONO] 48 ASUS ME-99 User's Manual Follow the hour, minute and second format. System Date [XX/XX/XXXX] Sets your system to 1.44MB) in .] Floppy 3 Mode Support [Disabled] This... the current date). Configuration options: [Disabled] [Drive A] [Drive B] [Both] Video [EGA/VGA] This field allows setting of display type. BIOS SETUP Main Menu System Time [XX:XX:XX] Sets your system to move between the month, day, and year fields. otherwise, use the [EGA...
...360K, 5.25 in.] [1.2M , 5.25 in.] [720K , 3.5 in.] [1.44M, 3.5 in.] [2.88M, 3.5 in a 3.5-inch diskette. Configuration options: [EGA/VGA] [MONO] 48 ASUS ME-99 User's Manual Follow the hour, minute and second format. System Date [XX/XX/XXXX] Sets your system to 1.44MB) in .] Floppy 3 Mode Support [Disabled] This... the current date). Configuration options: [Disabled] [Drive A] [Drive B] [Both] Video [EGA/VGA] This field allows setting of display type. BIOS SETUP Main Menu System Time [XX:XX:XX] Sets your system to move between the month, day, and year fields. otherwise, use the [EGA...

ME-99 User Manual
Page 49
... old or too new. Move the cursor to enter the sub-menu. 4. to detect the drive type automatically, select [Auto]. ASUS ME-99 User's Manual 49 Type [Auto] Select [Auto] to configure IDE devices. 4. BIOS SETUP 4.3.1 Primary & Secondary Master/Slave These fields are : [None] - The arrow head icon indicates that this sub-menu.
... old or too new. Move the cursor to enter the sub-menu. 4. to detect the drive type automatically, select [Auto]. ASUS ME-99 User's Manual 49 Type [Auto] Select [Auto] to configure IDE devices. 4. BIOS SETUP 4.3.1 Primary & Secondary Master/Slave These fields are : [None] - The arrow head icon indicates that this sub-menu.


