User Manual
Page 18
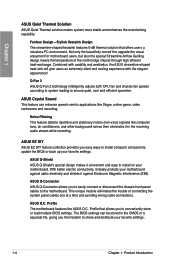
...panel cables to install computer components, update the BIOS or back up your motherboard. This unique module eliminates the trouble of the north bridge chipset through high efficient heat-exchange. ASUS Crystal Sound This feature can be stored in the incoming audio stream while recording. ...Not only the beautifully curved fins upgrade the visual enjoyment for motherboard users, but also the special Streamline Airflow Guiding design...
...panel cables to install computer components, update the BIOS or back up your motherboard. This unique module eliminates the trouble of the north bridge chipset through high efficient heat-exchange. ASUS Crystal Sound This feature can be stored in the incoming audio stream while recording. ...Not only the beautifully curved fins upgrade the visual enjoyment for motherboard users, but also the special Streamline Airflow Guiding design...

User Manual
Page 28
Push down the retention bracket lock on the retention mechanism to secure the heatsink and fan to the retention module base. Chapter 2 2. Align the other end of the retention bracket to the retention module base. 3. Ensure that the retention bracket is in place. 4. A clicking sound denotes that the fan and heatsink assembly perfectly fits the retention mechanism module base, otherwise you cannot snap the retention bracket in place. Attach one end of the retention bracket to the module base. 2-8 Chapter 2: Hardware information
Push down the retention bracket lock on the retention mechanism to secure the heatsink and fan to the retention module base. Chapter 2 2. Align the other end of the retention bracket to the retention module base. 3. Ensure that the retention bracket is in place. 4. A clicking sound denotes that the fan and heatsink assembly perfectly fits the retention mechanism module base, otherwise you cannot snap the retention bracket in place. Attach one end of the retention bracket to the module base. 2-8 Chapter 2: Hardware information
User Manual
Page 49
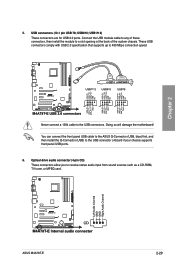
...to any of the system chassis. You can connect the front panel USB cable to the ASUS Q-Connector (USB, blue) first, and then install the Q-Connector (USB) to receive stereo audio input from sound sources such as a CD-ROM, TV tuner, or MPEG card. USB1112) These connectors .... USB connectors (10-1 pin USB 78; Doing so will damage the motherboard! USB910; Optical drive audio connector (4-pin CD) These connectors allow you to the USB connector onboard if your chassis supports front panel USB ports. 6. Chapter 2 5. ASUS M4A78T-E 2-29 Never connect a 1394 cable to the USB connectors.
...to any of the system chassis. You can connect the front panel USB cable to the ASUS Q-Connector (USB, blue) first, and then install the Q-Connector (USB) to receive stereo audio input from sound sources such as a CD-ROM, TV tuner, or MPEG card. USB1112) These connectors .... USB connectors (10-1 pin USB 78; Doing so will damage the motherboard! USB910; Optical drive audio connector (4-pin CD) These connectors allow you to the USB connector onboard if your chassis supports front panel USB ports. 6. Chapter 2 5. ASUS M4A78T-E 2-29 Never connect a 1394 cable to the USB connectors.


