
User Manual
Page 4
... shut down function 2-42 2.10.2 Using the dual function power switch 2-42 Chapter 3: BIOS setup 3.1 Managing and updating your BIOS 3-1 3.1.1 ASUS Update utility 3-1 3.1.2 Creating a bootable floppy disk 3-4 3.1.3 ASUS EZ Flash 2 utility 3-5 3.1.4 Updating the BIOS 3-6 3.1.5 Saving the current BIOS file 3-8 3.1.6 ASUS CrashFree BIOS 3 utility 3-9 3.2 BIOS setup program 3-11 3.2.1 BIOS menu screen 3-12 3.2.2 Menu bar 3-12 3.2.3 Legend bar 3-13 3.2.4 Menu items 3-13...
... shut down function 2-42 2.10.2 Using the dual function power switch 2-42 Chapter 3: BIOS setup 3.1 Managing and updating your BIOS 3-1 3.1.1 ASUS Update utility 3-1 3.1.2 Creating a bootable floppy disk 3-4 3.1.3 ASUS EZ Flash 2 utility 3-5 3.1.4 Updating the BIOS 3-6 3.1.5 Saving the current BIOS file 3-8 3.1.6 ASUS CrashFree BIOS 3 utility 3-9 3.2 BIOS setup program 3-11 3.2.1 BIOS menu screen 3-12 3.2.2 Menu bar 3-12 3.2.3 Legend bar 3-13 3.2.4 Menu items 3-13...

User Manual
Page 9
... the nVIDIA Hybrid SLI™ feature and shows the graphics card installation procedures. ASUS websites The ASUS website provides updated information on the motherboard. • Chapter 3: BIOS setup This chapter tells how to perform when installing system components. How this guide...describes the contents of the switches, jumpers, and connectors on ASUS hardware and software products. It includes description of the support DVD that you need when installing and configuring the motherboard. Optional documentation Your product package may include optional documentation, such...
... the nVIDIA Hybrid SLI™ feature and shows the graphics card installation procedures. ASUS websites The ASUS website provides updated information on the motherboard. • Chapter 3: BIOS setup This chapter tells how to perform when installing system components. How this guide...describes the contents of the switches, jumpers, and connectors on ASUS hardware and software products. It includes description of the support DVD that you need when installing and configuring the motherboard. Optional documentation Your product package may include optional documentation, such...

User Manual
Page 12
...-language BIOS ASUS AI NET 2 1 x PS/2 keyboard port (purple) 1 x Coaxial S/PDIF Out port 1 x Optical S/PDIF Out port 1 x HDMI Out port 1 x D-sub Out port 2 x LAN ports (RJ-45) 6 x USB 2.0/1.1 ports 8-channel audio I/O (continued on the rear panel) ASUS Workstation Features: - ASUS Q-Connector - ASUS SASsaby cards support ASUS Power Saving Solution: - ASUS Heat-pipe thermal solution - ASUS EZ Flash 2 - M3N WS specifications...
...-language BIOS ASUS AI NET 2 1 x PS/2 keyboard port (purple) 1 x Coaxial S/PDIF Out port 1 x Optical S/PDIF Out port 1 x HDMI Out port 1 x D-sub Out port 2 x LAN ports (RJ-45) 6 x USB 2.0/1.1 ports 8-channel audio I/O (continued on the rear panel) ASUS Workstation Features: - ASUS Q-Connector - ASUS SASsaby cards support ASUS Power Saving Solution: - ASUS Heat-pipe thermal solution - ASUS EZ Flash 2 - M3N WS specifications...
User Manual
Page 13
... M3N WS specifications summary Internal I/O connectors 3 x USB connectors support additional 6 USB ports 1 x Floppy disk drive connector 1 x IDE connector 6 x SATA connectors 1 x CPU Fan connector 2 x Chassis Fan connectors 1 x Power Fan connector 2 x IEEE1394a connectors 1 x Front panel audio connector 1 x Chassis Intrusion connector 1 x CD audio in 1 x 24-pin ATX Power connector 1 x 4-pin ATX 12V Power connector 1 x System Panel (Q-Connector) BIOS...
... M3N WS specifications summary Internal I/O connectors 3 x USB connectors support additional 6 USB ports 1 x Floppy disk drive connector 1 x IDE connector 6 x SATA connectors 1 x CPU Fan connector 2 x Chassis Fan connectors 1 x Power Fan connector 2 x IEEE1394a connectors 1 x Front panel audio connector 1 x Chassis Intrusion connector 1 x CD audio in 1 x 24-pin ATX Power connector 1 x 4-pin ATX 12V Power connector 1 x System Panel (Q-Connector) BIOS...
User Manual
Page 21
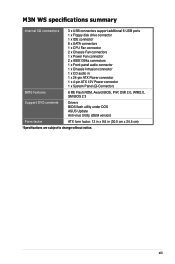
...ASUS M3N WS 1-5 ASUS Stack Cool 2 Stack Cool 2 is the most reliable fanless thermal solution to date. The Heat Pipe design is a fan-less and zero-noise cooling solution offered exclusively by ASUS. DO NOT uninstall the heat-pipe by the critical components to install computer components, update the BIOS or back up your motherboard... against static electricity and shields it can be carried away by the chipsets to install side-flow fan or passive cooler. ASUS Q-Shield The specially designed ASUS Q-Shield does without ...
...ASUS M3N WS 1-5 ASUS Stack Cool 2 Stack Cool 2 is the most reliable fanless thermal solution to date. The Heat Pipe design is a fan-less and zero-noise cooling solution offered exclusively by ASUS. DO NOT uninstall the heat-pipe by the critical components to install computer components, update the BIOS or back up your motherboard... against static electricity and shields it can be carried away by the chipsets to install side-flow fan or passive cooler. ASUS Q-Shield The specially designed ASUS Q-Shield does without ...

User Manual
Page 22
... a time and avoiding wrong cable connections. This unique module eliminates the trouble of booting the BIOS. Update your screen. ASUS MyLogo 2™ This feature allows you to the motherboard. feature of the motherboard BIOS allows automatic re-setting to the BIOS default settings in case the system hangs due to overclock the CPU speed in Windows...
... a time and avoiding wrong cable connections. This unique module eliminates the trouble of booting the BIOS. Update your screen. ASUS MyLogo 2™ This feature allows you to the motherboard. feature of the motherboard BIOS allows automatic re-setting to the BIOS default settings in case the system hangs due to overclock the CPU speed in Windows...
User Manual
Page 41
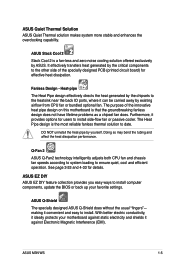
... to install expansion cards. Failure to do not need to use . 4. Remove the system unit cover (if your motherboard is completely seated on the slot. 5. Turn on BIOS setup. 2. Install the software drivers for the card. 2. Secure the card to unplug the power cord before adding... expansion cards that the cards do so may need IRQ assignments; Before installing the expansion card, read the documentation that you removed earlier. 6. ASUS M3N WS 2-17 Align the card connector with it by adjusting the software settings. 1. When using PCI cards on the next page. 3. See Chapter...
... to install expansion cards. Failure to do not need to use . 4. Remove the system unit cover (if your motherboard is completely seated on the slot. 5. Turn on BIOS setup. 2. Install the software drivers for the card. 2. Secure the card to unplug the power cord before adding... expansion cards that the cards do so may need IRQ assignments; Before installing the expansion card, read the documentation that you removed earlier. 6. ASUS M3N WS 2-17 Align the card connector with it by adjusting the software settings. 1. When using PCI cards on the next page. 3. See Chapter...

User Manual
Page 45
...the cap back to the chipset limitation, AC power off and on CLRTC jumper default position. ASUS M3N WS 2-21 Turn OFF the computer and unplug the power cord. 2. Hold down and reboot the system so the BIOS can clear the CMOS memory of date, time, and system setup parameters by erasing the ... 3. Move the jumper cap from pins 1-2 (default) to overclocking, use the C.P.R. (CPU Parameter Recall) feature. Shut down the key during the boot process and enter BIOS setup to clear the Real Time Clock (RTC) RAM in CMOS, which include system setup information such as system passwords.
...the cap back to the chipset limitation, AC power off and on CLRTC jumper default position. ASUS M3N WS 2-21 Turn OFF the computer and unplug the power cord. 2. Hold down and reboot the system so the BIOS can clear the CMOS memory of date, time, and system setup parameters by erasing the ... 3. Move the jumper cap from pins 1-2 (default) to overclocking, use the C.P.R. (CPU Parameter Recall) feature. Shut down the key during the boot process and enter BIOS setup to clear the Real Time Clock (RTC) RAM in CMOS, which include system setup information such as system passwords.
User Manual
Page 52
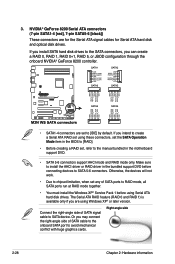
... hard disk and optical disk drives. Connect the right-angle side of SATA cable to the onboard SATA port to the manual bundled in the BIOS to [RAID]. • Before creating a RAID set to SATA 5-6 connectors. 3. Right angle side 2-28 Chapter 2: Hardware information If you install SATA hard disk drives to... the SATA connectors, you intend to create a Serial ATA RAID set using these connectors, set the SATA Operation Mode item in the motherboard support DVD. • SATA 5-6 connectors support AHCI mode and RAID mode only.
... hard disk and optical disk drives. Connect the right-angle side of SATA cable to the onboard SATA port to the manual bundled in the BIOS to [RAID]. • Before creating a RAID set to SATA 5-6 connectors. 3. Right angle side 2-28 Chapter 2: Hardware information If you install SATA hard disk drives to... the SATA connectors, you intend to create a Serial ATA RAID set using these connectors, set the SATA Operation Mode item in the motherboard support DVD. • SATA 5-6 connectors support AHCI mode and RAID mode only.
User Manual
Page 60
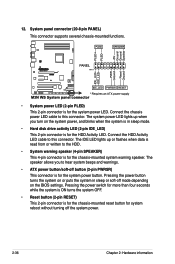
...connector. The system power LED lights up or flashes when data is read from or written to hear system beeps and warnings. • ATX power button/soft-off button (2-pin PWRSR) This connector is for the system power button. Connect the chassis power LED cable to this ...OFF. • Reset button (2-pin RESET) This 2-pin connector is for the chassis-mounted system warning speaker. The speaker allows you turn on the BIOS settings. System panel connector (20-8 pin PANEL) This connector supports several chassis-mounted functions. • System power LED (2-pin PLED) This 2-pin ...
...connector. The system power LED lights up or flashes when data is read from or written to hear system beeps and warnings. • ATX power button/soft-off button (2-pin PWRSR) This connector is for the system power button. Connect the chassis power LED cable to this ...OFF. • Reset button (2-pin RESET) This 2-pin connector is for the chassis-mounted system warning speaker. The speaker allows you turn on the BIOS settings. System panel connector (20-8 pin PANEL) This connector supports several chassis-mounted functions. • System power LED (2-pin PLED) This 2-pin ...
User Manual
Page 63
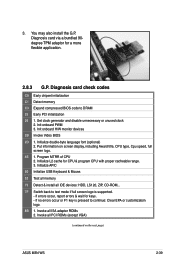
...bundled 90degree TPM adaptor for CPU & program CPU with proper cacheable range. 3. Init onboard PWM 3. Init onboard H/W monitor devices 2B Invoke Video BIOS 2D 1. Initialize double-byte language font (optional) 2. Initialize L2 cache for a more flexible application. 2.8.3 G.P. Invoke all IDE devices: HDD,...Early chipset initialization C1 Detect memory C3 Expand compressed BIOS code to continue: Clear EPA or customizatoin logo. 8B 1. Set clock generator and disable unnecessary or unused clock 2. Put information on the next page) ASUS M3N WS 2-39 If errors occur, report errors & wait...
...bundled 90degree TPM adaptor for CPU & program CPU with proper cacheable range. 3. Init onboard PWM 3. Init onboard H/W monitor devices 2B Invoke Video BIOS 2D 1. Initialize double-byte language font (optional) 2. Initialize L2 cache for a more flexible application. 2.8.3 G.P. Invoke all IDE devices: HDD,...Early chipset initialization C1 Detect memory C3 Expand compressed BIOS code to continue: Clear EPA or customizatoin logo. 8B 1. Set clock generator and disable unnecessary or unused clock 2. Put information on the next page) ASUS M3N WS 2-39 If errors occur, report errors & wait...

User Manual
Page 65
...If your retailer for the first time 1. If you do not see anything within 30 seconds from the time you press the ATX power button. At power on test. ASUS M3N WS 2-41 Follow the instructions in the following order: a. Be sure that is equipped with "green" standards or if it has...messages appear on the devices in Chapter 3. Check the jumper settings and connections or call your monitor complies with a surge protector. 5. BIOS beep codes BIOS Beep One short beep One continuous beep followed by two short beeps then a pause (repeated) One continuous beep followed by three short...
...If your retailer for the first time 1. If you do not see anything within 30 seconds from the time you press the ATX power button. At power on test. ASUS M3N WS 2-41 Follow the instructions in the following order: a. Be sure that is equipped with "green" standards or if it has...messages appear on the devices in Chapter 3. Check the jumper settings and connections or call your monitor complies with a surge protector. 5. BIOS beep codes BIOS Beep One short beep One continuous beep followed by two short beeps then a pause (repeated) One continuous beep followed by three short...

User Manual
Page 66
... the computer. 3. Pressing the power switch for more than four seconds puts the system to sleep mode or to soft-off mode regardless of the BIOS setting. 2.10 Turning off after Windows® shuts down. Click the Turn Off button to section 3.5 Power Menu in Chapter 3 for less than four seconds... lets the system enter the soft-off mode, depending on the BIOS setting. If you are using Windows® XP: 1. The power supply should turn off the computer 2.10.1 Using the OS shut down function If ...
... the computer. 3. Pressing the power switch for more than four seconds puts the system to sleep mode or to soft-off mode regardless of the BIOS setting. 2.10 Turning off after Windows® shuts down. Click the Turn Off button to section 3.5 Power Menu in Chapter 3 for less than four seconds... lets the system enter the soft-off mode, depending on the BIOS setting. If you are using Windows® XP: 1. The power supply should turn off the computer 2.10.1 Using the OS shut down function If ...
User Manual
Page 67
This chapter tells how to change the BIOS se3tup system settings through the BIOS Setup menus. Detailed descriptions of the BIOS parameters are also provided.
This chapter tells how to change the BIOS se3tup system settings through the BIOS Setup menus. Detailed descriptions of the BIOS parameters are also provided.
User Manual
Page 68
Chapter summary 3 3.1 Managing and updating your BIOS 3-1 3.2 BIOS setup program 3-11 3.3 Main menu 3-15 3.4 Advanced menu 3-20 3.5 Power menu 3-31 3.6 Boot menu 3-35 3.7 Tools menu 3-39 3.8 Exit menu 3-42 ASUS M3N WS
Chapter summary 3 3.1 Managing and updating your BIOS 3-1 3.2 BIOS setup program 3-11 3.3 Main menu 3-15 3.4 Advanced menu 3-20 3.5 Power menu 3-31 3.6 Boot menu 3-35 3.7 Tools menu 3-39 3.8 Exit menu 3-42 ASUS M3N WS
User Manual
Page 69
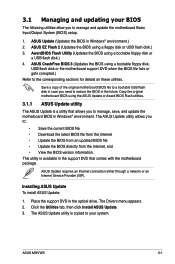
... an Internet Service Provider (ISP). ASUS M3N WS 3-1 AwardBIOS Flash Utility (Updates the BIOS using a floppy disk or USB flash disk.) 3. This utility is available in Windows® environment.) 2. The Drivers menu appears. 2. ASUS EZ Flash 2 (Updates the BIOS using a bootable floppy disk or a USB flash disk.) 4. Save a copy of the original motherboard BIOS file to a bootable USB...
... an Internet Service Provider (ISP). ASUS M3N WS 3-1 AwardBIOS Flash Utility (Updates the BIOS using a floppy disk or USB flash disk.) 3. This utility is available in Windows® environment.) 2. The Drivers menu appears. 2. ASUS EZ Flash 2 (Updates the BIOS using a bootable floppy disk or a USB flash disk.) 4. Save a copy of the original motherboard BIOS file to a bootable USB...
User Manual
Page 70
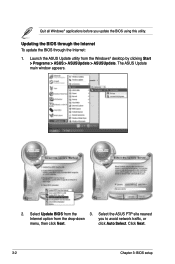
Select Update BIOS from the Windows® desktop by clicking Start > Programs > ASUS > ASUSUpdate > ASUSUpdate. The ASUS Update main window appears. 2. Select the ASUS FTP site nearest Internet option from the drop‑down you update the BIOS using this utility. click Auto Select. Updating the BIOS through the Internet To update the BIOS through the Internet: 1. Click Next. 3-2 Chapter 3: BIOS setup Quit all Windows® applications before you to avoid network traffic, or menu, then click Next. Launch the ASUS Update utility from the 3.
Select Update BIOS from the Windows® desktop by clicking Start > Programs > ASUS > ASUSUpdate > ASUSUpdate. The ASUS Update main window appears. 2. Select the ASUS FTP site nearest Internet option from the drop‑down you update the BIOS using this utility. click Auto Select. Updating the BIOS through the Internet To update the BIOS through the Internet: 1. Click Next. 3-2 Chapter 3: BIOS setup Quit all Windows® applications before you to avoid network traffic, or menu, then click Next. Launch the ASUS Update utility from the 3.
User Manual
Page 71
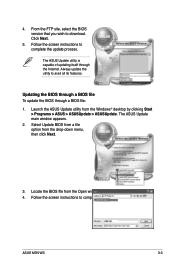
... all its features. Launch the ASUS Update utility from the Open window, then click Open. 4. Follow the screen instructions to download. 4. From the FTP site, select the BIOS version that you wish to complete the update process. Select Update BIOS from a file option from the drop‑down menu, then click Next. 3. M3N WS.rom M3N WS ASUS M3N WS 3-3
... all its features. Launch the ASUS Update utility from the Open window, then click Open. 4. Follow the screen instructions to download. 4. From the FTP site, select the BIOS version that you wish to complete the update process. Select Update BIOS from a file option from the drop‑down menu, then click Next. 3. M3N WS.rom M3N WS ASUS M3N WS 3-3

User Manual
Page 72
... Drive icon. d. Click File from the Windows® desktop, then select Computer. Click from the menu, then select Format. c. Copy the original or the latest motherboard BIOS file to the bootable floppy disk. 3-4 Chapter...
... Drive icon. d. Click File from the Windows® desktop, then select Computer. Click from the menu, then select Format. c. Copy the original or the latest motherboard BIOS file to the bootable floppy disk. 3-4 Chapter...

User Manual
Page 73
... to go through the long process of booting from a floppy disk and using EZ Flash 2: 1. ASUS M3N WS 3-5 When the correct BIOS file is found , EZ Flash 2 performs the BIOS update process and automatically reboots the system when done. • This function can support devices such as USB flash...menu to select EZ Flash 2 and press to download the latest BIOS file for the motherboard. 2. To update the BIOS using a DOS‑based utility. 3.1.3 ASUS EZ Flash 2 utility The ASUS EZ Flash 2 feature allows you to update the BIOS without having to a floppy disk or a USB flash disk, then...
... to go through the long process of booting from a floppy disk and using EZ Flash 2: 1. ASUS M3N WS 3-5 When the correct BIOS file is found , EZ Flash 2 performs the BIOS update process and automatically reboots the system when done. • This function can support devices such as USB flash...menu to select EZ Flash 2 and press to download the latest BIOS file for the motherboard. 2. To update the BIOS using a DOS‑based utility. 3.1.3 ASUS EZ Flash 2 utility The ASUS EZ Flash 2 feature allows you to update the BIOS without having to a floppy disk or a USB flash disk, then...


