
User Manual
Page 17
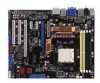
... cable Accessories 1�x�I��/�O���S���h��ie���ld� 1 x ASUS Q-Connector Kit (USB, 1394, system panel; Thank you start installing the motherboard, and hardware devices on it another standout in your package with the list below. 1.2 Package contents Check your retailer. ASUS M3N WS 1-1 Retail version only) 1 x G.P. Diagnosis Card (Retail version only) Application DVD ASUS motherboard support DVD Documentation User guide...
... cable Accessories 1�x�I��/�O���S���h��ie���ld� 1 x ASUS Q-Connector Kit (USB, 1394, system panel; Thank you start installing the motherboard, and hardware devices on it another standout in your package with the list below. 1.2 Package contents Check your retailer. ASUS M3N WS 1-1 Retail version only) 1 x G.P. Diagnosis Card (Retail version only) Application DVD ASUS motherboard support DVD Documentation User guide...
User Manual
Page 21
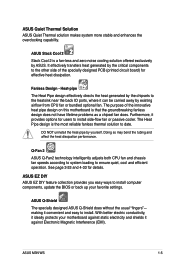
... dissipation performance. Q-Fan 2 ASUS Q-Fan2 technology intelligently adjusts both CPU fan and chassis fan speeds according to system loading to the heatsink near the back IO ports, where it can be carried away by existing airflow from CPU fan or bundled optional fan. Heat-pipe The Heat Pipe design effectively directs the heat generated by ASUS. See page 3-33 and 4-33 for users to install. ASUS Q-Shield The specially...
... dissipation performance. Q-Fan 2 ASUS Q-Fan2 technology intelligently adjusts both CPU fan and chassis fan speeds according to system loading to the heatsink near the back IO ports, where it can be carried away by existing airflow from CPU fan or bundled optional fan. Heat-pipe The Heat Pipe design effectively directs the heat generated by ASUS. See page 3-33 and 4-33 for users to install. ASUS Q-Shield The specially...
User Manual
Page 41
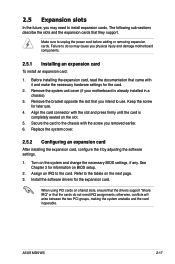
Replace the system cover. 2.5.2 Configuring an expansion card After installing the expansion card, configure the it and make the necessary hardware settings for later use . See Chapter 3 for the expansion card. ASUS M3N WS 2-17 Secure the card to install expansion cards. Assign an IRQ to the tables on the next page. 3. Refer to the card. Install the software drivers for information on the slot. 5. Align the card connector with the screw you...
Replace the system cover. 2.5.2 Configuring an expansion card After installing the expansion card, configure the it and make the necessary hardware settings for later use . See Chapter 3 for the expansion card. ASUS M3N WS 2-17 Secure the card to install expansion cards. Assign an IRQ to the tables on the next page. 3. Refer to the card. Install the software drivers for information on the slot. 5. Align the card connector with the screw you...
User Manual
Page 48
HDMI Out port. Using the CPU/Memory of higher speed and bandwidth with dual-VGA outputs that you connect 2 monitors to both the onboard VGA and HDMI ports. • With the bundled HDMI-to the onboard VGA port or the HDMI/DVI port at the same time if you have connected your reference. This port connects an external audio output device via a optical S/PDIF cable. 16. These 4-pin Universal Serial Bus (USB) ports are available for connecting USB 2.0 devices. 13. USB 2.0 ports 1 and 2. USB 2.0 ports 3 and 4. These 4-pin Universal Serial Bus (USB) ports are...
HDMI Out port. Using the CPU/Memory of higher speed and bandwidth with dual-VGA outputs that you connect 2 monitors to both the onboard VGA and HDMI ports. • With the bundled HDMI-to the onboard VGA port or the HDMI/DVI port at the same time if you have connected your reference. This port connects an external audio output device via a optical S/PDIF cable. 16. These 4-pin Universal Serial Bus (USB) ports are available for connecting USB 2.0 devices. 13. USB 2.0 ports 1 and 2. USB 2.0 ports 3 and 4. These 4-pin Universal Serial Bus (USB) ports are...
User Manual
Page 49
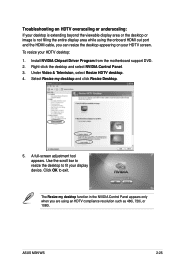
... HDTV compliance resolution such as 480i, 720i, or 1080i. Right-click the desktop and select NVIDIA Control Panel. 3. Select Resize my desktop and click Resize Desktop. 5. Use the scroll bar to resize the desktop to exit. Click OK to fit your HDTV desktop: 1. ASUS M3N WS 2-25 A full-screen adjustment tool appears. To resize your display device. Troubleshooting on your HDTV screen. Install NVIDIA Chipset Driver Program from the motherboard support DVD. 2.
... HDTV compliance resolution such as 480i, 720i, or 1080i. Right-click the desktop and select NVIDIA Control Panel. 3. Select Resize my desktop and click Resize Desktop. 5. Use the scroll bar to resize the desktop to exit. Click OK to fit your HDTV desktop: 1. ASUS M3N WS 2-25 A full-screen adjustment tool appears. To resize your display device. Troubleshooting on your HDTV screen. Install NVIDIA Chipset Driver Program from the motherboard support DVD. 2.
User Manual
Page 52
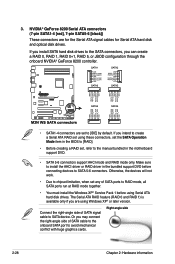
NVIDIA® GeForce 8200 Serial ATA connectors (7-pin SATA1-4 [red], 7-pin SATA5-6 [black]) These connectors are set to [IDE] by default. If you install SATA hard disk drives to the manual bundled in the bundled support DVD before using Windows XP® or later version. Otherwise, the devices will not work. • Due to chipset limitation, when set , refer to the SATA connectors, you are using Serial ATA hard disk drives. Connect the right-angle side of SATA signal cable to SATA 5-6 connectors. Right angle side...
NVIDIA® GeForce 8200 Serial ATA connectors (7-pin SATA1-4 [red], 7-pin SATA5-6 [black]) These connectors are set to [IDE] by default. If you install SATA hard disk drives to the manual bundled in the bundled support DVD before using Windows XP® or later version. Otherwise, the devices will not work. • Due to chipset limitation, when set , refer to the SATA connectors, you are using Serial ATA hard disk drives. Connect the right-angle side of SATA signal cable to SATA 5-6 connectors. Right angle side...
User Manual
Page 57
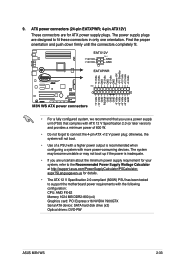
... may not boot up if the power is inadequate. • If you use a power supply unit (PSU) that complies with ATX 12 V Specification 2.0 (or later version) and provides a minimum power of a PSU with a higher power output is recommended when configuring a system with the following configuration: CPU: AMD FX-62 Memory 1024 MB DDR2-800 (x4) Graphics card: PCI Express x16 NVIDIA 7900GTX Serial ATA device: SATA hard disk drive (x2) Optical drives: DVD-RW ASUS M3N WS 2-33 The power supply plugs are...
... may not boot up if the power is inadequate. • If you use a power supply unit (PSU) that complies with ATX 12 V Specification 2.0 (or later version) and provides a minimum power of a PSU with a higher power output is recommended when configuring a system with the following configuration: CPU: AMD FX-62 Memory 1024 MB DDR2-800 (x4) Graphics card: PCI Express x16 NVIDIA 7900GTX Serial ATA device: SATA hard disk drive (x2) Optical drives: DVD-RW ASUS M3N WS 2-33 The power supply plugs are...
User Manual
Page 63
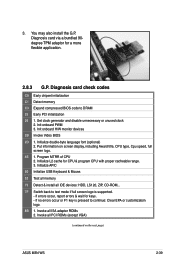
...) ASUS M3N WS 2-39 If errors occur, report errors & wait for a more flexible application. 2.8.3 G.P. Invoke all PCI ROMs (except VGA) (continued on screen display, including Award title, CPU type, Cpu speed, full screen logo. 4E 1. Init onboard PWM 3. If no errors occur or F1 key is supported. - Init onboard H/W monitor devices 2B Invoke Video BIOS 2D 1. Initialize APIC 50 Initialize USB Keyboard & Mouse. 52 Test all memory 75 Detect & install all ISA adapter ROMs 2. Invoke all IDE devices: HDD, LS120, ZIP, CD-ROM... 7F Switch...
...) ASUS M3N WS 2-39 If errors occur, report errors & wait for a more flexible application. 2.8.3 G.P. Invoke all PCI ROMs (except VGA) (continued on screen display, including Award title, CPU type, Cpu speed, full screen logo. 4E 1. Init onboard PWM 3. If no errors occur or F1 key is supported. - Init onboard H/W monitor devices 2B Invoke Video BIOS 2D 1. Initialize APIC 50 Initialize USB Keyboard & Mouse. 52 Test all memory 75 Detect & install all ISA adapter ROMs 2. Invoke all IDE devices: HDD, LS120, ZIP, CD-ROM... 7F Switch...
User Manual
Page 69
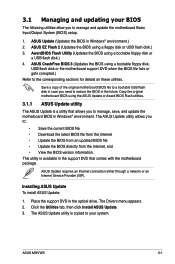
... these utilities. ASUS CrashFree BIOS 3 (Updates the BIOS using a bootable floppy disk or a USB flash disk.) 4. Save a copy of the original motherboard BIOS file to a bootable USB flash disk in case you to manage and update the motherboard Basic Input/Output System (BIOS) setup. 1. The ASUS Update utility allows you to manage, save, and update the motherboard BIOS in the optical drive. ASUS Update requires an Internet connection either through a network or an Internet Service Provider (ISP). Place the support DVD in Windows® environment. The ASUS Update utility is...
... these utilities. ASUS CrashFree BIOS 3 (Updates the BIOS using a bootable floppy disk or a USB flash disk.) 4. Save a copy of the original motherboard BIOS file to a bootable USB flash disk in case you to manage and update the motherboard Basic Input/Output System (BIOS) setup. 1. The ASUS Update utility allows you to manage, save, and update the motherboard BIOS in the optical drive. ASUS Update requires an Internet connection either through a network or an Internet Service Provider (ISP). Place the support DVD in Windows® environment. The ASUS Update utility is...

User Manual
Page 93
... Phoenix-Award BIOS CMOS Setup Utility Advanced Chipset Select Menu Hybrid Support [Auto] iGPU Frame Buffer Control [Auto] x Frame Buffer Size 128M Onboard GPU [Auto] K8NB HT Speed [Auto] K8NB HT Width [Auto] CPU Spread Spectrum [Disabled] PCIE Spread Spectrum [Disabled] SATA Spread Spectrum [Disabled] Primary Display Adapter [PCI-E] Item Specific Help Hybrid Support [Auto] Allows you install a Hybrid SLIsupport graphics card. Configuration options: [Disabled] [Enabled] AMD Cool'n'Quiet Function [Disabled] Enables or disables the AMD Cool'n'Quiet function. ASUS M3N WS...
... Phoenix-Award BIOS CMOS Setup Utility Advanced Chipset Select Menu Hybrid Support [Auto] iGPU Frame Buffer Control [Auto] x Frame Buffer Size 128M Onboard GPU [Auto] K8NB HT Speed [Auto] K8NB HT Width [Auto] CPU Spread Spectrum [Disabled] PCIE Spread Spectrum [Disabled] SATA Spread Spectrum [Disabled] Primary Display Adapter [PCI-E] Item Specific Help Hybrid Support [Auto] Allows you install a Hybrid SLIsupport graphics card. Configuration options: [Disabled] [Enabled] AMD Cool'n'Quiet Function [Disabled] Enables or disables the AMD Cool'n'Quiet function. ASUS M3N WS...
User Manual
Page 95
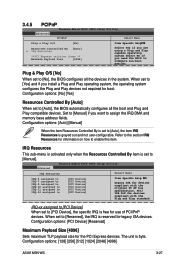
...] [4096] ASUS M3N WS 3-27 3.4.5 PCIPnP Phoenix-Award BIOS CMOS Setup Utility Advanced PCIPnP Select Menu Plug & Play O/S [No] Resources Controlled By [Auto] x IRQ Resources **PCI Express relative items ** Maximum Payload Size [4096] Item Specific Help Select Yes if you are using a Plug and Play capable operating system Select No if you need the BIOS to configure non-boot devices Plug & Play O/S [No] When set to [No], the BIOS configures all the boot and Plug and Play compatible devices. Configuration options: [No...
...] [4096] ASUS M3N WS 3-27 3.4.5 PCIPnP Phoenix-Award BIOS CMOS Setup Utility Advanced PCIPnP Select Menu Plug & Play O/S [No] Resources Controlled By [Auto] x IRQ Resources **PCI Express relative items ** Maximum Payload Size [4096] Item Specific Help Select Yes if you are using a Plug and Play capable operating system Select No if you need the BIOS to configure non-boot devices Plug & Play O/S [No] When set to [No], the BIOS configures all the boot and Plug and Play compatible devices. Configuration options: [No...
User Manual
Page 97
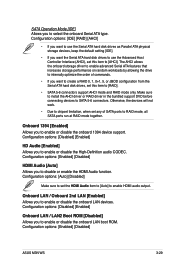
Configuration options: [Enabled] [Disabled] HDMI Audio [Auto] Allows you to enable or disable the onboard LAN devices. Onboard LAN / Onboard 2nd LAN [Enabled] Allows you to disable or enable the HDMI Audio function. Configuration options: [Enabled] [Disabled] ASUS M3N WS 3-29 The AHCI allows the onboard storage driver to enable advanced Serial ATA features that increases storage performance on random workloads by allowing the drive to internally optimize the order of SATA ports to RAID mode, all SATA ports run at RAID mode together. SATA Operation Mode [IDE] Allows you want to ...
Configuration options: [Enabled] [Disabled] HDMI Audio [Auto] Allows you to enable or disable the onboard LAN devices. Onboard LAN / Onboard 2nd LAN [Enabled] Allows you to disable or enable the HDMI Audio function. Configuration options: [Enabled] [Disabled] ASUS M3N WS 3-29 The AHCI allows the onboard storage driver to enable advanced Serial ATA features that increases storage performance on random workloads by allowing the drive to internally optimize the order of SATA ports to RAID mode, all SATA ports run at RAID mode together. SATA Operation Mode [IDE] Allows you want to ...
User Manual
Page 99
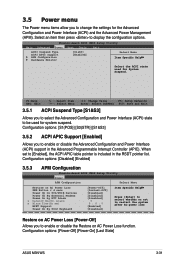
Phoenix-Award BIOS CMOS Setup Utility Main Advanced Power Boot Tools Exit ACPI Suspend Type ACPI APIC support APM Configuration Hardware Monitor [S1&S3] [Enabled] Select Menu Item Specific Help Select the ACPI state used for system suspend. Configuration options: [Power-Off] [Power-On] [Last State] ASUS M3N WS 3-31 Select an item then press to [Enabled], the ACPI APIC table pointer is included in the Advanced Programmable Interrupt Controller (APIC). When set to display the configuration options. F1:Help ESC: Exit ↑↓...
Phoenix-Award BIOS CMOS Setup Utility Main Advanced Power Boot Tools Exit ACPI Suspend Type ACPI APIC support APM Configuration Hardware Monitor [S1&S3] [Enabled] Select Menu Item Specific Help Select the ACPI state used for system suspend. Configuration options: [Power-Off] [Power-On] [Last State] ASUS M3N WS 3-31 Select an item then press to [Enabled], the ACPI APIC table pointer is included in the Advanced Programmable Interrupt Controller (APIC). When set to display the configuration options. F1:Help ESC: Exit ↑↓...
User Manual
Page 100
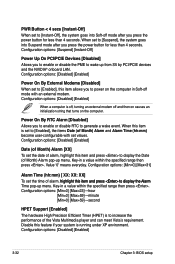
...;�r�m� Time pop-up menu. Configuration options: [Disabled] [Enabled] 3-32 Chapter 3: BIOS setup Configuration options: [Suspend] [Instant-Off] Power Up On PCI/PCIE Devices [Disabled] Allows you to enable or disable RTC to generate a wake event. Key-in a value within the specified range then press . PWR Button < 4 secs [Instant-Off] When set to [Instant-Off], the system goes into Suspend mode after you to power on the computer. Value '0' means...
...;�r�m� Time pop-up menu. Configuration options: [Disabled] [Enabled] 3-32 Chapter 3: BIOS setup Configuration options: [Suspend] [Instant-Off] Power Up On PCI/PCIE Devices [Disabled] Allows you to enable or disable RTC to generate a wake event. Key-in a value within the specified range then press . PWR Button < 4 secs [Instant-Off] When set to [Instant-Off], the system goes into Suspend mode after you to power on the computer. Value '0' means...
User Manual
Page 101
... BIOS. Configuration options: [Disabled] [Enabled] The CPU Q-Fan Profile item becomes user-configurable when you install a DC (3-pin) fan but set this item to a [PWM], the Q-Fan Control function will not work . • If you enable the CPU Q-Fan Control feature. This feature requires an ATX power supply that provides at full speed. It also allows you to select the CPU fan type you to display the configuration options. Select an item then press to enable or disable the CPU Q-Fan controller. ASUS M3N WS 3-33 CPU Q-Fan Control [Disabled] Allows you installed...
... BIOS. Configuration options: [Disabled] [Enabled] The CPU Q-Fan Profile item becomes user-configurable when you install a DC (3-pin) fan but set this item to a [PWM], the Q-Fan Control function will not work . • If you enable the CPU Q-Fan Control feature. This feature requires an ATX power supply that provides at full speed. It also allows you to select the CPU fan type you to display the configuration options. Select an item then press to enable or disable the CPU Q-Fan controller. ASUS M3N WS 3-33 CPU Q-Fan Control [Disabled] Allows you installed...
User Manual
Page 103
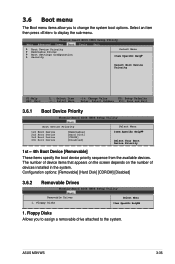
...items that appears on the screen depends on the number of devices installed in the system. Floppy Disks Allows you to the system. Configuration options: [Removable] [Hard Disk] [CDROM] [Disabled] 3.6.2 Removable Drives Phoenix-Award BIOS CMOS Setup Utility Boot Removable Drives Select Menu 1. ASUS M3N WS 3-35 Floppy Disks Item Specific Help 1. Phoenix-Award BIOS CMOS Setup Utility Main Advanced Power Boot Tools Exit Boot Device Priority Removable Drives Boot Settings Configuration Security Select Menu Item Specific Help Select Boot Device Priority F1:Help ESC: Exit...
...items that appears on the screen depends on the number of devices installed in the system. Floppy Disks Allows you to the system. Configuration options: [Removable] [Hard Disk] [CDROM] [Disabled] 3.6.2 Removable Drives Phoenix-Award BIOS CMOS Setup Utility Boot Removable Drives Select Menu 1. ASUS M3N WS 3-35 Floppy Disks Item Specific Help 1. Phoenix-Award BIOS CMOS Setup Utility Main Advanced Power Boot Tools Exit Boot Device Priority Removable Drives Boot Settings Configuration Security Select Menu Item Specific Help Select Boot Device Priority F1:Help ESC: Exit...
User Manual
Page 110
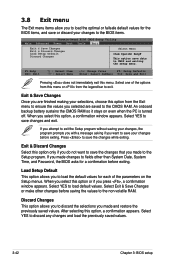
... exiting. After selecting this option, a confirmation window appears. 3.8 Exit menu The Exit menu items allow you to load the optimal or failsafe default values for the BIOS items, and save or discard your changes to the BIOS items. Phoenix-Award BIOS CMOS Setup Utility Main Advanced Power Boot Tools Exit Exit & Save Changes Exit & Discard Changes Load Setup Default Discard Changes Select Menu Item Specific Help This option save data to the Setup program. Select YES to...
... exiting. After selecting this option, a confirmation window appears. 3.8 Exit menu The Exit menu items allow you to load the optimal or failsafe default values for the BIOS items, and save or discard your changes to the BIOS items. Phoenix-Award BIOS CMOS Setup Utility Main Advanced Power Boot Tools Exit Exit & Save Changes Exit & Discard Changes Load Setup Default Discard Changes Select Menu Item Specific Help This option save data to the Setup program. Select YES to...
User Manual
Page 148
... NVIDIA® RAID configurations The motherboard includes a high performance SATA RAID controller integrated in the BIOS before setting your NVRAID settings after the CMOS is cleared; For optimal performance, install identical drives of SATA ports to RAID mode, all SATA ports run at RAID mode together. • Make sure to the power connector on RAID configurations. Connect a SATA power cable to re-enter your RAID configuration. See section 3.4.6 Onboard Device Configuration > MCP Storage Config for six independent Serial ATA channels. Install the SATA hard disks into the...
... NVIDIA® RAID configurations The motherboard includes a high performance SATA RAID controller integrated in the BIOS before setting your NVRAID settings after the CMOS is cleared; For optimal performance, install identical drives of SATA ports to RAID mode, all SATA ports run at RAID mode together. • Make sure to the power connector on RAID configurations. Connect a SATA power cable to re-enter your RAID configuration. See section 3.4.6 Onboard Device Configuration > MCP Storage Config for six independent Serial ATA channels. Install the SATA hard disks into the...
User Manual
Page 155
... a RAID driver disk. 8. To install the RAID driver in Windows® 1. Set the optical drive as the primary boot device. 4. Follow succeeding screen instructions to complete the process. 4.5.2 Creating a RAID/SATA driver disk in Windows® XP: 1. Boot your computer. 2. Press during POST to create a NVIDIA® 32/64 bit XP SATA RAID driver disk. 4. Insert the support DVD into the floppy drive then press . 9. Go to the Make Disk menu, and then click NVIDIA 32/64bit XP SATA RAID Driver to enter the BIOS setup utility. 3. Follow...
... a RAID driver disk. 8. To install the RAID driver in Windows® 1. Set the optical drive as the primary boot device. 4. Follow succeeding screen instructions to complete the process. 4.5.2 Creating a RAID/SATA driver disk in Windows® XP: 1. Boot your computer. 2. Press during POST to create a NVIDIA® 32/64 bit XP SATA RAID driver disk. 4. Insert the support DVD into the floppy drive then press . 9. Go to the Make Disk menu, and then click NVIDIA 32/64bit XP SATA RAID Driver to enter the BIOS setup utility. 3. Follow...
User Manual
Page 156
Follow the succeeding screen instructions to chipset limitation, the Serial ATA ports supported by the NVIDIA chipset doesn't support Serial Optical Disk Drives (Serial ODD) under DOS. 4-44 Chapter 4: Software support Insert the motherboard support DVD into the optical drive. Due to complete the installation. To install the RAID driver in the support DVD through the path below: Drivers\Chipset\Disk\AHCI 2. Find RAID driver in the support DVD through the path below: Drivers\Chipset\Disk\RAID Find AHCI driver in Windows® Vista™: 1.
Follow the succeeding screen instructions to chipset limitation, the Serial ATA ports supported by the NVIDIA chipset doesn't support Serial Optical Disk Drives (Serial ODD) under DOS. 4-44 Chapter 4: Software support Insert the motherboard support DVD into the optical drive. Due to complete the installation. To install the RAID driver in the support DVD through the path below: Drivers\Chipset\Disk\AHCI 2. Find RAID driver in the support DVD through the path below: Drivers\Chipset\Disk\RAID Find AHCI driver in Windows® Vista™: 1.


