
User Manual
Page 1
Motherboard
Motherboard

User Manual
Page 1
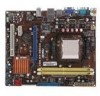
Motherboard M2N68-AM SE2
Motherboard M2N68-AM SE2
User Manual
Page 3
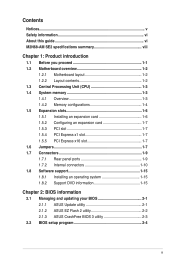
Contents Notices...v Safety information vi About this guide vi M2N68-AM SE2 specifications summary viii Chapter 1: Product introduction 1.1 Before you proceed 1-1 1.2 Motherboard overview 1-2 1.2.1 Motherboard layout 1-2 1.2.2 Layout contents 1-2 1.3 Central Processing Unit (CPU 1-3 1.4 System memory 1-3 1.4.1 Overview 1-3 1.4.2 Memory configurations 1-4 1.5 ... information 1-15 Chapter 2: BIOS information 2.1 Managing and updating your BIOS 2-1 2.1.1 ASUS Update utility 2-1 2.1.2 ASUS EZ Flash 2 utility 2-2 2.1.3 ASUS CrashFree BIOS 3 utility 2-3 2.2 BIOS setup program 2-4 iii
Contents Notices...v Safety information vi About this guide vi M2N68-AM SE2 specifications summary viii Chapter 1: Product introduction 1.1 Before you proceed 1-1 1.2 Motherboard overview 1-2 1.2.1 Motherboard layout 1-2 1.2.2 Layout contents 1-2 1.3 Central Processing Unit (CPU 1-3 1.4 System memory 1-3 1.4.1 Overview 1-3 1.4.2 Memory configurations 1-4 1.5 ... information 1-15 Chapter 2: BIOS information 2.1 Managing and updating your BIOS 2-1 2.1.1 ASUS Update utility 2-1 2.1.2 ASUS EZ Flash 2 utility 2-2 2.1.3 ASUS CrashFree BIOS 3 utility 2-3 2.2 BIOS setup program 2-4 iii
User Manual
Page 5
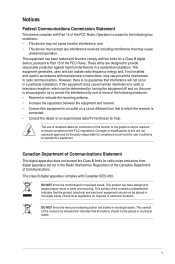
... to assure compliance with FCC regulations. Notices Federal Communications Commission Statement This device complies with Part 15 of parts and recycling. DO NOT throw the motherboard in municipal waste. This equipment has been tested and found to operate this equipment. If this unit not expressly approved by one or more of...
... to assure compliance with FCC regulations. Notices Federal Communications Commission Statement This device complies with Part 15 of parts and recycling. DO NOT throw the motherboard in municipal waste. This equipment has been tested and found to operate this equipment. If this unit not expressly approved by one or more of...
User Manual
Page 6
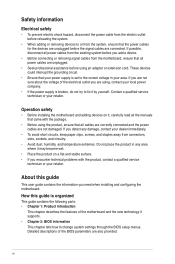
...• Ensure that your retailer. Operation safety • Before installing the motherboard and adding devices on a flat and stable surface. • If you need when installing and configuring the motherboard. How this guide This user guide contains the information you encounter technical problems... supply is organized This guide contains the following parts: • Chapter 1: Product introduction This chapter describes the features of the motherboard and the new technology it by yourself. If you add a device. • Before connecting or removing signal cables from the...
...• Ensure that your retailer. Operation safety • Before installing the motherboard and adding devices on a flat and stable surface. • If you need when installing and configuring the motherboard. How this guide This user guide contains the information you encounter technical problems... supply is organized This guide contains the following parts: • Chapter 1: Product introduction This chapter describes the features of the motherboard and the new technology it by yourself. If you add a device. • Before connecting or removing signal cables from the...
User Manual
Page 10
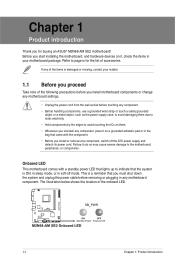
...buying an ASUS® M2N68-AM SE2 motherboard! Onboard LED This motherboard comes with a standby power LED that lights up to avoid touching the ICs on a grounded antistatic pad or in the bag that came with the component. • Before you install motherboard components or change any motherboard settings. ...of the following precautions before removing or plugging in soft-off the ATX power supply and detach its power cord. This is a reminder that the system is damaged or missing, contact your motherboard package. Chapter 1 Product introduction Thank you for the list of ...
...buying an ASUS® M2N68-AM SE2 motherboard! Onboard LED This motherboard comes with a standby power LED that lights up to avoid touching the ICs on a grounded antistatic pad or in the bag that came with the component. • Before you install motherboard components or change any motherboard settings. ...of the following precautions before removing or plugging in soft-off the ATX power supply and detach its power cord. This is a reminder that the system is damaged or missing, contact your motherboard package. Chapter 1 Product introduction Thank you for the list of ...
User Manual
Page 11
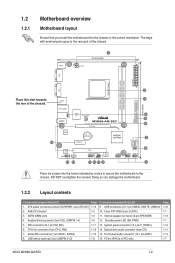
... the correct orientation. PCIe x16/PCIe x1/PCI slots Page 1-12 1-7 1-13 1-1 1-14 1-11 1-14 1-7 ASUS M2N68-AM SE2 1-2 Place this side towards the rear of the chassis. ATX power connectors (24-pin EATXPWR, 4-pin ATX12V) 2. Serial ATA connectors (7-pin SATA1, SATA2) 8. USB device wake... ports goes to the chassis. Clear RTC RAM (3-pin CLRTC) 11. 1.2 1.2.1 Motherboard overview Motherboard layout Ensure that you install the motherboard into the holes indicated by circles to secure the motherboard to the rear part of the chassis. DO NOT overtighten the screws! DDR2 DIMM slots...
... the correct orientation. PCIe x16/PCIe x1/PCI slots Page 1-12 1-7 1-13 1-1 1-14 1-11 1-14 1-7 ASUS M2N68-AM SE2 1-2 Place this side towards the rear of the chassis. ATX power connectors (24-pin EATXPWR, 4-pin ATX12V) 2. Serial ATA connectors (7-pin SATA1, SATA2) 8. USB device wake... ports goes to the chassis. Clear RTC RAM (3-pin CLRTC) 11. 1.2 1.2.1 Motherboard overview Motherboard layout Ensure that you install the motherboard into the holes indicated by circles to secure the motherboard to the rear part of the chassis. DO NOT overtighten the screws! DDR2 DIMM slots...

User Manual
Page 12
... with a 940-pin AM2+ / AM2 socket designed for the AM2+ / AM2 socket. 1.4 System memory 1.4.1 Overview This motherboard comes with two Double Data Rate 2 (DDR2) Dual Inline Memory Modules (DIMM) sockets. A DDR2 DIMM has the same physical dimensions as a DDR DIMM but has a ...
... with a 940-pin AM2+ / AM2 socket designed for the AM2+ / AM2 socket. 1.4 System memory 1.4.1 Overview This motherboard comes with two Double Data Rate 2 (DDR2) Dual Inline Memory Modules (DIMM) sockets. A DDR2 DIMM has the same physical dimensions as a DDR DIMM but has a ...
User Manual
Page 13
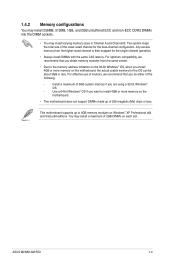
...channel for the dual-channel configuration. For effective use of memory, we recommend that you install 4GB or more memory on the motherboard. • This motherboard does not support DIMMs made up to install 4GB or more memory on each slot. The system maps the total size of ... obtain memory modules from the higher-sized channel is then mapped for the OS can be about 3GB or less. ASUS M2N68-AM SE2 1-4 Install a maximum of 2GB DIMMs on the motherboard, the actual usable memory for the single-channel operation. • Always install DIMMs with the same CAS latency....
...channel for the dual-channel configuration. For effective use of memory, we recommend that you install 4GB or more memory on the motherboard. • This motherboard does not support DIMMs made up to install 4GB or more memory on each slot. The system maps the total size of ... obtain memory modules from the higher-sized channel is then mapped for the OS can be about 3GB or less. ASUS M2N68-AM SE2 1-4 Install a maximum of 2GB DIMMs on the motherboard, the actual usable memory for the single-channel operation. • Always install DIMMs with the same CAS latency....
User Manual
Page 15
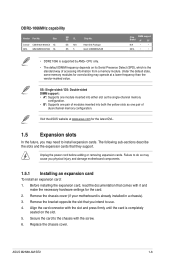
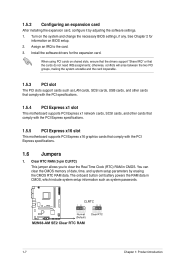
...DS N/A SS 5 Chip No. The following sub-sections describe the slots and the expansion cards that you physical injury and damage motherboard components. 1.5.1 Installing an expansion card To install an expansion card: 1. Failure to do so may need to install expansion cards.... chassis cover (if your motherboard is the standard way of dual-channel memory configuration. Remove the bracket opposite the slot that they support. Replace the chassis cover. Under the default state, some memory modules for the card. 2. ASUS M2N68-AM SE2 1-6 Visit the ASUS website at a lower frequency...
...DS N/A SS 5 Chip No. The following sub-sections describe the slots and the expansion cards that you physical injury and damage motherboard components. 1.5.1 Installing an expansion card To install an expansion card: 1. Failure to do so may need to install expansion cards.... chassis cover (if your motherboard is the standard way of dual-channel memory configuration. Remove the bracket opposite the slot that they support. Replace the chassis cover. Under the default state, some memory modules for the card. 2. ASUS M2N68-AM SE2 1-6 Visit the ASUS website at a lower frequency...
User Manual
Page 16
...information such as LAN cards, SCSI cards, USB cards, and other cards that comply with the PCI specifications. 1.5.4 PCI Express x1 slot This motherboard supports PCI Express x1 network cards, SCSI cards, and other cards that comply with the PCI Express specifications. 1.6 Jumpers 1. You can clear ... slots, ensure that the drivers support "Share IRQ" or that comply with the PCI Express specifications. 1.5.5 PCI Express x16 slot This motherboard supports PCI Express x16 graphics cards that the cards do not need IRQ assignments; Turn on the system and change the necessary BIOS settings...
...information such as LAN cards, SCSI cards, USB cards, and other cards that comply with the PCI specifications. 1.5.4 PCI Express x1 slot This motherboard supports PCI Express x1 network cards, SCSI cards, and other cards that comply with the PCI Express specifications. 1.6 Jumpers 1. You can clear ... slots, ensure that the drivers support "Share IRQ" or that comply with the PCI Express specifications. 1.5.5 PCI Express x16 slot This motherboard supports PCI Express x16 graphics cards that the cards do not need IRQ assignments; Turn on the system and change the necessary BIOS settings...
User Manual
Page 20
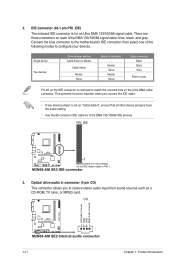
... the same setting. • Use the 80-conductor IDE cable for an Ultra DMA 133/100/66 signal cable. Connect the blue connector to the motherboard's IDE connector, then select one of device(s) - Optical drive audio in connector (4-pin CD) This connector allows you connect the IDE cable. • If any...
... the same setting. • Use the 80-conductor IDE cable for an Ultra DMA 133/100/66 signal cable. Connect the blue connector to the motherboard's IDE connector, then select one of device(s) - Optical drive audio in connector (4-pin CD) This connector allows you connect the IDE cable. • If any...
User Manual
Page 21
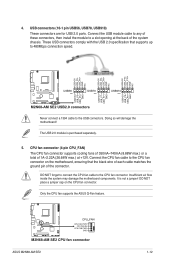
4. Never connect a 1394 cable to the CPU fan connector. Doing so will damage the motherboard! USB connectors (10-1 pin USB56, USB78, USB910) These connectors are for USB 2.0 ports. CPU fan connector (4-pin CPU_FAN) The CPU fan connector supports cooling...22A (26.64W max.) at +12V. It is purchased separately. 5. Insufficient air flow inside the system may damage the motherboard components. ASUS M2N68-AM SE2 1-12 DO NOT place a jumper cap on the motherboard, ensuring that supports up to the CPU fan connector on the CPU fan connector. Connect the CPU fan cable to...
4. Never connect a 1394 cable to the CPU fan connector. Doing so will damage the motherboard! USB connectors (10-1 pin USB56, USB78, USB910) These connectors are for USB 2.0 ports. CPU fan connector (4-pin CPU_FAN) The CPU fan connector supports cooling...22A (26.64W max.) at +12V. It is purchased separately. 5. Insufficient air flow inside the system may damage the motherboard components. ASUS M2N68-AM SE2 1-12 DO NOT place a jumper cap on the motherboard, ensuring that supports up to the CPU fan connector on the CPU fan connector. Connect the CPU fan cable to...
User Manual
Page 24
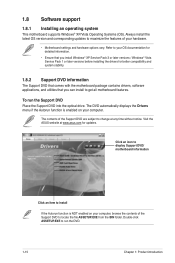
...to your computer, browse the contents of the Support DVD to get all motherboard features. Visit the ASUS website at any time without notice. 1.8 Software support 1.8.1 Installing an operating system This motherboard supports Windows® XP/Vista Operating Systems (OS). Double-click ASSETUP.EXE... to change at www.asus.com for better compatibility and system stability. 1.8.2 Support DVD information The Support DVD that comes with the motherboard package contains drivers, software applications, and utilities that you install Windows&#...
...to your computer, browse the contents of the Support DVD to get all motherboard features. Visit the ASUS website at any time without notice. 1.8 Software support 1.8.1 Installing an operating system This motherboard supports Windows® XP/Vista Operating Systems (OS). Double-click ASSETUP.EXE... to change at www.asus.com for better compatibility and system stability. 1.8.2 Support DVD information The Support DVD that comes with the motherboard package contains drivers, software applications, and utilities that you install Windows&#...
User Manual
Page 25
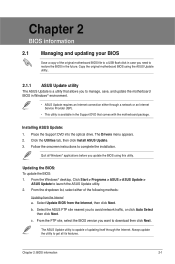
... you update the BIOS using the ASUS Update utility.. 2.1.1 ASUS Update utility The ASUS Update is a utility that comes with the motherboard package. Select Update BIOS from the Internet a. Select the ASUS FTP site nearest you to complete the installation. The ASUS Update utility is available in the ...you need to restore the BIOS in the Support DVD that allows you to manage, save, and update the motherboard BIOS in Windows® environment. • ASUS Update requires an Internet connection either of updating itself through a network or an Internet Service Provider (ISP). •...
... you update the BIOS using the ASUS Update utility.. 2.1.1 ASUS Update utility The ASUS Update is a utility that comes with the motherboard package. Select Update BIOS from the Internet a. Select the ASUS FTP site nearest you to complete the installation. The ASUS Update utility is available in the ...you need to restore the BIOS in the Support DVD that allows you to manage, save, and update the motherboard BIOS in Windows® environment. • ASUS Update requires an Internet connection either of updating itself through a network or an Internet Service Provider (ISP). •...
User Manual
Page 27
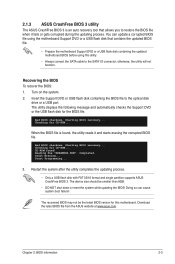
...8226; Only a USB flash disk with FAT 32/16 format and single partition supports ASUS CrashFree BIOS 3. Start Programming... 3. Download the latest BIOS file from the ASUS website at www.asus.com. Turn on the system. 2. Starting BIOS recovery... The utility displays the following...file is an auto recovery tool that contains the updated BIOS file. • Prepare the motherboard Support DVD or a USB flash disk containing the updated motherboard BIOS before using this motherboard. Checking for CD-ROM... Checking for CD-ROM... otherwise, the utility will not function...
...8226; Only a USB flash disk with FAT 32/16 format and single partition supports ASUS CrashFree BIOS 3. Start Programming... 3. Download the latest BIOS file from the ASUS website at www.asus.com. Turn on the system. 2. Starting BIOS recovery... The utility displays the following...file is an auto recovery tool that contains the updated BIOS file. • Prepare the motherboard Support DVD or a USB flash disk containing the updated motherboard BIOS before using this motherboard. Checking for CD-ROM... Checking for CD-ROM... otherwise, the utility will not function...
User Manual
Page 28
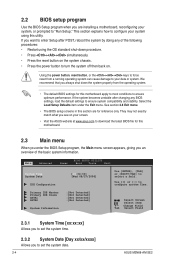
...see on . Change Field Tab Select Field 2.3.1 System Time [xx:xx:xx] Allows you to set the system date. 2-4 ASUS M2N68-AM SE2 If the system becomes unstable after POST, reboot the system by doing any BIOS settings, load the default settings to configure system Time... Detected] :[Not Detected] Select Screen Select Item +- See section 2.8 Exit menu. • The BIOS setup screens in this section are installing a motherboard, reconfiguring your system, or prompted to "Run Setup." They may not exactly match what you always shut down procedure. • Press ++ simultaneously....
...see on . Change Field Tab Select Field 2.3.1 System Time [xx:xx:xx] Allows you to set the system date. 2-4 ASUS M2N68-AM SE2 If the system becomes unstable after POST, reboot the system by doing any BIOS settings, load the default settings to configure system Time... Detected] :[Not Detected] Select Screen Select Item +- See section 2.8 Exit menu. • The BIOS setup screens in this section are installing a motherboard, reconfiguring your system, or prompted to "Run Setup." They may not exactly match what you always shut down procedure. • Press ++ simultaneously....
User Manual
Page 37
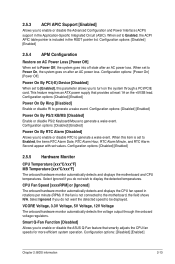
..., RTC Alarm Minute, and RTC Alarm Second appear with set to enable or disable the ASUS Q-Fan feature that provides at least 1A on AC Power Loss [Power Off] When set... to turn on after an AC power loss. This feature requires an ATX power supply that smartly adjusts the CPU fan speeds for more efficient system operation. Configuration options:...xxxºF] MB Temperature [xxxºC/xxxºF] The onboard hardware monitor automatically detects and displays the motherboard and CPU temperatures. If the fan is included in the RSDT pointer list. VCORE Voltage, 3.3V Voltage...
..., RTC Alarm Minute, and RTC Alarm Second appear with set to enable or disable the ASUS Q-Fan feature that provides at least 1A on AC Power Loss [Power Off] When set... to turn on after an AC power loss. This feature requires an ATX power supply that smartly adjusts the CPU fan speeds for more efficient system operation. Configuration options:...xxxºF] MB Temperature [xxxºC/xxxºF] The onboard hardware monitor automatically detects and displays the motherboard and CPU temperatures. If the fan is included in the RSDT pointer list. VCORE Voltage, 3.3V Voltage...


