
User Manual
Page 31
All rights reserved. exe 2 DOS afudos /o[filename filename A:\>afudos /oOLDBIOS1.rom 3. 按下 afudos /oOLDBIOS1.rom AMI Firmware Update Utility - BIOS 2.1 使用 AFUDOS BIOS AFUDOS DOS BIOS BIOS 程式。AFUDOS BIOS BIOS BIOS 程式 BIOS 程式。 1.2MB BIOS 1 AFUDOS 程式(afudos. done Write to file...... Version 1.19(ASUS V2.07(03.11.24BB)) Copyright (C) 2002 American Megatrends, Inc. ok A:\> 當 BIOS DOS 31 Reading flash .....
All rights reserved. exe 2 DOS afudos /o[filename filename A:\>afudos /oOLDBIOS1.rom 3. 按下 afudos /oOLDBIOS1.rom AMI Firmware Update Utility - BIOS 2.1 使用 AFUDOS BIOS AFUDOS DOS BIOS BIOS 程式。AFUDOS BIOS BIOS BIOS 程式 BIOS 程式。 1.2MB BIOS 1 AFUDOS 程式(afudos. done Write to file...... Version 1.19(ASUS V2.07(03.11.24BB)) Copyright (C) 2002 American Megatrends, Inc. ok A:\> 當 BIOS DOS 31 Reading flash .....

User Manual
Page 32
... Erasing flash ...... Do not turn off power during flash BIOS Reading file ....... Version 1.19(ASUS V2.07(03.11.24BB)) Copyright (C) 2002 American Megatrends, Inc. Version 1.19(ASUS V2.07(03.11.24BB)) Copyright (C) 2002 American Megatrends...flash .... AFUDOS BIOS 程式。 A:\>afudos /iP5B-VM DO.ROM AMI Firmware Update Utility - 更新 BIOS 程式 AFUDOS BIOS 程式。 1 tw.asus.com BIOS 片中。 BIOS BIOS 2. 將 AFUDOS.EXE BIOS 3 DOS afudos /i[filename filename BIOS 程式&#...
... Erasing flash ...... Do not turn off power during flash BIOS Reading file ....... Version 1.19(ASUS V2.07(03.11.24BB)) Copyright (C) 2002 American Megatrends, Inc. Version 1.19(ASUS V2.07(03.11.24BB)) Copyright (C) 2002 American Megatrends...flash .... AFUDOS BIOS 程式。 A:\>afudos /iP5B-VM DO.ROM AMI Firmware Update Utility - 更新 BIOS 程式 AFUDOS BIOS 程式。 1 tw.asus.com BIOS 片中。 BIOS BIOS 2. 將 AFUDOS.EXE BIOS 3 DOS afudos /i[filename filename BIOS 程式&#...

User Manual
Page 33
... 程式(AWDFLASH.EXE BIOS AwardBIOS Flash BIOS 程式。 1 http://tw.asus.com BIOS M2N-VM HDMI.bin FAT 32/16 格式的 USB BIOS 2 CD/DVD AwardBIOS Flash BIOS 3 DOS 4. 當 A BIOS 檔案與 AwardBIOS Flash 5 A awdflash 並按下 鍵。 AwardBIOS Flash Utility for ASUS V1.14 (C) Phoenix Technologies Ltd...
... 程式(AWDFLASH.EXE BIOS AwardBIOS Flash BIOS 程式。 1 http://tw.asus.com BIOS M2N-VM HDMI.bin FAT 32/16 格式的 USB BIOS 2 CD/DVD AwardBIOS Flash BIOS 3 DOS 4. 當 A BIOS 檔案與 AwardBIOS Flash 5 A awdflash 並按下 鍵。 AwardBIOS Flash Utility for ASUS V1.14 (C) Phoenix Technologies Ltd...

User Manual
Page 34
... Flash Type - OFE00 OK Write OK No Update Write Fail Warning: Don't Turn Off Power Or Reset System! 在更新 BIOS 9 Flash Complete BIOS F1 AwardBIOS Flash Utility for ASUS V1.14 (C) Phoenix Technologies Ltd. All Rights Reserved For C51PV-MCP51-M2A-VM HDMI-00 DATE:04/13/2006 Flash Type - PMC... Pm49FL004T LPC/FWH File Name to Program: M2A-VM HDMI.bin Flashing Complete Press to Program: M2A-VM HDMI.bin Programming Flash Memory - 7 BIOS N BIOS 8 BIOS BIOS AwardBIOS Flash Utility for ASUS V1.14 (C) Phoenix Technologies Ltd.
... Flash Type - OFE00 OK Write OK No Update Write Fail Warning: Don't Turn Off Power Or Reset System! 在更新 BIOS 9 Flash Complete BIOS F1 AwardBIOS Flash Utility for ASUS V1.14 (C) Phoenix Technologies Ltd. All Rights Reserved For C51PV-MCP51-M2A-VM HDMI-00 DATE:04/13/2006 Flash Type - PMC... Pm49FL004T LPC/FWH File Name to Program: M2A-VM HDMI.bin Flashing Complete Press to Program: M2A-VM HDMI.bin Programming Flash Memory - 7 BIOS N BIOS 8 BIOS BIOS AwardBIOS Flash Utility for ASUS V1.14 (C) Phoenix Technologies Ltd.
User Manual
Page 3
Contents Notices...v Safety information vi About this guide vi M2N68-AM SE2 specifications summary viii Chapter 1: Product introduction 1.1 Before you proceed 1-1 1.2 Motherboard overview 1-2 1.2.1 Motherboard layout 1-2 1.2.2 Layout contents 1-2 1.3 Central Processing Unit (CPU 1-3 1.4 System memory 1-3 1.4.1...Installing an operating system 1-15 1.8.2 Support DVD information 1-15 Chapter 2: BIOS information 2.1 Managing and updating your BIOS 2-1 2.1.1 ASUS Update utility 2-1 2.1.2 ASUS EZ Flash 2 utility 2-2 2.1.3 ASUS CrashFree BIOS 3 utility 2-3 2.2 BIOS setup program 2-4 iii
Contents Notices...v Safety information vi About this guide vi M2N68-AM SE2 specifications summary viii Chapter 1: Product introduction 1.1 Before you proceed 1-1 1.2 Motherboard overview 1-2 1.2.1 Motherboard layout 1-2 1.2.2 Layout contents 1-2 1.3 Central Processing Unit (CPU 1-3 1.4 System memory 1-3 1.4.1...Installing an operating system 1-15 1.8.2 Support DVD information 1-15 Chapter 2: BIOS information 2.1 Managing and updating your BIOS 2-1 2.1.1 ASUS Update utility 2-1 2.1.2 ASUS EZ Flash 2 utility 2-2 2.1.3 ASUS CrashFree BIOS 3 utility 2-3 2.2 BIOS setup program 2-4 iii
User Manual
Page 6
... yourself. Operation safety • Before installing the motherboard and adding devices on it may become wet. • Place the product on a flat and stable surface. • If you are not sure about the voltage of the BIOS parameters are also provided. Detailed descriptions of the... electrical outlet you need when installing and configuring the motherboard. How this guide This user guide contains the information you are not damaged. vi...
... yourself. Operation safety • Before installing the motherboard and adding devices on it may become wet. • Place the product on a flat and stable surface. • If you are not sure about the voltage of the BIOS parameters are also provided. Detailed descriptions of the... electrical outlet you need when installing and configuring the motherboard. How this guide This user guide contains the information you are not damaged. vi...
User Manual
Page 9
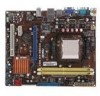
...M2N68-AM SE2 specifications summary ASUS special features Back panel I/O ports Internal I /O ports 1 x COM port 3 x USB 2.0/1.1 connectors support additional 6 USB 2.0/1.1 ports 1 x IDE connector 2 x SATA connectors 1 x system panel connector 1 x CD audio-in connector 1 x Internal speaker connector 1 x Front panel audio connector 1 x CPU fan connector 1 x 24-pin EATX power connector 1 x 4-pin ATX... 12V power connector 8Mb Flash ROM, AMI BIOS, PnP, DMI2.0, WfM2.0, ACPI2.0, SM BIOS 2.5 1 x Serial ATA cable 1 x UltraDMA 133/100/66 cable...
...M2N68-AM SE2 specifications summary ASUS special features Back panel I/O ports Internal I /O ports 1 x COM port 3 x USB 2.0/1.1 connectors support additional 6 USB 2.0/1.1 ports 1 x IDE connector 2 x SATA connectors 1 x system panel connector 1 x CD audio-in connector 1 x Internal speaker connector 1 x Front panel audio connector 1 x CPU fan connector 1 x 24-pin EATX power connector 1 x 4-pin ATX... 12V power connector 8Mb Flash ROM, AMI BIOS, PnP, DMI2.0, WfM2.0, ACPI2.0, SM BIOS 2.5 1 x Serial ATA cable 1 x UltraDMA 133/100/66 cable...
User Manual
Page 16
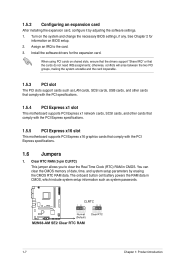
...such as LAN cards, SCSI cards, USB cards, and other cards that comply with the PCI specifications. 1.5.4 PCI Express x1 slot This motherboard supports PCI Express x1 network cards, SCSI cards, and other cards that comply with the PCI Express specifications. 1.6 Jumpers 1. Install the software... drivers for information on BIOS setup. 2. otherwise, conflicts will arise between the two PCI groups, making the system unstable and the card inoperable. 1.5.3 PCI slot The ...
...such as LAN cards, SCSI cards, USB cards, and other cards that comply with the PCI specifications. 1.5.4 PCI Express x1 slot This motherboard supports PCI Express x1 network cards, SCSI cards, and other cards that comply with the PCI Express specifications. 1.6 Jumpers 1. Install the software... drivers for information on BIOS setup. 2. otherwise, conflicts will arise between the two PCI groups, making the system unstable and the card inoperable. 1.5.3 PCI slot The ...
User Manual
Page 17
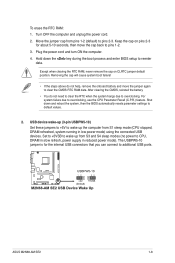
...move the jumper again to overclocking. Keep the cap on CLRTC jumper default position. Shut down the key during the boot process and enter BIOS setup to CPU, DRAM in slow refresh, power supply in low power mode) using the connected USB devices. To erase the RTC RAM...10) Set these jumpers to +5V to pins 1-2. 3. Hold down and reboot the system, then the BIOS automatically resets parameter settings to pins 2-3. For system failure due to additional USB ports. ASUS M2N68-AM SE2 1-8 Move the jumper cap from pins 1-2 (default) to default values. 2. Turn OFF the computer and...
...move the jumper again to overclocking. Keep the cap on CLRTC jumper default position. Shut down the key during the boot process and enter BIOS setup to CPU, DRAM in slow refresh, power supply in low power mode) using the connected USB devices. To erase the RTC RAM...10) Set these jumpers to +5V to pins 1-2. 3. Hold down and reboot the system, then the BIOS automatically resets parameter settings to pins 2-3. For system failure due to additional USB ports. ASUS M2N68-AM SE2 1-8 Move the jumper cap from pins 1-2 (default) to default values. 2. Turn OFF the computer and...
User Manual
Page 18
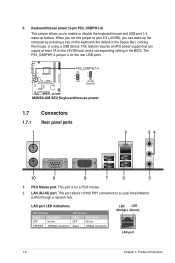
This port is for the rear USB ports. 1.7 Connectors 1.7.1 Rear panel ports 1 2 34 10 9 8 7 6 5 1. This feature requires an ATX power supply that can wake up feature. LAN (RJ-45) port. The PS2_USBPW1-4 jumper is the Space Bar), clicking the mouse, or using a USB device. ... enable or disable the keyboard/mouse and USB port 1-4 wake-up the computer by pressing a key on the +5VSB lead, and a corresponding setting in the BIOS. When you can supply at least 1A on the keyboard (the default is for a PS/2 mouse. 2. This port allows 10/100 PHY connection to a Local...
This port is for the rear USB ports. 1.7 Connectors 1.7.1 Rear panel ports 1 2 34 10 9 8 7 6 5 1. This feature requires an ATX power supply that can wake up feature. LAN (RJ-45) port. The PS2_USBPW1-4 jumper is the Space Bar), clicking the mouse, or using a USB device. ... enable or disable the keyboard/mouse and USB port 1-4 wake-up the computer by pressing a key on the +5VSB lead, and a corresponding setting in the BIOS. When you can supply at least 1A on the keyboard (the default is for a PS/2 mouse. 2. This port allows 10/100 PHY connection to a Local...
User Manual
Page 23
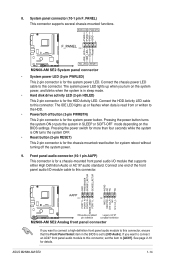
... data is set the item to this connector. Connect one end of the front panel audio I /O module that the Front Panel Select item in the BIOS is read from or written to [HD Audio]. Pressing the power switch for more than four seconds while the system is ON turns the system... I /O module cable to this connector, set to the HDD. • Power/Soft-off the system power. 9. 8. Connect the HDD Activity LED cable to [AC97]. ASUS M2N68-AM SE2 1-14 Connect the chassis power LED cable to this connector. The IDE LED lights up when you want to connect an AC97 front panel audio...
... data is set the item to this connector. Connect one end of the front panel audio I /O module that the Front Panel Select item in the BIOS is read from or written to [HD Audio]. Pressing the power switch for more than four seconds while the system is ON turns the system... I /O module cable to this connector, set to the HDD. • Power/Soft-off the system power. 9. 8. Connect the HDD Activity LED cable to [AC97]. ASUS M2N68-AM SE2 1-14 Connect the chassis power LED cable to this connector. The IDE LED lights up when you want to connect an AC97 front panel audio...
User Manual
Page 25
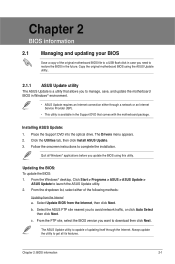
... the utility to restore the BIOS in the future. Chapter 2 BIOS information 2.1 Managing and updating your BIOS Save a copy of the original motherboard BIOS file to a USB flash disk in case you need to get all Windows® applications before you update the BIOS using the ASUS Update utility.. 2.1.1 ASUS Update utility The ASUS Update is a utility that comes...
... the utility to restore the BIOS in the future. Chapter 2 BIOS information 2.1 Managing and updating your BIOS Save a copy of the original motherboard BIOS file to a USB flash disk in case you need to get all Windows® applications before you update the BIOS using the ASUS Update utility.. 2.1.1 ASUS Update utility The ASUS Update is a utility that comes...
User Manual
Page 26
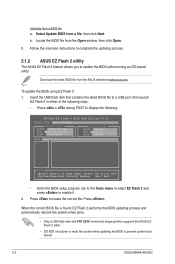
... the onscreen instructions to complete the updating process. 2.1.2 ASUS EZ Flash 2 utility The ASUS EZ Flash 2 feature allows you to update the BIOS without using EZ Flash 2: 1. Press to prevent system boot failure! 2-2 ASUS M2N68-AM SE2 When the correct BIOS file is found, EZ Flash 2 performs the BIOS updating process and automatically reboots the system when done...
... the onscreen instructions to complete the updating process. 2.1.2 ASUS EZ Flash 2 utility The ASUS EZ Flash 2 feature allows you to update the BIOS without using EZ Flash 2: 1. Press to prevent system boot failure! 2-2 ASUS M2N68-AM SE2 When the correct BIOS file is found, EZ Flash 2 performs the BIOS updating process and automatically reboots the system when done...
User Manual
Page 27
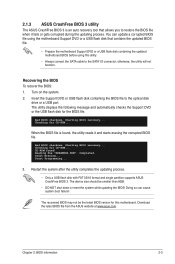
... 32/16 format and single partition supports ASUS CrashFree BIOS 3. Doing so can update a corrupted BIOS file using this motherboard. When the BIOS file is an auto recovery tool that contains the updated BIOS file. • Prepare the motherboard Support DVD or a USB flash disk containing the updated motherboard BIOS before using the motherboard Support DVD or a USB flash disk...
... 32/16 format and single partition supports ASUS CrashFree BIOS 3. Doing so can update a corrupted BIOS file using this motherboard. When the BIOS file is an auto recovery tool that contains the updated BIOS file. • Prepare the motherboard Support DVD or a USB flash disk containing the updated motherboard BIOS before using the motherboard Support DVD or a USB flash disk...
User Manual
Page 28
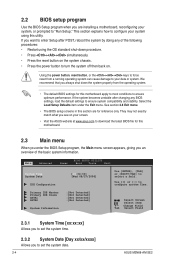
.... • The default BIOS settings for this motherboard apply to most conditions to "Run Setup." Main Advanced Power BIOS SETUP UTILITY Boot Tools Exit System Time 19:34:30] System Date [Wed 08/27/2008] IDE Configuration Use [ENTER], [TAB] or [SHIFT-TAB] to set the system date. 2-4 ASUS M2N68-AM SE2 We recommend that you...
.... • The default BIOS settings for this motherboard apply to most conditions to "Run Setup." Main Advanced Power BIOS SETUP UTILITY Boot Tools Exit System Time 19:34:30] System Date [Wed 08/27/2008] IDE Configuration Use [ENTER], [TAB] or [SHIFT-TAB] to set the system date. 2-4 ASUS M2N68-AM SE2 We recommend that you...
User Manual
Page 29
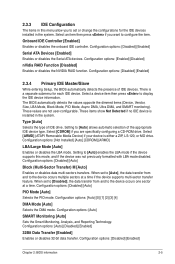
... transfer from and to display the IDE device information. Configuration options: [Disabled] [Enabled] Chapter 2: BIOS information 2-5 Configuration options: [Disabled] [Enabled] 2.3.4 Primary IDE Master/Slave While entering Setup, the BIOS automatically detects the presence of IDE drive. The BIOS automatically detects the values opposite the dimmed items (Device, Vendor, Size, LBA Mode, Block Mode...
... transfer from and to display the IDE device information. Configuration options: [Disabled] [Enabled] Chapter 2: BIOS information 2-5 Configuration options: [Disabled] [Enabled] 2.3.4 Primary IDE Master/Slave While entering Setup, the BIOS automatically detects the presence of IDE drive. The BIOS automatically detects the values opposite the dimmed items (Device, Vendor, Size, LBA Mode, Block Mode...
User Manual
Page 30
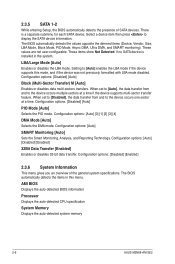
...the Smart Monitoring, Analysis, and Reporting Technology. The BIOS automatically detects the items in the system. AMI BIOS Displays the auto-detected BIOS information Processor Displays the auto-detected CPU specification System Memory Displays the auto-detected system memory 2-6 ASUS M2N68-AM SE2 The BIOS automatically detects the values opposite the dimmed items (Device,... set to [Auto], the data transfer from and to the device occurs multiple sectors at a time. 2.3.5 SATA 1-2 While entering Setup, the BIOS automatically detects the presence of the general system specifications.
...the Smart Monitoring, Analysis, and Reporting Technology. The BIOS automatically detects the items in the system. AMI BIOS Displays the auto-detected BIOS information Processor Displays the auto-detected CPU specification System Memory Displays the auto-detected system memory 2-6 ASUS M2N68-AM SE2 The BIOS automatically detects the values opposite the dimmed items (Device,... set to [Auto], the data transfer from and to the device occurs multiple sectors at a time. 2.3.5 SATA 1-2 While entering Setup, the BIOS automatically detects the presence of the general system specifications.
User Manual
Page 31
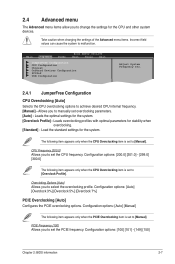
... when changing the settings of the Advanced menu items. Incorrect field values can cause the system to manually set the PCIE frequency. Main Advanced Power BIOS SETUP UTILITY Boot Tools Exit JumperFree Configuration CPU Configuration Chipset Onboard Devices Configuration PCIPnP USB Configuration Adjust System Frequency etc. 2.4.1 JumperFree Configuration CPU Overclocking [Auto... to change the settings for the system. Load the standard settings for the CPU and other system devices. Configuration options: [100] [101] - [149] [150] Chapter 2: BIOS information 2-7
... when changing the settings of the Advanced menu items. Incorrect field values can cause the system to manually set the PCIE frequency. Main Advanced Power BIOS SETUP UTILITY Boot Tools Exit JumperFree Configuration CPU Configuration Chipset Onboard Devices Configuration PCIPnP USB Configuration Adjust System Frequency etc. 2.4.1 JumperFree Configuration CPU Overclocking [Auto... to change the settings for the system. Load the standard settings for the CPU and other system devices. Configuration options: [100] [101] - [149] [150] Chapter 2: BIOS information 2-7

User Manual
Page 33
...Configuration options: [Auto] [1.35V] 2.4.2 CPU Configuration The items in this menu show the CPU-related information that the BIOS automatically detects. The driver developer may enable it for the normal operation. Configuration options: [Disabled] [Enabled] CPU ...[2.250V] Chipset Voltage [Auto] Allows you to enable or disable the AMD Secure Virtual Machine mode. Configuration options: [Enabled] [Disabled] Chapter 2: BIOS information 2-9 GART Error Reporting [Disabled] This option should remain disabled for testing purpose. tRDRD [Auto] Configuration options: [Auto] [2 CLK] ~ [5...
...Configuration options: [Auto] [1.35V] 2.4.2 CPU Configuration The items in this menu show the CPU-related information that the BIOS automatically detects. The driver developer may enable it for the normal operation. Configuration options: [Disabled] [Enabled] CPU ...[2.250V] Chipset Voltage [Auto] Allows you to enable or disable the AMD Secure Virtual Machine mode. Configuration options: [Enabled] [Disabled] Chapter 2: BIOS information 2-9 GART Error Reporting [Disabled] This option should remain disabled for testing purpose. tRDRD [Auto] Configuration options: [Auto] [2 CLK] ~ [5...
User Manual
Page 35
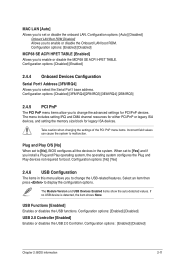
...change the USB-related features. If no USB device is detected, the item shows None. Configuration options: [Enabled] [Disabled] Chapter 2: BIOS information 2-11 Plug and Play O/S [No] When set or disable the onboard LAN. The menu includes setting IRQ and DMA channel resources... size block for PCI/PnP devices. Configuration options: [No] [Yes] 2.4.6 USB Configuration The items in this menu allows you to [No], BIOS configures all the devices in the system. USB Functions [Enabled] Enables or disables the USB functions. Configuration options: [Disabled] [Enabled] 2.4.4 Onboard...
...change the USB-related features. If no USB device is detected, the item shows None. Configuration options: [Enabled] [Disabled] Chapter 2: BIOS information 2-11 Plug and Play O/S [No] When set or disable the onboard LAN. The menu includes setting IRQ and DMA channel resources... size block for PCI/PnP devices. Configuration options: [No] [Yes] 2.4.6 USB Configuration The items in this menu allows you to [No], BIOS configures all the devices in the system. USB Functions [Enabled] Enables or disables the USB functions. Configuration options: [Disabled] [Enabled] 2.4.4 Onboard...


