
User Manual
Page 1
Motherboard M2N68-AM SE2
Motherboard M2N68-AM SE2
User Manual
Page 3
Contents Notices...v Safety information vi About this guide vi M2N68-AM SE2 specifications summary viii Chapter 1: Product introduction 1.1 Before you proceed 1-1 1.2 Motherboard overview 1-2 1.2.1 Motherboard layout 1-2 1.2.2 Layout contents 1-2 1.3 Central Processing Unit (CPU 1-3 1.4 System memory 1-3 1.4.1 Overview 1-3 1.4.2 Memory configurations 1-4 1.5 ... information 1-15 Chapter 2: BIOS information 2.1 Managing and updating your BIOS 2-1 2.1.1 ASUS Update utility 2-1 2.1.2 ASUS EZ Flash 2 utility 2-2 2.1.3 ASUS CrashFree BIOS 3 utility 2-3 2.2 BIOS setup program 2-4 iii
Contents Notices...v Safety information vi About this guide vi M2N68-AM SE2 specifications summary viii Chapter 1: Product introduction 1.1 Before you proceed 1-1 1.2 Motherboard overview 1-2 1.2.1 Motherboard layout 1-2 1.2.2 Layout contents 1-2 1.3 Central Processing Unit (CPU 1-3 1.4 System memory 1-3 1.4.1 Overview 1-3 1.4.2 Memory configurations 1-4 1.5 ... information 1-15 Chapter 2: BIOS information 2.1 Managing and updating your BIOS 2-1 2.1.1 ASUS Update utility 2-1 2.1.2 ASUS EZ Flash 2 utility 2-2 2.1.3 ASUS CrashFree BIOS 3 utility 2-3 2.2 BIOS setup program 2-4 iii
User Manual
Page 8
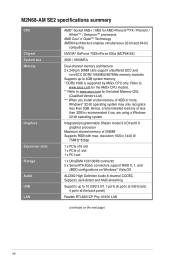
...2.0/1.1 ports (6 ports at mid-board, 4 ports at the back panel) Realtek RTL8201CP Phy 10/100 LAN (continued on the next page) viii M2N68-AM SE2 specifications summary CPU Chipset System bus Memory Graphics Expansion slots Storage Audio USB LAN AMD® Socket AM2+ / AM2 for the latest Memory QVL (... shared memory of 4GB or more, Windows® 32-bit operating system may only recognize less than 3GB. Refer to www.asus.com for the AM2+ CPU models. ** Refer to www.asus.com for AMD Phenom™FX / Phenom / Athlon™ / Sempron™ processors AMD Cool 'n' Quiet™ Technology...
...2.0/1.1 ports (6 ports at mid-board, 4 ports at the back panel) Realtek RTL8201CP Phy 10/100 LAN (continued on the next page) viii M2N68-AM SE2 specifications summary CPU Chipset System bus Memory Graphics Expansion slots Storage Audio USB LAN AMD® Socket AM2+ / AM2 for the latest Memory QVL (... shared memory of 4GB or more, Windows® 32-bit operating system may only recognize less than 3GB. Refer to www.asus.com for the AM2+ CPU models. ** Refer to www.asus.com for AMD Phenom™FX / Phenom / Athlon™ / Sempron™ processors AMD Cool 'n' Quiet™ Technology...
User Manual
Page 9
M2N68-AM SE2 specifications summary ASUS special features Back panel I/O ports Internal I /O ports 1 x COM port 3 x USB 2.0/1.1 connectors support additional 6 USB 2.0/1.1 ports 1 x IDE connector 2 x SATA connectors 1 x system panel connector 1 x CD audio-in connector 1 x Internal speaker connector 1 x Front panel audio connector 1 x CPU fan connector 1 x 24-pin EATX power connector 1 x 4-pin ATX 12V power connector 8Mb Flash ROM...
M2N68-AM SE2 specifications summary ASUS special features Back panel I/O ports Internal I /O ports 1 x COM port 3 x USB 2.0/1.1 connectors support additional 6 USB 2.0/1.1 ports 1 x IDE connector 2 x SATA connectors 1 x system panel connector 1 x CD audio-in connector 1 x Internal speaker connector 1 x Front panel audio connector 1 x CPU fan connector 1 x 24-pin EATX power connector 1 x 4-pin ATX 12V power connector 8Mb Flash ROM...
User Manual
Page 10
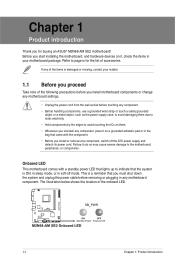
...bag that the system is damaged or missing, contact your motherboard package. Failure to do so may cause severe damage to page ix for buying an ASUS® M2N68-AM SE2 motherboard! Refer to the motherboard, peripherals, or components. Onboard LED This motherboard comes with a standby power LED that lights up to avoid... or change any motherboard settings. • Unplug the power cord from the wall socket before removing or plugging in your retailer. 1.1 Before you proceed Take note of the items is ON, in sleep mode, or in soft-off the ATX power supply and detach its power cord....
...bag that the system is damaged or missing, contact your motherboard package. Failure to do so may cause severe damage to page ix for buying an ASUS® M2N68-AM SE2 motherboard! Refer to the motherboard, peripherals, or components. Onboard LED This motherboard comes with a standby power LED that lights up to avoid... or change any motherboard settings. • Unplug the power cord from the wall socket before removing or plugging in your retailer. 1.1 Before you proceed Take note of the items is ON, in sleep mode, or in soft-off the ATX power supply and detach its power cord....
User Manual
Page 11
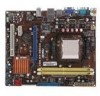
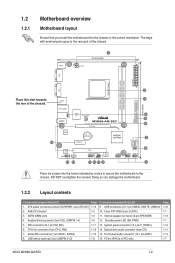
ATX power connectors (24-pin EATXPWR, 4-pin ATX12V) 2. Keyboard/mouse power (3-pin PS2_USBPW 1-4) 5. Doing so can damage the motherboard. 1.2.2 Layout contents Connectors/Jumpers/Slots/LED 1. DDR2 DIMM slots 4. Clear RTC RAM (3-pin CLRTC) 11. Standby power LED (SB_PWR) 13. System panel connector (10-1 pin ... audio connector (4-pin CD) 15. Front panel audio connector (10-1 pin AAFP) 16. PCIe x16/PCIe x1/PCI slots Page 1-12 1-7 1-13 1-1 1-14 1-11 1-14 1-7 ASUS M2N68-AM SE2 1-2
ATX power connectors (24-pin EATXPWR, 4-pin ATX12V) 2. Keyboard/mouse power (3-pin PS2_USBPW 1-4) 5. Doing so can damage the motherboard. 1.2.2 Layout contents Connectors/Jumpers/Slots/LED 1. DDR2 DIMM slots 4. Clear RTC RAM (3-pin CLRTC) 11. Standby power LED (SB_PWR) 13. System panel connector (10-1 pin ... audio connector (4-pin CD) 15. Front panel audio connector (10-1 pin AAFP) 16. PCIe x16/PCIe x1/PCI slots Page 1-12 1-7 1-13 1-1 1-14 1-11 1-14 1-7 ASUS M2N68-AM SE2 1-2
User Manual
Page 13
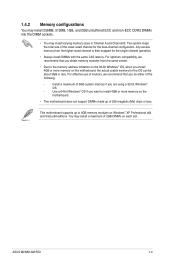
Any excess memory from the same vendor. • Due to 4GB memory modules on the motherboard. • This motherboard does not support DIMMs made up to the memory address limitation on the 32-bit Windows® OS, when you install 4GB or more ...for the single-channel operation. • Always install DIMMs with the same CAS latency. This motherboard supports up of 256 megabits (Mb) chips or less. You may install varying memory sizes in Channel A and Channel B. ASUS M2N68-AM SE2 1-4 For effective use of memory, we recommend that you are using a 32-bit Windows®...
Any excess memory from the same vendor. • Due to 4GB memory modules on the motherboard. • This motherboard does not support DIMMs made up to the memory address limitation on the 32-bit Windows® OS, when you install 4GB or more ...for the single-channel operation. • Always install DIMMs with the same CAS latency. This motherboard supports up of 256 megabits (Mb) chips or less. You may install varying memory sizes in Channel A and Channel B. ASUS M2N68-AM SE2 1-4 For effective use of memory, we recommend that you are using a 32-bit Windows®...
User Manual
Page 15
... the documentation that comes with the screw. 6. Remove the chassis cover (if your motherboard is completely seated on its Serial Presence Detect (SPD), which is the standard way of dual-channel memory configuration. Secure the card to use. 4. ASUS M2N68-AM SE2 1-6 SS: Single-sided / DS: Double-sided DIMM support: • A*: Supports one module...
... the documentation that comes with the screw. 6. Remove the chassis cover (if your motherboard is completely seated on its Serial Presence Detect (SPD), which is the standard way of dual-channel memory configuration. Secure the card to use. 4. ASUS M2N68-AM SE2 1-6 SS: Single-sided / DS: Double-sided DIMM support: • A*: Supports one module...
User Manual
Page 17
... the BIOS automatically resets parameter settings to reenter data. The USBPW5-10 jumper is for about 5-10 seconds, then move the jumper again to pins 1-2. 3. ASUS M2N68-AM SE2 1-8 After clearing the CMOS, reinstall the battery. • You do not help, remove the onboard battery and move the cap back to clear the...
... the BIOS automatically resets parameter settings to reenter data. The USBPW5-10 jumper is for about 5-10 seconds, then move the jumper again to pins 1-2. 3. ASUS M2N68-AM SE2 1-8 After clearing the CMOS, reinstall the battery. • You do not help, remove the onboard battery and move the cap back to clear the...
User Manual
Page 19
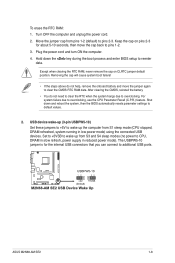
... Out Bass/Center 6. The data transfer rate of the Serial ATA 3Gb/s is faster than the standard parallel ATA with Serial ATA 1.5Gb/s specification. ASUS M2N68-AM SE2 1-10 Line Out port (lime). This port connects to the audio configuration table below for the function of this port becomes Front Speaker Out. 5. USB...
... Out Bass/Center 6. The data transfer rate of the Serial ATA 3Gb/s is faster than the standard parallel ATA with Serial ATA 1.5Gb/s specification. ASUS M2N68-AM SE2 1-10 Line Out port (lime). This port connects to the audio configuration table below for the function of this port becomes Front Speaker Out. 5. USB...
User Manual
Page 21
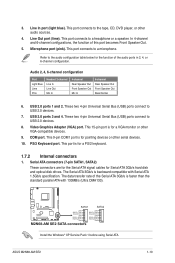
...connector. DO NOT forget to connect the CPU fan cable to the USB connectors. Insufficient air flow inside the system may damage the motherboard components. ASUS M2N68-AM SE2 1-12 USB connectors (10-1 pin USB56, USB78, USB910) These connectors are for USB 2.0 ports. Connect the CPU fan cable to... 480Mbps connection speed. Only the CPU fan supports the ASUS Q-Fan feature. These USB connectors comply with the USB 2.0 specification that the black ...
...connector. DO NOT forget to connect the CPU fan cable to the USB connectors. Insufficient air flow inside the system may damage the motherboard components. ASUS M2N68-AM SE2 1-12 USB connectors (10-1 pin USB56, USB78, USB910) These connectors are for USB 2.0 ports. Connect the CPU fan cable to... 480Mbps connection speed. Only the CPU fan supports the ASUS Q-Fan feature. These USB connectors comply with the USB 2.0 specification that the black ...
User Manual
Page 23
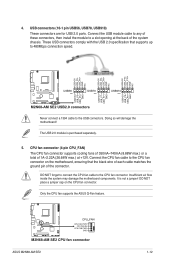
... this connector. Front panel audio connector (10-1 pin AAFP) This connector is for the system power button. See page 2-10 for the HDD Activity LED. ASUS M2N68-AM SE2 1-14 System panel connector (10-1 pin F_PANEL) This connector supports several chassis-mounted functions. • System power LED (2-pin PWRLED) This 2-pin connector is...
... this connector. Front panel audio connector (10-1 pin AAFP) This connector is for the system power button. See page 2-10 for the HDD Activity LED. ASUS M2N68-AM SE2 1-14 System panel connector (10-1 pin F_PANEL) This connector supports several chassis-mounted functions. • System power LED (2-pin PWRLED) This 2-pin connector is...
User Manual
Page 26
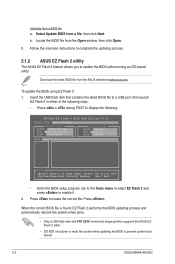
...the Open window, then click Open. 3. To update the BIOS using an OS‑based utility. Press to prevent system boot failure! 2-2 ASUS M2N68-AM SE2 When the correct BIOS file is found, EZ Flash 2 performs the BIOS updating process and automatically reboots the system when done. • Only... Flash 2 utility The ASUS EZ Flash 2 feature allows you to display the following: ASUSTek EZ Flash 2 BIOS ROM Utility V3.34 FLASH TYPE: MXIC 25L8005 Current ROM BOARD: M2N68-AM SE2 VER: 0207 (H:00 B01) DATE: 01/07/2009 Update ROM BOARD: Unknown VER: Unknown DATE: Unknown PATH: A:\ A: ...
...the Open window, then click Open. 3. To update the BIOS using an OS‑based utility. Press to prevent system boot failure! 2-2 ASUS M2N68-AM SE2 When the correct BIOS file is found, EZ Flash 2 performs the BIOS updating process and automatically reboots the system when done. • Only... Flash 2 utility The ASUS EZ Flash 2 feature allows you to display the following: ASUSTek EZ Flash 2 BIOS ROM Utility V3.34 FLASH TYPE: MXIC 25L8005 Current ROM BOARD: M2N68-AM SE2 VER: 0207 (H:00 B01) DATE: 01/07/2009 Update ROM BOARD: Unknown VER: Unknown DATE: Unknown PATH: A:\ A: ...
User Manual
Page 28
... a field. Select the Load Setup Defaults item under the Exit menu. See section 2.8 Exit menu. • The BIOS setup screens in this motherboard apply to most conditions to enter Setup after changing any of the basic system information. Primary IDE Master Primary IDE Slave SATA1 SATA2 System Information...19:34:30] System Date [Wed 08/27/2008] IDE Configuration Use [ENTER], [TAB] or [SHIFT-TAB] to set the system date. 2-4 ASUS M2N68-AM SE2 We recommend that you see on your system, or prompted to download the latest BIOS file for reference only. Use [+] or [-] to your system ...
... a field. Select the Load Setup Defaults item under the Exit menu. See section 2.8 Exit menu. • The BIOS setup screens in this motherboard apply to most conditions to enter Setup after changing any of the basic system information. Primary IDE Master Primary IDE Slave SATA1 SATA2 System Information...19:34:30] System Date [Wed 08/27/2008] IDE Configuration Use [ENTER], [TAB] or [SHIFT-TAB] to set the system date. 2-4 ASUS M2N68-AM SE2 We recommend that you see on your system, or prompted to download the latest BIOS file for reference only. Use [+] or [-] to your system ...
User Manual
Page 30
... PIO mode. AMI BIOS Displays the auto-detected BIOS information Processor Displays the auto-detected CPU specification System Memory Displays the auto-detected system memory 2-6 ASUS M2N68-AM SE2 Configuration options: [Disabled] [Auto] Block (Multi-Sector Transfer) M [Auto] Enables or disables data multi-sectors transfers. LBA/Large Mode [Auto] Enables or disables the...
... PIO mode. AMI BIOS Displays the auto-detected BIOS information Processor Displays the auto-detected CPU specification System Memory Displays the auto-detected system memory 2-6 ASUS M2N68-AM SE2 Configuration options: [Disabled] [Auto] Block (Multi-Sector Transfer) M [Auto] Enables or disables data multi-sectors transfers. LBA/Large Mode [Auto] Enables or disables the...
User Manual
Page 32
...] Allows you to 1�C��L�K 2�C��L�K 3��C�L�K��] tWRWR [Auto] Configuration options: [Auto] [1 CLK] [2 CLK] [3 CLK] 2-8 ASUS M2N68-AM SE2
...] Allows you to 1�C��L�K 2�C��L�K 3��C�L�K��] tWRWR [Auto] Configuration options: [Auto] [1 CLK] [2 CLK] [3 CLK] 2-8 ASUS M2N68-AM SE2
User Manual
Page 34
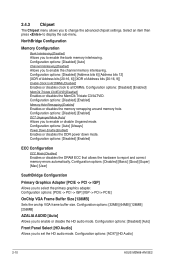
... ECC Mode [Disabled] Enables or disables the DRAM ECC that allows the hardware to display the sub-menu. Configuration options: [AC97] [HD Audio] 2-10 ASUS M2N68-AM SE2 2.4.3 Chipset The Chipset menu allows you to enable the bank memory interleaving. NorthBridge Configuration Memory Configuration Bank Interleaving [Disabled] Allows you to change the advanced...
... ECC Mode [Disabled] Enables or disables the DRAM ECC that allows the hardware to display the sub-menu. Configuration options: [AC97] [HD Audio] 2-10 ASUS M2N68-AM SE2 2.4.3 Chipset The Chipset menu allows you to enable the bank memory interleaving. NorthBridge Configuration Memory Configuration Bank Interleaving [Disabled] Allows you to change the advanced...
User Manual
Page 36
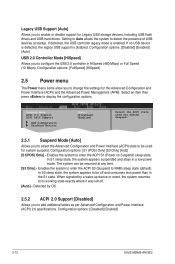
...). When signaled by OS. 2.5.2 ACPI 2.0 Support [Disabled] Allows you to enter the ACPI S1 (Power on Suspend) sleep state. Configuration options: [Disabled] [Enabled] 2-12 ASUS M2N68-AM SE2 Suspend Mode ACPI 2.0 Support ACPI APIC Support APM Configuration Hardware Monitor [Auto] [Disabled] [Enabled] Select the ACPI state used for the Advanced Configuration and Power...
...). When signaled by OS. 2.5.2 ACPI 2.0 Support [Disabled] Allows you to enter the ACPI S1 (Power on Suspend) sleep state. Configuration options: [Disabled] [Enabled] 2-12 ASUS M2N68-AM SE2 Suspend Mode ACPI 2.0 Support ACPI APIC Support APM Configuration Hardware Monitor [Auto] [Disabled] [Enabled] Select the ACPI state used for the Advanced Configuration and Power...
User Manual
Page 38
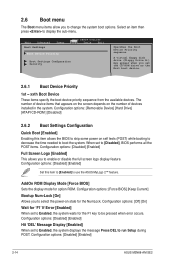
...Message Display [Enabled] When set to enable or disable the full screen logo display feature. Configuration options: [Disabled] [Enabled] 2-14 ASUS M2N68-AM SE2 AddOn ROM Display Mode [Force BIOS] Sets the display mode for the F1 key to boot the system. Main Advanced Boot Settings Power... ~ xxth Boot Device These items specify the boot device priority sequence from the available devices. Select an item then press to use the ASUS MyLogo 2™ feature. A virtual floppy disk drive (Floppy Drive B:) may appear when you to run Setup during POST. Configuration options...
...Message Display [Enabled] When set to enable or disable the full screen logo display feature. Configuration options: [Disabled] [Enabled] 2-14 ASUS M2N68-AM SE2 AddOn ROM Display Mode [Force BIOS] Sets the display mode for the F1 key to boot the system. Main Advanced Boot Settings Power... ~ xxth Boot Device These items specify the boot device priority sequence from the available devices. Select an item then press to use the ASUS MyLogo 2™ feature. A virtual floppy disk drive (Floppy Drive B:) may appear when you to run Setup during POST. Configuration options...
User Manual
Page 40
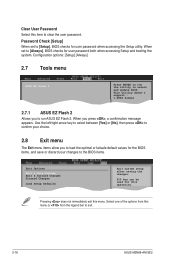
... the system. Configuration options: [Setup] [Always] 2.7 Tools menu Main Advanced Power BIOS SETUP UTILITY Boot Tools Exit ASUS EZ Flash 2 Press ENTER to run ASUS EZ Flash 2. This utility doesn't support : 1.NTFS format 2.7.1 ASUS EZ Flash 2 Allows you to the BIOS items. Exit Options Exit & Save Changes Exit & Discard Changes Discard Changes...When set to [Setup], BIOS checks for this operation. Select one of the options from this menu. Password Check [Setup] When set to exit. 2-16 ASUS M2N68-AM SE2 F10 key can be used for user password when accessing the Setup utility.
... the system. Configuration options: [Setup] [Always] 2.7 Tools menu Main Advanced Power BIOS SETUP UTILITY Boot Tools Exit ASUS EZ Flash 2 Press ENTER to run ASUS EZ Flash 2. This utility doesn't support : 1.NTFS format 2.7.1 ASUS EZ Flash 2 Allows you to the BIOS items. Exit Options Exit & Save Changes Exit & Discard Changes Discard Changes...When set to [Setup], BIOS checks for this operation. Select one of the options from this menu. Password Check [Setup] When set to exit. 2-16 ASUS M2N68-AM SE2 F10 key can be used for user password when accessing the Setup utility.
