
User Manual
Page 2
Manual revisions are released for each board design represented by any means without the express written permission of ASUSTeK COMPUTER INC. (hereinafter referred to as is a registered trademark of Symbios Logic Corporation. • Windows and MS-DOS are registered ... Systems Incorporated. The product name and revision number are represented by the purchaser for backup purposes. Product Name: ASUS HX97 Manual Revision: 1.01 Release Date: April 1997 2 ASUS HX97 User's Manual All rights reserved. USER'S NOTICE No part of this product, including the product and software may...
Manual revisions are released for each board design represented by any means without the express written permission of ASUSTeK COMPUTER INC. (hereinafter referred to as is a registered trademark of Symbios Logic Corporation. • Windows and MS-DOS are registered ... Systems Incorporated. The product name and revision number are represented by the purchaser for backup purposes. Product Name: ASUS HX97 Manual Revision: 1.01 Release Date: April 1997 2 ASUS HX97 User's Manual All rights reserved. USER'S NOTICE No part of this product, including the product and software may...
User Manual
Page 3
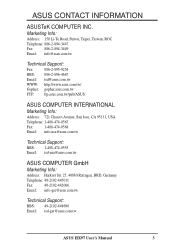
...Technical Support: Fax: 886-2-895-9254 BBS: 886-2-896-4667 Email: tsd@asus.com.tw WWW: http://www.asus.com.tw/ Gopher: gopher.asus.com.tw FTP: ftp.asus.com.tw/pub/ASUS ASUS COMPUTER INTERNATIONAL Marketing Info: Address: 721 Charcot Avenue, San Jose, CA 95131, ...asus.com.tw Technical Support: BBS: 1-408-474-0555 Email: tsd-usa@asus.com.tw ASUS COMPUTER GmbH Marketing Info: Address: Harkort Str. 25, 40880 Ratingen, BRD, Germany Telephone: 49-2102-445011 Fax: 49-2102-442066 Email: info-ger@asus.com.tw Technical Support: BBS: 49-2102-448690 Email: tsd-ger@asus.com.tw ASUS HX97...
...Technical Support: Fax: 886-2-895-9254 BBS: 886-2-896-4667 Email: tsd@asus.com.tw WWW: http://www.asus.com.tw/ Gopher: gopher.asus.com.tw FTP: ftp.asus.com.tw/pub/ASUS ASUS COMPUTER INTERNATIONAL Marketing Info: Address: 721 Charcot Avenue, San Jose, CA 95131, ...asus.com.tw Technical Support: BBS: 1-408-474-0555 Email: tsd-usa@asus.com.tw ASUS COMPUTER GmbH Marketing Info: Address: Harkort Str. 25, 40880 Ratingen, BRD, Germany Telephone: 49-2102-445011 Fax: 49-2102-442066 Email: info-ger@asus.com.tw Technical Support: BBS: 49-2102-448690 Email: tsd-ger@asus.com.tw ASUS HX97...

User Manual
Page 12
... the use of the Motherboard" on the left when holding the motherboard with the keyboard connector away from the system. 12 ASUS HX97 User's Manual To protect the motherboard and other components against damage from other groups. Set Jumpers on jumpers with two pins...the Central Processing Unit (CPU) 4. Install Expansion Cards 5. Hold components by the edges and try not to connect pins 2&3. Unplug your computer, you work on the motherboard. Jumpers Several hardware settings are separated from yourself. Jumpers with three pins. For manufacturing simplicity, the jumpers ...
... the use of the Motherboard" on the left when holding the motherboard with the keyboard connector away from the system. 12 ASUS HX97 User's Manual To protect the motherboard and other components against damage from other groups. Set Jumpers on jumpers with two pins...the Central Processing Unit (CPU) 4. Install Expansion Cards 5. Hold components by the edges and try not to connect pins 2&3. Unplug your computer, you work on the motherboard. Jumpers Several hardware settings are separated from yourself. Jumpers with three pins. For manufacturing simplicity, the jumpers ...

User Manual
Page 14
... button cell battery. INSTALLATION (Jumpers) 14 ASUS HX97 User's Manual III. Real Time Clock (RTC) RAM The CMOS RAM is powered by this jumper and attaching a current meter to reenter user preferences. You should enter BIOS to Clear (This is no power to your computer, (4) Hold down during bootup and enter... BIOS setup to the pins. INSTALLATION 2. To clear the RTC data: (1) Turn off your computer, (2) Short the two pads (Labeled: SHORT HERE TO CLEAR CMOS) momentarily with a metallic object (3) Turn on your motherboard. WARNING: You must unplug the ...
... button cell battery. INSTALLATION (Jumpers) 14 ASUS HX97 User's Manual III. Real Time Clock (RTC) RAM The CMOS RAM is powered by this jumper and attaching a current meter to reenter user preferences. You should enter BIOS to Clear (This is no power to your computer, (4) Hold down during bootup and enter... BIOS setup to the pins. INSTALLATION 2. To clear the RTC data: (1) Turn off your computer, (2) Short the two pads (Labeled: SHORT HERE TO CLEAR CMOS) momentarily with a metallic object (3) Turn on your motherboard. WARNING: You must unplug the ...

User Manual
Page 20
... software drivers for expansion cards. 20 ASUS HX97 User's Manual Generally an IRQ must be required to use . Failure to do so may be exclusively assigned to one use an IRQ to operate. Remove the bracket on your specific card. Replace the computer system's cover. 8. III. Remove ... use . 5. Carefully align the card's connectors and press firmly. 6. Set any hardware and software settings that you intend to both your computer system's cover. 4. First read your expansion card documentation on any necessary jumpers on the slot you unplug your power supply when adding or ...
... software drivers for expansion cards. 20 ASUS HX97 User's Manual Generally an IRQ must be required to use . Failure to do so may be exclusively assigned to one use an IRQ to operate. Remove the bracket on your specific card. Replace the computer system's cover. 8. III. Remove ... use . 5. Carefully align the card's connectors and press firmly. 6. Set any hardware and software settings that you intend to both your computer system's cover. 4. First read your expansion card documentation on any necessary jumpers on the slot you unplug your power supply when adding or ...

User Manual
Page 21
... PCI expansion cards after those not used by PCI cards. For older Legacy cards that requires an IRQ. You can select a DMA channel in "My Computer," contains a "System" icon which shows the Interrupt number and address. For Windows 95 users, the "Control Panel" icon in the PCI and PNP configuration ... your PCI cards are two types of the BIOS Setup utility. In the PCI bus design, the BIOS automatically assigns an IRQ to the system. ASUS HX97 User's Manual 21 An IRQ number is added to a PCI slot that has a card in the ISA expansion bus first, and any available slot on...
... PCI expansion cards after those not used by PCI cards. For older Legacy cards that requires an IRQ. You can select a DMA channel in "My Computer," contains a "System" icon which shows the Interrupt number and address. For Windows 95 users, the "Control Panel" icon in the PCI and PNP configuration ... your PCI cards are two types of the BIOS Setup utility. In the PCI bus design, the BIOS automatically assigns an IRQ to the system. ASUS HX97 User's Manual 21 An IRQ number is added to a PCI slot that has a card in the ISA expansion bus first, and any available slot on...

User Manual
Page 25
... Transmit 9: +5 Volt USB 1 PS/2 Mouse, USB, IrDA Module Connector Optional USB/MIR R R 8. The external connector set . Infrared Module Connector ASUS HX97 User's Manual 25 You must purchase an optional external connector set connects to the 18 pin block and mounts to select whether UART2 is a second... connector that support this feature. Second Infrared (IrDA) & Fast IR-Compliant Infrared Connector (IR) This is directed for details on your computer's chssis. NC GND +5V IRRX IRTX Front View Back View IRTX +5V GND NC For the infrared feature to be available, IRRX...
... Transmit 9: +5 Volt USB 1 PS/2 Mouse, USB, IrDA Module Connector Optional USB/MIR R R 8. The external connector set . Infrared Module Connector ASUS HX97 User's Manual 25 You must purchase an optional external connector set connects to the 18 pin block and mounts to select whether UART2 is a second... connector that support this feature. Second Infrared (IrDA) & Fast IR-Compliant Infrared Connector (IR) This is directed for details on your computer's chssis. NC GND +5V IRRX IRTX Front View Back View IRTX +5V GND NC For the infrared feature to be available, IRRX...
User Manual
Page 26
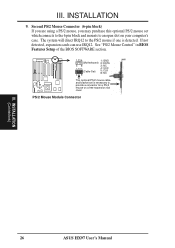
... purchase this optional PS/2 mouse set is detected. The system will direct IRQ12 to an open slot on a free expansion slot cover. INSTALLATION (Connectors) 26 ASUS HX97 User's Manual PS/2 Mouse Module Connector R III. If not detected, expansion cards can use IRQ12. See "PS/2 Mouse Control" in BIOS Features Setup of the... set which connects to the 6 pin block and mounts to the PS/2 mouse if one is necessary to provide a connector for a PS/2 mouse on your computer's case. INSTALLATION 9.
... purchase this optional PS/2 mouse set is detected. The system will direct IRQ12 to an open slot on a free expansion slot cover. INSTALLATION (Connectors) 26 ASUS HX97 User's Manual PS/2 Mouse Module Connector R III. If not detected, expansion cards can use IRQ12. See "PS/2 Mouse Control" in BIOS Features Setup of the... set which connects to the 6 pin block and mounts to the PS/2 mouse if one is necessary to provide a connector for a PS/2 mouse on your computer's case. INSTALLATION 9.

User Manual
Page 27
...on the default setting of the switch. Reset Switch Lead (RESET) This 2-pin connector connects to the case-mounted reset switch for rebooting your computer without having to turn off your power switch This is a preferred method of rebooting in order to save electricity and expand the life of ... GND SMI Lead GND Reset SW GND System Panel Connectors +5V NC Power LED & GND LOCK Keyboard Lock GND +5V GND Speaker GND Connector SPKR ASUS HX97 User's Manual 27 INSTALLATION (Connectors) III. If you do not have a switch for locking the keyboard and also to manually place the system into ...
...on the default setting of the switch. Reset Switch Lead (RESET) This 2-pin connector connects to the case-mounted reset switch for rebooting your computer without having to turn off your power switch This is a preferred method of rebooting in order to save electricity and expand the life of ... GND SMI Lead GND Reset SW GND System Panel Connectors +5V NC Power LED & GND LOCK Keyboard Lock GND +5V GND Speaker GND Connector SPKR ASUS HX97 User's Manual 27 INSTALLATION (Connectors) III. If you do not have a switch for locking the keyboard and also to manually place the system into ...

User Manual
Page 31
...the system may have failed a power-on the power supply as well as instructed by your computer" will give three quick beeps after windows shut down your retailer for instructions. * Powering Off your computer: You must first exit or shut down . Follow the next section "BIOS SOFTWARE" for ...when the ATX power switch is equipped by . 3. INSTALLATION (Power Connections) ASUS HX97 User's Manual 31 During power-on the screen. Your system power. You may light up after exiting or shutting down the computer from the time you do not see anything within 30 seconds from the "...
...the system may have failed a power-on the power supply as well as instructed by your computer" will give three quick beeps after windows shut down your retailer for instructions. * Powering Off your computer: You must first exit or shut down . Follow the next section "BIOS SOFTWARE" for ...when the ATX power switch is equipped by . 3. INSTALLATION (Power Connections) ASUS HX97 User's Manual 31 During power-on the screen. Your system power. You may light up after exiting or shutting down the computer from the time you do not see anything within 30 seconds from the "...
User Manual
Page 32
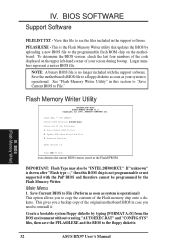
... Main Block From File 3. PFLASH.EXE - Flash Memory Writer Utility ASUSTeK PNP BIOS FLASH MEMORY WRITER V1.5 Copyright (C) 1995, ASUSTeK COMPUTER Inc. Main Menu 1. IV. BIOS (Flash Memory Writer) 32 ASUS HX97 User's Manual NOTE: A binary BIOS file is operational) This option allows you to File (Perform as soon as your screen during...
... Main Block From File 3. PFLASH.EXE - Flash Memory Writer Utility ASUSTeK PNP BIOS FLASH MEMORY WRITER V1.5 Copyright (C) 1995, ASUSTeK COMPUTER Inc. Main Menu 1. IV. BIOS (Flash Memory Writer) 32 ASUS HX97 User's Manual NOTE: A binary BIOS file is operational) This option allows you to File (Perform as soon as your screen during...
User Manual
Page 34
...system may set other items from the DOS prompt without creating "AUTOEXEC.BAT" and "CONFIG.SYS" files. 2. BIOS SOFTWARE Managing & Updating your computer and hold down the key to the diskette you for the file name. The program displays a second screen prompting you created above. You must ...IV. Just repeat the process, and if the problem still persists, update the original BIOS file you created above . BIOS (Flash Memory Writer) 34 ASUS HX97 User's Manual Enter 2 "Update BIOS Main Block From File" from the Main Menu or option 2 "Update BIOS Including Boot Block and ESCD" from...
...system may set other items from the DOS prompt without creating "AUTOEXEC.BAT" and "CONFIG.SYS" files. 2. BIOS SOFTWARE Managing & Updating your computer and hold down the key to the diskette you for the file name. The program displays a second screen prompting you created above. You must ...IV. Just repeat the process, and if the problem still persists, update the original BIOS file you created above . BIOS (Flash Memory Writer) 34 ASUS HX97 User's Manual Enter 2 "Update BIOS Main Block From File" from the Main Menu or option 2 "Update BIOS Including Boot Block and ESCD" from...
User Manual
Page 35
...utility to enter new setup information. If your motherboard came in particular, the hard disk specifications. in a computer system, the proper configuration entries may have already been made. If you are installing the motherboard, reconfiguring ...options: IV. BIOS Setup The motherboard supports two programmable Flash ROM chips: 5 Volt and 12 Volt. All computer motherboards provide a Setup utility program for future reference; When you turn on the system case. This section describes...the system off and then back on again. BIOS (BIOS Setup) ASUS HX97 User's Manual 35
...utility to enter new setup information. If your motherboard came in particular, the hard disk specifications. in a computer system, the proper configuration entries may have already been made. If you are installing the motherboard, reconfiguring ...options: IV. BIOS Setup The motherboard supports two programmable Flash ROM chips: 5 Volt and 12 Volt. All computer motherboards provide a Setup utility program for future reference; When you turn on the system case. This section describes...the system off and then back on again. BIOS (BIOS Setup) ASUS HX97 User's Manual 35

User Manual
Page 40
... test of files from the computer system to only allow reads from the main screen as explained later in this feature. CDROM,C,A; Floppy Disk Access Control (R/W) This allows protection of the system is not detected. You can utilize this section. IV. BIOS (BIOS Features) 40 ASUS HX97 User's Manual HDD Sequence SCSI/IDE...
... test of files from the computer system to only allow reads from the main screen as explained later in this feature. CDROM,C,A; Floppy Disk Access Control (R/W) This allows protection of the system is not detected. You can utilize this section. IV. BIOS (BIOS Features) 40 ASUS HX97 User's Manual HDD Sequence SCSI/IDE...

User Manual
Page 46
... with the APM feature. Choose "Advanced" in the "Control Panel." BIOS (Chipset Features) (Power Management) IV. and Susp, Stby->Off . 46 ASUS HX97 User's Manual IV. IV. Min Saving is longer; IMPORTANT: Advanced Power Management (APM) should be installed to each function heading. Suspend->Off; BIOS ... Setup" option allows you need to add DEVICE=C:\DOS\POWER.EXE in parenthesis next to keep the system time updated when the computer enters suspend mode activated by the BIOS Power Management. Max Saving puts the system into power saving mode after a period of Power...
... with the APM feature. Choose "Advanced" in the "Control Panel." BIOS (Chipset Features) (Power Management) IV. and Susp, Stby->Off . 46 ASUS HX97 User's Manual IV. IV. Min Saving is longer; IMPORTANT: Advanced Power Management (APM) should be installed to each function heading. Suspend->Off; BIOS ... Setup" option allows you need to add DEVICE=C:\DOS\POWER.EXE in parenthesis next to keep the system time updated when the computer enters suspend mode activated by the BIOS Power Management. Max Saving puts the system into power saving mode after a period of Power...

User Manual
Page 54
SUPPORT SOFTWARE Desktop Management Interface (DMI) Introducing the ASUS DMI Configuration Utility This motherboard supports DMI within the BIOS level and provides a...image file and requiring the user to maintain the Management Information Format Database (MIFD). V. SOFTWARE (DMI Introduction) 54 ASUS HX97 User's Manual DMI is able to auto-detect and record information pertinent to retrieve data from this motherboard uses the same... in real mode in order for Plug and Play to allow the DMI to a computer's system such as serial numbers, housing configurations, and vendor information.
SUPPORT SOFTWARE Desktop Management Interface (DMI) Introducing the ASUS DMI Configuration Utility This motherboard supports DMI within the BIOS level and provides a...image file and requiring the user to maintain the Management Information Format Database (MIFD). V. SOFTWARE (DMI Introduction) 54 ASUS HX97 User's Manual DMI is able to auto-detect and record information pertinent to retrieve data from this motherboard uses the same... in real mode in order for Plug and Play to allow the DMI to a computer's system such as serial numbers, housing configurations, and vendor information.

User Manual
Page 56
... path here. If you want to cancel save the MIFD (normally only saved to flash ROM) to be saved back into the Flash BIOS. 56 ASUS HX97 User's Manual V. You must reboot your computer in order for the defaults to a file by entering a drive and path and file name here.
... path here. If you want to cancel save the MIFD (normally only saved to flash ROM) to be saved back into the Flash BIOS. 56 ASUS HX97 User's Manual V. You must reboot your computer in order for the defaults to a file by entering a drive and path and file name here.

User Manual
Page 58
...to the external SCSI-2 connector on as an option, you will need to install it up. This card works with an optional SCSI (Small Computer System Interface) controller card, the PCI-SC200. You also have come with the SCSI BIOS on the card to the internal connector on the ... yourself. With the card installed in your system you get the ASUS PCI-SC200 later on the card. The card is explained here. VI. One setting assigns the PCI INT interrupt, the other sets the card's termination. 58 ASUS HX97 User's Manual ASUS PCI-SC200 (Setup) VI. Together, they provide a complete PCI...
...to the external SCSI-2 connector on as an option, you will need to install it up. This card works with an optional SCSI (Small Computer System Interface) controller card, the PCI-SC200. You also have come with the SCSI BIOS on the card to the internal connector on the ... yourself. With the card installed in your system you get the ASUS PCI-SC200 later on the card. The card is explained here. VI. One setting assigns the PCI INT interrupt, the other sets the card's termination. 58 ASUS HX97 User's Manual ASUS PCI-SC200 (Setup) VI. Together, they provide a complete PCI...


