CUWE User Manual
Page 2
For previous or updated manuals, BIOS, drivers, or product release information, contact ASUS at http://www.asus.com.tw or through any of the means indicated on the product itself. Product warranty or service will not be extended if: (1)...NOT LIMITED TO THE IMPLIED WARRANTIES OR CONDITIONS OF MERCHANTABILITY OR FITNESS FOR A PARTICULAR PURPOSE. Product Name: Manual Revision: Release Date: ASUS CUWE 1.08 E473 November 1999 2 ASUS CUWE User's Manual SPECIFICATIONS AND INFORMATION CONTAINED IN THIS MANUAL ARE FURNISHED FOR INFORMATIONAL USE ONLY, AND ARE SUBJECT TO CHANGE AT ANY TIME...
For previous or updated manuals, BIOS, drivers, or product release information, contact ASUS at http://www.asus.com.tw or through any of the means indicated on the product itself. Product warranty or service will not be extended if: (1)...NOT LIMITED TO THE IMPLIED WARRANTIES OR CONDITIONS OF MERCHANTABILITY OR FITNESS FOR A PARTICULAR PURPOSE. Product Name: Manual Revision: Release Date: ASUS CUWE 1.08 E473 November 1999 2 ASUS CUWE User's Manual SPECIFICATIONS AND INFORMATION CONTAINED IN THIS MANUAL ARE FURNISHED FOR INFORMATIONAL USE ONLY, AND ARE SUBJECT TO CHANGE AT ANY TIME...
CUWE User Manual
Page 4
... First Use of the Computer System 47 4.1.2 Updating BIOS Procedures 48 4.2 BIOS Setup Program 51 4.2.1 BIOS Menu Bar 52 4.2.2 Legend Bar 52 4.3 Main Menu 54 4.3.1 Primary & Secondary Master/Slave 55 4.4 Advanced Menu 60 4.4.1 Chip Configuration 64 4.4.2 I/O Device Configuration 67 4.4.3 PCI Configuration 69 4.4.4 Shadow Configuration 72 4 ASUS CUWE User's Manual HARDWARE SETUP 14 3.1 Motherboard Layout 14...
... First Use of the Computer System 47 4.1.2 Updating BIOS Procedures 48 4.2 BIOS Setup Program 51 4.2.1 BIOS Menu Bar 52 4.2.2 Legend Bar 52 4.3 Main Menu 54 4.3.1 Primary & Secondary Master/Slave 55 4.4 Advanced Menu 60 4.4.1 Chip Configuration 64 4.4.2 I/O Device Configuration 67 4.4.3 PCI Configuration 69 4.4.4 Shadow Configuration 72 4 ASUS CUWE User's Manual HARDWARE SETUP 14 3.1 Motherboard Layout 14...
CUWE User Manual
Page 7
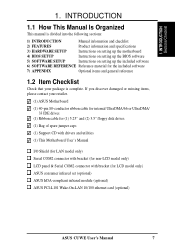
... and checklist 2) FEATURES Product information and specifications 3) HARDWARE SETUP Instructions on setting up the motherboard 4) BIOS SETUP Instructions on setting up the BIOS software 5) SOFTWARE SETUP Instructions on setting up the included software 6) SOFTWARE REFERENCE Reference material for the included...panel & Serial COM2 connector with bracket (for LCD model only) ASUS consumer infrared set (optional) ASUS IrDA-compliant infrared module (optional) ASUS PCI-L101 Wake-On-LAN 10/100 ethernet card (optional) ASUS CUWE User's Manual 7 1. If you discover damaged or missing items...
... and checklist 2) FEATURES Product information and specifications 3) HARDWARE SETUP Instructions on setting up the motherboard 4) BIOS SETUP Instructions on setting up the BIOS software 5) SOFTWARE SETUP Instructions on setting up the included software 6) SOFTWARE REFERENCE Reference material for the included...panel & Serial COM2 connector with bracket (for LCD model only) ASUS consumer infrared set (optional) ASUS IrDA-compliant infrared module (optional) ASUS PCI-L101 Wake-On-LAN 10/100 ethernet card (optional) ASUS CUWE User's Manual 7 1. If you discover damaged or missing items...
CUWE User Manual
Page 8
.... • Smart Slots! Supports Wake-On-LAN, Wake-On-Ring, Keyboard Wake-Up, and BIOS Wake-Up. • AMR Slot! FEATURES 2.1 The ASUS CUWE Motherboard The CUWE motherboard from ASUS is enabled. Intel Pentium III EB 133MHz FSB, Coppermine core FC-PGA Intel Pentium III E 100MHz... PCI slot can gain about 12% performance over that of frequency and Vcore voltage all through BIOS setup when JumperFree™ mode is carefully designed for 2D graphics. • ASUS Graphics Driver! 2. FEATURES Specifications 2. Controller supports UltraDMA/66 up to 66MB/s, UltraDMA/ 33 ...
.... • Smart Slots! Supports Wake-On-LAN, Wake-On-Ring, Keyboard Wake-Up, and BIOS Wake-Up. • AMR Slot! FEATURES 2.1 The ASUS CUWE Motherboard The CUWE motherboard from ASUS is enabled. Intel Pentium III EB 133MHz FSB, Coppermine core FC-PGA Intel Pentium III E 100MHz... PCI slot can gain about 12% performance over that of frequency and Vcore voltage all through BIOS setup when JumperFree™ mode is carefully designed for 2D graphics. • ASUS Graphics Driver! 2. FEATURES Specifications 2. Controller supports UltraDMA/66 up to 66MB/s, UltraDMA/ 33 ...
CUWE User Manual
Page 9
...control and protection over the motherboard. This interface transmits sharp, bright images by eliminating digital-to-analog and analog-to 48kHz. ASUS CUWE User's Manual 9 Supports remote monitor, diagnosis, and management (Alert on LAN 2.0) network configuration. 2.1.2 Optional Components The following...Firmware Hub! Integrated Consumer IR and Standard IR supports an optional remote control package for virtually automatic setup. • Smart BIOS! 4Mbit firmware gives a new easy-to save space and money while reducing complications associated with external peripherals, personal gadgets, ...
...control and protection over the motherboard. This interface transmits sharp, bright images by eliminating digital-to-analog and analog-to 48kHz. ASUS CUWE User's Manual 9 Supports remote monitor, diagnosis, and management (Alert on LAN 2.0) network configuration. 2.1.2 Optional Components The following...Firmware Hub! Integrated Consumer IR and Standard IR supports an optional remote control package for virtually automatic setup. • Smart BIOS! 4Mbit firmware gives a new easy-to save space and money while reducing complications associated with external peripherals, personal gadgets, ...
CUWE User Manual
Page 10
... operating systems (OS) supporting OS Direct Power Management (OSPM) functionality. The integrated motion compensation allows for an exciting gameplay experience. 10 ASUS CUWE User's Manual 2. Fast 3D graphics engine allows for smooth MPEG1 or MPEG2 video playback. Onboard IDE Bus Master controller with existing ATA-2...the IDE Transfer Speed! IDE transfers using UltraDMA/ 33 Bus Master IDE can be used. • Suspend and Go! Both the BIOS and hardware levels of all is compatible with two connectors that these features implemented in two channels. AC'97 DAC/ADC built into the...
... operating systems (OS) supporting OS Direct Power Management (OSPM) functionality. The integrated motion compensation allows for an exciting gameplay experience. 10 ASUS CUWE User's Manual 2. Fast 3D graphics engine allows for smooth MPEG1 or MPEG2 video playback. Onboard IDE Bus Master controller with existing ATA-2...the IDE Transfer Speed! IDE transfers using UltraDMA/ 33 Bus Master IDE can be used. • Suspend and Go! Both the BIOS and hardware levels of all is compatible with two connectors that these features implemented in two channels. AC'97 DAC/ADC built into the...
CUWE User Manual
Page 11
...as the Soft-Off (see ATX Power Switch Lead in the world! • Message LED (requires ACPI OS support)! Through the BIOS, the power button can determine the stage the computer is necessary to critical motherboard components. Suspend or Sleep) button or as the ... and OS/2, require much more than 4 seconds will give the user information on remotely through BIOS setup to allow the computer to present enormous user interfaces and run large applications. ASUS CUWE User's Manual 11 2. FEATURES Intelligence 2. A simple glimpse provides useful information to prevent possible ...
...as the Soft-Off (see ATX Power Switch Lead in the world! • Message LED (requires ACPI OS support)! Through the BIOS, the power button can determine the stage the computer is necessary to critical motherboard components. Suspend or Sleep) button or as the ... and OS/2, require much more than 4 seconds will give the user information on remotely through BIOS setup to allow the computer to present enormous user interfaces and run large applications. ASUS CUWE User's Manual 11 2. FEATURES Intelligence 2. A simple glimpse provides useful information to prevent possible ...

CUWE User Manual
Page 18
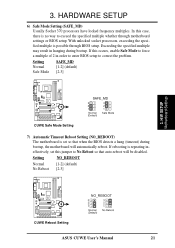
NOTE: For JumperFree™ mode, all dip switches (DSW) must be made through the BIOS setup (see 4.4 Advanced Menu). Setting JEN Disable (Jumper) [1-2] Enable (JumperFree) [2-3] (default) 01 01 01 JEN 123 123 ® CUWE Jumper JumperFree (Default) CUWE JumperFree™ Mode Setting 3. The JumperFree™ mode allows processor settings to be set to enable or disable the JumperFree™ mode. H/W SETUP Motherboard Settings 18 ASUS CUWE User's Manual 3. HARDWARE SETUP 1) JumperFree™ Mode Setting (JEN) This jumper allows you to OFF.
NOTE: For JumperFree™ mode, all dip switches (DSW) must be made through the BIOS setup (see 4.4 Advanced Menu). Setting JEN Disable (Jumper) [1-2] Enable (JumperFree) [2-3] (default) 01 01 01 JEN 123 123 ® CUWE Jumper JumperFree (Default) CUWE JumperFree™ Mode Setting 3. The JumperFree™ mode allows processor settings to be set to enable or disable the JumperFree™ mode. H/W SETUP Motherboard Settings 18 ASUS CUWE User's Manual 3. HARDWARE SETUP 1) JumperFree™ Mode Setting (JEN) This jumper allows you to OFF.
CUWE User Manual
Page 21
.... If this case, there is possible through motherboard settings or BIOS setup. Setting NO_REBOOT Normal [1-2] (default) No Reboot [2-3] ® CUWE CUWE Reboot Setting NO_REBOOT 3 2 1 Normal (Default) 3 2 1 No Reboot ASUS CUWE User's Manual 21 H/W SETUP Motherboard Settings 01 01 01 01 01 01 ® CUWE CUWE Safe Mode Setting SAFE_MD 3 3 2 2 1 1 Normal Safe Mode (Default) 7) Automatic Timeout Reboot Setting...
.... If this case, there is possible through motherboard settings or BIOS setup. Setting NO_REBOOT Normal [1-2] (default) No Reboot [2-3] ® CUWE CUWE Reboot Setting NO_REBOOT 3 2 1 Normal (Default) 3 2 1 No Reboot ASUS CUWE User's Manual 21 H/W SETUP Motherboard Settings 01 01 01 01 01 01 ® CUWE CUWE Safe Mode Setting SAFE_MD 3 3 2 2 1 1 Normal Safe Mode (Default) 7) Automatic Timeout Reboot Setting...
CUWE User Manual
Page 22
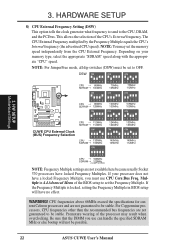
...frequencies above 66MHz exceed the specifications for current Celeron processors and are not guaranteed to be set to be possible. 22 ASUS CUWE User's Manual 3. Multiple in BIOS setup will not be stable. Premature wearing of the CPU's External frequency. WARNING! Be sure that the DIMM you ... frequencies are not guaranteed to OFF. If the Frequency Multiple is locked, setting the Frequency Multiple in 4.4 Advanced Menu of the BIOS setup to the CPU, DRAM, and the PCI bus. The CPU External Frequency multiplied by the Frequency Multiple equals the CPU's Internal...
...frequencies above 66MHz exceed the specifications for current Celeron processors and are not guaranteed to be set to be possible. 22 ASUS CUWE User's Manual 3. Multiple in BIOS setup will not be stable. Premature wearing of the CPU's External frequency. WARNING! Be sure that the DIMM you ... frequencies are not guaranteed to OFF. If the Frequency Multiple is locked, setting the Frequency Multiple in 4.4 Advanced Menu of the BIOS setup to the CPU, DRAM, and the PCI bus. The CPU External Frequency multiplied by the Frequency Multiple equals the CPU's Internal...
CUWE User Manual
Page 24
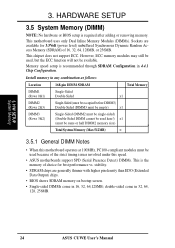
... removing memory. Sockets are generally thinner with higher pin density than EDO (Extended Data Output) chips. • BIOS shows SDRAM memory on bootup screen. • Single-sided DIMMs come in 16, 32, 64,128MB; This ...be available. Install memory in 4.4.1 Chip Configuration. HARDWARE SETUP 3.5 System Memory (DIMM) NOTE: No hardware or BIOS setup is recommended through SDRAM Configuration in any combination as follows: Location 168-pin DIMM SDRAM Total Memory DIMM1 ... SETUP System Memory 3. 3. double-sided come in 32, 64, 128, 256MB. 24 ASUS CUWE User's Manual
... removing memory. Sockets are generally thinner with higher pin density than EDO (Extended Data Output) chips. • BIOS shows SDRAM memory on bootup screen. • Single-sided DIMMs come in 16, 32, 64,128MB; This ...be available. Install memory in 4.4.1 Chip Configuration. HARDWARE SETUP 3.5 System Memory (DIMM) NOTE: No hardware or BIOS setup is recommended through SDRAM Configuration in any combination as follows: Location 168-pin DIMM SDRAM Total Memory DIMM1 ... SETUP System Memory 3. 3. double-sided come in 32, 64, 128, 256MB. 24 ASUS CUWE User's Manual
CUWE User Manual
Page 27
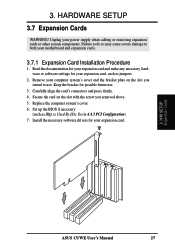
... you intend to both your expansion card, such as IRQ xx Used By ISA: Yes in 4.4.3 PCI Configuration) 7. Set up the BIOS if necessary (such as jumpers. 2. H/W SETUP Expansion Cards ASUS CUWE User's Manual 27 Failure to do so may cause severe damage to use . 3. Keep the bracket for your power supply when...
... you intend to both your expansion card, such as IRQ xx Used By ISA: Yes in 4.4.3 PCI Configuration) 7. Set up the BIOS if necessary (such as jumpers. 2. H/W SETUP Expansion Cards ASUS CUWE User's Manual 27 Failure to do so may cause severe damage to use . 3. Keep the bracket for your power supply when...
CUWE User Manual
Page 29
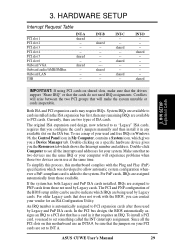
... shared ---shared -shared ---- For PnP cards, IRQs are in any remaining IRQs are two types of the BIOS setup utility can contact your vendor for your PCI cards are being used by Legacy and PnP ISA cards. ...this process, this motherboard use at the same time. To see all the PCI slots on this motherboard complies with the BIOS, you the Resources tab which gives you need IRQ assignments. INT-C --- An IRQ number is added to PCI expansion...automatic system configuration whenever a PnP-compliant card is automatically assigned to the system. ASUS CUWE User's Manual 29
... shared ---shared -shared ---- For PnP cards, IRQs are in any remaining IRQs are two types of the BIOS setup utility can contact your vendor for your PCI cards are being used by Legacy and PnP ISA cards. ...this process, this motherboard use at the same time. To see all the PCI slots on this motherboard complies with the BIOS, you the Resources tab which gives you need IRQ assignments. INT-C --- An IRQ number is added to PCI expansion...automatic system configuration whenever a PnP-compliant card is automatically assigned to the system. ASUS CUWE User's Manual 29
CUWE User Manual
Page 34
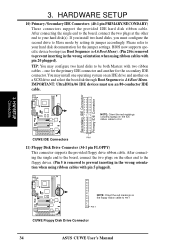
Please refer to PIN 1 ® CUWE PIN 1 CUWE Floppy Disk Drive Connector 34 ASUS CUWE User's Manual You may configure two hard disks to prevent inserting in 4.6 Boot Menu). (Pin 20 is removed to PIN 1 ® CUWE PIN 1 CUWE IDE Connectors 11) Floppy Disk Drive... Connector (34-1 pin FLOPPY) This connector supports the provided floppy drive ribbon cable. H/W SETUP Connectors NOTE: Orient the red markings on the floppy ribbon cable to your hard disk(s). If you install two hard disks, you must use an 80-conductor IDE cable. BIOS...
Please refer to PIN 1 ® CUWE PIN 1 CUWE Floppy Disk Drive Connector 34 ASUS CUWE User's Manual You may configure two hard disks to prevent inserting in 4.6 Boot Menu). (Pin 20 is removed to PIN 1 ® CUWE PIN 1 CUWE IDE Connectors 11) Floppy Disk Drive... Connector (34-1 pin FLOPPY) This connector supports the provided floppy drive ribbon cable. H/W SETUP Connectors NOTE: Orient the red markings on the floppy ribbon cable to your hard disk(s). If you install two hard disks, you must use an 80-conductor IDE cable. BIOS...
CUWE User Manual
Page 43
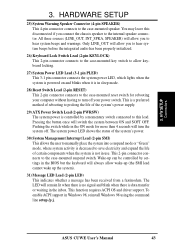
...) This 2-pin connector connects to the case-mounted reset switch for more than 4 seconds will switch the system between ON and SOFT OFF. ASUS CUWE User's Manual 43 This 2-pin connector connects to the case-mounted speaker. You may leave this lead. This function requires ACPI OS and driver...electricity and expand the life of the system's power supply. 29) ATX Power Switch Lead (2-pin PWRSW) The system power is in the BIOS but the keyboard will allow you connect the chassis speaker to turn the system off your computer without having to the internal speaker connector. ...
...) This 2-pin connector connects to the case-mounted reset switch for more than 4 seconds will switch the system between ON and SOFT OFF. ASUS CUWE User's Manual 43 This 2-pin connector connects to the case-mounted speaker. You may leave this lead. This function requires ACPI OS and driver...electricity and expand the life of the system's power supply. 29) ATX Power Switch Lead (2-pin PWRSW) The system power is in the BIOS but the keyboard will allow you connect the chassis speaker to turn the system off your computer without having to the internal speaker connector. ...
CUWE User Manual
Page 45
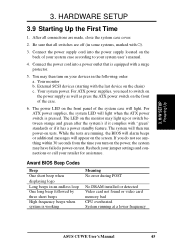
...or call your system user's manual. 4. Connect the power supply cord into a power outlet that all connections are running at a lower frequency ASUS CUWE User's Manual 45 You may have failed a power-on your devices in an endless loop One long beep followed by three short beeps High frequency...working Meaning No error during POST No DRAM installed or detected Video card not found or video card memory bad CPU overheated System running , the BIOS will alarm beeps or additional messages will appear on the back of the case. 6. Your monitor b. The LED on the chain) c. While...
...or call your system user's manual. 4. Connect the power supply cord into a power outlet that all connections are running at a lower frequency ASUS CUWE User's Manual 45 You may have failed a power-on your devices in an endless loop One long beep followed by three short beeps High frequency...working Meaning No error during POST No DRAM installed or detected Video card not found or video card memory bad CPU overheated System running , the BIOS will alarm beeps or additional messages will appear on the back of the case. 6. Your monitor b. The LED on the chain) c. While...
CUWE User Manual
Page 46
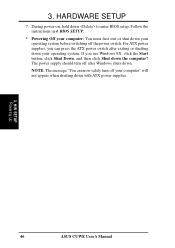
... button, click Shut Down, and then click Shut down with ATX power supplies. 3. H/W SETUP Powering Up 46 ASUS CUWE User's Manual Follow the instructions in 4. The power supply should turn off the power switch. BIOS SETUP. * Powering Off your computer: You must first exit or shut down your operating system before switching off...
... button, click Shut Down, and then click Shut down with ATX power supplies. 3. H/W SETUP Powering Up 46 ASUS CUWE User's Manual Follow the instructions in 4. The power supply should turn off the power switch. BIOS SETUP. * Powering Off your computer: You must first exit or shut down your operating system before switching off...
CUWE User Manual
Page 47
... by the Flash Memory Writer utility. Larger numbers represent a newer BIOS file. 1. NOTE: BIOS setup must specify "Floppy" as the first item in Windows and will not work with a Flash Memory Writer utility (AFLASH.EXE) to the just created boot disk. ASUS CUWE User's Manual 47 It will not work with DOS prompt in...
... by the Flash Memory Writer utility. Larger numbers represent a newer BIOS file. 1. NOTE: BIOS setup must specify "Floppy" as the first item in Windows and will not work with a Flash Memory Writer utility (AFLASH.EXE) to the just created boot disk. ASUS CUWE User's Manual 47 It will not work with DOS prompt in...
CUWE User Manual
Page 48
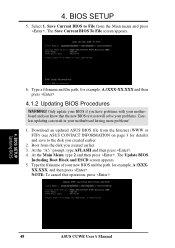
... the Main menu and press . At the Main Menu, type 2 and then press . BIOS SETUP Updating BIOS 48 ASUS CUWE User's Manual The Update BIOS Including Boot Block and ESCD screen appears. 5. The Save Current BIOS To File screen appears. 6. Only update your BIOS if you have problems with your motherboard and you know that the new...
... the Main menu and press . At the Main Menu, type 2 and then press . BIOS SETUP Updating BIOS 48 ASUS CUWE User's Manual The Update BIOS Including Boot Block and ESCD screen appears. 5. The Save Current BIOS To File screen appears. 6. Only update your BIOS if you have problems with your motherboard and you know that the new...
CUWE User Manual
Page 49
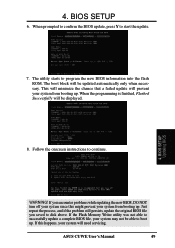
...is finished, Flashed Successfully will be displayed. 8. The boot block will be updated automatically only when necessary. BIOS SETUP Updating BIOS WARNING! ASUS CUWE User's Manual 49 If this might prevent your system will prevent your system may not be able to successfully update... a complete BIOS file, your system from booting up. When prompted to confirm the BIOS update, press Y to continue. 4. This will ...
...is finished, Flashed Successfully will be displayed. 8. The boot block will be updated automatically only when necessary. BIOS SETUP Updating BIOS WARNING! ASUS CUWE User's Manual 49 If this might prevent your system will prevent your system may not be able to successfully update... a complete BIOS file, your system from booting up. When prompted to confirm the BIOS update, press Y to continue. 4. This will ...


