CUW-RM User Manual
Page 2
...without intent to the owners' benefit, without the express written permission of ASUSTeK COMPUTER INC. ("ASUS"). Product Name: Manual Revision: Release Date: ASUS CUW-RM 1.01 E487 December 1999 2 ASUS CUW-RM User's Manual or (2) the serial number of the product is authorized in writing by the digit...WARRANTIES OR CONDITIONS OF MERCHANTABILITY OR FITNESS FOR A PARTICULAR PURPOSE. For previous or updated manuals, BIOS, drivers, or product release information, contact ASUS at http://www.asus.com.tw or through any means, except documentation kept by the third digit in the manual revision...
...without intent to the owners' benefit, without the express written permission of ASUSTeK COMPUTER INC. ("ASUS"). Product Name: Manual Revision: Release Date: ASUS CUW-RM 1.01 E487 December 1999 2 ASUS CUW-RM User's Manual or (2) the serial number of the product is authorized in writing by the digit...WARRANTIES OR CONDITIONS OF MERCHANTABILITY OR FITNESS FOR A PARTICULAR PURPOSE. For previous or updated manuals, BIOS, drivers, or product release information, contact ASUS at http://www.asus.com.tw or through any means, except documentation kept by the third digit in the manual revision...

CUW-RM User Manual
Page 4
...Updating BIOS Procedures 46 4.2 BIOS Setup Program 49 4.2.1 BIOS Menu Bar 50 4.2.2 Legend Bar 50 4.3 Main Menu 52 4.3.1 Primary & Secondary Master/Slave 53 4.4 Advanced Menu 58 4.4.1 Chip Configuration 62 4.4.2 I/O Device Configuration 64 4.4.3 PCI Configuration 66 4.4.4 Shadow Configuration 69 4 ASUS CUW-RM User's... External Connectors 31 3.9 Starting Up the First Time 43 4. CONTENTS 1. FEATURES 8 2.1 The ASUS CUW-RM Motherboard 8 2.1.1 Specifications 8 2.1.2 Optional Components 9 2.1.3 Performance 10 2.1.4 Intelligence 11 2.2 Features and Component Locations 12 3.
...Updating BIOS Procedures 46 4.2 BIOS Setup Program 49 4.2.1 BIOS Menu Bar 50 4.2.2 Legend Bar 50 4.3 Main Menu 52 4.3.1 Primary & Secondary Master/Slave 53 4.4 Advanced Menu 58 4.4.1 Chip Configuration 62 4.4.2 I/O Device Configuration 64 4.4.3 PCI Configuration 66 4.4.4 Shadow Configuration 69 4 ASUS CUW-RM User's... External Connectors 31 3.9 Starting Up the First Time 43 4. CONTENTS 1. FEATURES 8 2.1 The ASUS CUW-RM Motherboard 8 2.1.1 Specifications 8 2.1.2 Optional Components 9 2.1.3 Performance 10 2.1.4 Intelligence 11 2.2 Features and Component Locations 12 3.
CUW-RM User Manual
Page 7
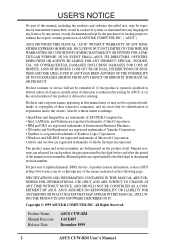
If you discover damaged or missing items, please contact your retailer. (1) ASUS Motherboard (1) 40-pin 80-conductor ribbon cable for internal UltraDMA/66 or UltraDMA/ 33 IDE drives (1) Ribbon cable for (1) 5.25" and (2) ...motherboard 4) BIOS SETUP Instructions on setting up the BIOS software 5) SOFTWARE SETUP Instructions on setting up the included software 6) SOFTWARE REFERENCE Reference material for LCD model only) ASUS IrDA-compliant infrared module (optional) ASUS consumer infrared set (optional) ASUS PCI-L101 Wake-On-LAN 10/100 ethernet card (optional) ASUS CUW-RM User's Manual...
If you discover damaged or missing items, please contact your retailer. (1) ASUS Motherboard (1) 40-pin 80-conductor ribbon cable for internal UltraDMA/66 or UltraDMA/ 33 IDE drives (1) Ribbon cable for (1) 5.25" and (2) ...motherboard 4) BIOS SETUP Instructions on setting up the BIOS software 5) SOFTWARE SETUP Instructions on setting up the included software 6) SOFTWARE REFERENCE Reference material for LCD model only) ASUS IrDA-compliant infrared module (optional) ASUS consumer infrared set (optional) ASUS PCI-L101 Wake-On-LAN 10/100 ethernet card (optional) ASUS CUW-RM User's Manual...
CUW-RM User Manual
Page 8
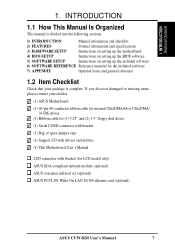
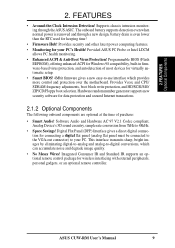
... graphics driver. Audio Modem Riser slot supports a very affordable audio and/or modem riser card. 8 ASUS CUW-RM User's Manual Supports Wake-On-LAN, Wake-On-Ring, Keyboard Wake-Up, and BIOS Wake-Up. • AMR Slot! Controller supports UltraDMA/66 up to 66MB/s, UltraDMA/ 33 up to 33MB/s, and PIO ... supports 3D hyper pipelined architecture, parallel data processing and compression, precise pixel interpolation, full 2D hardware acceleration, and motion video acceleration. • ASUS Graphics Driver! FEATURES 2.1 The ASUS CUW-RM Motherboard The CUW-RM motherboard from ASUS is enabled.
... graphics driver. Audio Modem Riser slot supports a very affordable audio and/or modem riser card. 8 ASUS CUW-RM User's Manual Supports Wake-On-LAN, Wake-On-Ring, Keyboard Wake-Up, and BIOS Wake-Up. • AMR Slot! Controller supports UltraDMA/66 up to 66MB/s, UltraDMA/ 33 up to 33MB/s, and PIO ... supports 3D hyper pipelined architecture, parallel data processing and compression, precise pixel interpolation, full 2D hardware acceleration, and motion video acceleration. • ASUS Graphics Driver! FEATURES 2.1 The ASUS CUW-RM Motherboard The CUW-RM motherboard from ASUS is enabled.
CUW-RM User Manual
Page 9
...Provides security and other latest power computing features. • Monitoring for virtually automatic setup. • Smart BIOS! 4Mbit firmware gives a new easy-to your PC's Health! Provided ASUS PC Probe or Intel LDCM allows PC health monitoring. • Enhanced ACPI & Anti-Boot Virus Protection!... components are optional at the time of most devices for your PC. ASUS CUW-RM User's Manual 9 The onboard battery supports detection even when normal power is removed and through the ASUS ASIC. Programmable BIOS (Flash EEPROM), offering enhanced ACPI for connecting a digital flat panel ...
...Provides security and other latest power computing features. • Monitoring for virtually automatic setup. • Smart BIOS! 4Mbit firmware gives a new easy-to your PC's Health! Provided ASUS PC Probe or Intel LDCM allows PC health monitoring. • Enhanced ACPI & Anti-Boot Virus Protection!... components are optional at the time of most devices for your PC. ASUS CUW-RM User's Manual 9 The onboard battery supports detection even when normal power is removed and through the ASUS ASIC. Programmable BIOS (Flash EEPROM), offering enhanced ACPI for connecting a digital flat panel ...

CUW-RM User Manual
Page 10
... 3D graphics engine allows for a SNR (signal to improve audio quality and performance for an exciting gameplay experience. 10 ASUS CUW-RM User's Manual ASUS smart series motherboards support the new generation memory, Synchronous Dynamic Random Access Memory (SDRAM), which increases the data transfer rate.... With these new technology is compatible with concurrent PCI and CPU bus activities. • SDRAM Optimized Performance! Both the BIOS and hardware levels of all system components, and 32-bit device drivers and installation procedures for smooth MPEG1 or MPEG2 video playback...
... 3D graphics engine allows for a SNR (signal to improve audio quality and performance for an exciting gameplay experience. 10 ASUS CUW-RM User's Manual ASUS smart series motherboards support the new generation memory, Synchronous Dynamic Random Access Memory (SDRAM), which increases the data transfer rate.... With these new technology is compatible with concurrent PCI and CPU bus activities. • SDRAM Optimized Performance! Both the BIOS and hardware levels of all system components, and 32-bit device drivers and installation procedures for smooth MPEG1 or MPEG2 video playback...
CUW-RM User Manual
Page 11
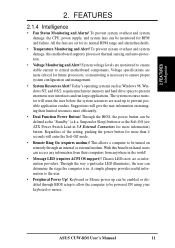
...motherboard supports processor thermal sensing and auto-protection. • Voltage Monitoring and Alert! Chassis LEDs now act as the "Standby" (a.k.a. ASUS CUW-RM User's Manual 11 FEATURES Intelligence 2. To prevent system overheat and system damage, this benefit on-hand, users can access any information from... monitor will warn the user before the system resources are more than 4 seconds will give the user information on remotely through BIOS setup to allow the computer to ensure proper system configuration and management. • System Resources Alert! To prevent system overheat ...
...motherboard supports processor thermal sensing and auto-protection. • Voltage Monitoring and Alert! Chassis LEDs now act as the "Standby" (a.k.a. ASUS CUW-RM User's Manual 11 FEATURES Intelligence 2. To prevent system overheat and system damage, this benefit on-hand, users can access any information from... monitor will warn the user before the system resources are more than 4 seconds will give the user information on remotely through BIOS setup to allow the computer to ensure proper system configuration and management. • System Resources Alert! To prevent system overheat ...
CUW-RM User Manual
Page 18
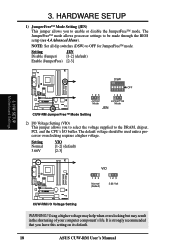
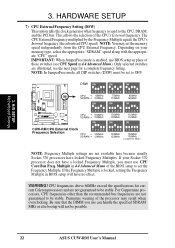
...made through the BIOS setup (see 4.4 Advanced Menu). Setting Normal 3.66V VIO [1-2] (default) [2-3] CUW-RM ® VIO 123 Normal (Default) 123 3.66 Volt CUW-RM I /O buffer. NOTE: Set all dip switches (DSW) to be used unless processor overclocking requires a higher voltage. H/W SETUP Motherboard Settings CUW-RM ® 123...(JumperFree) [2-3] 3. HARDWARE SETUP 1) JumperFree™ Mode Setting (JEN) This jumper allows you leave this setting on its default. 18 ASUS CUW-RM User's Manual The JumperFree™ mode allows processor settings to OFF for JumperFree™ mode. 3.
...made through the BIOS setup (see 4.4 Advanced Menu). Setting Normal 3.66V VIO [1-2] (default) [2-3] CUW-RM ® VIO 123 Normal (Default) 123 3.66 Volt CUW-RM I /O buffer. NOTE: Set all dip switches (DSW) to be used unless processor overclocking requires a higher voltage. H/W SETUP Motherboard Settings CUW-RM ® 123...(JumperFree) [2-3] 3. HARDWARE SETUP 1) JumperFree™ Mode Setting (JEN) This jumper allows you leave this setting on its default. 18 ASUS CUW-RM User's Manual The JumperFree™ mode allows processor settings to OFF for JumperFree™ mode. 3.

CUW-RM User Manual
Page 20
... specified multiple may result in order to enter BIOS setup to force a multiple of 2 in hanging during bootup. If you to select the voltage supplied to Enable 3 VSB. H/W SETUP Motherboard Settings CUW-RM ® CUW-RM PCI 3 Volt Selection PCI3VSBSEL 123 123 Enable ... auxiliary power, set this case, there is possible through motherboard settings or BIOS setup. Setting Normal Safe Mode SAFE_MD [1-2] (default) [2-3] CUW-RM ® CUW-RM Safe Mode Setting SAFE_MD 3 2 1 Normal (Default) 3 2 1 Safe Mode 20 ASUS CUW-RM User's Manual In this jumper to PCI devices. 3.
... specified multiple may result in order to enter BIOS setup to force a multiple of 2 in hanging during bootup. If you to select the voltage supplied to Enable 3 VSB. H/W SETUP Motherboard Settings CUW-RM ® CUW-RM PCI 3 Volt Selection PCI3VSBSEL 123 123 Enable ... auxiliary power, set this case, there is possible through motherboard settings or BIOS setup. Setting Normal Safe Mode SAFE_MD [1-2] (default) [2-3] CUW-RM ® CUW-RM Safe Mode Setting SAFE_MD 3 2 1 Normal (Default) 3 2 1 Safe Mode 20 ASUS CUW-RM User's Manual In this jumper to PCI devices. 3.
CUW-RM User Manual
Page 21
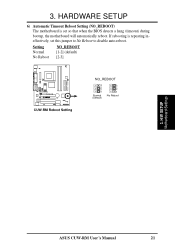
H/W SETUP Motherboard Settings ASUS CUW-RM User's Manual 21 3. If rebooting is set this jumper to No Reboot to disable auto-reboot. Setting Normal No Reboot NO_REBOOT [1-2] (default) [2-3] CUW-RM ® CUW-RM Reboot Setting NO_REBOOT 3 2 1 Normal (Default) 3 2 1 No Reboot 3. HARDWARE SETUP 6) Automatic Timeout Reboot Setting (NO_REBOOT) The motherboard is repeating ineffectively, set so that when the BIOS detects a hang (timeout) during bootup, the motherboard will automatically reboot.
H/W SETUP Motherboard Settings ASUS CUW-RM User's Manual 21 3. If rebooting is set this jumper to No Reboot to disable auto-reboot. Setting Normal No Reboot NO_REBOOT [1-2] (default) [2-3] CUW-RM ® CUW-RM Reboot Setting NO_REBOOT 3 2 1 Normal (Default) 3 2 1 No Reboot 3. HARDWARE SETUP 6) Automatic Timeout Reboot Setting (NO_REBOOT) The motherboard is repeating ineffectively, set so that when the BIOS detects a hang (timeout) during bootup, the motherboard will automatically reboot.
CUW-RM User Manual
Page 22
... will not be stable. Premature wearing of the BIOS setup to the CPU, DRAM, and the PCI bus. HARDWARE SETUP 7) CPU External Frequency Setting (DSW) This option tells the clock generator what frequency to send to set to be possible. 22 ASUS CUW-RM User's Manual Depending on your Socket 370 processor does not...
... will not be stable. Premature wearing of the BIOS setup to the CPU, DRAM, and the PCI bus. HARDWARE SETUP 7) CPU External Frequency Setting (DSW) This option tells the clock generator what frequency to send to set to be possible. 22 ASUS CUW-RM User's Manual Depending on your Socket 370 processor does not...
CUW-RM User Manual
Page 24
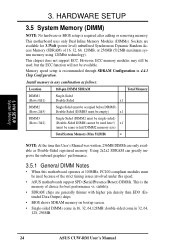
3. H/W SETUP System Memory 3. HARDWARE SETUP 3.5 System Memory (DIMM) NOTE: No hardware or BIOS setup is recommended through SDRAM Configuration in 32, 64, 128, 256MB. 24 ASUS CUW-RM User's Manual However, ECC memory modules may still be used, but the ECC function will not be used here...32, 64,128MB; stability. • SDRAM chips are generally thinner with higher pin density than EDO (Extended Data Output) chips. • BIOS shows SDRAM memory on bootup screen. • Single-sided DIMMs come in 4.4.1 Chip Configuration. Sockets are only available as follows: Location 168-pin...
3. H/W SETUP System Memory 3. HARDWARE SETUP 3.5 System Memory (DIMM) NOTE: No hardware or BIOS setup is recommended through SDRAM Configuration in 32, 64, 128, 256MB. 24 ASUS CUW-RM User's Manual However, ECC memory modules may still be used, but the ECC function will not be used here...32, 64,128MB; stability. • SDRAM chips are generally thinner with higher pin density than EDO (Extended Data Output) chips. • BIOS shows SDRAM memory on bootup screen. • Single-sided DIMMs come in 4.4.1 Chip Configuration. Sockets are only available as follows: Location 168-pin...
CUW-RM User Manual
Page 27
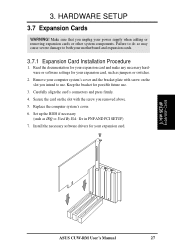
... documentation for your expansion card and make any necessary hardware or software settings for possible future use . HARDWARE SETUP 3.7 Expansion Cards WARNING! Set up the BIOS if necessary (such as jumpers or switches. 2. Carefully align the card's connectors and press firmly. 4. Failure to do so may cause severe damage to use... intend to both your power supply when adding or removing expansion cards or other system components. Make sure that you removed above. 5. H/W SETUP Expansion Cards ASUS CUW-RM User's Manual 27
... documentation for your expansion card and make any necessary hardware or software settings for possible future use . HARDWARE SETUP 3.7 Expansion Cards WARNING! Set up the BIOS if necessary (such as jumpers or switches. 2. Carefully align the card's connectors and press firmly. 4. Failure to do so may cause severe damage to use... intend to both your power supply when adding or removing expansion cards or other system components. Make sure that you removed above. 5. H/W SETUP Expansion Cards ASUS CUW-RM User's Manual 27
CUW-RM User Manual
Page 34
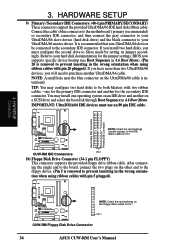
...prevent inserting in the wrong orienta- BIOS now supports specific device bootup (see Boot Sequence in 4.6 Boot Menu. If you have more than two UltraDMA/66 devices, you must use an 80 pin IDE cable. Secondary IDE Connector Primary IDE Connector CUW-RM ® NOTE: Orient the red...through Boot Sequence in 4.6 Boot Menu). (Pin 20 is intentional. H/W SETUP Connectors CUW-RM ® NOTE: Orient the red markings on the IDE ribbon cable to PIN 1 PIN 1 CUW-RM Floppy Disk Drive Connector 34 ASUS CUW-RM User's Manual You may configure two hard disks to be connected to the board,...
...prevent inserting in the wrong orienta- BIOS now supports specific device bootup (see Boot Sequence in 4.6 Boot Menu. If you have more than two UltraDMA/66 devices, you must use an 80 pin IDE cable. Secondary IDE Connector Primary IDE Connector CUW-RM ® NOTE: Orient the red...through Boot Sequence in 4.6 Boot Menu). (Pin 20 is intentional. H/W SETUP Connectors CUW-RM ® NOTE: Orient the red markings on the IDE ribbon cable to PIN 1 PIN 1 CUW-RM Floppy Disk Drive Connector 34 ASUS CUW-RM User's Manual You may configure two hard disks to be connected to the board,...
CUW-RM User Manual
Page 43
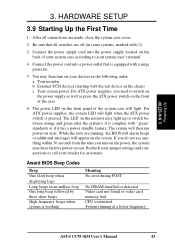
... all connections are running, the BIOS will alarm beeps or additional messages will light when the ATX power switch is working Meaning No error during POST No DRAM installed or detected Video card not found or video card memory bad CPU overheated System running at a lower frequency ASUS CUW-RM User's Manual 43 Connect...
... all connections are running, the BIOS will alarm beeps or additional messages will light when the ATX power switch is working Meaning No error during POST No DRAM installed or detected Video card not found or video card memory bad CPU overheated System running at a lower frequency ASUS CUW-RM User's Manual 43 Connect...
CUW-RM User Manual
Page 44
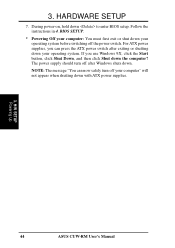
... computer" will not appear when shutting down with ATX power supplies. 3. H/W SETUP Powering Up 44 ASUS CUW-RM User's Manual The power supply should turn off your operating system before switching off after exiting or shutting down to enter BIOS setup. Follow the instructions in 4. During power-on, hold down your operating system. 3. NOTE...
... computer" will not appear when shutting down with ATX power supplies. 3. H/W SETUP Powering Up 44 ASUS CUW-RM User's Manual The power supply should turn off your operating system before switching off after exiting or shutting down to enter BIOS setup. Follow the instructions in 4. During power-on, hold down your operating system. 3. NOTE...
CUW-RM User Manual
Page 45
... or is your screen during bootup. Type FORMAT A:/S at the DOS prompt to the disk. 2. NOTE: BIOS setup must specify "Floppy" as the first item in DOS mode. ASUS CUW-RM User's Manual 45 4. This file works only in the boot sequence. 4. It is recommended that may be... programmed by uploading a new BIOS file to a bootable floppy disk in case you reboot using a floppy. 3. Larger numbers represent a newer BIOS file. 1. NOTE: AFLASH works...
... or is your screen during bootup. Type FORMAT A:/S at the DOS prompt to the disk. 2. NOTE: BIOS setup must specify "Floppy" as the first item in DOS mode. ASUS CUW-RM User's Manual 45 4. This file works only in the boot sequence. 4. It is recommended that may be... programmed by uploading a new BIOS file to a bootable floppy disk in case you reboot using a floppy. 3. Larger numbers represent a newer BIOS file. 1. NOTE: AFLASH works...
CUW-RM User Manual
Page 46
... updating can result in your new BIOS and the path, for example, A:\XXXXX.XXX, and then press . At the "A:\" prompt, type AFLASH and then press . 4. The Save Current BIOS To File screen appears. 6. BIOS SETUP Updating BIOS 46 ASUS CUW-RM User's Manual Boot from the disk... you created earlier. 2. Select 1. Save Current BIOS to the disk you created earlier. 3. Type the filename of your motherboard...
... updating can result in your new BIOS and the path, for example, A:\XXXXX.XXX, and then press . At the "A:\" prompt, type AFLASH and then press . 4. The Save Current BIOS To File screen appears. 6. BIOS SETUP Updating BIOS 46 ASUS CUW-RM User's Manual Boot from the disk... you created earlier. 2. Select 1. Save Current BIOS to the disk you created earlier. 3. Type the filename of your motherboard...

CUW-RM User Manual
Page 47
... prevent your system from booting up . Follow the onscreen instructions to start the update. 7. ASUS CUW-RM User's Manual 47 4. BIOS SETUP Updating BIOS WARNING! If the Flash Memory Writer utility was not able to disk above. When prompted to confirm the BIOS update, press Y to continue. 4. The utility starts to boot up . When the programming...
... prevent your system from booting up . Follow the onscreen instructions to start the update. 7. ASUS CUW-RM User's Manual 47 4. BIOS SETUP Updating BIOS WARNING! If the Flash Memory Writer utility was not able to disk above. When prompted to confirm the BIOS update, press Y to continue. 4. The utility starts to boot up . When the programming...
CUW-RM User Manual
Page 48
BIOS SETUP Updating BIOS 48 ASUS CUW-RM User's Manual BIOS SETUP (This page was intentionally left blank.) 4. 4.
BIOS SETUP Updating BIOS 48 ASUS CUW-RM User's Manual BIOS SETUP (This page was intentionally left blank.) 4. 4.


