

User Guide
Page 18
...then mapped for the latest QVL. 1-8 Chapter 1: Product introduction Check with the same CAS Latency. To operate at the vendor-marked or at www.asus.com for single-channel operation. • According to the Microsoft® support site at a lower frequency than the vendor-marked value. Use a...://support.microsoft. For effective use of memory, we recommend that you install memory modules of the lower-sized channel for overclocking may install varying memory sizes in Channel A and Channel B. Under the default state, some memory modules for the dual-channel configuration.
...then mapped for the latest QVL. 1-8 Chapter 1: Product introduction Check with the same CAS Latency. To operate at the vendor-marked or at www.asus.com for single-channel operation. • According to the Microsoft® support site at a lower frequency than the vendor-marked value. Use a...://support.microsoft. For effective use of memory, we recommend that you install memory modules of the lower-sized channel for overclocking may install varying memory sizes in Channel A and Channel B. Under the default state, some memory modules for the dual-channel configuration.
User Guide
Page 23
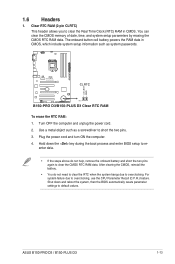
...RTC) RAM in CMOS, which include system setup information such as a screwdriver to overclocking. The onboard button cell battery powers the RAM data in CMOS. B150-PRO D3 B150-PLUS D3 CLRTC +3V_BAT GND PIN 1 B150-PRO D3/B150-PLUS D3 Clear RTC RAM To erase the RTC RAM: 1. Plug the power cord and ... due to default values. Shut down the key during the boot process and enter BIOS setup to clear the CMOS RTC RAM data. ASUS B150-PRO D3 / B150-PLUS D3 1-13 1.6 Headers 1. Use a metal object such as system passwords. After clearing the CMOS, reinstall the battery. • You do...
...RTC) RAM in CMOS, which include system setup information such as a screwdriver to overclocking. The onboard button cell battery powers the RAM data in CMOS. B150-PRO D3 B150-PLUS D3 CLRTC +3V_BAT GND PIN 1 B150-PRO D3/B150-PLUS D3 Clear RTC RAM To erase the RTC RAM: 1. Plug the power cord and ... due to default values. Shut down the key during the boot process and enter BIOS setup to clear the CMOS RTC RAM data. ASUS B150-PRO D3 / B150-PLUS D3 1-13 1.6 Headers 1. Use a metal object such as system passwords. After clearing the CMOS, reinstall the battery. • You do...

User Guide
Page 39
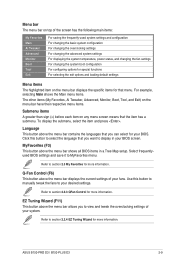
...to the system. Refer to Selects the display switch EZ System Tuning modes language of the BIOS setup program Configures system overclocking Displays the CPU Fan's speed. Click the button to manually tune the fans Loads optimized default settings Shows the bootable ... you installed to select the display language, system performance mode, fan profile and boot device priority. The default screen for details. ASUS B150-PRO D3 / B150-PLUS D3 2-7 To access the Advanced Mode, click Advanced Mode(F7) or press . Displays the CPU/motherboard temperature, CPU voltage output, CPU...
...to the system. Refer to Selects the display switch EZ System Tuning modes language of the BIOS setup program Configures system overclocking Displays the CPU Fan's speed. Click the button to manually tune the fans Loads optimized default settings Shows the bootable ... you installed to select the display language, system performance mode, fan profile and boot device priority. The default screen for details. ASUS B150-PRO D3 / B150-PLUS D3 2-7 To access the Advanced Mode, click Advanced Mode(F7) or press . Displays the CPU/motherboard temperature, CPU voltage output, CPU...
User Guide
Page 41
...setup. ASUS B150-PRO D3 / B150-PLUS D3 2-9 To display the submenu, select the item and press . Q-Fan Control (F6) This button above the menu bar allows you to select the language that you can select for your desired settings. Use this button to view and tweak the overclocking settings ...Monitor Boot Tool Exit For saving the frequently-used system settings and configuration For changing the basic system configuration For changing the overclocking settings For changing the advanced system settings For displaying the system temperature, power status, and changing the fan settings For ...
...setup. ASUS B150-PRO D3 / B150-PLUS D3 2-9 To display the submenu, select the item and press . Q-Fan Control (F6) This button above the menu bar allows you to select the language that you can select for your desired settings. Use this button to view and tweak the overclocking settings ...Monitor Boot Tool Exit For saving the frequently-used system settings and configuration For changing the basic system configuration For changing the overclocking settings For changing the advanced system settings For displaying the system temperature, power status, and changing the fan settings For ...
User Guide
Page 45
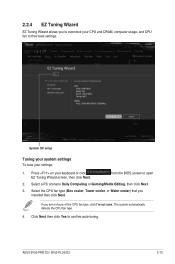
2.2.4 EZ Tuning Wizard EZ Tuning Wizard allows you to overclock your CPU and DRAM, computer usage, and CPU fan to open 2. The system automatically detects the CPU fan type. 4. If you installed then click Next. ASUS B150-PRO D3 / B150-PLUS D3 2-13 Select a PC scenario Daily Computing or Gaming/Media Editing, then click Next. 3. Select the CPU...
2.2.4 EZ Tuning Wizard EZ Tuning Wizard allows you to overclock your CPU and DRAM, computer usage, and CPU fan to open 2. The system automatically detects the CPU fan type. 4. If you installed then click Next. ASUS B150-PRO D3 / B150-PLUS D3 2-13 Select a PC scenario Daily Computing or Gaming/Media Editing, then click Next. 3. Select the CPU...

User Guide
Page 48
Scroll down to malfunction. 2.5 Ai Tweaker menu The Ai Tweaker menu items allow you installed on the CPU and DIMM model you to configure overclocking-related items. Be cautious when changing the settings of the Ai Tweaker menu items. Incorrect field values can cause the system to display other BIOS items. 2-16 Chapter 2: Getting started The configuration options for this section vary depending on the motherboard.
Scroll down to malfunction. 2.5 Ai Tweaker menu The Ai Tweaker menu items allow you installed on the CPU and DIMM model you to configure overclocking-related items. Be cautious when changing the settings of the Ai Tweaker menu items. Incorrect field values can cause the system to display other BIOS items. 2-16 Chapter 2: Getting started The configuration options for this section vary depending on the motherboard.


