
A8N-VM CSM User's Manual for English Edition
Page 3
Contents Notices vi Safety information vii A8N-VM CSM specifications summary viii Chapter 1: Product introduction 1.1 Welcome 1-2 1.2 Package contents 1-2 1.3 Special features 1-2 1.3.1 Product highlights 1-2 1.3.2 Innovative ASUS features 1-5 1.4 Before you proceed 1-6 1.5 Motherboard overview 1-7 1.5.1 Motherboard layout 1-7 1.5.2 Placement direction 1-8 1.5.3 Screw holes 1-8 1.6 Central Processing Unit (CPU 1-9 1.7 System memory 1-11 1.7.1 Overview 1-11 1.7.2 Memory configurations 1-11 1.7.3 Installing a DIMM 1-13 1.7.4 Removing a DIMM 1-13 1.8 Expansion slots...
Contents Notices vi Safety information vii A8N-VM CSM specifications summary viii Chapter 1: Product introduction 1.1 Welcome 1-2 1.2 Package contents 1-2 1.3 Special features 1-2 1.3.1 Product highlights 1-2 1.3.2 Innovative ASUS features 1-5 1.4 Before you proceed 1-6 1.5 Motherboard overview 1-7 1.5.1 Motherboard layout 1-7 1.5.2 Placement direction 1-8 1.5.3 Screw holes 1-8 1.6 Central Processing Unit (CPU 1-9 1.7 System memory 1-11 1.7.1 Overview 1-11 1.7.2 Memory configurations 1-11 1.7.3 Installing a DIMM 1-13 1.7.4 Removing a DIMM 1-13 1.8 Expansion slots...

A8N-VM CSM User's Manual for English Edition
Page 4
...14 2.3.6 System Information 2-15 2.4 Advanced menu 2-16 2.4.1 AMD Cool 'n' Quiet Configuration 2-16 2.4.2 JumperFree Configuration 2-17 2.4.3 CPU Configuration 2-18 2.4.4 Chipset 2-18 2.4.5 Onboard Devices Configuration 2-25 2.4.6 PCI PnP 2-26 2.4.7 USB Configuration 2-27 iv Contents Chapter... 2: BIOS setup 2.1 Managing and updating your BIOS 2-2 2.1.1 Creating a bootable floppy disk 2-2 2.1.2 ASUS EZ Flash utility 2-3 2.1.3 AFUDOS utility 2-4 2.1.4 ASUS Update utility 2-6 2.2 BIOS setup program 2-9 2.2.1 BIOS menu screen 2-10 2.2.2 Menu bar 2-10 2.2.3 Navigation...
...14 2.3.6 System Information 2-15 2.4 Advanced menu 2-16 2.4.1 AMD Cool 'n' Quiet Configuration 2-16 2.4.2 JumperFree Configuration 2-17 2.4.3 CPU Configuration 2-18 2.4.4 Chipset 2-18 2.4.5 Onboard Devices Configuration 2-25 2.4.6 PCI PnP 2-26 2.4.7 USB Configuration 2-27 iv Contents Chapter... 2: BIOS setup 2.1 Managing and updating your BIOS 2-2 2.1.1 Creating a bootable floppy disk 2-2 2.1.2 ASUS EZ Flash utility 2-3 2.1.3 AFUDOS utility 2-4 2.1.4 ASUS Update utility 2-6 2.2 BIOS setup program 2-9 2.2.1 BIOS menu screen 2-10 2.2.2 Menu bar 2-10 2.2.3 Navigation...
A8N-VM CSM User's Manual for English Edition
Page 8
...® 88E1111 PHY supports: - NV Firewall VIA 6307 IEEE 1394a controller supports: - 2 x IEEE 1394a ports (continued on the next page) viii NV Active Armor - A8N-VM CSM specifications summary CPU Chipset Front Side Bus Memory Expansion slots Graphics Storage High Definition Audio LAN IEEE 1394 Socket 939 for RGB display N o t e : DVI-D only supports digital...
...® 88E1111 PHY supports: - NV Firewall VIA 6307 IEEE 1394a controller supports: - 2 x IEEE 1394a ports (continued on the next page) viii NV Active Armor - A8N-VM CSM specifications summary CPU Chipset Front Side Bus Memory Expansion slots Graphics Storage High Definition Audio LAN IEEE 1394 Socket 939 for RGB display N o t e : DVI-D only supports digital...

A8N-VM CSM User's Manual for English Edition
Page 9
... 1 x IEEE 1394a connector 1 x Front panel audio connector 1 x CD audio in connector 1 x Chassis intrusion connector 1 x Serial port connector 1 x CPU fan connector 1 x Chassis fan connector 1 x Floppy disk drive connector 1 x Primary IDE connector 1 x Secondary IDE connector 1 x S/PDIF Out connector 1...) (continued on the next page) ix x 9.6 in . A8N-VM CSM specifications summary USB Special features Supports up to 8 USB 2.0 ports ASUS Q-Fan ASUS C.P.R. (CPU Parameter Recall) ASUS CrashFree BIOS 2 ASUS EZ Flash ASUS MyLogo2™ Stepless Frequency Selection (SFS) allows FSB tuning from ...
... 1 x IEEE 1394a connector 1 x Front panel audio connector 1 x CD audio in connector 1 x Chassis intrusion connector 1 x Serial port connector 1 x CPU fan connector 1 x Chassis fan connector 1 x Floppy disk drive connector 1 x Primary IDE connector 1 x Secondary IDE connector 1 x S/PDIF Out connector 1...) (continued on the next page) ix x 9.6 in . A8N-VM CSM specifications summary USB Special features Supports up to 8 USB 2.0 ports ASUS Q-Fan ASUS C.P.R. (CPU Parameter Recall) ASUS CrashFree BIOS 2 ASUS EZ Flash ASUS MyLogo2™ Stepless Frequency Selection (SFS) allows FSB tuning from ...

A8N-VM CSM User's Manual for English Edition
Page 15
...reboot the system, and the BIOS automatically restores the CPU default setting for details. ASUS MyLogo2™ This feature allows you can easily update the system BIOS even before loading the operating system. See page 2-33 for each parameter. ASUS A8N-VM CSM 1-5 No need to use a DOS-based utility or... boot from the support CD in case the system hangs due to the BIOS default settings in case when the BIOS codes and data are corrupted. ASUS CrashFree BIOS 2 This feature allows you...
...reboot the system, and the BIOS automatically restores the CPU default setting for details. ASUS MyLogo2™ This feature allows you can easily update the system BIOS even before loading the operating system. See page 2-33 for each parameter. ASUS A8N-VM CSM 1-5 No need to use a DOS-based utility or... boot from the support CD in case the system hangs due to the BIOS default settings in case when the BIOS codes and data are corrupted. ASUS CrashFree BIOS 2 This feature allows you...
A8N-VM CSM User's Manual for English Edition
Page 19
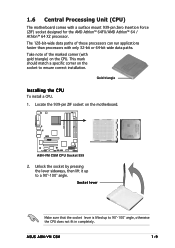
This mark should match a specific corner on the socket to 90°-100° angle, otherwise the CPU does not fit in completely. ASUS A8N-VM CSM 1-9 Locate the 939-pin ZIF socket on the CPU. Socket lever Make sure that the socket lever is lifted up to a 90°-100° angle. Unlock the socket by...
This mark should match a specific corner on the socket to 90°-100° angle, otherwise the CPU does not fit in completely. ASUS A8N-VM CSM 1-9 Locate the 939-pin ZIF socket on the CPU. Socket lever Make sure that the socket lever is lifted up to a 90°-100° angle. Unlock the socket by...

A8N-VM CSM User's Manual for English Edition
Page 20
...can occur if you fail to connect the CPU fan connector! Connect the CPU fan cable to the CPU_FAN connector on the side tab to prevent bending the pins and damaging the CPU! 5. CPU_FAN A8N-VM CSM GND +12V Rotation ® A8N-VM CSM CPU fan connector Do not forget to plug this ...connector. 1-10 Chapter 1: Product introduction 3. Install a CPU heatsink and fan following the instructions that it fits in place....
...can occur if you fail to connect the CPU fan connector! Connect the CPU fan cable to the CPU_FAN connector on the side tab to prevent bending the pins and damaging the CPU! 5. CPU_FAN A8N-VM CSM GND +12V Rotation ® A8N-VM CSM CPU fan connector Do not forget to plug this ...connector. 1-10 Chapter 1: Product introduction 3. Install a CPU heatsink and fan following the instructions that it fits in place....

A8N-VM CSM User's Manual for English Edition
Page 27
... setup to default values. To erase the RTC RAM: 1. Keep the cap on CLRTC jumper default position. Removing the cap will cause system boot failure! A8N-VM CSM ® A8N-VM CSM Clear RTC RAM CLRTC 2 1 Normal (Default) 3 2 Clear CMOS You do not need to clear the RTC when the system hangs due to pins ... cord. 2. The onboard button cell battery powers the RAM data in CMOS. Move the jumper cap from pins 1-2 (default) to overclocking, use the C.P.R. (CPU Parameter Recall) feature. Reinstall the battery. 5. ASUS A8N-VM CSM 1-17 For system failure due to pins 2-3.
... setup to default values. To erase the RTC RAM: 1. Keep the cap on CLRTC jumper default position. Removing the cap will cause system boot failure! A8N-VM CSM ® A8N-VM CSM Clear RTC RAM CLRTC 2 1 Normal (Default) 3 2 Clear CMOS You do not need to clear the RTC when the system hangs due to pins ... cord. 2. The onboard button cell battery powers the RAM data in CMOS. Move the jumper cap from pins 1-2 (default) to overclocking, use the C.P.R. (CPU Parameter Recall) feature. Reinstall the battery. 5. ASUS A8N-VM CSM 1-17 For system failure due to pins 2-3.

A8N-VM CSM User's Manual for English Edition
Page 28
... in low power mode) using the connected USB devices. A8N-VM CSM USBPW34 USBPW12 3 3 2 2 2 2 1 1 +5V (Default) +5VSB +5V (Default) +5VSB USBPW78 USBPW56 ® 246 246 A8N-VM CSM USB device wake-up 135 +5V (Default) 135 +5VSB • The USB device wake-up from S1 sleep mode (CPU stopped, DRAM refreshed, system running in sleep mode. 1-18...
... in low power mode) using the connected USB devices. A8N-VM CSM USBPW34 USBPW12 3 3 2 2 2 2 1 1 +5V (Default) +5VSB +5V (Default) +5VSB USBPW78 USBPW56 ® 246 246 A8N-VM CSM USB device wake-up 135 +5V (Default) 135 +5VSB • The USB device wake-up from S1 sleep mode (CPU stopped, DRAM refreshed, system running in sleep mode. 1-18...

A8N-VM CSM User's Manual for English Edition
Page 35
... separately. CPU_FAN CPU_FAN CHA_FAN CHA_FAN ® A8N-VM CSM Fan connectors 6 . GND +12V Rotation A8N-VM CSM +5V SPDIFOUT GND ® SPDIF_OUT A8N-VM CSM Digital audio connector ASUS A8N-VM CSM 1-25 Insufficient air flow inside the system may... damage the motherboard components. The S/PDIF module is for an additional Sony/Philips Digital Interface (S/PDIF) port(s). These are not jumpers! Connect the S/PDIF module cable to this connector, then install the module to the fan connectors on the fan connectors. CPU...
... separately. CPU_FAN CPU_FAN CHA_FAN CHA_FAN ® A8N-VM CSM Fan connectors 6 . GND +12V Rotation A8N-VM CSM +5V SPDIFOUT GND ® SPDIF_OUT A8N-VM CSM Digital audio connector ASUS A8N-VM CSM 1-25 Insufficient air flow inside the system may... damage the motherboard components. The S/PDIF module is for an additional Sony/Philips Digital Interface (S/PDIF) port(s). These are not jumpers! Connect the S/PDIF module cable to this connector, then install the module to the fan connectors on the fan connectors. CPU...

A8N-VM CSM User's Manual for English Edition
Page 55
... the auto-detected system memory. 2.3.6 System Information This menu gives you an overview of the general system specifications. ASUS A8N-VM CSM 2-15 The BIOS automatically detects the items in this menu. Processor Displays the auto-detected CPU specification. Main BIOS SETUP UTILITY AMIBIOS Version : 0110 Build Date : 09/04/05 Processor Type Speed Count...
... the auto-detected system memory. 2.3.6 System Information This menu gives you an overview of the general system specifications. ASUS A8N-VM CSM 2-15 The BIOS automatically detects the items in this menu. Processor Displays the auto-detected CPU specification. Main BIOS SETUP UTILITY AMIBIOS Version : 0110 Build Date : 09/04/05 Processor Type Speed Count...

A8N-VM CSM User's Manual for English Edition
Page 56
... to enable or disable the AMD Cool 'n' Quiet™ technology feature. Main Advanced BIOS SETUP UTILITY Power Boot Exit AMD Cool 'N' Quiet Configuration JumperFree Configuration CPU Configuration Chipset Onboard Devices Configuration PCI PnP USB Configuration Configure AMD Cool 'N' Quiet support Select Screen Select Item Enter Go to Sub Screen F1 General... setup Take caution when changing the settings of the Advanced menu items. Incorrect field values can cause the system to change the settings for the CPU and other system devices.
... to enable or disable the AMD Cool 'n' Quiet™ technology feature. Main Advanced BIOS SETUP UTILITY Power Boot Exit AMD Cool 'N' Quiet Configuration JumperFree Configuration CPU Configuration Chipset Onboard Devices Configuration PCI PnP USB Configuration Configure AMD Cool 'N' Quiet support Select Screen Select Item Enter Go to Sub Screen F1 General... setup Take caution when changing the settings of the Advanced menu items. Incorrect field values can cause the system to change the settings for the CPU and other system devices.

A8N-VM CSM User's Manual for English Edition
Page 57
If the system becomes unstable, return to adjust the CPU FSB frequency. S t a n d a r d - loads the standard settings for the system. CPU FSB Frequency [XXX] Allows you to achieve the desired CPU internal frequency. The values range from 200 to adjust the CPU FSB frequency. ASUS A8N-VM CSM 2-17 Select either one of this item is auto-detected by the...
If the system becomes unstable, return to adjust the CPU FSB frequency. S t a n d a r d - loads the standard settings for the system. CPU FSB Frequency [XXX] Allows you to achieve the desired CPU internal frequency. The values range from 200 to adjust the CPU FSB frequency. ASUS A8N-VM CSM 2-17 Select either one of this item is auto-detected by the...
A8N-VM CSM User's Manual for English Edition
Page 58
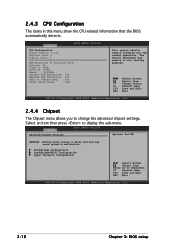
...Configuration SouthBridge/MCP51 Configuration Hyper Transport Configuration Select Screen Select Item Enter Go to change the advanced chipset settings. Advanced BIOS SETUP UTILITY CPU Configuration Module Version: 14.06 Physical Count: 1 Logical Count: 1 AMD Athlon(tm) 64 Processor 3200+ Revision: D0 Cache...then press to Change Freq. : Yes uCode Patch Level : 0x41 This option should remain disabled for testing purpose. 2.4.3 CPU Configuration The items in below sections may enable it for the normal operation. Advanced BIOS SETUP UTILITY Advanced Chipset Settings Options for...
...Configuration SouthBridge/MCP51 Configuration Hyper Transport Configuration Select Screen Select Item Enter Go to change the advanced chipset settings. Advanced BIOS SETUP UTILITY CPU Configuration Module Version: 14.06 Physical Count: 1 Logical Count: 1 AMD Athlon(tm) 64 Processor 3200+ Revision: D0 Cache...then press to Change Freq. : Yes uCode Patch Level : 0x41 This option should remain disabled for testing purpose. 2.4.3 CPU Configuration The items in below sections may enable it for the normal operation. Advanced BIOS SETUP UTILITY Advanced Chipset Settings Options for...

A8N-VM CSM User's Manual for English Edition
Page 70
...[50ºC] [N/A] VCORE Voltage 3.3V Voltage 5V Voltage 12V Voltage [ 1.320V] [ 3.345V] [ 5.094V] [11.880V] CPU Temperature Select Screen Select Item +- CPU Temperature [xxxºC/xxxºF] or [Ignored] MB Temperature [xxxºC/xxxºF] or [Ignored] The onboard hardware monitor automatically ...detects and displays the motherboard and CPU temperatures. When set to [Enabled], this parameter allows you do not wish to display the detected temperatures. 2-30 Chapter 2: BIOS...
...[50ºC] [N/A] VCORE Voltage 3.3V Voltage 5V Voltage 12V Voltage [ 1.320V] [ 3.345V] [ 5.094V] [11.880V] CPU Temperature Select Screen Select Item +- CPU Temperature [xxxºC/xxxºF] or [Ignored] MB Temperature [xxxºC/xxxºF] or [Ignored] The onboard hardware monitor automatically ...detects and displays the motherboard and CPU temperatures. When set to [Enabled], this parameter allows you do not wish to display the detected temperatures. 2-30 Chapter 2: BIOS...

A8N-VM CSM User's Manual for English Edition
Page 71
... for this item depend on the recommended temperature settings. Configuration options: [Ignored] [Enabled] CPU Target Temperature [XXXºC] Allows you to lower CPU temperature. The configuration options for more efficient system operation. Target temperature options are at 3ºC intervals. ASUS A8N-VM CSM 2-31 If the fan is not connected to the motherboard, the field shows...
... for this item depend on the recommended temperature settings. Configuration options: [Ignored] [Enabled] CPU Target Temperature [XXXºC] Allows you to lower CPU temperature. The configuration options for more efficient system operation. Target temperature options are at 3ºC intervals. ASUS A8N-VM CSM 2-31 If the fan is not connected to the motherboard, the field shows...

A8N-VM CSM User's Manual for English Edition
Page 82
... documents in healthy operating condition. This utility requires an Internet connection either through a network or an Internet Service Provider (ISP). ASUS PC Probe II This smart utility monitors the fan speed, CPU temperature, and system voltages, and alerts you of any detected problems. This utility helps you to update the motherboard BIOS...
... documents in healthy operating condition. This utility requires an Internet connection either through a network or an Internet Service Provider (ISP). ASUS PC Probe II This smart utility monitors the fan speed, CPU temperature, and system voltages, and alerts you of any detected problems. This utility helps you to update the motherboard BIOS...

A8N-VM CSM English Manual E2216
Page 3
Contents Notices vi Safety information vii A8N-VM CSM specifications summary viii Chapter 1: Product introduction 1.1 Welcome 1-2 1.2 Package contents 1-2 1.3 Special features 1-2 1.3.1 Product highlights 1-2 1.3.2 Innovative ASUS features 1-5 1.4 Before you proceed 1-6 1.5 Motherboard overview 1-7 1.5.1 Motherboard layout 1-7 1.5.2 Placement direction 1-8 1.5.3 Screw holes 1-8 1.6 Central Processing Unit (CPU 1-9 1.7 System memory 1-11 1.7.1 Overview 1-11 1.7.2 Memory configurations 1-11 1.7.3 Installing a DIMM 1-13 1.7.4 Removing a DIMM 1-13 1.8 Expansion slots...
Contents Notices vi Safety information vii A8N-VM CSM specifications summary viii Chapter 1: Product introduction 1.1 Welcome 1-2 1.2 Package contents 1-2 1.3 Special features 1-2 1.3.1 Product highlights 1-2 1.3.2 Innovative ASUS features 1-5 1.4 Before you proceed 1-6 1.5 Motherboard overview 1-7 1.5.1 Motherboard layout 1-7 1.5.2 Placement direction 1-8 1.5.3 Screw holes 1-8 1.6 Central Processing Unit (CPU 1-9 1.7 System memory 1-11 1.7.1 Overview 1-11 1.7.2 Memory configurations 1-11 1.7.3 Installing a DIMM 1-13 1.7.4 Removing a DIMM 1-13 1.8 Expansion slots...

A8N-VM CSM English Manual E2216
Page 4
...14 2.3.6 System Information 2-15 2.4 Advanced menu 2-16 2.4.1 AMD Cool 'n' Quiet Configuration 2-16 2.4.2 JumperFree Configuration 2-17 2.4.3 CPU Configuration 2-18 2.4.4 Chipset 2-18 2.4.5 Onboard Devices Configuration 2-25 2.4.6 PCI PnP 2-26 2.4.7 USB Configuration 2-27 iv Contents ...Chapter 2: BIOS setup 2.1 Managing and updating your BIOS 2-2 2.1.1 Creating a bootable floppy disk 2-2 2.1.2 ASUS EZ Flash utility 2-3 2.1.3 AFUDOS utility 2-4 2.1.4 ASUS Update utility 2-6 2.2 BIOS setup program 2-9 2.2.1 BIOS menu screen 2-10 2.2.2 Menu bar 2-10 2.2.3 Navigation...
...14 2.3.6 System Information 2-15 2.4 Advanced menu 2-16 2.4.1 AMD Cool 'n' Quiet Configuration 2-16 2.4.2 JumperFree Configuration 2-17 2.4.3 CPU Configuration 2-18 2.4.4 Chipset 2-18 2.4.5 Onboard Devices Configuration 2-25 2.4.6 PCI PnP 2-26 2.4.7 USB Configuration 2-27 iv Contents ...Chapter 2: BIOS setup 2.1 Managing and updating your BIOS 2-2 2.1.1 Creating a bootable floppy disk 2-2 2.1.2 ASUS EZ Flash utility 2-3 2.1.3 AFUDOS utility 2-4 2.1.4 ASUS Update utility 2-6 2.2 BIOS setup program 2-9 2.2.1 BIOS menu screen 2-10 2.2.2 Menu bar 2-10 2.2.3 Navigation...

A8N-VM CSM English Manual E2216
Page 8
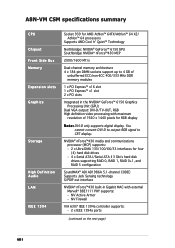
A8N-VM CSM specifications summary CPU Chipset Front Side Bus Memory Expansion slots Graphics Storage High Definition Audio LAN IEEE 1394 Socket 939 for AMD Athlon™ 64FX/Athlon™ 64 ...
A8N-VM CSM specifications summary CPU Chipset Front Side Bus Memory Expansion slots Graphics Storage High Definition Audio LAN IEEE 1394 Socket 939 for AMD Athlon™ 64FX/Athlon™ 64 ...


