Motherboard DIY Troubleshooting Guide
Page 1
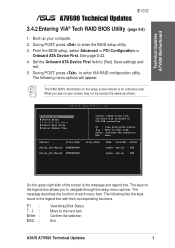
... menu options will appear. Technical Updates A7V600 Motherboard IE1372 A7V600 Technical Updates 3.4.2 Entering VIA® Tech RAID BIOS Utility (page 3-9) 1. Boot-up your screen may not be exactly the same as shown. Set the Onboard ATA Device First field to the next item Confirm the selection Exit ASUS A7V600 Technical Updates 1 The keys on the...
... menu options will appear. Technical Updates A7V600 Motherboard IE1372 A7V600 Technical Updates 3.4.2 Entering VIA® Tech RAID BIOS Utility (page 3-9) 1. Boot-up your screen may not be exactly the same as shown. Set the Onboard ATA Device First field to the next item Confirm the selection Exit ASUS A7V600 Technical Updates 1 The keys on the...

A7V600 User Manual
Page 3
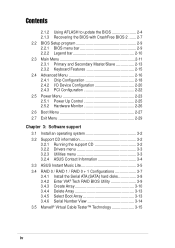
Features Contents Notices v Safety information vi About this guide vii ASUS contact information viii A7V600 specifications summary ix Chapter 1: Product introduction 1.1 Welcome 1-2 1.2 Package contents 1-2 1.3 Special Features 1-3 1.3.1 Product highlights 1-3 1.3.2 Value-added solutions 1-5 1.4 Motherboard components 1-6 1.4.1 Core specifications 1-7 1.5 ...for this motherboard 1-15 1.10.3 AGP slot 1-15 1.10.4 WiFi slot 1-16 1.11 Jumpers 1-17 1.12 Connectors 1-19 Chapter 2: BIOS information 2.1 Managing and updating your BIOS 2-2 2.1.1 Using ASUS EZ Flash to update the...
Features Contents Notices v Safety information vi About this guide vii ASUS contact information viii A7V600 specifications summary ix Chapter 1: Product introduction 1.1 Welcome 1-2 1.2 Package contents 1-2 1.3 Special Features 1-3 1.3.1 Product highlights 1-3 1.3.2 Value-added solutions 1-5 1.4 Motherboard components 1-6 1.4.1 Core specifications 1-7 1.5 ...for this motherboard 1-15 1.10.3 AGP slot 1-15 1.10.4 WiFi slot 1-16 1.11 Jumpers 1-17 1.12 Connectors 1-19 Chapter 2: BIOS information 2.1 Managing and updating your BIOS 2-2 2.1.1 Using ASUS EZ Flash to update the...
A7V600 User Manual
Page 4
Safeguards Contents 2.1.2 Using AFLASH to update the BIOS 2-4 2.1.3 Recovering the BIOS with CrashFree BIOS 2 ....... 2-7 2.2 BIOS Setup program 2-9 2.2.1 BIOS menu bar 2-9 2.2.2 Legend bar 2-10 2.3 Main Menu 2-11 2.3.1 Primary and Secondary ...the support CD 3-2 3.2.2 Drivers menu 3-3 3.2.3 Utilities menu 3-3 3.2.4 ASUS Contact Information 3-4 3.3 ASUS Instant Music Lite 3-5 3.4 RAID 0 / RAID 1 / RAID 0 + 1 Configurations 3-7 3.4.1 Install the Serial ATA (SATA) hard disks 3-8 3.4.2 Enter VIA® Tech RAID BIOS Utility 3-9 3.4.3 Create Array 3-10 3.4.4 Delete Array 3-13 3.4.5 ...
Safeguards Contents 2.1.2 Using AFLASH to update the BIOS 2-4 2.1.3 Recovering the BIOS with CrashFree BIOS 2 ....... 2-7 2.2 BIOS Setup program 2-9 2.2.1 BIOS menu bar 2-9 2.2.2 Legend bar 2-10 2.3 Main Menu 2-11 2.3.1 Primary and Secondary ...the support CD 3-2 3.2.2 Drivers menu 3-3 3.2.3 Utilities menu 3-3 3.2.4 ASUS Contact Information 3-4 3.3 ASUS Instant Music Lite 3-5 3.4 RAID 0 / RAID 1 / RAID 0 + 1 Configurations 3-7 3.4.1 Install the Serial ATA (SATA) hard disks 3-8 3.4.2 Enter VIA® Tech RAID BIOS Utility 3-9 3.4.3 Create Array 3-10 3.4.4 Delete Array 3-13 3.4.5 ...
A7V600 User Manual
Page 9
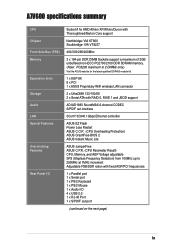
A7V600 specifications summary CPU Chipset Front Side Bus (FSB) Memory Expansion slots Storage Audio LAN Special Features Overclocking Features Rear Panel I/O Socket A for AMD Athlon XP/... RAID 0, RAID 1 and JBOD support ADI AD1980 SoundMAX 6-channel CODEC S/PDIF out interface 3Com® 3C940 1Gbps Ethernet controller ASUS EZ Flash Power Loss Restart ASUS C.O.P. (CPU Overheating Protection) ASUS CrashFree BIOS 2 ASUS Instant Music Lite ASUS JumperFree ASUS C.P.R. (CPU Parameter Recall) CPU, Memory, and AGP Voltage adjustable SFS (Stepless Frequency Selection) from 100Mhz up to 250MHz...
A7V600 specifications summary CPU Chipset Front Side Bus (FSB) Memory Expansion slots Storage Audio LAN Special Features Overclocking Features Rear Panel I/O Socket A for AMD Athlon XP/... RAID 0, RAID 1 and JBOD support ADI AD1980 SoundMAX 6-channel CODEC S/PDIF out interface 3Com® 3C940 1Gbps Ethernet controller ASUS EZ Flash Power Loss Restart ASUS C.O.P. (CPU Overheating Protection) ASUS CrashFree BIOS 2 ASUS Instant Music Lite ASUS JumperFree ASUS C.P.R. (CPU Parameter Recall) CPU, Memory, and AGP Voltage adjustable SFS (Stepless Frequency Selection) from 100Mhz up to 250MHz...
A7V600 User Manual
Page 10
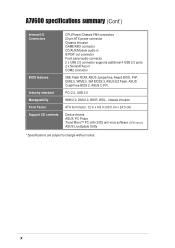
... panel audio connector 2 x USB 2.0 connector supports additional 4 USB 2.0 ports 2 x Serial ATA port COM2 connector 2Mb Flash ROM, ASUS Jumperfree, Award BIOS, PnP, DMI2.0, WfM2.0, SM BIOS2.3, ASUS EZ Flash, ASUS CrashFree BIOS 2, ASUS C.P.R. x A7V600 specifications summary (Cont') Internal I/O Connectors BIOS features Industry standard Manageability Form Factor Support CD contents CPU/Power/Chassis FAN connectors 20 pin ATX power...
... panel audio connector 2 x USB 2.0 connector supports additional 4 USB 2.0 ports 2 x Serial ATA port COM2 connector 2Mb Flash ROM, ASUS Jumperfree, Award BIOS, PnP, DMI2.0, WfM2.0, SM BIOS2.3, ASUS EZ Flash, ASUS CrashFree BIOS 2, ASUS C.P.R. x A7V600 specifications summary (Cont') Internal I/O Connectors BIOS features Industry standard Manageability Form Factor Support CD contents CPU/Power/Chassis FAN connectors 20 pin ATX power...

A7V600 User Manual
Page 14
... port on Rear Panel I/O The A7V600 provides convenient connectivity to overclocking, C.P.R. When the system hangs due to external home theater audio systems via an S/PDIF out interface. No need to overclocking. The higher bandwidth of USB 2.0 allows connection of the ASUS motherboard BIOS allows automatic resetting to the BIOS previous settings in case the...
... port on Rear Panel I/O The A7V600 provides convenient connectivity to overclocking, C.P.R. When the system hangs due to external home theater audio systems via an S/PDIF out interface. No need to overclocking. The higher bandwidth of USB 2.0 allows connection of the ASUS motherboard BIOS allows automatic resetting to the BIOS previous settings in case the...
A7V600 User Manual
Page 15
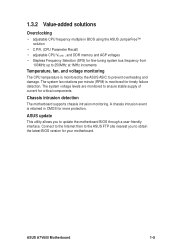
...the latest BIOS version for fine-tuning system bus frequency from 100MHz up to 250MHz at 1MHz increments Temperature, fan, and voltage monitoring The CPU temperature is monitored for more protection. Chassis intrusion detection The motherboard supports chassis intrusion monitoring. ASUS A7V600 Motherboard ...1-5 The system fan rotations per minute (RPM) is monitored by the ASUS ASIC to prevent overheating and damage. Connect to the Internet then to the ASUS FTP site nearest you to ensure stable ...
...the latest BIOS version for fine-tuning system bus frequency from 100MHz up to 250MHz at 1MHz increments Temperature, fan, and voltage monitoring The CPU temperature is monitored for more protection. Chassis intrusion detection The motherboard supports chassis intrusion monitoring. ASUS A7V600 Motherboard ...1-5 The system fan rotations per minute (RPM) is monitored by the ASUS ASIC to prevent overheating and damage. Connect to the Internet then to the ASUS FTP site nearest you to ensure stable ...
A7V600 User Manual
Page 17
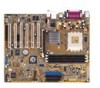
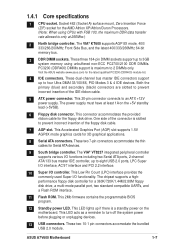
...programmable BIOS program. 12 Standby power LED. This Low Pin Count (LPC) interface provides the commonly used Super I /O controller. This LED acts as a reminder to an ATX +12V power supply. These two 7-pin connectors accommodate the thin cables for 3D graphical applications. 8 Serial ATA connectors. ASUS A7V600 .../ 333/266/200MHz Front Side Bus, and the latest 400/333/266MHz 64-bit memory bus. 3 DDR DIMM sockets. Visit the ASUS website (www.asus.com) for the AMD Athlon XP/Athlon/Duron Processors. (Note: When using unbuffered non-ECC PC2700/2100 DDR DIMMs. PC3200 (DDR400...
...programmable BIOS program. 12 Standby power LED. This Low Pin Count (LPC) interface provides the commonly used Super I /O controller. This LED acts as a reminder to an ATX +12V power supply. These two 7-pin connectors accommodate the thin cables for 3D graphical applications. 8 Serial ATA connectors. ASUS A7V600 .../ 333/266/200MHz Front Side Bus, and the latest 400/333/266MHz 64-bit memory bus. 3 DDR DIMM sockets. Visit the ASUS website (www.asus.com) for the AMD Athlon XP/Athlon/Duron Processors. (Note: When using unbuffered non-ECC PC2700/2100 DDR DIMMs. PC3200 (DDR400...
A7V600 User Manual
Page 24
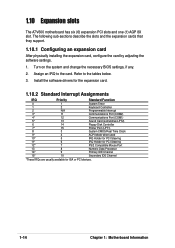
... they support. 1.10.1 Configuring an expansion card After physically installing the expansion card, configure the card by adjusting the software settings. 1. 1.10 Expansion slots The A7V600 motherboard has six (6) expansion PCI slots and one (1) AGP 8X slot. Turn on the system and change the necessary...
... they support. 1.10.1 Configuring an expansion card After physically installing the expansion card, configure the card by adjusting the software settings. 1. 1.10 Expansion slots The A7V600 motherboard has six (6) expansion PCI slots and one (1) AGP 8X slot. Turn on the system and change the necessary...
A7V600 User Manual
Page 27
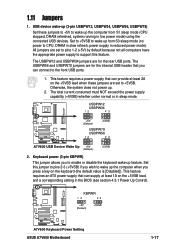
... are for the rear USB ports. Set to +5VSB to +5VSB. Set this feature. KBPWR 12 23 A7V600 +5V (Default) +5VSB ® A7V600 Keyboard Power Setting ASUS A7V600 Motherboard 1-17 The USBPW56 and USBPW78 jumpers are for the internal USB header that can provide at least 1A ... must NOT exceed the power supply capability (+5VSB) whether under normal or in the BIOS (see section 4.5.1 Power Up Control). USBPW12 USBPW34 12 23 A7V600 ® +5V (Default) +5VSB USBPW78 USBPW56 12 23 A7V600 USB Device Wake Up +5V (Default) +5VSB 2. Otherwise, the system does not...
... are for the rear USB ports. Set to +5VSB to +5VSB. Set this feature. KBPWR 12 23 A7V600 +5V (Default) +5VSB ® A7V600 Keyboard Power Setting ASUS A7V600 Motherboard 1-17 The USBPW56 and USBPW78 jumpers are for the internal USB header that can provide at least 1A ... must NOT exceed the power supply capability (+5VSB) whether under normal or in the BIOS (see section 4.5.1 Power Up Control). USBPW12 USBPW34 12 23 A7V600 ® +5V (Default) +5VSB USBPW78 USBPW56 12 23 A7V600 USB Device Wake Up +5V (Default) +5VSB 2. Otherwise, the system does not...
A7V600 User Manual
Page 28
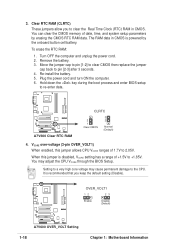
...Re-install the battery. 5. Plug the power cord and turn ON the computer. 6. Hold down the key during the boot process and enter BIOS setup to the CPU. A7V600 ® A7V600 Clear RTC RAM CLRTC 2 1 Clear CMOS 3 2 Normal (Default) 4. It is disabled, VCORE setting has a range of +1.5V to...; A7V600 OVER_VOLT Setting 1-18 Chapter 1: Motherboard Information Remove the battery. 3. Setting to a very high core voltage may adjust the CPU VCORE through the BIOS Setup. Turn OFF the computer and unplug the power cord. 2. You may cause permanent damage to re-enter data. VCORE over...
...Re-install the battery. 5. Plug the power cord and turn ON the computer. 6. Hold down the key during the boot process and enter BIOS setup to the CPU. A7V600 ® A7V600 Clear RTC RAM CLRTC 2 1 Clear CMOS 3 2 Normal (Default) 4. It is disabled, VCORE setting has a range of +1.5V to...; A7V600 OVER_VOLT Setting 1-18 Chapter 1: Motherboard Information Remove the battery. 3. Setting to a very high core voltage may adjust the CPU VCORE through the BIOS Setup. Turn OFF the computer and unplug the power cord. 2. You may cause permanent damage to re-enter data. VCORE over...
A7V600 User Manual
Page 29
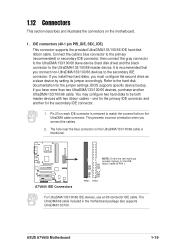
... when you have more than two UltraDMA/133/100/66 devices, purchase another for the jumper settings. A7V600 PRI_IDE SEC_IDE ® A7V600 IDE Connectors PIN 1 PIN 1 For UltraDMA/133/100/66 IDE devices, use an 80-conductor IDE... cable. The hole near the blue connector on the motherboard. 1. BIOS supports specific device bootup. If you connect the cables.... NOTE: Orient the red markings (usually zigzag) on the UltraDMA cable connector. ASUS A7V600 Motherboard 1-19
... when you have more than two UltraDMA/133/100/66 devices, purchase another for the jumper settings. A7V600 PRI_IDE SEC_IDE ® A7V600 IDE Connectors PIN 1 PIN 1 For UltraDMA/133/100/66 IDE devices, use an 80-conductor IDE... cable. The hole near the blue connector on the motherboard. 1. BIOS supports specific device bootup. If you connect the cables.... NOTE: Orient the red markings (usually zigzag) on the UltraDMA cable connector. ASUS A7V600 Motherboard 1-19
A7V600 User Manual
Page 36
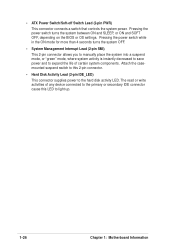
... write activities of certain system components. Pressing the power switch turns the system between ON and SLEEP, or ON and SOFT OFF, depending on the BIOS or OS settings. • ATX Power Switch/Soft-off Switch Lead (2-pin PWR) This connector connects a switch that controls the system power. Attach the casemounted...
... write activities of certain system components. Pressing the power switch turns the system between ON and SLEEP, or ON and SOFT OFF, depending on the BIOS or OS settings. • ATX Power Switch/Soft-off Switch Lead (2-pin PWR) This connector connects a switch that controls the system power. Attach the casemounted...
A7V600 User Manual
Page 37
Chapter 2 This chapter tells how to change the system settings through the BIOS setup menus. Detailed descriptions of the BIOS parameters are also provided. BIOS Information ASUS A7V600 Motherboard 2-1
Chapter 2 This chapter tells how to change the system settings through the BIOS setup menus. Detailed descriptions of the BIOS parameters are also provided. BIOS Information ASUS A7V600 Motherboard 2-1
A7V600 User Manual
Page 38
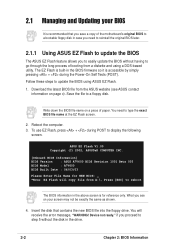
... V1.00 Copyright (C) 2002, ASUSTeK COMPUTER INC. [Onboard BIOS Information] BIOS Version : ASUS A7V600 BIOS Revision 1001 Beta 003 BIOS Model : A7V600 BIOS Built Date : 06/03/03 Please Enter File Name for reference only. You need to reinstall the original BIOS later. 2.1.1 Using ASUS EZ Flash to update the BIOS The ASUS EZ Flash feature allows you to easily update the...
... V1.00 Copyright (C) 2002, ASUSTeK COMPUTER INC. [Onboard BIOS Information] BIOS Version : ASUS A7V600 BIOS Revision 1001 Beta 003 BIOS Model : A7V600 BIOS Built Date : 06/03/03 Please Enter File Name for reference only. You need to reinstall the original BIOS later. 2.1.1 Using ASUS EZ Flash to update the BIOS The ASUS EZ Flash feature allows you to easily update the...
A7V600 User Manual
Page 39
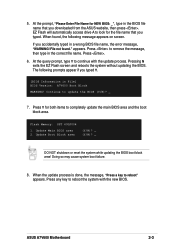
... process. Press . 6. appears. Update Boot Block area (Y/N)? _ (Y/N)? _ DO NOT shutdown or reset the system while updating the BIOS boot block area! ASUS A7V600 Motherboard 2-3 5. Press any key to remove the message, then type in File] BIOS Version: A7V600 Boot Block WARNING! The following message appears on screen. Continue to reboot" appears. File not found , the...
... process. Press . 6. appears. Update Boot Block area (Y/N)? _ (Y/N)? _ DO NOT shutdown or reset the system while updating the BIOS boot block area! ASUS A7V600 Motherboard 2-3 5. Press any key to remove the message, then type in File] BIOS Version: A7V600 Boot Block WARNING! The following message appears on screen. Continue to reboot" appears. File not found , the...
A7V600 User Manual
Page 40
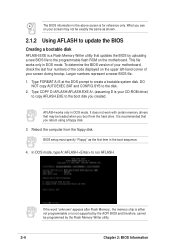
... corner of your CD-ROM drive) to copy AFLASH.EXE to the programmable flash ROM on your screen may not be programmed by uploading a new BIOS file to the boot disk you reboot using a floppy disk. 3. It does not work with certain memory drivers that you created. The... in DOS mode. AFLASH works only in the above screen is for reference only. Reboot the computer from the hard drive. BIOS setup must specify "Floppy" as shown. 2.1.2 Using AFLASH to the disk. 2. This file works only in the boot sequence. 4. Type FORMAT A:/S at the DOS prompt ...
... corner of your CD-ROM drive) to copy AFLASH.EXE to the programmable flash ROM on your screen may not be programmed by uploading a new BIOS file to the boot disk you reboot using a floppy disk. 3. It does not work with certain memory drivers that you created. The... in DOS mode. AFLASH works only in the above screen is for reference only. Reboot the computer from the hard drive. BIOS setup must specify "Floppy" as shown. 2.1.2 Using AFLASH to the disk. 2. This file works only in the boot sequence. 4. Type FORMAT A:/S at the DOS prompt ...
A7V600 User Manual
Page 41
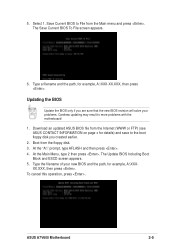
... screen appears. 6. To cancel this operation, press . 5. Download an updated ASUS BIOS file from the Internet (WWW or FTP) (see ASUS CONTACT INFORMATION on page x for details) and save to File from the floppy disk. 3. Updating the BIOS Update the BIOS only if you created earlier. 2. Type a filename and the path, for example, A:\XXX- ASUS A7V600 Motherboard 2-5
... screen appears. 6. To cancel this operation, press . 5. Download an updated ASUS BIOS file from the Internet (WWW or FTP) (see ASUS CONTACT INFORMATION on page x for details) and save to File from the floppy disk. 3. Updating the BIOS Update the BIOS only if you created earlier. 2. Type a filename and the path, for example, A:\XXX- ASUS A7V600 Motherboard 2-5
A7V600 User Manual
Page 42
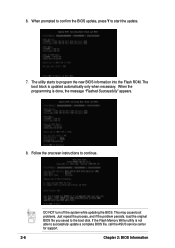
...updated automatically only when necessary. 6. This may cause boot problems. Just repeat the process, and if the problem persists, load the original BIOS file you saved to continue. The boot block is done, the message "Flashed Successfully" appears. 8. If the Flash Memory Writer utility ...is not able to start the update. 7. When prompted to confirm the BIOS update, press Y to successfully update a complete BIOS file, call the ASUS service center for support. 2-6 Chapter 2: BIOS Information The utility starts to program the new...
...updated automatically only when necessary. 6. This may cause boot problems. Just repeat the process, and if the problem persists, load the original BIOS file you saved to continue. The boot block is done, the message "Flashed Successfully" appears. 8. If the Flash Memory Writer utility ...is not able to start the update. 7. When prompted to confirm the BIOS update, press Y to successfully update a complete BIOS file, call the ASUS service center for support. 2-6 Chapter 2: BIOS Information The utility starts to program the new...
A7V600 User Manual
Page 43
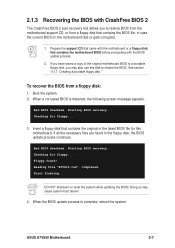
.... DO NOT shutdown or reset the system while updating the BIOS! ASUS A7V600 Motherboard 2-7 2.1.3 Recovering the BIOS with the BIOS update process. 2. To recover the BIOS from a floppy disk that contains the BIOS file, in the floppy disk, the BIOS update process continues. Reading file "A7V600.rom". Completed. Start flashing... Doing so may also use this motherboard. If you...
.... DO NOT shutdown or reset the system while updating the BIOS! ASUS A7V600 Motherboard 2-7 2.1.3 Recovering the BIOS with the BIOS update process. 2. To recover the BIOS from a floppy disk that contains the BIOS file, in the floppy disk, the BIOS update process continues. Reading file "A7V600.rom". Completed. Start flashing... Doing so may also use this motherboard. If you...


