User manual for A7S8X-MX
Page 3
Contents Notices vi Safety information vii About this guide viii Typography ix A7S8X-MX specifications summary x Chapter 1: Product introduction 1.1 Welcome 1-2 1.2 Package contents 1-2 1.3 Special features 1-3 1.3.1 Product highlights 1-3 1.3.2 Innovative ASUS features 1-4 1.4 Before you proceed 1-5 1.5 Motherboard overview 1-6 1.5.1 Placement direction 1-6 1.5.2 Screw holes 1-6 1.5.3 Motherboard layout 1-7 1.6 Central Processing Unit (CPU 1-8 1.7 System memory 1-10 1.7.1 Overview 1-10 1.7.2 Memory Configurations 1-10 1.7.3 Installing a DIMM 1-12...
Contents Notices vi Safety information vii About this guide viii Typography ix A7S8X-MX specifications summary x Chapter 1: Product introduction 1.1 Welcome 1-2 1.2 Package contents 1-2 1.3 Special features 1-3 1.3.1 Product highlights 1-3 1.3.2 Innovative ASUS features 1-4 1.4 Before you proceed 1-5 1.5 Motherboard overview 1-6 1.5.1 Placement direction 1-6 1.5.2 Screw holes 1-6 1.5.3 Motherboard layout 1-7 1.6 Central Processing Unit (CPU 1-8 1.7 System memory 1-10 1.7.1 Overview 1-10 1.7.2 Memory Configurations 1-10 1.7.3 Installing a DIMM 1-12...
User manual for A7S8X-MX
Page 4
... a bootable floppy disk 2-2 2.1.2 AwardBIOS Flash Utility 2-3 2.1.3 ASUS EZ Flash utility 2-5 2.1.4 ASUS CrashFree BIOS utility 2-6 2.1.5 ASUS Update utility 2-7 2.2 BIOS Setup program 2-10 2.2.1 BIOS menu... bar 2-11 2.2.2 Legend bar 2-11 2.3 Main Menu 2-13 2.3.1 System Time 2-13 2.3.2 System Date 2-13 2.3.3 Legacy Diskette A 2-13 2.3.4 HDD SMART Monitoring 2-13 2.3.5 Installed Memory 2-13 2.3.6 Primary and Secondary IDE Master/Slave 2-14 2.3.7 First and Second SATA Master 2-15 2.4 Advanced Menu 2-16 2.4.1 CPU...
... a bootable floppy disk 2-2 2.1.2 AwardBIOS Flash Utility 2-3 2.1.3 ASUS EZ Flash utility 2-5 2.1.4 ASUS CrashFree BIOS utility 2-6 2.1.5 ASUS Update utility 2-7 2.2 BIOS Setup program 2-10 2.2.1 BIOS menu... bar 2-11 2.2.2 Legend bar 2-11 2.3 Main Menu 2-13 2.3.1 System Time 2-13 2.3.2 System Date 2-13 2.3.3 Legacy Diskette A 2-13 2.3.4 HDD SMART Monitoring 2-13 2.3.5 Installed Memory 2-13 2.3.6 Primary and Secondary IDE Master/Slave 2-14 2.3.7 First and Second SATA Master 2-15 2.4 Advanced Menu 2-16 2.4.1 CPU...
User manual for A7S8X-MX
Page 10
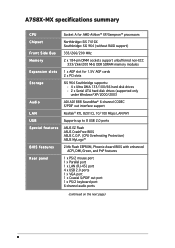
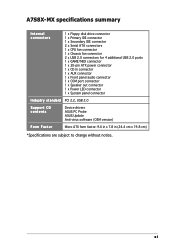
A7S8X-MX specifications summary CPU Chipset Front Side Bus Memory Expansion slots Storage Audio LAN USB Special features BIOS features Rear panel Socket A for AMD Athlon™ XP/Sempron™ ... SoundMax® 6-channel CODEC S/PDIF out interface support Realtek® RTL 8201CL 10/100 Mbps LAN PHY Supports up to 8 USB 2.0 ports ASUS EZ Flash ASUS CrashFree BIOS ASUS C.O.P. (CPU Overheating Protection) ASUS MyLogo™ 2 Mb Flash EEPROM, Phoenix-Award BIOS with enhanced ACPI, DMI, Green, and PnP features 1 x PS/2 mouse port 1 x Parallel port 1 x LAN...
A7S8X-MX specifications summary CPU Chipset Front Side Bus Memory Expansion slots Storage Audio LAN USB Special features BIOS features Rear panel Socket A for AMD Athlon™ XP/Sempron™ ... SoundMax® 6-channel CODEC S/PDIF out interface support Realtek® RTL 8201CL 10/100 Mbps LAN PHY Supports up to 8 USB 2.0 ports ASUS EZ Flash ASUS CrashFree BIOS ASUS C.O.P. (CPU Overheating Protection) ASUS MyLogo™ 2 Mb Flash EEPROM, Phoenix-Award BIOS with enhanced ACPI, DMI, Green, and PnP features 1 x PS/2 mouse port 1 x Parallel port 1 x LAN...
User manual for A7S8X-MX
Page 11
xi A7S8X-MX specifications summary Internal connectors 1 x Floppy disk drive connector 1 x Primary IDE connector 1 x Secondary IDE connector 2 x Serial ATA connectors 1 x CPU fan connector 1 x Chassis fan connector 2 x USB 2.0 connectors for 4 additional USB 2.0 ports 1 x GAME/MIDI connector 1 x 20-pin...Speaker out connector 1 x Power LED connector 1 x System panel connector I n d ustry standard PCI 2.2, USB 2.0 Support CD contents Device drivers ASUS PC Probe ASUS Update Anti-virus software (OEM version) Form Factor Micro ATX form factor: 9.6 in x 7.8 in (24.4 cm x 19.8 cm) *...
xi A7S8X-MX specifications summary Internal connectors 1 x Floppy disk drive connector 1 x Primary IDE connector 1 x Secondary IDE connector 2 x Serial ATA connectors 1 x CPU fan connector 1 x Chassis fan connector 2 x USB 2.0 connectors for 4 additional USB 2.0 ports 1 x GAME/MIDI connector 1 x 20-pin...Speaker out connector 1 x Power LED connector 1 x System panel connector I n d ustry standard PCI 2.2, USB 2.0 Support CD contents Device drivers ASUS PC Probe ASUS Update Anti-virus software (OEM version) Form Factor Micro ATX form factor: 9.6 in x 7.8 in (24.4 cm x 19.8 cm) *...
User manual for A7S8X-MX
Page 16
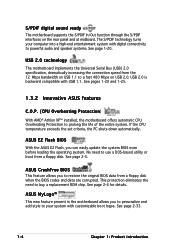
... and 1-25. 1.3.2 Innovative ASUS features C.O.P. (CPU Overheating Protection) With AMD® Athlon XP™ installed, the motherboard offers automatic CPU Overheating Protection to restore the original BIOS data from a floppy disk when the BIOS codes and data are corrupted. If the CPU temperature exceeds the set criteria,... the PC shuts down automatically. ASUS CrashFree BIOS This feature allows you to prolong the life of the entire system. See page 2-6 ...
... and 1-25. 1.3.2 Innovative ASUS features C.O.P. (CPU Overheating Protection) With AMD® Athlon XP™ installed, the motherboard offers automatic CPU Overheating Protection to restore the original BIOS data from a floppy disk when the BIOS codes and data are corrupted. If the CPU temperature exceeds the set criteria,... the PC shuts down automatically. ASUS CrashFree BIOS This feature allows you to prolong the life of the entire system. See page 2-6 ...
User manual for A7S8X-MX
Page 20
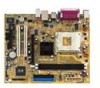
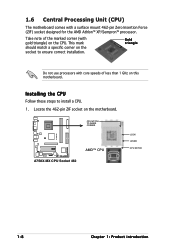
This mark should match a specific corner on this motherboard. CPU NOTCH TO INNER CORNER A7S8X-MX ® A7S8X-MX CPU Socket 462 AMD™ CPU LOCK LEVER CPU NOTCH 1-8 Chapter 1: Product introduction Installing the CPU Follow these steps to ensure correct installation. Gold triangle Do not use processors with core speeds of ... for the AMD Athlon™ XP/Sempron™ processor. Locate the 462-pin ZIF socket on the CPU. 1.6 Central Processing Unit (CPU) The motherboard comes with gold triangle) on the motherboard. Take note of less than 1 GHz on the socket to ...
This mark should match a specific corner on this motherboard. CPU NOTCH TO INNER CORNER A7S8X-MX ® A7S8X-MX CPU Socket 462 AMD™ CPU LOCK LEVER CPU NOTCH 1-8 Chapter 1: Product introduction Installing the CPU Follow these steps to ensure correct installation. Gold triangle Do not use processors with core speeds of ... for the AMD Athlon™ XP/Sempron™ processor. Locate the 462-pin ZIF socket on the CPU. 1.6 Central Processing Unit (CPU) The motherboard comes with gold triangle) on the motherboard. Take note of less than 1 GHz on the socket to ...
User manual for A7S8X-MX
Page 21
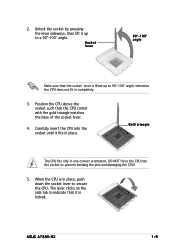
...socket lever to secure the CPU. ASUS A7S8X-MX 1-9 Unlock the socket by pressing the lever sideways, then lift it up to prevent bending the pins and damaging the CPU! 5. DO NOT force the CPU into the socket until it is locked. When the CPU is lifted up to indicate that the CPU corner with the gold ...90°-100° angle; Socket lever 90°-100° angle Make sure that the socket lever is in one correct orientation. Position the CPU above the socket such that it fits in completely. 3. The lever clicks on the side tab to a 90°-100° angle. 2. otherwise ...
...socket lever to secure the CPU. ASUS A7S8X-MX 1-9 Unlock the socket by pressing the lever sideways, then lift it up to prevent bending the pins and damaging the CPU! 5. DO NOT force the CPU into the socket until it is locked. When the CPU is lifted up to indicate that the CPU corner with the gold ...90°-100° angle; Socket lever 90°-100° angle Make sure that the socket lever is in one correct orientation. Position the CPU above the socket such that it fits in completely. 3. The lever clicks on the side tab to a 90°-100° angle. 2. otherwise ...
User manual for A7S8X-MX
Page 29
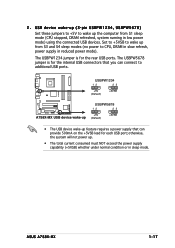
Set to +5VSB to additional USB ports. otherwise, the system will not power up from S1 sleep mode (CPU stopped, DRAM refreshed, system running in low power mode) using the connected USB devices. The USBPW5678 jumper is for each USB port; The USBPW1234 jumper ... sleep modes (no power to wake up feature requires a power supply that you can provide 500mA on the +5VSB lead for the rear USB ports. 2 . ASUS A7S8X-MX 1-17 USB device wake-up (3-pin USBPW1234, USBPW5678) Set these jumpers to +5V to CPU, DRAM in slow refresh, power supply in sleep mode.
Set to +5VSB to additional USB ports. otherwise, the system will not power up from S1 sleep mode (CPU stopped, DRAM refreshed, system running in low power mode) using the connected USB devices. The USBPW5678 jumper is for each USB port; The USBPW1234 jumper ... sleep modes (no power to wake up feature requires a power supply that you can provide 500mA on the +5VSB lead for the rear USB ports. 2 . ASUS A7S8X-MX 1-17 USB device wake-up (3-pin USBPW1234, USBPW5678) Set these jumpers to +5V to CPU, DRAM in slow refresh, power supply in sleep mode.

User manual for A7S8X-MX
Page 30
Refer to the jumper settings below. 1 FSB_SEL1 FSB_SEL0 100MHZ A7S8X-MX 1 FSB_SEL1 FSB_SEL0 133MHZ 1 ® FSB_SEL1 FSB_SEL0 A7S8X-MX External frequency selection 166MHZ (Default) Make sure you to page 2-36. 1-18 Chapter 1: Product introduction External frequency selection (3-pin FSB_SEL1, FSB_SEL0) These jumpers allow you load the BIOS setup default after changing the external frequency selection. 3 . Refer to set the CPU Front Side Bus (FSB) frequency.
Refer to the jumper settings below. 1 FSB_SEL1 FSB_SEL0 100MHZ A7S8X-MX 1 FSB_SEL1 FSB_SEL0 133MHZ 1 ® FSB_SEL1 FSB_SEL0 A7S8X-MX External frequency selection 166MHZ (Default) Make sure you to page 2-36. 1-18 Chapter 1: Product introduction External frequency selection (3-pin FSB_SEL1, FSB_SEL0) These jumpers allow you load the BIOS setup default after changing the external frequency selection. 3 . Refer to set the CPU Front Side Bus (FSB) frequency.
User manual for A7S8X-MX
Page 36
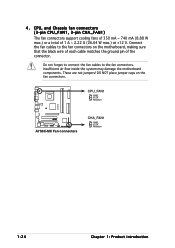
CPU, and Chassis fan connectors (3-pin CPU_FAN1, 3-pin CHA_FAN1) The fan connectors support cooling fans of 350 mA ~ 740 mA (8.88 W max.) or a total of the ..., making sure that the black wire of each cable matches the ground pin of 1 A ~ 2.22 A (26.64 W max.) at +12 V. CPU_FAN1 GND +12V Rotation A7S8X-MX ® A7S8X-MX Fan connectors CHA_FAN1 GND +12V Rotation 1-24 Chapter 1: Product introduction 4 . Do not forget to connect the fan cables to the fan connectors on the fan...
CPU, and Chassis fan connectors (3-pin CPU_FAN1, 3-pin CHA_FAN1) The fan connectors support cooling fans of 350 mA ~ 740 mA (8.88 W max.) or a total of the ..., making sure that the black wire of each cable matches the ground pin of 1 A ~ 2.22 A (26.64 W max.) at +12 V. CPU_FAN1 GND +12V Rotation A7S8X-MX ® A7S8X-MX Fan connectors CHA_FAN1 GND +12V Rotation 1-24 Chapter 1: Product introduction 4 . Do not forget to connect the fan cables to the fan connectors on the fan...

User manual for A7S8X-MX
Page 58
CPU Configuration Chipset PCIPnP Onboard Device Configuration USB Configuration Select Menu Item Specific Help Press Enter to malfunction. Take caution when changing the settings of the Advanced menu items. Incorrect field values may cause the system to Set. 2-16 Chapter 2: BIOS setup 2.4 Advanced Menu The Advanced menu items allow you to change the settings for the CPU and other system devices.
CPU Configuration Chipset PCIPnP Onboard Device Configuration USB Configuration Select Menu Item Specific Help Press Enter to malfunction. Take caution when changing the settings of the Advanced menu items. Incorrect field values may cause the system to Set. 2-16 Chapter 2: BIOS setup 2.4 Advanced Menu The Advanced menu items allow you to change the settings for the CPU and other system devices.

User manual for A7S8X-MX
Page 59
2.4.1 CPU configuration The items in this menu show the CPU-related information auto-detected by the BIOS. CPU Configuration CPU Type CPU Speed Cache RAM AMD Sempron(tm) 1500 MHz 256 K Select Menu Item Specific Help ASUS A7S8X-MX 2-17
2.4.1 CPU configuration The items in this menu show the CPU-related information auto-detected by the BIOS. CPU Configuration CPU Type CPU Speed Cache RAM AMD Sempron(tm) 1500 MHz 256 K Select Menu Item Specific Help ASUS A7S8X-MX 2-17

User manual for A7S8X-MX
Page 62
...Help Select AGP aperture size. The BIOS auto-detects the value of this item. CPU: DRAM Frequency Ratio [SPD] Allows you to select which graphics controller to use as the primary boot device. CPU Frequency [166] Displays the frequency set by the clock generator to select the frequency... ratio between the CPU and DRAM. The BIOS auto-detects the value of this item. Configuration options: [SPD] [5:4]...
...Help Select AGP aperture size. The BIOS auto-detects the value of this item. CPU: DRAM Frequency Ratio [SPD] Allows you to select which graphics controller to use as the primary boot device. CPU Frequency [166] Displays the frequency set by the clock generator to select the frequency... ratio between the CPU and DRAM. The BIOS auto-detects the value of this item. Configuration options: [SPD] [5:4]...
User manual for A7S8X-MX
Page 71
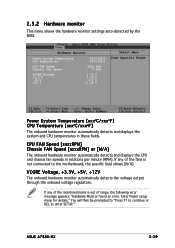
...+3.3V, +5V, +12V The onboard hardware monitor automatically detects the voltage output through the onboard voltage regulators. Hardware Monitor Power System Temperature CPU Temperature 39oC/102oF 39oC/102oF CPU FAN Speed Chassis Fan Speed 4891 RPM 0 RPM VCORE Voltage +3.3 V +5 V +12 V 1.79 V 3.26 V 4.9 V...CPU temperatures in rotations per minute (RPM). If any of range, the following error message appears: "Hardware Monitor found an error. 2.5.2 Hardware monitor This menu shows the hardware monitor settings auto-detected by the BIOS. Enter Power setup menu for details." ASUS A7S8X-MX...
...+3.3V, +5V, +12V The onboard hardware monitor automatically detects the voltage output through the onboard voltage regulators. Hardware Monitor Power System Temperature CPU Temperature 39oC/102oF 39oC/102oF CPU FAN Speed Chassis Fan Speed 4891 RPM 0 RPM VCORE Voltage +3.3 V +5 V +12 V 1.79 V 3.26 V 4.9 V...CPU temperatures in rotations per minute (RPM). If any of range, the following error message appears: "Hardware Monitor found an error. 2.5.2 Hardware monitor This menu shows the hardware monitor settings auto-detected by the BIOS. Enter Power setup menu for details." ASUS A7S8X-MX...
User manual for A7S8X-MX
Page 82
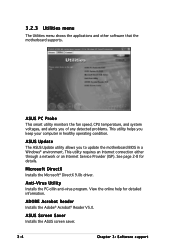
...ISP). Microsoft DirectX Installs the Microsoft® DirectX 9.0b driver. ASUS Screen Saver Installs the ASUS screen saver. 3-4 Chapter 3: Software support Anti-Virus Utility Installs the PC-cillin anti-virus program. ASUS Update The ASUS Update utility allows you keep your computer in a Windows®.... 3.2.3 Utilities menu The Utilities menu shows the applications and other software that the motherboard supports. ASUS PC Probe This smart utility monitors the fan speed, CPU temperature, and system voltages, and alerts you of any detected problems. This utility helps you to...
...ISP). Microsoft DirectX Installs the Microsoft® DirectX 9.0b driver. ASUS Screen Saver Installs the ASUS screen saver. 3-4 Chapter 3: Software support Anti-Virus Utility Installs the PC-cillin anti-virus program. ASUS Update The ASUS Update utility allows you keep your computer in a Windows®.... 3.2.3 Utilities menu The Utilities menu shows the applications and other software that the motherboard supports. ASUS PC Probe This smart utility monitors the fan speed, CPU temperature, and system voltages, and alerts you of any detected problems. This utility helps you to...


