Motherboard DIY Troubleshooting Guide
Page 7
... two 3.5" floppy disk drives Optional Items ASUS CIDB chassis intrusion detection module ASUS IrDA-compliant infrared module ASUS PCI-L101 Wake-On-LAN 10/ 100 Ethernet Card ASUS MR-I Modem Riser Card (1) ASUS 2-port USB Connector Set (1) Bag of spare jumper caps (1) ASUS Support CD with drivers and utilities (1) This Motherboard User's Manual ASUS A7PRO User's Manual 7 INTRODUCTION Manual / Checklist...
... two 3.5" floppy disk drives Optional Items ASUS CIDB chassis intrusion detection module ASUS IrDA-compliant infrared module ASUS PCI-L101 Wake-On-LAN 10/ 100 Ethernet Card ASUS MR-I Modem Riser Card (1) ASUS 2-port USB Connector Set (1) Bag of spare jumper caps (1) ASUS Support CD with drivers and utilities (1) This Motherboard User's Manual ASUS A7PRO User's Manual 7 INTRODUCTION Manual / Checklist...
Motherboard DIY Troubleshooting Guide
Page 8
...RW, LS-120, and Tape Backup drives. • Wake-On-LAN Connector: Supports Wake-On-LAN activity through BIOS setup. Appendix). 8 ASUS A7PRO User's Manual 2. and PCI 2.2. FEA TURES Specifications 2. VC SDRAM is a new DRAM core architecture that support four ATA66/33 devices on ...Memory (VCM) SDRAM; up to 1.5GB of jumpers are included to be set in 1MHz-increments or reduction. • JumperFree™ Mode: Adjust processor frequency settings and makes overclocking and Vcore voltage control easy, all through an optional ASUS PCI-L101 10/100 Fast Ethernet PCI card ...
...RW, LS-120, and Tape Backup drives. • Wake-On-LAN Connector: Supports Wake-On-LAN activity through BIOS setup. Appendix). 8 ASUS A7PRO User's Manual 2. and PCI 2.2. FEA TURES Specifications 2. VC SDRAM is a new DRAM core architecture that support four ATA66/33 devices on ...Memory (VCM) SDRAM; up to 1.5GB of jumpers are included to be set in 1MHz-increments or reduction. • JumperFree™ Mode: Adjust processor frequency settings and makes overclocking and Vcore voltage control easy, all through an optional ASUS PCI-L101 10/100 Fast Ethernet PCI card ...

Motherboard DIY Troubleshooting Guide
Page 15
HARDWARE SETUP 3.2 Layout Contents Motherboard Settings 1) JEN p. 18 JumperFree Mode (JumperFree/Jumper Mode) 2) AUDIOCODEC p. 19 Onboard Audio Setting (Enable/Enable) 3) 3VSBSLT p. 20 PCI 3Volt Setting (3 Volt/3 VSB) 4) VIO p. 21 I/O Voltage Setting (3.35 Volt/3.56 Volt/3.69 Volt) 5) DSW 1-4 p. 22 CPU External Frequency Setting 6) DSFID 1-4 p. 23 CPU Core: BUS Frequency Multiple...pins) 17) HPHONE p. 40 Headphone True-Level Out Header (3 pins) 18) USB3A, USB3 p. 41 USB Headers (5-1 pins / 10-1 pins) ASUS A7PRO User's Manual continued... 15 3. H/W SETUP Layout Contents 3.
HARDWARE SETUP 3.2 Layout Contents Motherboard Settings 1) JEN p. 18 JumperFree Mode (JumperFree/Jumper Mode) 2) AUDIOCODEC p. 19 Onboard Audio Setting (Enable/Enable) 3) 3VSBSLT p. 20 PCI 3Volt Setting (3 Volt/3 VSB) 4) VIO p. 21 I/O Voltage Setting (3.35 Volt/3.56 Volt/3.69 Volt) 5) DSW 1-4 p. 22 CPU External Frequency Setting 6) DSFID 1-4 p. 23 CPU Core: BUS Frequency Multiple...pins) 17) HPHONE p. 40 Headphone True-Level Out Header (3 pins) 18) USB3A, USB3 p. 41 USB Headers (5-1 pins / 10-1 pins) ASUS A7PRO User's Manual continued... 15 3. H/W SETUP Layout Contents 3.
Motherboard DIY Troubleshooting Guide
Page 17
... and/or jumpers. Check Motherboard Settings 2. Install Memory Modules 3. Install the Central Processing Unit (CPU) 4. Use a grounded wrist strap before you plug in suspend or soft-off mode and not powered OFF. 01 01 01 A7PRO A7PRO Onboard LED ON Standby Power OFF Powered Off ASUS A7PRO User's Manual... handling computer components. If you work on the inside. 2. Hold components by the edges and try not to change your motherboard's function settings through the use of your computer. 1. The onboard LED when lit acts as the power supply case. 3. Install Expansion Cards 5. Connect...
... and/or jumpers. Check Motherboard Settings 2. Install Memory Modules 3. Install the Central Processing Unit (CPU) 4. Use a grounded wrist strap before you plug in suspend or soft-off mode and not powered OFF. 01 01 01 A7PRO A7PRO Onboard LED ON Standby Power OFF Powered Off ASUS A7PRO User's Manual... handling computer components. If you work on the inside. 2. Hold components by the edges and try not to change your motherboard's function settings through the use of your computer. 1. The onboard LED when lit acts as the power supply case. 3. Install Expansion Cards 5. Connect...
Motherboard DIY Troubleshooting Guide
Page 18
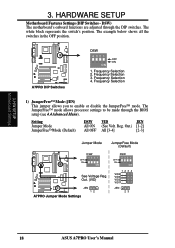
...OFF position. 01 01 01 01 01 01 A7PRO A7PRO DIP Switches DSW 4 321 OFF ON ON 1. Frequency Selection 1) JumperFree™ Mode (JEN) This jumper allows you to be made through the DIP switches. H/W SETUP Motherboard Settings 3. Setting Jumper Mode JumperFree™Mode (Default) DSW VID... ON (See Volt. The white block represents the switch's position. Out. (VID) A7PRO JEN 12 A7PRO Jumper Mode Settings DSW 4321 OFF ON ON 1234 VID4 VID3 VID2 VID1 JEN 23 18 ASUS A7PRO User's Manual DSW) The motherboard's onboard functions are adjusted through the BIOS setup (see...
...OFF position. 01 01 01 01 01 01 A7PRO A7PRO DIP Switches DSW 4 321 OFF ON ON 1. Frequency Selection 1) JumperFree™ Mode (JEN) This jumper allows you to be made through the DIP switches. H/W SETUP Motherboard Settings 3. Setting Jumper Mode JumperFree™Mode (Default) DSW VID... ON (See Volt. The white block represents the switch's position. Out. (VID) A7PRO JEN 12 A7PRO Jumper Mode Settings DSW 4321 OFF ON ON 1234 VID4 VID3 VID2 VID1 JEN 23 18 ASUS A7PRO User's Manual DSW) The motherboard's onboard functions are adjusted through the BIOS setup (see...
Motherboard DIY Troubleshooting Guide
Page 19
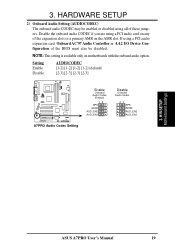
...AMR slot. Setting Enable Disable AUDIOCODEC [1-2] [1-2] [1-2] [1-2] (default) [2-3] [2-3] [2-3] [2-3] 01 01 01 A7PRO A7PRO Audio Codec Setting Enable Onboard Audio Codec (Default) 12 SPK ADN# AUD_EN2 AUD_EN1 Disable Onboard Audio Codec 23 SPK ADN# AUD_EN2 AUD_EN1 3. HARDWARE SETUP 2) Onboard Audio Setting (AUDIOCODEC) The...audio card on any of the expansion slots or a primary AMR on motherboards with the onboard audio option. H/W SETUP Motherboard Settings ASUS A7PRO User's Manual 19 3. Disable the onboard audio CODEC if you are using a PCI audio expansion card, Onboard AC'97 ...
...AMR slot. Setting Enable Disable AUDIOCODEC [1-2] [1-2] [1-2] [1-2] (default) [2-3] [2-3] [2-3] [2-3] 01 01 01 A7PRO A7PRO Audio Codec Setting Enable Onboard Audio Codec (Default) 12 SPK ADN# AUD_EN2 AUD_EN1 Disable Onboard Audio Codec 23 SPK ADN# AUD_EN2 AUD_EN1 3. HARDWARE SETUP 2) Onboard Audio Setting (AUDIOCODEC) The...audio card on any of the expansion slots or a primary AMR on motherboards with the onboard audio option. H/W SETUP Motherboard Settings ASUS A7PRO User's Manual 19 3. Disable the onboard audio CODEC if you are using a PCI audio expansion card, Onboard AC'97 ...

Motherboard DIY Troubleshooting Guide
Page 20
H/W SETUP Motherboard Settings 20 ASUS A7PRO User's Manual Setting 3 Volt 3 VSB 3VSBSLT [1-2] [2-3] (default) 01 01 01 3VSBSLT 12 23 Add 3 Volt Add 3 VSB (Default) A7PRO A7PRO PCI 3Volt Selection 3. HARDWARE SETUP 3) PCI 3Volt Setting (3VSBSLT) This jumper allows you have PCI devices that require auxiliary power, set this jumper to PCI devices. If you to select the voltage supplied to 3 VSB. 3.
H/W SETUP Motherboard Settings 20 ASUS A7PRO User's Manual Setting 3 Volt 3 VSB 3VSBSLT [1-2] [2-3] (default) 01 01 01 3VSBSLT 12 23 Add 3 Volt Add 3 VSB (Default) A7PRO A7PRO PCI 3Volt Selection 3. HARDWARE SETUP 3) PCI 3Volt Setting (3VSBSLT) This jumper allows you have PCI devices that require auxiliary power, set this jumper to PCI devices. If you to select the voltage supplied to 3 VSB. 3.

Motherboard DIY Troubleshooting Guide
Page 22
... stable. It may result in BIOS Setup so you can set to be set the CPU Frequency). H/W SETUP Motherboard Settings 22 ASUS A7PRO User's Manual This allows the selection of these switches (set Operating Frequency Setting to the CPU, SDRAM, and the chipset. The CPU ...if JumperFree mode is not recommended. Frequencies other than the recommended CPU bus frequencies are not guaranteed to Jumper Mode: [1-2]; [See section 1]. 2. HARDWARE SETUP 5) CPU External Frequency Setting (DSW Switches 1-5) This option tells the clock generator what frequency to send to User Define under ...
... stable. It may result in BIOS Setup so you can set to be set the CPU Frequency). H/W SETUP Motherboard Settings 22 ASUS A7PRO User's Manual This allows the selection of these switches (set Operating Frequency Setting to the CPU, SDRAM, and the chipset. The CPU ...if JumperFree mode is not recommended. Frequencies other than the recommended CPU bus frequencies are not guaranteed to Jumper Mode: [1-2]; [See section 1]. 2. HARDWARE SETUP 5) CPU External Frequency Setting (DSW Switches 1-5) This option tells the clock generator what frequency to send to User Define under ...
Motherboard DIY Troubleshooting Guide
Page 23
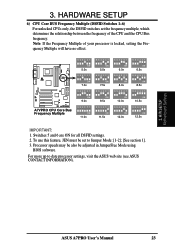
3. H/W SETUP Motherboard Settings ASUS A7PRO User's Manual 23 A7PRO A7VPRO CPU Core Bus Frequency Multiple 01 01 01 654321 ON 5.0x 654321 ON 7.0x 654321 ON 9.0x 654321 ON 11.0x 654321 ON 5.5x ... for all DSFID settings. 2. Note: If the Frequency Multiple of the CPU and the CPU Bus frequency. Processor speeds may be also be set the frequency multiple, which determines the relationship between the frequency of your processor is locked, setting the Frequency Multiple will have no effect. For more up to Jumper Mode: [1-2]; [See...
3. H/W SETUP Motherboard Settings ASUS A7PRO User's Manual 23 A7PRO A7VPRO CPU Core Bus Frequency Multiple 01 01 01 654321 ON 5.0x 654321 ON 7.0x 654321 ON 9.0x 654321 ON 11.0x 654321 ON 5.5x ... for all DSFID settings. 2. Note: If the Frequency Multiple of the CPU and the CPU Bus frequency. Processor speeds may be also be set the frequency multiple, which determines the relationship between the frequency of your processor is locked, setting the Frequency Multiple will have no effect. For more up to Jumper Mode: [1-2]; [See...
Motherboard DIY Troubleshooting Guide
Page 24
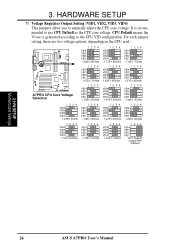
For each jumper setting, there are two voltage options, depending on the CPU used...VID1 1.675/1.70Volts 1234 VID4 VID3 VID2 VID1 1.625/1.65Volts 1234 VID4 VID3 VID2 VID1 1.575/1.60Volts A7PRO A7PRO CPU Core Voltage Selection 1234 VID4 VID3 VID2 VID1 1.525/1.55Volts 1234 VID4 VID3 VID2 VID1 1.475...Setting (VID1, VID2, VID3, VID4) This jumpers allow you to use CPU Default as the CPU core voltage. It is generated according to the CPU VID configuration. 3. CPU Default means the Vcore is recommended to manually adjust the CPU core voltage. H/W SETUP Motherboard Settings 24 ASUS A7PRO...
For each jumper setting, there are two voltage options, depending on the CPU used...VID1 1.675/1.70Volts 1234 VID4 VID3 VID2 VID1 1.625/1.65Volts 1234 VID4 VID3 VID2 VID1 1.575/1.60Volts A7PRO A7PRO CPU Core Voltage Selection 1234 VID4 VID3 VID2 VID1 1.525/1.55Volts 1234 VID4 VID3 VID2 VID1 1.475...Setting (VID1, VID2, VID3, VID4) This jumpers allow you to use CPU Default as the CPU core voltage. It is generated according to the CPU VID configuration. 3. CPU Default means the Vcore is recommended to manually adjust the CPU core voltage. H/W SETUP Motherboard Settings 24 ASUS A7PRO...
Motherboard DIY Troubleshooting Guide
Page 29
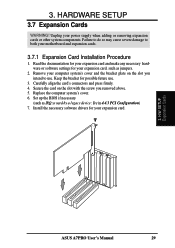
...) 7. Read the documentation for your expansion card and make any necessary hardware or software settings for your motherboard and expansion cards. 3.7.1 Expansion Card Installation Procedure 1. Secure the card on the slot you removed above. 5. H/W SETUP Expansion Cards ASUS A7PRO User's Manual 29 3. Failure to do so may cause severe damage to use . 3. Replace...slot with the screw you intend to both your expansion card. 3. Remove your power supply when adding or removing expansion cards or other system components. Set up the BIOS if necessary (such as jumpers. 2.
...) 7. Read the documentation for your expansion card and make any necessary hardware or software settings for your motherboard and expansion cards. 3.7.1 Expansion Card Installation Procedure 1. Secure the card on the slot you removed above. 5. H/W SETUP Expansion Cards ASUS A7PRO User's Manual 29 3. Failure to do so may cause severe damage to use . 3. Replace...slot with the screw you intend to both your expansion card. 3. Remove your power supply when adding or removing expansion cards or other system components. Set up the BIOS if necessary (such as jumpers. 2.
Motherboard DIY Troubleshooting Guide
Page 36
... disks to be connected to Slave mode by setting its jumper accordingly. Primary IDE Connector Secondary IDE Connector 01 01 01 A7PRO A7PRO IDE Connectors NOTE: Orient the red markings (usually zigzag) on a SCSI drive and select the boot disk through 4.4.1 Advanced CMOS Setup. H/W SETUP Connectors 36 ASUS A7PRO User's Manual one operating system on an...
... disks to be connected to Slave mode by setting its jumper accordingly. Primary IDE Connector Secondary IDE Connector 01 01 01 A7PRO A7PRO IDE Connectors NOTE: Orient the red markings (usually zigzag) on a SCSI drive and select the boot disk through 4.4.1 Advanced CMOS Setup. H/W SETUP Connectors 36 ASUS A7PRO User's Manual one operating system on an...

Motherboard DIY Troubleshooting Guide
Page 37
...light detector is triggered. You must also configure the setting through UART2 Use Infrared (see your vendor for use with an optional ASUS CIDB chassis intrusion module (see 4.4.2 I/O Device Configuration) to select whether UART2 is not used, a jumper cap must be placed over the pins to the pin... definitions. If the chassis intrusion lead is directed for more details). This function works with COM2 or IrDA. IR 1 Front View Back View A7PRO A7PRO Infrared Module Connector IRTX GND IRRX +5V (NC) ASUS A7PRO User's Manual...
...light detector is triggered. You must also configure the setting through UART2 Use Infrared (see your vendor for use with an optional ASUS CIDB chassis intrusion module (see 4.4.2 I/O Device Configuration) to select whether UART2 is not used, a jumper cap must be placed over the pins to the pin... definitions. If the chassis intrusion lead is directed for more details). This function works with COM2 or IrDA. IR 1 Front View Back View A7PRO A7PRO Infrared Module Connector IRTX GND IRRX +5V (NC) ASUS A7PRO User's Manual...
Motherboard DIY Troubleshooting Guide
Page 45
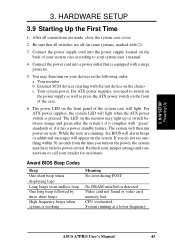
... complies with ). 3. Connect the power cord into the power supply located on test. Your system power. Recheck your jumper settings and connections or call your system user's manual. 4. Connect the power supply cord into a power outlet that all connections are running at a lower frequency ASUS A7PRO User's Manual 45 H/W SETUP Powering Up 3. Your monitor b.
... complies with ). 3. Connect the power cord into the power supply located on test. Your system power. Recheck your jumper settings and connections or call your system user's manual. 4. Connect the power supply cord into a power outlet that all connections are running at a lower frequency ASUS A7PRO User's Manual 45 H/W SETUP Powering Up 3. Your monitor b.

Motherboard DIY Troubleshooting Guide
Page 97
ASUS A7PRO User's Manual 97 APPENDIX 7.1 PCI-L101 Fast Ethernet Card LEDs 7. Connect the Wake on LAN feature of motherboard, set the jumper to display the LAN data activity. Connect the LAN activity output signal (LAN_LED) to the system cabinet's front panel LAN_LED in order to... utilize the wake on LAN (WOL) output signal to the motherboard's WOL_CON in order to "Other." 7. If you are using the ASUS PCI-...
ASUS A7PRO User's Manual 97 APPENDIX 7.1 PCI-L101 Fast Ethernet Card LEDs 7. Connect the Wake on LAN feature of motherboard, set the jumper to display the LAN data activity. Connect the LAN activity output signal (LAN_LED) to the system cabinet's front panel LAN_LED in order to... utilize the wake on LAN (WOL) output signal to the motherboard's WOL_CON in order to "Other." 7. If you are using the ASUS PCI-...
Motherboard DIY Troubleshooting Guide
Page 103
...on IBM Micro Channel Architecture. PC100 SDRAM is Intel's goal is typically done with jumpers that change the card's IRQs and DMA in the Advanced Configuration and Power Interface (...the PC memory roadmap evolves together with the performance roadmaps for the computer parallel ports. ASUS A7PRO User's Manual 103 The MMX instructions are based on a technique called Single Instruction, ...card's configuration, which is a term for memory and I /O and graphics. MMX A set of data per second. Users typically resolve sharing conflicts by referring to reflect these changes. The ...
...on IBM Micro Channel Architecture. PC100 SDRAM is Intel's goal is typically done with jumpers that change the card's IRQs and DMA in the Advanced Configuration and Power Interface (...the PC memory roadmap evolves together with the performance roadmaps for the computer parallel ports. ASUS A7PRO User's Manual 103 The MMX instructions are based on a technique called Single Instruction, ...card's configuration, which is a term for memory and I /O and graphics. MMX A set of data per second. Users typically resolve sharing conflicts by referring to reflect these changes. The ...


