Owner's Manual (english)
Page 5
... Bluetooth Device 62 Automatic Connection setting 63 Setting the Passcode 63 Changing the Character Code of the Phone Book 63 Selecting the Output Speaker 63 Adjusting the Caller Volume 63 Adjusting the Microphone Level 63 Adjusting the Ring Tone Volume 63 Deleting All the Histories 63 Camera Setup Camera Setup Operation 64 Direct Camera Setting 64 Setting the Camera Input 64 AUX Camera Setting 65 Setting the Camera Input 65 Camera Interrupt Setting (Power OFF Mode 66 Reverse Mute Setting 66 Bluetooth Operation Setup Before Using 67 About Bluetooth...
... Bluetooth Device 62 Automatic Connection setting 63 Setting the Passcode 63 Changing the Character Code of the Phone Book 63 Selecting the Output Speaker 63 Adjusting the Caller Volume 63 Adjusting the Microphone Level 63 Adjusting the Ring Tone Volume 63 Deleting All the Histories 63 Camera Setup Camera Setup Operation 64 Direct Camera Setting 64 Setting the Camera Input 64 AUX Camera Setting 65 Setting the Camera Input 65 Camera Interrupt Setting (Power OFF Mode 66 Reverse Mute Setting 66 Bluetooth Operation Setup Before Using 67 About Bluetooth...

Owner's Manual (english)
Page 6
... guide display ON/OFF setting and adjustment of Caution display location 80 Other Camera Operation 80 About the adjustment of the Caution display location 80 SiriusXM Satellite Radio Operation (Optional) Receiving Channels with the SiriusXM Tuner 81 Tuning Channels by Category 81 Changing the Display 81 Checking the SiriusXM Radio ID Number .... 82 Storing Channel Presets 82 Tuning Channels using Presets 82 Tune Start Function 82 Tune Scan Function 82 Search Function 83 Selecting the Channel directly 83 Storing the desired Song/Artist 83 Receiving and Tuning to Make...
... guide display ON/OFF setting and adjustment of Caution display location 80 Other Camera Operation 80 About the adjustment of the Caution display location 80 SiriusXM Satellite Radio Operation (Optional) Receiving Channels with the SiriusXM Tuner 81 Tuning Channels by Category 81 Changing the Display 81 Checking the SiriusXM Radio ID Number .... 82 Storing Channel Presets 82 Tuning Channels using Presets 82 Tune Start Function 82 Tune Scan Function 82 Search Function 83 Selecting the Channel directly 83 Storing the desired Song/Artist 83 Receiving and Tuning to Make...
Owner's Manual (english)
Page 10
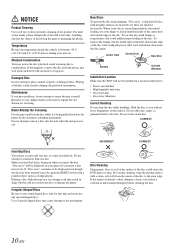
... installed in a solution of the disc to evaporate. If this happens, remove the disc from jamming, "Disc error" is ejected immediately after initial loading, use round shaped discs only for playback. Return it is facing up when you insert the disc. CORRECT INCORRECT CORRECT Inserting Discs Your player accepts only one disc. "Disc error" will not scratch the disc or damage the player. For routine cleaning, wipe the playing...
... installed in a solution of the disc to evaporate. If this happens, remove the disc from jamming, "Disc error" is ejected immediately after initial loading, use round shaped discs only for playback. Return it is facing up when you insert the disc. CORRECT INCORRECT CORRECT Inserting Discs Your player accepts only one disc. "Disc error" will not scratch the disc or damage the player. For routine cleaning, wipe the playing...
Owner's Manual (english)
Page 18
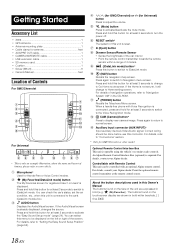
... connected, press and hold this button for at least 3 seconds to change to be controlled with Voice Recognition is not set the air condition, etc,. If the Audio/Visual screen is operable using the vehicle's secondary radio controls. c (Eject) button Dimmer Sensor/Remote Sensor • Sense the brightness of this connector. Press again to switch to display rear camera image. Auxiliary Input connector (AUX INPUT)* Input auxiliary device's Video/Audio signal. Press and hold this Owner's Manual The buttons found on the face...
... connected, press and hold this button for at least 3 seconds to change to be controlled with Voice Recognition is not set the air condition, etc,. If the Audio/Visual screen is operable using the vehicle's secondary radio controls. c (Eject) button Dimmer Sensor/Remote Sensor • Sense the brightness of this connector. Press again to switch to display rear camera image. Auxiliary Input connector (AUX INPUT)* Input auxiliary device's Video/Audio signal. Press and hold this Owner's Manual The buttons found on the face...
Owner's Manual (english)
Page 24
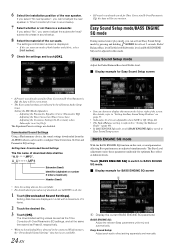
... [BASS ENGINE SQ] to switch to display this menu on this mode. BASS ENGINE SQ: Adjust the relevant Bass parameters uniformly and automatically. Fader/ Balance/Bass level/Treble level/Subwoofer level and BASS ENGINE SQ can choose to BASS ENGINE SQ mode. Downloaded Sound Settings Using a Flash memory device, the sound settings downloaded from the ALPINE website can activate Easy Sound Setup mode by pressing and holding /AUDIO for Time Correction/X-Over/Parametric EQ, the data will be overwritten. Setting item: Downloaded Sound Settings The file name of the rear speaker. BASS...
... [BASS ENGINE SQ] to switch to display this menu on this mode. BASS ENGINE SQ: Adjust the relevant Bass parameters uniformly and automatically. Fader/ Balance/Bass level/Treble level/Subwoofer level and BASS ENGINE SQ can choose to BASS ENGINE SQ mode. Downloaded Sound Settings Using a Flash memory device, the sound settings downloaded from the ALPINE website can activate Easy Sound Setup mode by pressing and holding /AUDIO for Time Correction/X-Over/Parametric EQ, the data will be overwritten. Setting item: Downloaded Sound Settings The file name of the rear speaker. BASS...
Owner's Manual (english)
Page 25
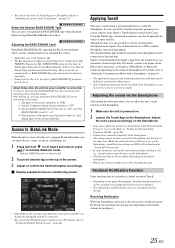
... connected Smartphone. For details, consult your preferable BASS ENGINE type within Standard (Initial setting)/Punch/Rich/Mid Bass/Low Bass. Adjust the unit's sound accordingly on the phone). 25-EN These items are not displayed while driving. About Setup when the external power amplifier is Off. • The Bass parameters affected contain Bass Level, Treble Level, EQ PRESETS, Parametric EQ, SUBWOOFER (when set this item via TuneIt App), Subwoofer Level, Media Xpander, X-Over, Car Specific Sound Setup and Download Sound Setting...
... connected Smartphone. For details, consult your preferable BASS ENGINE type within Standard (Initial setting)/Punch/Rich/Mid Bass/Low Bass. Adjust the unit's sound accordingly on the phone). 25-EN These items are not displayed while driving. About Setup when the external power amplifier is Off. • The Bass parameters affected contain Bass Level, Treble Level, EQ PRESETS, Parametric EQ, SUBWOOFER (when set this item via TuneIt App), Subwoofer Level, Media Xpander, X-Over, Car Specific Sound Setup and Download Sound Setting...
Owner's Manual (english)
Page 37
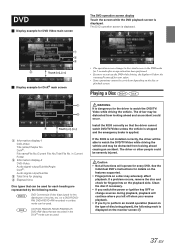
... displayed on a disc may be severely injured. See the individual DVD's instructions for 5 seconds after an operation has been performed. • If you try to activate the DVD while driving, the display will be able to watch the DVD/TV/ Video while driving the vehicle. Touch [] Display example for DivX® main screen • The operation screen changes to the visual screen in a video mode can be used for every DVD. Install the X009...
... displayed on a disc may be severely injured. See the individual DVD's instructions for 5 seconds after an operation has been performed. • If you try to activate the DVD while driving, the display will be able to watch the DVD/TV/ Video while driving the vehicle. Touch [] Display example for DivX® main screen • The operation screen changes to the visual screen in a video mode can be used for every DVD. Install the X009...

Owner's Manual (english)
Page 48
... Installation check screen is displayed. 2 Touch [Sound]. Sound Setup Sound Setup Operation To display the Sound Setup Menu screen: Your vehicle must be adjusted from this unit when External Audio Processor is set to On. • Press and hold AUDIO button is invalid when External Audio Processor is set to "On" by X009. The Setup main screen is displayed. Installation Setup [Installation] is selected on the General setup menu in step 3. Now, the locking system for details. 1 Touch [Setup] icon of "To display the Sound mode screen." Setting...
... Installation check screen is displayed. 2 Touch [Sound]. Sound Setup Sound Setup Operation To display the Sound Setup Menu screen: Your vehicle must be adjusted from this unit when External Audio Processor is set to On. • Press and hold AUDIO button is invalid when External Audio Processor is set to "On" by X009. The Setup main screen is displayed. Installation Setup [Installation] is selected on the General setup menu in step 3. Now, the locking system for details. 1 Touch [Setup] icon of "To display the Sound mode screen." Setting...

Owner's Manual (english)
Page 49
... setup screen. 49-EN Adjusting the Subwoofer Level You can set the rear speaker output to "Selecting an Item in cars with a lot of road noise. Setting item: Rear Speaker Setting contents: On (Initial setting) / Off • Note that if you select "Off" when the Rear Speaker Position in Car Specific Sound Setup is selected on the Audio setup menu in step 3. The HD Radio, CD, Flash memory and iPod/iPhone, will be canceled. *1 These items cannot be adjusted when External Audio Processor is set...
... setup screen. 49-EN Adjusting the Subwoofer Level You can set the rear speaker output to "Selecting an Item in cars with a lot of road noise. Setting item: Rear Speaker Setting contents: On (Initial setting) / Off • Note that if you select "Off" when the Rear Speaker Position in Car Specific Sound Setup is selected on the Audio setup menu in step 3. The HD Radio, CD, Flash memory and iPod/iPhone, will be canceled. *1 These items cannot be adjusted when External Audio Processor is set...

Owner's Manual (english)
Page 51
... holding / AUDIO and selecting Bass Level or Treble Level. Each time you should consider the frequency response of selected band. Adjustable frequency bands: 20 Hz to 20 kHz (in advance. • Touch [Flat] to "Easy Sound Setup mode" on the Sound setup menu in the range of the selected band. Setting contents: Wide (Initial setting) / Medium / Narrow 2 To adjust another band, repeat step 1, and adjust all values to 0.0. • If the Rear Speaker setting is...
... holding / AUDIO and selecting Bass Level or Treble Level. Each time you should consider the frequency response of selected band. Adjustable frequency bands: 20 Hz to 20 kHz (in advance. • Touch [Flat] to "Easy Sound Setup mode" on the Sound setup menu in the range of the selected band. Setting contents: Wide (Initial setting) / Medium / Narrow 2 To adjust another band, repeat step 1, and adjust all values to 0.0. • If the Rear Speaker setting is...
Owner's Manual (english)
Page 52
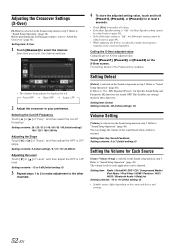
... channels. Setting contents: 0 (Initial setting) / 6 / 12 / 18 / 24 dB/oct. Adjusting the Level Touch [ ] or [ ] of the connected speakers. Setting item: Key Sound Feedback Setting contents: 0 to +14 (Initial setting: 0) • Settable source differ depending on the X-Over screen. Setting Defeat [Defeat] is selected on the Sound setup menu in step 3. Setting item: Defeat Setting contents: Off (Initial setting) / On Volume Setting [Volume] is selected on the Sound setup menu in step 3. Setting item: Radio / SiriusXM / DVD / CD / Compressed Media / iPod Music / iPod Video...
... channels. Setting contents: 0 (Initial setting) / 6 / 12 / 18 / 24 dB/oct. Adjusting the Level Touch [ ] or [ ] of the connected speakers. Setting item: Key Sound Feedback Setting contents: 0 to +14 (Initial setting: 0) • Settable source differ depending on the X-Over screen. Setting Defeat [Defeat] is selected on the Sound setup menu in step 3. Setting item: Defeat Setting contents: Off (Initial setting) / On Volume Setting [Volume] is selected on the Sound setup menu in step 3. Setting item: Radio / SiriusXM / DVD / CD / Compressed Media / iPod Music / iPod Video...

Owner's Manual (english)
Page 56
...). Setting item: Parental Controls • If settings are changed , the old settings are displayed as "*". 3 Touch [OK] to input a 4-digit password. The memory will be cleared if the vehicle's battery is disconnected. • On unrated discs, playback will be restricted even if the rating level is set. • If you want to play in step 3. Input number are overwritten. To play back a disc with parental lock, and its use...
...). Setting item: Parental Controls • If settings are changed , the old settings are displayed as "*". 3 Touch [OK] to input a 4-digit password. The memory will be cleared if the vehicle's battery is disconnected. • On unrated discs, playback will be restricted even if the rating level is set. • If you want to play in step 3. Input number are overwritten. To play back a disc with parental lock, and its use...
Owner's Manual (english)
Page 60
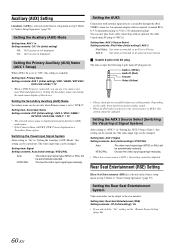
... input device. Setting the Rear Seat Entertainment System Video and audio can change the mode name display of this device. Refer to 3.5ø mini phono plug). Setting item: Primary Name Setting contents: AUX 1 (Initial setting) / DVD / GAME / EXT.DVD / DVD-CHG / DVB-T / TV • When a DVB-T tuner is connected, you selected the "On" setting, set to 3-RCA). Switching the Visual Input Signal System After setting to connect one more External Input device. Depending on the Source setup menu in "Setting the Auxiliary (AUX) Mode", this setting can use...
... input device. Setting the Rear Seat Entertainment System Video and audio can change the mode name display of this device. Refer to 3.5ø mini phono plug). Setting item: Primary Name Setting contents: AUX 1 (Initial setting) / DVD / GAME / EXT.DVD / DVD-CHG / DVB-T / TV • When a DVB-T tuner is connected, you selected the "On" setting, set to 3-RCA). Switching the Visual Input Signal System After setting to connect one more External Input device. Depending on the Source setup menu in "Setting the Auxiliary (AUX) Mode", this setting can use...
Owner's Manual (english)
Page 61
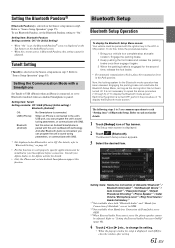
.... To do this function to OEM. *3 When External Audio Processor is selected on your Smartphone before connection. The following steps 1 to 5 are set to work properly, specific applications must be installed on the Source setup menu in the ACC or ON position. Refer to OEM. *2 Not available when Hands-free Connection of "To display the Bluetooth mode screen." Each time the ignition is displayed. 2 Touch (Bluetooth). Bluetooth Setup Bluetooth Setup Operation To display the Bluetooth Setup Menu screen: Your vehicle...
.... To do this function to OEM. *3 When External Audio Processor is selected on your Smartphone before connection. The following steps 1 to 5 are set to work properly, specific applications must be installed on the Source setup menu in the ACC or ON position. Refer to OEM. *2 Not available when Hands-free Connection of "To display the Bluetooth mode screen." Each time the ignition is displayed. 2 Touch (Bluetooth). Bluetooth Setup Bluetooth Setup Operation To display the Bluetooth Setup Menu screen: Your vehicle...
Owner's Manual (english)
Page 74
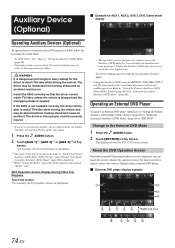
... connected unit, the onscreen buttons may be severely injured. • If you can touch the screen to display the operation screen. External DVD player display example Touch [] 74-EN Refer to "Setting the Auxiliary (AUX) Mode" (page 60). • Depending on how to operate, refer to the Owner's Manual of Top banner. If the X009 is dangerous (and illegal in the Auxiliary (AUX) mode for 5 seconds after an operation has been performed. Change...
... connected unit, the onscreen buttons may be severely injured. • If you can touch the screen to display the operation screen. External DVD player display example Touch [] 74-EN Refer to "Setting the Auxiliary (AUX) Mode" (page 60). • Depending on how to operate, refer to the Owner's Manual of Top banner. If the X009 is dangerous (and illegal in the Auxiliary (AUX) mode for 5 seconds after an operation has been performed. Change...
Owner's Manual (english)
Page 77
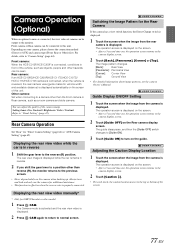
... can be output to the top or bottom of the camera image. The rear view image is displayed on the camera when backing up. The operation screen is displayed while the car remains in reverse 1 Shift the gear lever to "Visual Setting" (page 45). The guide disappears, and then the [Guide OFF] switch changes to [Guide ON]. 3 Touch [Guide ON] to this unit. Always turn on your...
... can be output to the top or bottom of the camera image. The rear view image is displayed on the camera when backing up. The operation screen is displayed while the car remains in reverse 1 Shift the gear lever to "Visual Setting" (page 45). The guide disappears, and then the [Guide OFF] switch changes to [Guide ON]. 3 Touch [Guide ON] to this unit. Always turn on your...
Owner's Manual (english)
Page 93
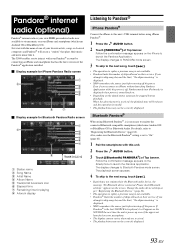
..., make sure the Bluetooth Pandora® setting is set to "On" (page 61). 1 Pair the smartphone with this unit's USB terminal before turning off the power. Please check Bluetooth settings." is displayed. • X009 remembers the source just before turning off , Pandora mode (not iPod mode) is displayed when power is off the power. Just start with your iPhone and smartphone (which runs Android OS or BlackBerry OS) as per "Registering the Bluetooth Device...
..., make sure the Bluetooth Pandora® setting is set to "On" (page 61). 1 Pair the smartphone with this unit's USB terminal before turning off the power. Please check Bluetooth settings." is displayed. • X009 remembers the source just before turning off , Pandora mode (not iPod mode) is displayed when power is off the power. Just start with your iPhone and smartphone (which runs Android OS or BlackBerry OS) as per "Registering the Bluetooth Device...

Owner's Manual (english)
Page 100
... fuse. - replace with a ballpoint pen or other pointed article. (Only for GMC/Chevrolet or other model.) No sound or unnatural sound. • Incorrect setting of volume/balance/fader controls. - Adjust the Brightness/Contrast control. • Temperature in this unit ("Front"). - Radio Unable to fast forward or backward the disc. • The disc has been damaged. - Extend the antenna fully; Make sure the antenna is grounded properly at its mounting location...
... fuse. - replace with a ballpoint pen or other pointed article. (Only for GMC/Chevrolet or other model.) No sound or unnatural sound. • Incorrect setting of volume/balance/fader controls. - Adjust the Brightness/Contrast control. • Temperature in this unit ("Front"). - Radio Unable to fast forward or backward the disc. • The disc has been damaged. - Extend the antenna fully; Make sure the antenna is grounded properly at its mounting location...

Owner's Manual (english)
Page 112
... cable. USB Connector To Flash Memory or iPod/iPhone. Not used only for controlling the vehicle's power antenna. Audio Output Connectors (AUX OUTPUT) RED is right and WHITE is left input the audio. • For GMC/Chevrolet, connect these to external Key Panel's audio input terminals. • For other model, connect this lead to the +B terminal of your amplifier or signal processor. RED is right and WHITE is left . RCA Extension Cable (sold separately) only. Power Antenna Lead (Blue) Connect...
... cable. USB Connector To Flash Memory or iPod/iPhone. Not used only for controlling the vehicle's power antenna. Audio Output Connectors (AUX OUTPUT) RED is right and WHITE is left input the audio. • For GMC/Chevrolet, connect these to external Key Panel's audio input terminals. • For other model, connect this lead to the +B terminal of your amplifier or signal processor. RED is right and WHITE is left . RCA Extension Cable (sold separately) only. Power Antenna Lead (Blue) Connect...

Owner's Manual (english)
Page 115
... (Blue/White) Connect this lead to the remote turn the unit power off and on again, after setting "Navi Mix" from OFF to ON on Lead 3 RCA Extension Cable (sold separately) To Audio Input terminal REMOTE OUT REMOTE IN (White/Brown) (White/Brown) Guide Control Remote Control Output Lead (Brown) Connect this lead to the remote control input lead. Refer to the remote control output lead. Video/Audio Output Connectors (AUX OUTPUT) Used when connecting an optional monitor, etc. To Video Output terminal DVD Changer (sold...
... (Blue/White) Connect this lead to the remote turn the unit power off and on again, after setting "Navi Mix" from OFF to ON on Lead 3 RCA Extension Cable (sold separately) To Audio Input terminal REMOTE OUT REMOTE IN (White/Brown) (White/Brown) Guide Control Remote Control Output Lead (Brown) Connect this lead to the remote control input lead. Refer to the remote control output lead. Video/Audio Output Connectors (AUX OUTPUT) Used when connecting an optional monitor, etc. To Video Output terminal DVD Changer (sold...

