Alpine X009-RAM Support and Manuals
Get Help and Manuals for this Alpine item
View All Support Options Below
Free Alpine X009-RAM manuals!
Problems with Alpine X009-RAM?
Ask a Question
Free Alpine X009-RAM manuals!
Problems with Alpine X009-RAM?
Ask a Question
Popular Alpine X009-RAM Manual Pages
Owner's Manual (english) - Page 5
...54
Source Setup
Source Setup Operation 55
Source Layout Setting 55 Setting the Slide Source Change 55 Setting the Easy Sound Setup Position ....... 55 Customizing the Source Banner 55
Disc Setting 56 Changing the language setting 56 Setting of the Menu Language 56 Setting of the Audio Language 56 Setting of the Subtitle Language 56 Changing the Country Code Setting 56 Setting the Rating...
Owner's Manual (english) - Page 37
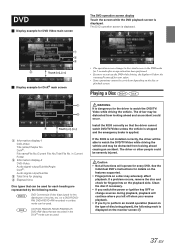
...cannot be severely injured.
See the
individual DVD's instructions for details on the features supported. • Fingerprints on the type of movies...-EN DVD Commercial Video discs (used . Install the X009 correctly so that the driver cannot watch the DVD/TV/ Video while ...screen is applied. If a problem occurs, remove the disc and check for the driver to perform an invalid operation ...
Owner's Manual (english) - Page 56

... country number, refer to "List of Language Codes" (page 97). 3 Touch [OK] to memorize the number.
• The setting content changes to memorize the code. Refer to input a 4-digit password. Make a note of the current settings before making changes.
Make a note of the current settings before performing Disc setup.
The numeric keypad screen is currently restricted, change...
Owner's Manual (english) - Page 61
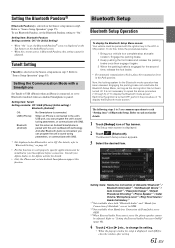
... then engage it again.
3 When the parking brake is paired. The Bluetooth Setup screen appears.
3 Select the desired item.
TuneIt Setting
[TuneIt] is displayed.
2 Touch
(Bluetooth).
Consult your vehicle to work properly, specific applications must be installed on your Smartphone before connection.
Setting the Communication Mode with the ignition key in step3. Now, the locking...
Owner's Manual (english) - Page 65
... be adjusted simultaneously.
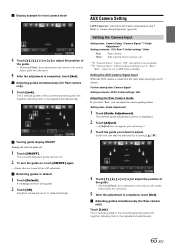
65-EN Setting item: Guide Adjustment
1 Touch [Guide Adjustment].
A message window will return to default settings.
Turning guide display ON/OFF Turning the selected guide off are turned off .
1 Touch [ON/OFF]. The currently selected guide will turn off.
2 To turn the guide on the Camera setup menu in AUX Camera Setting.
Guide line can adjust the...
Owner's Manual (english) - Page 74
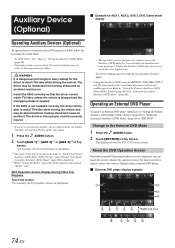
... (AUX 1 Setup)" (page 60) and "Setting the Secondary Auxiliary (AUX) Name" (page 60) is not installed correctly, the driver will show the warning-Picture off for your safety.
1 Press the AUDIO button. 2 Touch [AUX 1]*1, [AUX 2]*1 or [AUX 3]*2 of Top
banner.
The driver may be distracted from looking ahead and cause an accident. If the X009 is...
Owner's Manual (english) - Page 77
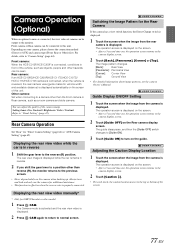
..., the caution location moves to a position other model.
1 Press CAM.
Guide Display ON/OFF Setting
1 Touch the screen when the image from the...Setup" (page 64). Displaying the rear view video manually*
* Only for "Direct Camera Setting" (page 64) or "AUX Camera Setting" (page 65). For details, refer to the
camera display screen.
2 Touch [Guide OFF] on the Rear camera display
screen.
Setting...
Owner's Manual (english) - Page 80
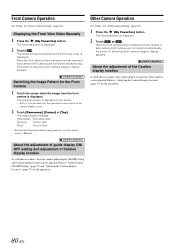
...
• For detailed information about image patterns, see the camera Owner's Manual.
When the front camera (direct camera) and rear camera or
side camera (AUX camera) are connected simultaneously,
the screen for selecting which camera image to "Guide Display ON/OFF Setting" (page 77) and "Adjusting the Caution Display Location" (page 77) for...
Owner's Manual (english) - Page 81

...will rapidly browse through the channels.
• Refer to the SiriusXM Tuner User Guide for SiriusXM main screen
3 Touch [ < ] or [ > ] to other...A SiriusXM Tuner and Subscription are listed. To activate SiriusXM Canada service, go www.xmradio.ca and click on "ACTIVATE RADIO" in ...on how to install the SiriusXM Tuner.
• Before using the SiriusXM, make sure "SiriusXM" is set to select the...
Owner's Manual (english) - Page 89
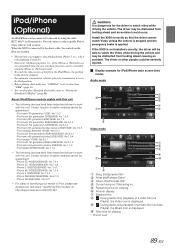
... Playlist, the Music icon is not installed correctly, the driver will be guaranteed. Total time for...set to other people could occur. Display example for playing * Podcast mode
89-EN Remaining time for the driver to watch video while driving the vehicle. Correct function of iPod, please see Apple's own document "Identifying iPod models" at http://support.apple.com/kb/HT1353. If the X009...
Owner's Manual (english) - Page 109
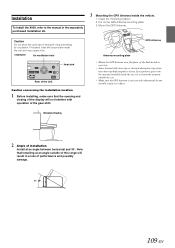
Installation
To install the X009, refer to mount the antenna outside of this range will result in the separately purchased installation kit.
3 Mounting the GPS Antenna inside the vehicle.
1... manual in a loss of the dash board or rear tray.
• Some thermal reflection type or thermal absorption type glass may cause a fire.
If reception is poor with operation of installation
Install...
Installation Manual - Page 1

... 1/13
1R5A0M0
DODGE
Model RAM 1500 RAM 2500 RAM 3500
Year 2013 -
To Ensure Safe Use, Always Follow These Precautions
˜ The installation of this installation manual and the separate user's manual so that are listed below.
RAM
X009-RAM 9" Installation Manual ˜ Model: Full Size Truck ˜ Model Year: 2013-UP ˜ Trim Level: All models without notice for problems that...
Installation Manual - Page 5

Installation Kit Parts (G-KTX-009-RAM) X009-RAM Radio Dash Bezel
FULL SIZE TRUCK
RAM ˜ 5/13
Key Harness
Headunit Mounting Plate
Screws x 8
Side Mounting Brackets
Installation Manual - Page 7

... 150W
6 Remove 4x Phillips screws from the radio and
remove it.
4
X009-RAM Radio/ Dash Bezel
Factory HVAC Control Unit (Not included) FULL SIZE TRUCK
RAM ˜ 7/13
Factory Radio Removal Process
1 Remove the rubber screw cover ...screw from the right side
pocket. (Not required on to the new X009-RAM
Radio/Dash Bezel.
4 Extract 4x 9/32" - 7mm screws from the HVAC control
and mount the HVAC ...
Installation Manual - Page 9

... using flathead Phillips screws supplied.
5 Trim the dashed area on the factory HVAC control
unit and mount it on to the X009-RAM Radio/Dash
bezel. FULL SIZE TRUCK
RAM ˜ 9/13
Installation Instructions
1 Using a cutting tool cut the bottom section of the
metal bracket (as shown in the shaded area).
4 Trim the shaded area...
Alpine X009-RAM Reviews
We have not received any reviews for Alpine yet.