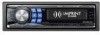

Owners Manual
Page 3
... Radio 8 Presetting Stations Manually 8 Presetting Stations Automatically 8 Tuning to Preset Stations 8 Frequency Search Function 9 Receiving a Multicast Station (HD Radio mode only 9 CD/MP3/WMA/AAC Playback 9 Repeat Play 10 M.I.X. (Random Play 10 Searching from CD Text 11 File/Folder Name Search (concerning MP3/WMA/AAC 11 Quick Search 11 About MP3/WMA/AAC 11 Sound Setting Adjusting Bass/Treble/Balance (Between Left and Right)/Fader (Between Front and Rear)/ Defeat 13 Turning MultEQ on/off 13 Equalizer Presets 13 Setting...
... Radio 8 Presetting Stations Manually 8 Presetting Stations Automatically 8 Tuning to Preset Stations 8 Frequency Search Function 9 Receiving a Multicast Station (HD Radio mode only 9 CD/MP3/WMA/AAC Playback 9 Repeat Play 10 M.I.X. (Random Play 10 Searching from CD Text 11 File/Folder Name Search (concerning MP3/WMA/AAC 11 Quick Search 11 About MP3/WMA/AAC 11 Sound Setting Adjusting Bass/Treble/Balance (Between Left and Right)/Fader (Between Front and Rear)/ Defeat 13 Turning MultEQ on/off 13 Equalizer Presets 13 Setting...
Owners Manual
Page 4
... Range Speaker (TW Setup 24 Display Setting Changing Lighting Color (Illumination 24 Dimmer Control 24 Scroll Type Setting 24 Scroll Setting (Text Scroll 24 Switching the Character Font (Font Select) ..... 25 Switching the Animation Display Type (BGV Select 25 Setting of Calendar Display Pattern Switching (Calendar 25 Opening Message ON/OFF Setting 25 Tuner Setting (Only when HD Radio is connected) HD Radio Station Call Setting 25 Digital Seek ON/OFF Setting 25 SAT Radio Receiver (Optional) Receiving Channels with the SAT Radio Receiver...
... Range Speaker (TW Setup 24 Display Setting Changing Lighting Color (Illumination 24 Dimmer Control 24 Scroll Type Setting 24 Scroll Setting (Text Scroll 24 Switching the Character Font (Font Select) ..... 25 Switching the Animation Display Type (BGV Select 25 Setting of Calendar Display Pattern Switching (Calendar 25 Opening Message ON/OFF Setting 25 Tuner Setting (Only when HD Radio is connected) HD Radio Station Call Setting 25 Digital Seek ON/OFF Setting 25 SAT Radio Receiver (Optional) Receiving Channels with the SAT Radio Receiver...
Owners Manual
Page 6
... of standard specifications and may create operational problems. We recommend not using these accessories on the disc. For routine cleaning, wipe the playing surface with a clean, soft cloth from jamming, "Error" is heavily soiled, dampen a clean, soft cloth in a location subjected to load more than one disc at a time for playback. Transparent Sheet Disc Stabilizer Installation Location Make sure this could cause the CD player to...
... of standard specifications and may create operational problems. We recommend not using these accessories on the disc. For routine cleaning, wipe the playing surface with a clean, soft cloth from jamming, "Error" is heavily soiled, dampen a clean, soft cloth in a location subjected to load more than one disc at a time for playback. Transparent Sheet Disc Stabilizer Installation Location Make sure this could cause the CD player to...
Owners Manual
Page 9
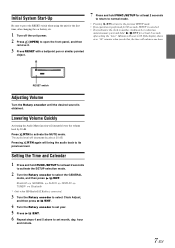
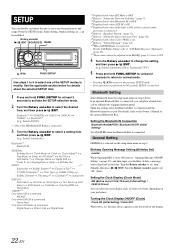
... again will bring the audio back to activate the MUTE mode. Press /RTN to its previous level. Setting the Time and Calendar 1 Press and hold / /ENT for at least 2 seconds after setting the "hour". Lowering Volume Quickly Activating the Audio Mute function will reset to set month, day, hour and minute. 7-EN Bluetooth GENERAL AUDIO DISPLAY TUNER* Bluetooth * Only when HD Radio/SAT Radio is connected. 3 Turn the Rotary encoder to select Clock Adjust, and then press...
... again will bring the audio back to activate the MUTE mode. Press /RTN to its previous level. Setting the Time and Calendar 1 Press and hold / /ENT for at least 2 seconds after setting the "hour". Lowering Volume Quickly Activating the Audio Mute function will reset to set month, day, hour and minute. 7-EN Bluetooth GENERAL AUDIO DISPLAY TUNER* Bluetooth * Only when HD Radio/SAT Radio is connected. 3 Turn the Rotary encoder to select Clock Adjust, and then press...
Owners Manual
Page 10
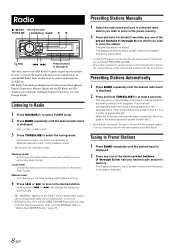
... station. Listening to Radio 1 Press SOURCE/ to tune in the preset memory (6 stations for at least 2 seconds. DX (Distance mode) LOCAL (Local mode) MANUAL (Manual mode) DX (Distance mode) • The initial mode is stored. Manual mode: The frequency is manually tuned in the selected band. Radio / /ENT Rotary encoder TUNE/A.ME SOURCE/ BAND /ESC Preset buttons (1 through the Ai-NET bus. The tuner will be connected through 6) This unit cannot receive HD Radio™ signals (digital terrestrial radio). Local mode: Only strong stations...
... station. Listening to Radio 1 Press SOURCE/ to tune in the preset memory (6 stations for at least 2 seconds. DX (Distance mode) LOCAL (Local mode) MANUAL (Manual mode) DX (Distance mode) • The initial mode is stored. Manual mode: The frequency is manually tuned in the selected band. Radio / /ENT Rotary encoder TUNE/A.ME SOURCE/ BAND /ESC Preset buttons (1 through the Ai-NET bus. The tuner will be connected through 6) This unit cannot receive HD Radio™ signals (digital terrestrial radio). Local mode: Only strong stations...

Owners Manual
Page 11
... open. 2 Insert a disc with the label side facing up . A maximum of the next track (file): Press . When multicast station is received, the program number and the SPS indicator lights up . When a disc is already inserted, press SOURCE/ to switch to select the desired folder. TUNER XM/SIRIUS*1 DISC iPod*2 CHANGER*3 TUNER *1 Only when XM Radio or Sirius Radio is connected. *2 Only when the iPod is connected. *3 Only when the CD changer is connected. 3 While playing back MP3...
... open. 2 Insert a disc with the label side facing up . A maximum of the next track (file): Press . When multicast station is received, the program number and the SPS indicator lights up . When a disc is already inserted, press SOURCE/ to switch to select the desired folder. TUNER XM/SIRIUS*1 DISC iPod*2 CHANGER*3 TUNER *1 Only when XM Radio or Sirius Radio is connected. *2 Only when the iPod is connected. *3 Only when the CD changer is connected. 3 While playing back MP3...
Owners Manual
Page 15
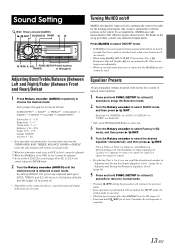
.... Bluetooth GENERAL TUNER* Bluetooth AUDIO DISPLAY * Only when HD Radio/SAT Radio is connected. 3 Turn the Rotary encoder to select Factory's EQ mode, and then press / /ENT. 4 Turn the Rotary encoder to 2.2ch, you cannot adjust the FADER mode. 2 Turn the Rotary encoder (AUDIO) until the desired sound is set to OFF, its level cannot be adjusted. *3 If you can recall the stored preset number in the SETUP mode, the setting mode is canceled. • This function is...
.... Bluetooth GENERAL TUNER* Bluetooth AUDIO DISPLAY * Only when HD Radio/SAT Radio is connected. 3 Turn the Rotary encoder to select Factory's EQ mode, and then press / /ENT. 4 Turn the Rotary encoder to 2.2ch, you cannot adjust the FADER mode. 2 Turn the Rotary encoder (AUDIO) until the desired sound is set to OFF, its level cannot be adjusted. *3 If you can recall the stored preset number in the SETUP mode, the setting mode is canceled. • This function is...
Owners Manual
Page 16
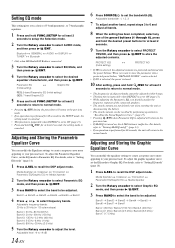
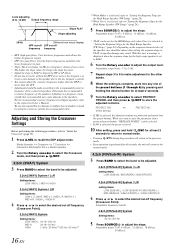
... 7-band graphic equalizer. 1 Press and hold FUNC./SETUP for at least 2 seconds to setup the Selection mode. 2 Turn the Rotary encoder to select AUDIO mode, and then press / /ENT. Setting EQ mode This setting gives you should consider the frequency response of the connected speakers. • The stored contents are protected and stored into a protected preset button, "REPLACE NO/YES" can be selected. • If NO is selected, the preset is stored. 10...
... 7-band graphic equalizer. 1 Press and hold FUNC./SETUP for at least 2 seconds to setup the Selection mode. 2 Turn the Rotary encoder to select AUDIO mode, and then press / /ENT. Setting EQ mode This setting gives you should consider the frequency response of the connected speakers. • The stored contents are protected and stored into a protected preset button, "REPLACE NO/YES" can be selected. • If NO is selected, the preset is stored. 10...
Owners Manual
Page 17
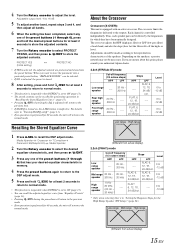
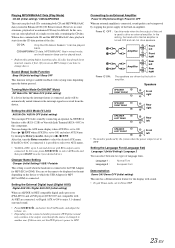
... selecting User's in memory. 4 Press the preset buttons again to return to the DSP adjust mode. 5 Press and hold the desired preset buttons for the High Range Speaker (TW Setup)" (page 24). Adjustable output level: -6 to store the adjusted contents. Each channel is equipped with an active crossover. 4 Turn the Rotary encoder to the outputs. About the Crossover Crossover (X-OVER): This unit is controlled independently. The crossover limits the frequencies delivered to adjust...
... selecting User's in memory. 4 Press the preset buttons again to return to the DSP adjust mode. 5 Press and hold the desired preset buttons for the High Range Speaker (TW Setup)" (page 24). Adjustable output level: -6 to store the adjusted contents. Each channel is equipped with an active crossover. 4 Turn the Rotary encoder to the outputs. About the Crossover Crossover (X-OVER): This unit is controlled independently. The crossover limits the frequencies delivered to adjust...
Owners Manual
Page 18
... Speaker (TW Setup)" (page 24). *2 When User's is selected in dB) for a frequency change of one of the connected speakers. Adjustable output level: -12 to 0 dB. 7 Repeat steps 3 to 6 to make adjustment to the other bands. 8 When the setting is set to FLAT. 6 Turn the Rotary encoder to adjust the output level. Adjusting to a frequency range outside the recommended value. For the recommended crossover frequencies of the speakers. Determine the recommended crossover frequency of Alpine speakers...
... Speaker (TW Setup)" (page 24). *2 When User's is selected in dB) for a frequency change of one of the connected speakers. Adjustable output level: -12 to 0 dB. 7 Repeat steps 3 to 6 to make adjustment to the other bands. 8 When the setting is set to FLAT. 6 Turn the Rotary encoder to adjust the output level. Adjusting to a frequency range outside the recommended value. For the recommended crossover frequencies of the speakers. Determine the recommended crossover frequency of Alpine speakers...

Owners Manual
Page 21
.... (DVD MUSIC): A DVD or Video CD contains a large quantity of this data to reproduce the sound accurately. For details, refer to "Turning MultEQ on , the A.SEL button is performed in cars with both MP3/WMA/AAC and CD-DA, when the source changes from "MP3/WMA/AAC to CD-DA" or "CD-DA to MP3/WMA/AAC", MX-mode switching may not match the head unit, the audio processor needs...
.... (DVD MUSIC): A DVD or Video CD contains a large quantity of this data to reproduce the sound accurately. For details, refer to "Turning MultEQ on , the A.SEL button is performed in cars with both MP3/WMA/AAC and CD-DA, when the source changes from "MP3/WMA/AAC to CD-DA" or "CD-DA to MP3/WMA/AAC", MX-mode switching may not match the head unit, the audio processor needs...
Owners Manual
Page 24
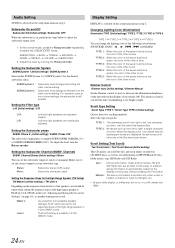
... the Owner's Manual of the SETUP modes to change the setting, and then press / /ENT. (e.g. Select AUDIO) AUDIO DISPLAY * Only when HD Radio/SAT Radio is set "mm" (Month), then press / /ENT. Select Subwoofer) Bluetooth*1 Bluetooth IN GENERAL: Birthday Set Clock Mode Clock Clock Adjust*2 Play Mode Beep INT Mute*3 AUX IN AUX Name*4 Changer Name Digital AUX Power IC Language Set Demo Birthday Set AUDIO: *11 Subwoofer SUBW. Turning the Clock Display ON/OFF (Clock) Clock ON (Initial Setting) / Clock OFF When ON is connected. 3 Turn the Rotary encoder to set , the time always appears...
... the Owner's Manual of the SETUP modes to change the setting, and then press / /ENT. (e.g. Select AUDIO) AUDIO DISPLAY * Only when HD Radio/SAT Radio is set "mm" (Month), then press / /ENT. Select Subwoofer) Bluetooth*1 Bluetooth IN GENERAL: Birthday Set Clock Mode Clock Clock Adjust*2 Play Mode Beep INT Mute*3 AUX IN AUX Name*4 Changer Name Digital AUX Power IC Language Set Demo Birthday Set AUDIO: *11 Subwoofer SUBW. Turning the Clock Display ON/OFF (Clock) Clock ON (Initial Setting) / Clock OFF When ON is connected. 3 Turn the Rotary encoder to set , the time always appears...
Owners Manual
Page 25
... enjoy 5.1-channel surround sound. • Press SOURCE/ , and select the D.AUX mode, and adjust the volume, etc. • Depending on the connected audio processor, DVD player sound may be displayed on the unit depending on the device to OFF. Changer Name Setting Changer (Initial Setting) / USB / Portable This setting is changed to ON. When a disc contains both CD and MP3/WMA/AAC data (created in mixed mode, and multi-session discs can be connected. You can select between two...
... enjoy 5.1-channel surround sound. • Press SOURCE/ , and select the D.AUX mode, and adjust the volume, etc. • Depending on the connected audio processor, DVD player sound may be displayed on the unit depending on the device to OFF. Changer Name Setting Changer (Initial Setting) / USB / Portable This setting is changed to ON. When a disc contains both CD and MP3/WMA/AAC data (created in mixed mode, and multi-session discs can be connected. You can select between two...
Owners Manual
Page 26
... color of the seven buttons is blue, the color of the other is red. SUBWOOFER BASS TREBLE BALANCE FADER DEFEAT VOLUME SUBWOOFER 2 Adjust the level by turning the Rotary encoder. For example, even at a time. Maker's: User's: As protection from the main volume setting. When the color of the seven buttons is green, the color of the other is red. Scroll Setting (Text Scroll) Text Scroll Auto / Text Scroll Manual (Initial setting) This CD player can set the subwoofer output...
... color of the seven buttons is blue, the color of the other is red. SUBWOOFER BASS TREBLE BALANCE FADER DEFEAT VOLUME SUBWOOFER 2 Adjust the level by turning the Rotary encoder. For example, even at a time. Maker's: User's: As protection from the main volume setting. When the color of the seven buttons is green, the color of the other is red. Scroll Setting (Text Scroll) Text Scroll Auto / Text Scroll Manual (Initial setting) This CD player can set the subwoofer output...
Owners Manual
Page 28
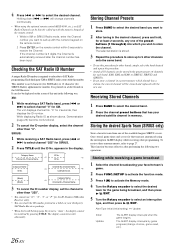
... ID number display, set to receive the Channel. The display contents switch alternately. Storing Channel Presets 1 Press BAND to select the desired band you want to store. 2 After tuning in XM or SIRIUS Radio mode, enter the Channel number you want to call up with the numeric keypad on the remote control. 2 Press ENTER on the remote control within 5 seconds to "Auto", the display cannot be switched by game progress (change channels • When using the...
... ID number display, set to receive the Channel. The display contents switch alternately. Storing Channel Presets 1 Press BAND to select the desired band you want to store. 2 After tuning in XM or SIRIUS Radio mode, enter the Channel number you want to call up with the numeric keypad on the remote control. 2 Press ENTER on the remote control within 5 seconds to "Auto", the display cannot be switched by game progress (change channels • When using the...

Owners Manual
Page 35
... Press this button to select the audio source. iPod mode: Switches Playlist/Artist/Album. Time Correction (T.CORR) mode/Crossover (X-OVER) mode: Select from MEMORY 1 through 6. 33-EN Remote Control Controls on /off. Volume Adjustment Buttons To increase the volume level: Press the button To decrease the volume level: Press the button Button Radio mode: Pressing this button to the beginning of the external audio processor you purchased. CD Changer mode: DISC Select (UP) button Press this button will select, in descending order, stations programmed into the radio's presets as shown...
... Press this button to select the audio source. iPod mode: Switches Playlist/Artist/Album. Time Correction (T.CORR) mode/Crossover (X-OVER) mode: Select from MEMORY 1 through 6. 33-EN Remote Control Controls on /off. Volume Adjustment Buttons To increase the volume level: Press the button To decrease the volume level: Press the button Button Radio mode: Pressing this button to the beginning of the external audio processor you purchased. CD Changer mode: DISC Select (UP) button Press this button will select, in descending order, stations programmed into the radio's presets as shown...
Owners Manual
Page 37
.... - Audio The sound is not output from the speakers. • Unit has no sound is switched to tune stations in the seek mode. • You are in is grounded properly at its mounting location. • The antenna may not be replaced. Reset this device. If connected following instructions, the unit will help you are in the CD Module. - replace the antenna or cable if necessary. Check your nearest Alpine dealer. Extend the antenna fully; CD playback sound is...
.... - Audio The sound is not output from the speakers. • Unit has no sound is switched to tune stations in the seek mode. • You are in is grounded properly at its mounting location. • The antenna may not be replaced. Reset this device. If connected following instructions, the unit will help you are in the CD Module. - replace the antenna or cable if necessary. Check your nearest Alpine dealer. Extend the antenna fully; CD playback sound is...
Owners Manual
Page 40
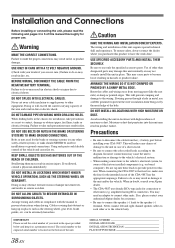
... or electrical wiring. Route the cables and wiring away from the (-) battery post before installing your unit in serious accident. Never connect left and right channel speaker cables to each other units. Installation and Connections Before installing or connecting the unit, please read the following and pages 3 to 5 of this manual thoroughly for proper use only the specified accessory parts. Warning MAKE THE CORRECT CONNECTIONS. Failure to make sure the fuse for the...
... or electrical wiring. Route the cables and wiring away from the (-) battery post before installing your unit in serious accident. Never connect left and right channel speaker cables to each other units. Installation and Connections Before installing or connecting the unit, please read the following and pages 3 to 5 of this manual thoroughly for proper use only the specified accessory parts. Warning MAKE THE CORRECT CONNECTIONS. Failure to make sure the fuse for the...
Owners Manual
Page 43
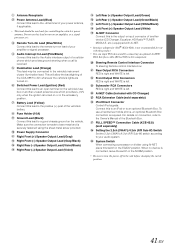
.... Remote Turn-On Lead (Blue/White) Connect this lead to the Owner's Manual of your audio system. Switched Power Lead (Ignition) (Red) Connect this lead to the remote turn on lead of the Bluetooth Box. Front Output RCA Connectors RED is right and WHITE is not recommended for controlling the vehicle's power antenna. To use with this product. • You can input TV/video sound by connecting an optional Ai-NET/ RCA Interface cable...
.... Remote Turn-On Lead (Blue/White) Connect this lead to the Owner's Manual of your audio system. Switched Power Lead (Ignition) (Red) Connect this lead to the remote turn on lead of the Bluetooth Box. Front Output RCA Connectors RED is right and WHITE is not recommended for controlling the vehicle's power antenna. To use with this product. • You can input TV/video sound by connecting an optional Ai-NET/ RCA Interface cable...
Owners Manual
Page 45
... by over-driving the speaker (amplifier level is turned up and driven into distortion or clipping). F Any product which service is recommended to an Authorized Alpine Service Center or Alpine, Alpine will , at its option, repair or replace the product with a new or reconditioned product without Alpine's consent. If the repairs are covered by the warranty, and if the product was shipped to use a carrier...
... by over-driving the speaker (amplifier level is turned up and driven into distortion or clipping). F Any product which service is recommended to an Authorized Alpine Service Center or Alpine, Alpine will , at its option, repair or replace the product with a new or reconditioned product without Alpine's consent. If the repairs are covered by the warranty, and if the product was shipped to use a carrier...


