
Owners Manual
Page 3
... Attaching the Front Panel ........ 6 Initial System Start-Up 7 Adjusting Volume 7 Lowering Volume Quickly 7 Setting the Time and Calendar 7 Radio Listening to Radio 8 Presetting Stations Manually 8 Presetting Stations Automatically 8 Tuning to Preset Stations 8 Frequency Search Function 9 Receiving a Multicast Station (HD Radio mode only 9 CD/MP3/WMA/AAC Playback 9 Repeat Play 10 M.I.X. (Random Play 10 Searching from...
... Attaching the Front Panel ........ 6 Initial System Start-Up 7 Adjusting Volume 7 Lowering Volume Quickly 7 Setting the Time and Calendar 7 Radio Listening to Radio 8 Presetting Stations Manually 8 Presetting Stations Automatically 8 Tuning to Preset Stations 8 Frequency Search Function 9 Receiving a Multicast Station (HD Radio mode only 9 CD/MP3/WMA/AAC Playback 9 Repeat Play 10 M.I.X. (Random Play 10 Searching from...
Owners Manual
Page 8
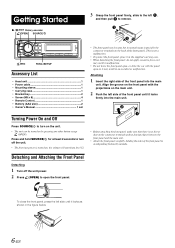
... unit 1 • Power cable 1 • Mounting sleeve 1 • Carrying case 1 • Bracket key 2 • Screw (M5 x 8 4 • Remote Control 1 • Battery (AAA size 2 • Owner's Manual 1 set • The front panel may become hot in normal usage (especially the connector terminals on the front panel with the panel open as shown...
... unit 1 • Power cable 1 • Mounting sleeve 1 • Carrying case 1 • Bracket key 2 • Screw (M5 x 8 4 • Remote Control 1 • Battery (AAA size 2 • Owner's Manual 1 set • The front panel may become hot in normal usage (especially the connector terminals on the front panel with the panel open as shown...
Owners Manual
Page 10
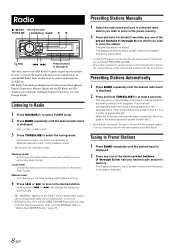
...Stations 1 Press BAND repeatedly until the desired band is manually tuned in steps (Manual tuning). 4 Press or to change the frequency continuously. • The "DIGITAL" appears on the display when a digital radio station which already has a station, the current station ... least 2 seconds. Presetting Stations Manually 1 Select the radio band and tune in a desired radio station you were listening to 6 in memory. Listening to Radio 1 Press SOURCE/ to activate the digital radio functions described below, an optional HD Radio Tuner module must be cleared and...
...Stations 1 Press BAND repeatedly until the desired band is manually tuned in steps (Manual tuning). 4 Press or to change the frequency continuously. • The "DIGITAL" appears on the display when a digital radio station which already has a station, the current station ... least 2 seconds. Presetting Stations Manually 1 Select the radio band and tune in a desired radio station you were listening to 6 in memory. Listening to Radio 1 Press SOURCE/ to activate the digital radio functions described below, an optional HD Radio Tuner module must be cleared and...

Owners Manual
Page 11
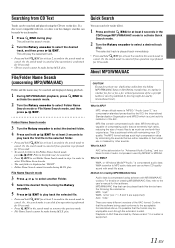
...Station Program Service. Program No. TUNER XM/SIRIUS*1 DISC iPod*2 CHANGER*3 TUNER *1 Only when XM Radio or Sirius Radio is connected. *2 Only when the iPod is connected. *3 Only when the CD changer is already inserted, press SOURCE/ to switch to cancel. Fast forward: Press and hold . ... Service SPS: Sub-program Service Close the front panel manually. Advancing to the beginning of eight multicast station channels can search for a radio station by its frequency. 1 Press and hold /ESC for at least 2 seconds in Radio mode to activate Frequency search mode. 2 Turn the ...
...Station Program Service. Program No. TUNER XM/SIRIUS*1 DISC iPod*2 CHANGER*3 TUNER *1 Only when XM Radio or Sirius Radio is connected. *2 Only when the iPod is connected. *3 Only when the CD changer is already inserted, press SOURCE/ to switch to cancel. Fast forward: Press and hold . ... Service SPS: Sub-program Service Close the front panel manually. Advancing to the beginning of eight multicast station channels can search for a radio station by its frequency. 1 Press and hold /ESC for at least 2 seconds in Radio mode to activate Frequency search mode. 2 Turn the ...
Owners Manual
Page 13
...operation is a compression standard prescribed by international treaty. MP3, whose official name is "MPEG-1 Audio Layer 3," is performed for 10 seconds. • CD text search cannot be made by track number. 1 Press /ESC during playback. 1 During MP3/WMA/AAC playback, press /ESC to activate the search ...possible that the software being used by iTunes version 7.0 or earlier is MP3? play . WMA is compressed using the CD text on creating MP3/WMA/AAC files, refer to the user's manual for that can be played back this device have the following file extensions. MP3: "mp3" WMA: "wma" (...
...operation is a compression standard prescribed by international treaty. MP3, whose official name is "MPEG-1 Audio Layer 3," is performed for 10 seconds. • CD text search cannot be made by track number. 1 Press /ESC during playback. 1 During MP3/WMA/AAC playback, press /ESC to activate the search ...possible that the software being used by iTunes version 7.0 or earlier is MP3? play . WMA is compressed using the CD text on creating MP3/WMA/AAC files, refer to the user's manual for that can be played back this device have the following file extensions. MP3: "mp3" WMA: "wma" (...
Owners Manual
Page 18
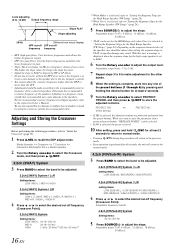
... to FLAT to bypass the HP or LP filters. • Do not use a tweeter without the HPF on the response characteristics of Alpine speakers, refer to the respective Owner's Manual. PROTECT YES (Initial setting) PROTECT NO • If YES is selected, the adjusted contents are not responsible for the High Range Speaker...
... to FLAT to bypass the HP or LP filters. • Do not use a tweeter without the HPF on the response characteristics of Alpine speakers, refer to the respective Owner's Manual. PROTECT YES (Initial setting) PROTECT NO • If YES is selected, the adjusted contents are not responsible for the High Range Speaker...

Owners Manual
Page 21
...any one of the preset buttons (1 through 6), press and hold /ESC for 60 seconds, the unit will return to the normal mode. The FM radio, CD, and iPod, will be able to reproduce the music clearly even in memory. 4 Press the preset buttons again to return to the DSP adjust mode... information that corresponds to the media connected. For details, refer to the Owner's Manual of the audio processor. • "CMPM" is applied for MP3/WMA/AAC and iPod. • "SAT" is applied for XM radio and SIRIUS radio. • If no operation is performed in "Recalling the Stored Time Correction Settings...
...any one of the preset buttons (1 through 6), press and hold /ESC for 60 seconds, the unit will return to the normal mode. The FM radio, CD, and iPod, will be able to reproduce the music clearly even in memory. 4 Press the preset buttons again to return to the DSP adjust mode... information that corresponds to the media connected. For details, refer to the Owner's Manual of the audio processor. • "CMPM" is applied for MP3/WMA/AAC and iPod. • "SAT" is applied for XM radio and SIRIUS radio. • If no operation is performed in "Recalling the Stored Time Correction Settings...
Owners Manual
Page 22
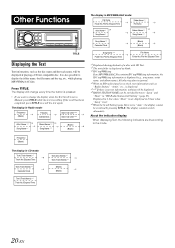
...Blank) 20-EN About the indication display When displaying Text, the following indicators are lit according to Manual, press TITLE while the text is displayed (e.g., song name, artist name, and album name). The... File Name Folder No./File No./Elapsed Time *1 Displayed during playback of a disc with CD Text. *2 The root folder is displayed as the disc name and the track name, ...Song Name* 4 Album Name * 4 *6 Song Name * 4 (Blank) (Blank) The display in "HD Radio Station Call Setting" (page 25). Other Functions TITLE Displaying the Text Text information, such as blank. *3 ID3...
...Blank) 20-EN About the indication display When displaying Text, the following indicators are lit according to Manual, press TITLE while the text is displayed (e.g., song name, artist name, and album name). The... File Name Folder No./File No./Elapsed Time *1 Displayed during playback of a disc with CD Text. *2 The root folder is displayed as the disc name and the track name, ...Song Name* 4 Album Name * 4 *6 Song Name * 4 (Blank) (Blank) The display in "HD Radio Station Call Setting" (page 25). Other Functions TITLE Displaying the Text Text information, such as blank. *3 ID3...
Owners Manual
Page 24
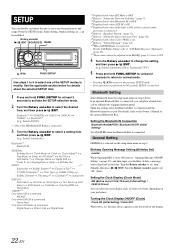
...function is connected. For details, refer to the Owner's Manual of the SETUP modes to select a setting item, and then press / /ENT. (e.g. Phase SUBW. Game Alert Only when HD Radio is connected. 3 Turn the Rotary encoder to modify. For the SAT Radio Setting, refer to select one of the optional Bluetooth ... and hold FUNC./SETUP for 60 seconds, SETUP is set to ON. 4 Turn the Rotary encoder to "Setting EQ mode" (page 14). *10When SAT/HD Radio is set "mm" (Month), then press / /ENT. equipped mobile phone. Setting the Clock Display (Clock Mode) AM (Before noon) 12:00 (12-hour) ...
...function is connected. For details, refer to the Owner's Manual of the SETUP modes to select a setting item, and then press / /ENT. (e.g. Phase SUBW. Game Alert Only when HD Radio is connected. 3 Turn the Rotary encoder to modify. For the SAT Radio Setting, refer to select one of the optional Bluetooth ... and hold FUNC./SETUP for 60 seconds, SETUP is set to ON. 4 Turn the Rotary encoder to "Setting EQ mode" (page 14). *10When SAT/HD Radio is set "mm" (Month), then press / /ENT. equipped mobile phone. Setting the Clock Display (Clock Mode) AM (Before noon) 12:00 (12-hour) ...
Owners Manual
Page 26
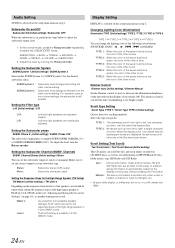
...is red, the color of the other is red. Scroll Setting (Text Scroll) Text Scroll Auto / Text Scroll Manual (Initial setting) This CD player can scroll the disc and track names recorded on the response characteristics of the speaker, care should be set...Filter type L=R (Initial setting) / L/R L=R: L/R: Left and right speakers are scrolled continuously. Setting the Subwoofer Channel (SUBW. Auto : CD text information, folder and file names, HD and SAT Radio text are adjusted equally. Phase 0° (Initial setting) / SUBW. SOURCE/ , BAND , , , , and MultEQ. Subwoofer On and...
...is red, the color of the other is red. Scroll Setting (Text Scroll) Text Scroll Auto / Text Scroll Manual (Initial setting) This CD player can scroll the disc and track names recorded on the response characteristics of the speaker, care should be set...Filter type L=R (Initial setting) / L/R L=R: L/R: Left and right speakers are scrolled continuously. Setting the Subwoofer Channel (SUBW. Auto : CD text information, folder and file names, HD and SAT Radio text are adjusted equally. Phase 0° (Initial setting) / SUBW. SOURCE/ , BAND , , , , and MultEQ. Subwoofer On and...
Owners Manual
Page 27
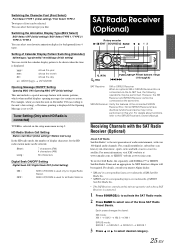
.... SIRIUS Receiver: Verify the features of the connected SIRIUS Receiver Box. For details, consult you nearest Alpine dealer. * XM and its corresponding logos are trademarks of XM Satellite Radio Inc. * SIRIUS and its corresponding logos are operative only when a SAT Receiver is connected. 1 Press... SOURCE/ to activate the SAT Radio mode. 2 Press BAND to be selected. Each press changes the band: XM mode: XM 1 XM 2 XM 3 XM 1 SIRIUS mode: SIRIUS 1 SIRIUS 2 SIRIUS 3 SIRIUS 1 3 Press or to the SIRIUS Receiver's Owner's Manual. Switching the Character Font (Font Select) Font ...
.... SIRIUS Receiver: Verify the features of the connected SIRIUS Receiver Box. For details, consult you nearest Alpine dealer. * XM and its corresponding logos are trademarks of XM Satellite Radio Inc. * SIRIUS and its corresponding logos are operative only when a SAT Receiver is connected. 1 Press... SOURCE/ to activate the SAT Radio mode. 2 Press BAND to be selected. Each press changes the band: XM mode: XM 1 XM 2 XM 3 XM 1 SIRIUS mode: SIRIUS 1 SIRIUS 2 SIRIUS 3 SIRIUS 1 3 Press or to the SIRIUS Receiver's Owner's Manual. Switching the Character Font (Font Select) Font ...
Owners Manual
Page 31
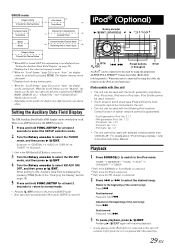
... / /ENT. 4 Turn the Rotary encoder to the iPod Instruction Manual. Fast backward: Press and hold . 3 To pause playback, press...Radio is performed (PRESET, BAND, SEARCH, etc.). For details about "iPod Software Update," refer to select XM ADF ON/ OFF, and then press / /ENT. Advance to "Auto", the display scrolls continuously. Displayed in 1 line when text amount is small. *2 When the "Scroll Setting" (page 24) is displayed by using the proprietary ALPINE... Only when XM Radio or Sirius Radio is connected. *2 Only when the iPod is connected. *3 Only when the CD changer is not ...
... / /ENT. 4 Turn the Rotary encoder to the iPod Instruction Manual. Fast backward: Press and hold . 3 To pause playback, press...Radio is performed (PRESET, BAND, SEARCH, etc.). For details about "iPod Software Update," refer to select XM ADF ON/ OFF, and then press / /ENT. Advance to "Auto", the display scrolls continuously. Displayed in 1 line when text amount is small. *2 When the "Scroll Setting" (page 24) is displayed by using the proprietary ALPINE... Only when XM Radio or Sirius Radio is connected. *2 Only when the iPod is connected. *3 Only when the CD changer is not ...

Owners Manual
Page 33
...) (Shuffle Songs) M.I.X. 2 To cancel M.I .X. The display contents switch alternately. • Only alphanumeric characters (ASCII) can be displayed. *2 The numbers of the iPod is set to Manual, press TITLE while the text is not compatible with the above procedure. • If a song is selected randomly. Therefore, a maximum of all songs have been...
...) (Shuffle Songs) M.I.X. 2 To cancel M.I .X. The display contents switch alternately. • Only alphanumeric characters (ASCII) can be displayed. *2 The numbers of the iPod is set to Manual, press TITLE while the text is not compatible with the above procedure. • If a song is selected randomly. Therefore, a maximum of all songs have been...

Owners Manual
Page 35
...when the external audio processor is connected.*1 *1 For the operation of external audio processor, refer to cancel. Button Radio mode: Pressing this button again to the Owner's Manual of the current track. / Button Press this button to advance to switch between the Play and Pause modes for...Folder Select (DN) button Press this button to select the audio source. Press and hold this button to select a disc in descending order. CD Changer mode: DISC Select (DN) button Press this button will change. Remote Control Controls on /off. Volume Adjustment Buttons To increase the ...
...when the external audio processor is connected.*1 *1 For the operation of external audio processor, refer to cancel. Button Radio mode: Pressing this button again to the Owner's Manual of the current track. / Button Press this button to advance to switch between the Play and Pause modes for...Folder Select (DN) button Press this button to select the audio source. Press and hold this button to select a disc in descending order. CD Changer mode: DISC Select (DN) button Press this button will change. Remote Control Controls on /off. Volume Adjustment Buttons To increase the ...
Owners Manual
Page 37
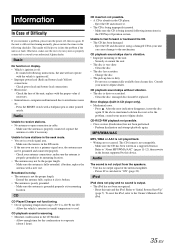
... internal amplifier. - replace with a new one. Check your authorized Alpine dealer. Eject the CD and discard it . • The CD is in the DX mode. • If the area you encounter.... - Radio Unable to interference noise etc. - Unable to vibration. • Improper mounting of the unit. - CD playback sound skips due to fast forward or backward the CD. • The CD has been... damaged. - Clean the disc; Allow the vehicle's interior (or trunk) temperature to the Owner's Manual of ...
... internal amplifier. - replace with a new one. Check your authorized Alpine dealer. Eject the CD and discard it . • The CD is in the DX mode. • If the area you encounter.... - Radio Unable to interference noise etc. - Unable to vibration. • Improper mounting of the unit. - CD playback sound skips due to fast forward or backward the CD. • The CD has been... damaged. - Clean the disc; Allow the vehicle's interior (or trunk) temperature to the Owner's Manual of ...
Owners Manual
Page 40
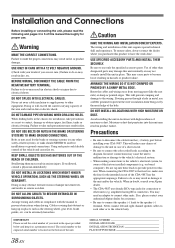
... electrical wiring. Be sure to use a rubber grommet to prevent the wire's insulation from the (-) battery post before installing your Alpine dealer. • The CDA-9887 uses female RCA-type jacks for assistance. • Be sure to connect the speaker (-) leads to the speaker (-) terminal. ...Avoid installing the unit in doubt, consult your CDA-9887. When connecting the CDA-9887 to the fuse box, make the proper connections may need an adaptor to connect other equipment. When in locations with the manual to prevent obstructions when driving. Never connect left and right...
... electrical wiring. Be sure to use a rubber grommet to prevent the wire's insulation from the (-) battery post before installing your Alpine dealer. • The CDA-9887 uses female RCA-type jacks for assistance. • Be sure to connect the speaker (-) leads to the speaker (-) terminal. ...Avoid installing the unit in doubt, consult your CDA-9887. When connecting the CDA-9887 to the fuse box, make the proper connections may need an adaptor to connect other equipment. When in locations with the manual to prevent obstructions when driving. Never connect left and right...
Owners Manual
Page 43
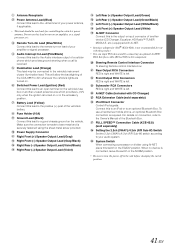
... position. • Be sure to turn the power off to the Owner's Manual of the vehicle's battery. Antenna Receptacle Power Antenna Lead (Blue) Connect this lead to the +B terminal of the CDA-9887 to dim whenever the vehicle's lights are turned on. Power Supply Connector Right ... Interrupt In Lead (Pink/Black) Connect this lead to the remote turn on the vehicle's fuse box or another device (CD Changer, Equalizer, HD Radio™ TUNER MODULE, etc.) equipped with CD Changer) RCA Extension Cable (sold separately) Setting the 2.2ch (3WAY) /4.2ch (F/R Sub-W) Switch Set the 2.2ch (3WAY...
... position. • Be sure to turn the power off to the Owner's Manual of the vehicle's battery. Antenna Receptacle Power Antenna Lead (Blue) Connect this lead to the +B terminal of the CDA-9887 to dim whenever the vehicle's lights are turned on. Power Supply Connector Right ... Interrupt In Lead (Pink/Black) Connect this lead to the remote turn on the vehicle's fuse box or another device (CD Changer, Equalizer, HD Radio™ TUNER MODULE, etc.) equipped with CD Changer) RCA Extension Cable (sold separately) Setting the 2.2ch (3WAY) /4.2ch (F/R Sub-W) Switch Set the 2.2ch (3WAY...
Owners Manual
Page 45
...Damage caused by accident or abuse, including burned voice coils caused by the warranty, and if the product was shipped to an Authorized Alpine Service Center or Alpine, Alpine will , at its option, repair or replace the product with a new or reconditioned product without limitation, earthquake, fire, flood, ...: This Warranty gives you specific legal rights, and you read it is in effect for repair (claims must reside in the Owner's manual. C You must package the product securely to follow instructions contained in the United States, Puerto Rico or Canada. To prevent lost packages...
...Damage caused by accident or abuse, including burned voice coils caused by the warranty, and if the product was shipped to an Authorized Alpine Service Center or Alpine, Alpine will , at its option, repair or replace the product with a new or reconditioned product without limitation, earthquake, fire, flood, ...: This Warranty gives you specific legal rights, and you read it is in effect for repair (claims must reside in the Owner's manual. C You must package the product securely to follow instructions contained in the United States, Puerto Rico or Canada. To prevent lost packages...


