
User Manual
Page 3
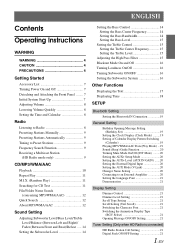
... (INT Mute) .........20 Setting the AUX+ Setup Mode 20 Setting the AUX+ Level (AUX IN GAIN) .......20 Setting the External Digital Input 20 Setting the AUX Mode (V-Link 20 Changer Name Setting 20 Connecting to an External Amplifier 20 Setting the Language Font 21 Demonstration 21 Display Setting Dimmer Control 21 Dimmer Level Setting 21 Scroll Type Setting 21 Scroll Setting (Text Scroll 21...
... (INT Mute) .........20 Setting the AUX+ Setup Mode 20 Setting the AUX+ Level (AUX IN GAIN) .......20 Setting the External Digital Input 20 Setting the AUX Mode (V-Link 20 Changer Name Setting 20 Connecting to an External Amplifier 20 Setting the Language Font 21 Demonstration 21 Display Setting Dimmer Control 21 Dimmer Level Setting 21 Scroll Type Setting 21 Scroll Setting (Text Scroll 21...

User Manual
Page 12
... only when the iPod is connected and AUX+ Setup is set to OFF, refer to "Setting the AUX+ Setup Mode" (page 20). *3 Displayed only when the AUX+ Setup is set to ON, refer to "Setting the AUX+ Setup Mode" (page 20). *4 Displayed only when Bluetooth IN is set to ADAPTER, refer to "Bluetooth Setting" (page 19). *5 Only when the CD...
... only when the iPod is connected and AUX+ Setup is set to OFF, refer to "Setting the AUX+ Setup Mode" (page 20). *3 Displayed only when the AUX+ Setup is set to ON, refer to "Setting the AUX+ Setup Mode" (page 20). *4 Displayed only when Bluetooth IN is set to ADAPTER, refer to "Bluetooth Setting" (page 19). *5 Only when the CD...
User Manual
Page 21
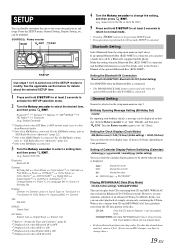
... : shows the month dd : shows the day ex. Select AUX IN) Bluetooth: Bluetooth IN General: Birthday Set Clock Mode Clock Adjust*5 Calendar Play Mode Beep INT Mute*6 AUX+ Setup AUX+ Name*7 AUX IN GAIN*7 Digital AUX D.AUX Name*8 AUX IN AUX Name*9 Changer Name Power IC Language Set Demo Birthday Set Display: Dimmer Dimmer Level Font Select BGV Select Scroll Type...
... : shows the month dd : shows the day ex. Select AUX IN) Bluetooth: Bluetooth IN General: Birthday Set Clock Mode Clock Adjust*5 Calendar Play Mode Beep INT Mute*6 AUX+ Setup AUX+ Name*7 AUX IN GAIN*7 Digital AUX D.AUX Name*8 AUX IN AUX Name*9 Changer Name Power IC Language Set Demo Birthday Set Display: Dimmer Dimmer Level Font Select BGV Select Scroll Type...
User Manual
Page 22
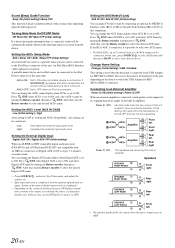
... ignition off and back on again. Low: High: Decreases the external input audio level. Increases the external input audio level. Setting the External Digital Input Digital AUX ON / Digital AUX OFF (Initial setting) When an ALPINE Ai-NET compatible digital audio processor (PXA-H701) and a DVD player (DVE-5207) not compatible with Ai-NET are...
... ignition off and back on again. Low: High: Decreases the external input audio level. Increases the external input audio level. Setting the External Digital Input Digital AUX ON / Digital AUX OFF (Initial setting) When an ALPINE Ai-NET compatible digital audio processor (PXA-H701) and a DVD player (DVE-5207) not compatible with Ai-NET are...
User Manual
Page 28
...only when the iPod is connected and AUX+ Setup is set to OFF, refer to "Setting the AUX+ Setup Mode" (page 20). *3 Displayed only when the AUX+ Setup is set to ON, refer to "Setting the AUX+ Setup Mode" (page 20). *4 Displayed only when Bluetooth IN is set to "Bluetooth Setting" (page 19). *5 Only when the..., and then press /ENT. Bluetooth*1 HD Radio*4 General Display Bluetooth XM*2/SIRIUS*3 *1 Displayed only when INT Mute is OFF and the mode is set to other than Bluetooth Audio. *2 Only when XM Radio is connected. *3 Only when SIRIUS Radio is connected. *4 Only when HD Radio is connected...
...only when the iPod is connected and AUX+ Setup is set to OFF, refer to "Setting the AUX+ Setup Mode" (page 20). *3 Displayed only when the AUX+ Setup is set to ON, refer to "Setting the AUX+ Setup Mode" (page 20). *4 Displayed only when Bluetooth IN is set to "Bluetooth Setting" (page 19). *5 Only when the..., and then press /ENT. Bluetooth*1 HD Radio*4 General Display Bluetooth XM*2/SIRIUS*3 *1 Displayed only when INT Mute is OFF and the mode is set to other than Bluetooth Audio. *2 Only when XM Radio is connected. *3 Only when SIRIUS Radio is connected. *4 Only when HD Radio is connected...
User Manual
Page 29
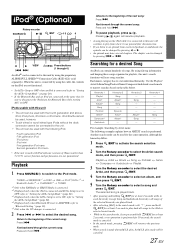
... to this unit is connected by using the cable, the controls on the iPod are not functional. • Set AUX+ Setup to OFF when an iPod is connected (refer to "Setting the AUX+ Setup Mode" on page 20). • If the Bluetooth Box and an iPod are connected at the same... an ARTIST search is performed. Fast forward through the current song: Press and hold . Song - - - For example: Searching by using the proprietary ALPINE FULL SPEED™ Connection Cable (KCE-422i) (sold separately). Playlist Artist Album Song Podcast Genre Composer Audiobook Playlist 3 Turn the Rotary encoder to select ...
... to this unit is connected by using the cable, the controls on the iPod are not functional. • Set AUX+ Setup to OFF when an iPod is connected (refer to "Setting the AUX+ Setup Mode" on page 20). • If the Bluetooth Box and an iPod are connected at the same... an ARTIST search is performed. Fast forward through the current song: Press and hold . Song - - - For example: Searching by using the proprietary ALPINE FULL SPEED™ Connection Cable (KCE-422i) (sold separately). Playlist Artist Album Song Podcast Genre Composer Audiobook Playlist 3 Turn the Rotary encoder to select ...
User Manual
Page 33
... correct output for your subwoofer type. The FM radio, CD, USB memory and iPod, will be taken when setting the response slope of the high range speaker in 2.2ch (3WAY) mode. AUX (MX level 1): Choose the MX mode (CMPM, MOVIE, or MUSIC) that was lost at the factory for the High ...Range Speaker (TW Setup) Depending on , you a choice of compression. OFF (Initial setting) ON • When Blackout mode is applied to stereo or...
... correct output for your subwoofer type. The FM radio, CD, USB memory and iPod, will be taken when setting the response slope of the high range speaker in 2.2ch (3WAY) mode. AUX (MX level 1): Choose the MX mode (CMPM, MOVIE, or MUSIC) that was lost at the factory for the High ...Range Speaker (TW Setup) Depending on , you a choice of compression. OFF (Initial setting) ON • When Blackout mode is applied to stereo or...
User Manual
Page 39
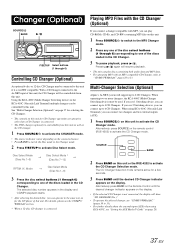
...can connect up to 6 CD Changers. Disc Select Mode (Disc No.1~6) Disc Select Mode * (Disc No.7~12) RPT/M.I.X. Multi-Changer Selection (Optional) Alpine's Ai-NET system will resume playback. • The unit can connect up to 6 CD Changers. SOURCE BAND 2 Press BAND on the remote control (...changer. 1 Press SOURCE/ to activate the CHANGER mode. • The source indicator varies depending on page 20. 37-EN For details, please see "Setting the AUX Mode (V-Link)" on the connected source. • Press BAND to switch the Disc mode in the CD Changer. 3 To pause playback, press /...
...can connect up to 6 CD Changers. Disc Select Mode (Disc No.1~6) Disc Select Mode * (Disc No.7~12) RPT/M.I.X. Multi-Changer Selection (Optional) Alpine's Ai-NET system will resume playback. • The unit can connect up to 6 CD Changers. SOURCE BAND 2 Press BAND on the remote control (...changer. 1 Press SOURCE/ to activate the CHANGER mode. • The source indicator varies depending on page 20. 37-EN For details, please see "Setting the AUX Mode (V-Link)" on the connected source. • Press BAND to switch the Disc mode in the CD Changer. 3 To pause playback, press /...
User Manual
Page 50
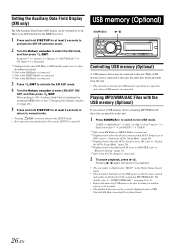
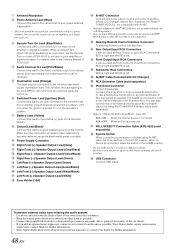
...8226; This lead should be used only for controlling the vehicle's power antenna. Do not use the Remote Turn-on Lead of the CDA-9886 to turn on or in the accessory position. Ground Lead (Black) Connect this lead to dim whenever the vehicle's lights are turned..., or a signal processor, etc. For details, refer to "Setting the AUX+ Setup Mode" (page 20). USB Connector Connect USB cable. Your Alpine dealer carries various noise suppressors, contact them for further information. • Your Alpine dealer knows best about noise prevention measures so consult your amplifier or...
...8226; This lead should be used only for controlling the vehicle's power antenna. Do not use the Remote Turn-on Lead of the CDA-9886 to turn on or in the accessory position. Ground Lead (Black) Connect this lead to dim whenever the vehicle's lights are turned..., or a signal processor, etc. For details, refer to "Setting the AUX+ Setup Mode" (page 20). USB Connector Connect USB cable. Your Alpine dealer carries various noise suppressors, contact them for further information. • Your Alpine dealer knows best about noise prevention measures so consult your amplifier or...


