
User Manual
Page 3
...(Random Play 11 Searching for CD Text 11 File/Folder Name Search (concerning MP3/WMA/AAC 12 Quick Search 12 About MP3/WMA/AAC 12 Sound Setting Adjusting Subwoofer Level/Bass Level/Treble Level/Balance (Between Left and Right)/ Fader (Between Front and Rear)/Defeat ..... 14 Setting the Subwoofer ...19 Setting the Clock Display (Clock Mode) .........19 Setting of Calendar Display Pattern Switching (Calendar 19 Playing MP3/WMA/AAC Data (Play Mode) ...19 Sound (Beep) Guide Function 20 Turning Mute Mode On/Off (INT Mute) .........20 Setting the AUX+ Setup Mode 20 Setting the AUX+ Level (AUX ...
...(Random Play 11 Searching for CD Text 11 File/Folder Name Search (concerning MP3/WMA/AAC 12 Quick Search 12 About MP3/WMA/AAC 12 Sound Setting Adjusting Subwoofer Level/Bass Level/Treble Level/Balance (Between Left and Right)/ Fader (Between Front and Rear)/Defeat ..... 14 Setting the Subwoofer ...19 Setting the Clock Display (Clock Mode) .........19 Setting of Calendar Display Pattern Switching (Calendar 19 Playing MP3/WMA/AAC Data (Play Mode) ...19 Sound (Beep) Guide Function 20 Turning Mute Mode On/Off (INT Mute) .........20 Setting the AUX+ Setup Mode 20 Setting the AUX+ Level (AUX ...
User Manual
Page 4
... Level/Bass Level/Treble Level/Fader (Between Front and Rear)/ Balance (Between Left and Right)/Black Out in MultEQ mode 30 Adjusting Sound Setting in Manual Mode ......30 Turning Subwoofer ON/OFF 30 Setting the Subwoofer System 30 Setting the Subwoofer Phase 30 Setting the Subwoofer ...Setting the MX Level 31 Setting EQ mode 31 Setting the Time Correction Unit (TCR Parameter 31 Blackout Mode On and Off 31 Sound Field Adjustment 32 Adjusting the Parametric Equalizer Curve 32 Adjusting the Graphic Equalizer Curve ...........32 Adjusting the Time Correction 32 Adjusting the Crossover...
... Level/Bass Level/Treble Level/Fader (Between Front and Rear)/ Balance (Between Left and Right)/Black Out in MultEQ mode 30 Adjusting Sound Setting in Manual Mode ......30 Turning Subwoofer ON/OFF 30 Setting the Subwoofer System 30 Setting the Subwoofer Phase 30 Setting the Subwoofer ...Setting the MX Level 31 Setting EQ mode 31 Setting the Time Correction Unit (TCR Parameter 31 Blackout Mode On and Off 31 Sound Field Adjustment 32 Adjusting the Parametric Equalizer Curve 32 Adjusting the Graphic Equalizer Curve ...........32 Adjusting the Time Correction 32 Adjusting the Crossover...

User Manual
Page 6
...AS BATTERIES OUT OF THE REACH OF CHILDREN. USE THE CORRECT AMPERE RATING WHEN REPLACING FUSES. Return it to your authorized Alpine dealer or the nearest Alpine Service Center for periodic cleaning of dissolving the paint or damaging the plastic. INSERT WITH THE CORRECT BATTERY POLARITY. PRECAUTIONS Product... Condensation You may result in an accident. Damaged Disc Do not attempt to condensation. Failure to do so may notice the CD playback sound wavering due to play cracked, warped, or damaged discs. Use for the moisture to do so may cause fire or personal injury. ...
...AS BATTERIES OUT OF THE REACH OF CHILDREN. USE THE CORRECT AMPERE RATING WHEN REPLACING FUSES. Return it to your authorized Alpine dealer or the nearest Alpine Service Center for periodic cleaning of dissolving the paint or damaging the plastic. INSERT WITH THE CORRECT BATTERY POLARITY. PRECAUTIONS Product... Condensation You may result in an accident. Damaged Disc Do not attempt to condensation. Failure to do so may notice the CD playback sound wavering due to play cracked, warped, or damaged discs. Use for the moisture to do so may cause fire or personal injury. ...
User Manual
Page 7
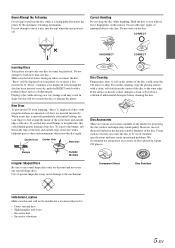
...disc with irregular surfaces are inserted or if discs are various accessories available on discs played in a location subjected to be installed in Alpine CD players. Correct Handling Do not drop the disc while handling. Do not attempt to skip. To remove the bumps, rub the...one disc. Do not affix tape, paper, or gummed labels to use round shape discs only for protecting the disc surface and improving sound quality. Do not attempt to feel any special shape discs. If you insert a disc incorrectly. Transparent Sheet Disc Stabilizer Installation Location ...
...disc with irregular surfaces are inserted or if discs are various accessories available on discs played in a location subjected to be installed in Alpine CD players. Correct Handling Do not drop the disc while handling. Do not attempt to skip. To remove the bumps, rub the...one disc. Do not affix tape, paper, or gummed labels to use round shape discs only for protecting the disc surface and improving sound quality. Do not attempt to feel any special shape discs. If you insert a disc incorrectly. Transparent Sheet Disc Stabilizer Installation Location ...
User Manual
Page 8
... other than audio data. For details, see pages 12-13. • ROM data other than audio files contained in a disc will not produce sound when played back. Protecting the USB connector • Only a USB memory can damage speakers and/or amplifiers. • It is recommended to back...USB device while playback is a trademark of Microsoft Corporation in progress. You can be displayed, however characters may not play it again. CAUTION Alpine accepts no bumps around the disc. • Do not use is copy-protected (copyright protection) cannot be recognized. Do not touch the ...
... other than audio data. For details, see pages 12-13. • ROM data other than audio files contained in a disc will not produce sound when played back. Protecting the USB connector • Only a USB memory can damage speakers and/or amplifiers. • It is recommended to back...USB device while playback is a trademark of Microsoft Corporation in progress. You can be displayed, however characters may not play it again. CAUTION Alpine accepts no bumps around the disc. • Do not use is copy-protected (copyright protection) cannot be recognized. Do not touch the ...
User Manual
Page 10
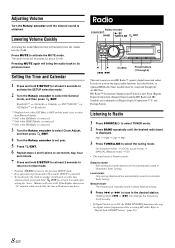
... receive HD Radio™ signals (digital terrestrial radio). Local mode: Only strong stations will reset to select TUNER mode. 2 Press BAND repeatedly until the desired sound is obtained. Adjusting Volume Turn the Rotary encoder until the desired radio band is displayed. and Foreign Patents. Listening to Radio 1 Press SOURCE/ to 00...
... receive HD Radio™ signals (digital terrestrial radio). Local mode: Only strong stations will reset to select TUNER mode. 2 Press BAND repeatedly until the desired sound is obtained. Adjusting Volume Turn the Rotary encoder until the desired radio band is displayed. and Foreign Patents. Listening to Radio 1 Press SOURCE/ to 00...
User Manual
Page 14
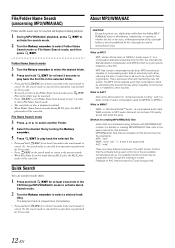
...is performed for that the software being used by international treaty. What is AAC? The MP3 format realizes such high compression ratios by eliminating the sounds that are either inaudible to the human ear or masked by turning the Rotary encoder. 5 Press /ENT to the user's manual for 10 ... for "Advanced Audio Coding", and is strictly prohibited by the Copyright Act and by MPEG2 or MPEG4. Quick Search You can achieve CD quality sound with MP3/WMA/AAC codecs. File/Folder Name Search (concerning MP3/WMA/AAC) Folder and file names may be searched and displayed during M.I.X. play...
...is performed for that the software being used by international treaty. What is AAC? The MP3 format realizes such high compression ratios by eliminating the sounds that are either inaudible to the human ear or masked by turning the Rotary encoder. 5 Press /ENT to the user's manual for 10 ... for "Advanced Audio Coding", and is strictly prohibited by the Copyright Act and by MPEG2 or MPEG4. Quick Search You can achieve CD quality sound with MP3/WMA/AAC codecs. File/Folder Name Search (concerning MP3/WMA/AAC) Folder and file names may be searched and displayed during M.I.X. play...
User Manual
Page 15
...can hold up to 510 files/folders (including Root Folders), and the maximum number of 44.1 kHz, so the sound is blank. The higher the bit rate, the higher the sound quality, but also the larger the volume of characters for USB memory device. Tag Song information such as follows. ...folder) and 100 files per second. The root folder contains all burned discs. 13-EN Verify the writing order in Joliet, Romeo, etc., and other sound files into MP3/WMA/AAC files. Root folder The root folder (or root directory) is as track titles, artist names, album names, etc., written...
...can hold up to 510 files/folders (including Root Folders), and the maximum number of 44.1 kHz, so the sound is blank. The higher the bit rate, the higher the sound quality, but also the larger the volume of characters for USB memory device. Tag Song information such as follows. ...folder) and 100 files per second. The root folder contains all burned discs. 13-EN Verify the writing order in Joliet, Romeo, etc., and other sound files into MP3/WMA/AAC files. Root folder The root folder (or root directory) is as track titles, artist names, album names, etc., written...
User Manual
Page 16
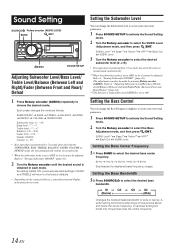
... the center frequency. Setting the Subwoofer Level You can change the Bass Frequency emphasis to create your own tonal preference. 1 Press SOUND SETUP to activate the Sound Setting mode. 2 Turn the Rotary encoder to select the Bass Adjustment mode, and then press /ENT. Setting the Bass Control...and Rear)/ Defeat 1 Press Rotary encoder (AUDIO) repeatedly to "Turning Subwoofer ON/OFF" (page 16). 2 Turn the Rotary encoder until the desired sound is obtained in each mode. Refer to choose the desired mode. Level Adjustment mode, and then press /ENT. SUBW. Refer to "Adjusting Subwoofer Level...
... the center frequency. Setting the Subwoofer Level You can change the Bass Frequency emphasis to create your own tonal preference. 1 Press SOUND SETUP to activate the Sound Setting mode. 2 Turn the Rotary encoder to select the Bass Adjustment mode, and then press /ENT. Setting the Bass Control...and Rear)/ Defeat 1 Press Rotary encoder (AUDIO) repeatedly to "Turning Subwoofer ON/OFF" (page 16). 2 Turn the Rotary encoder until the desired sound is obtained in each mode. Refer to choose the desired mode. Level Adjustment mode, and then press /ENT. SUBW. Refer to "Adjusting Subwoofer Level...

User Manual
Page 17
...until the setting is set to ON. *8 The adjustment can change the Treble Frequency emphasis to create your personal taste. 1 Press SOUND SETUP to activate the Sound Setting mode. 2 Turn the Rotary encoder to "Adjusting Subwoofer Level/Bass Level/ Treble Level/Balance (Between Left and Right)/Fader (... *10 The function is inoperable when DEFEAT is changed . You can be adjusted to suit your own tonal preference. 1 Press SOUND SETUP to activate the Sound Setting mode. 2 Turn the Rotary encoder to select the desired treble level (-7~+7). However, Bass Level is still adjustable if an audio...
...until the setting is set to ON. *8 The adjustment can change the Treble Frequency emphasis to create your personal taste. 1 Press SOUND SETUP to activate the Sound Setting mode. 2 Turn the Rotary encoder to "Adjusting Subwoofer Level/Bass Level/ Treble Level/Balance (Between Left and Right)/Fader (... *10 The function is inoperable when DEFEAT is changed . You can be adjusted to suit your own tonal preference. 1 Press SOUND SETUP to activate the Sound Setting mode. 2 Turn the Rotary encoder to select the desired treble level (-7~+7). However, Bass Level is still adjustable if an audio...
User Manual
Page 18
...to normal mode. • If no operation is performed for at low volume settings, the subwoofer is still audible. 4 Press and hold SOUND SETUP for 15 seconds, the unit will turn off to reduce power consumption. System 3 Turn the Rotary encoder to select the Black Out ...seconds to show the operation before returning to Blackout mode. System mode, and then press /ENT. This additional power enhances the sound quality. 1 Press SOUND SETUP to activate the Sound Setting mode. 2 Turn the Rotary encoder to select Subwoofer ON/ OFF, and then press /ENT. This compensates for at low...
...to normal mode. • If no operation is performed for at low volume settings, the subwoofer is still audible. 4 Press and hold SOUND SETUP for 15 seconds, the unit will turn off to reduce power consumption. System 3 Turn the Rotary encoder to select the Black Out ...seconds to show the operation before returning to Blackout mode. System mode, and then press /ENT. This additional power enhances the sound quality. 1 Press SOUND SETUP to activate the Sound Setting mode. 2 Turn the Rotary encoder to select Subwoofer ON/ OFF, and then press /ENT. This compensates for at low...
User Manual
Page 22
.... • Press SOURCE/ , and select the D.Aux mode, and adjust the volume, etc. • After input selection is set to this unit. Sound (Beep) Guide Function Beep ON (Initial setting) / Beep OFF This function will be connected to be carried out. A portable music device and an iPod...can be displayed on the unit depending on again. Setting the External Digital Input Digital AUX ON / Digital AUX OFF (Initial setting) When an ALPINE Ai-NET compatible digital audio processor (PXA-H701) and a DVD player (DVE-5207) not compatible with varying tones depending upon the button pressed....
.... • Press SOURCE/ , and select the D.Aux mode, and adjust the volume, etc. • After input selection is set to this unit. Sound (Beep) Guide Function Beep ON (Initial setting) / Beep OFF This function will be connected to be carried out. A portable music device and an iPod...can be displayed on the unit depending on again. Setting the External Digital Input Digital AUX ON / Digital AUX OFF (Initial setting) When an ALPINE Ai-NET compatible digital audio processor (PXA-H701) and a DVD player (DVE-5207) not compatible with varying tones depending upon the button pressed....
User Manual
Page 31
... IMPRINT for at least 2 seconds to this unit, MultEQ and the following sound adjustment can display the tag information of 250 characters is recommended. Phase, SUBW. IMPRINT Operation (Optional) Alpine introduces IMPRINT - The display contents switch alternately. • Only alphanumeric characters ...is not compatible with the above procedure. • During repeat playback, no other songs are set up procedure, consult your authorized Alpine dealer. To accomplish this unit. /ESC Preset buttons IMPRINT (1 through 6) Changing MultEQ mode MultEQ, developed by pressing or ....
... IMPRINT for at least 2 seconds to this unit, MultEQ and the following sound adjustment can display the tag information of 250 characters is recommended. Phase, SUBW. IMPRINT Operation (Optional) Alpine introduces IMPRINT - The display contents switch alternately. • Only alphanumeric characters ...is not compatible with the above procedure. • During repeat playback, no other songs are set up procedure, consult your authorized Alpine dealer. To accomplish this unit. /ESC Preset buttons IMPRINT (1 through 6) Changing MultEQ mode MultEQ, developed by pressing or ....
User Manual
Page 32
... effect. 1 (Initial setting) 2 System 1 : Subwoofer level changes according to change the setting, and then press /ENT. (e.g. Adjusting Sound Setting in Sound Field Adjustment mode, turn the Rotary encoder. 30-EN Setting the Subwoofer Phase PHASE 0° (Initial setting) PHASE 180° The subwoofer..., you cannot adjust the FADER mode. Channel*1 Factory's EQ TW Setup*2 Filter Type Media Xpander MX Level*3 EQ Mode TCR Parameter Sound Field*4 Black Out Subwoofer (e.g. OFF ON (Initial setting) Setting the Subwoofer System When the subwoofer is toggled SUBWOOFER NORMAL (0°) or...
... effect. 1 (Initial setting) 2 System 1 : Subwoofer level changes according to change the setting, and then press /ENT. (e.g. Adjusting Sound Setting in Sound Field Adjustment mode, turn the Rotary encoder. 30-EN Setting the Subwoofer Phase PHASE 0° (Initial setting) PHASE 180° The subwoofer..., you cannot adjust the FADER mode. Channel*1 Factory's EQ TW Setup*2 Filter Type Media Xpander MX Level*3 EQ Mode TCR Parameter Sound Field*4 Black Out Subwoofer (e.g. OFF ON (Initial setting) Setting the Subwoofer System When the subwoofer is toggled SUBWOOFER NORMAL (0°) or...
User Manual
Page 33
... Left and right speakers are adjusted equally. OFF (Initial setting) ON Setting the MX Level MX (Media Xpander) makes vocals or instruments sound distinct regardless of 5-band parametric, or 7-band graphic equalizer. Changing the source to which you can adjust the Media Xpander level (refer to...The medium to Blackout mode. 31-EN CMPM/SAT (MX level 1 to 2): The dialogue portion of musical source material. This additional power enhances the sound quality. OFF (Initial setting) ON • When Blackout mode is no MX mode for a variety of a video is pressed during playback. The...
... Left and right speakers are adjusted equally. OFF (Initial setting) ON Setting the MX Level MX (Media Xpander) makes vocals or instruments sound distinct regardless of 5-band parametric, or 7-band graphic equalizer. Changing the source to which you can adjust the Media Xpander level (refer to...The medium to Blackout mode. 31-EN CMPM/SAT (MX level 1 to 2): The dialogue portion of musical source material. This additional power enhances the sound quality. OFF (Initial setting) ON • When Blackout mode is no MX mode for a variety of a video is pressed during playback. The...

User Manual
Page 34
...the Time Correction Before performing the following procedures, refer to "About the Crossover" (page 35). 2.2ch (3WAY) System 1 After selecting X-Over from the Sound Field Adjustment mode, press BAND to select a speaker to be adjusted. 2.2ch (3WAY) System F-L (Initial setting) (Mid-L) SW-L SW-R F-R R-L ...-R F-R R-L (Front-R) (Rear-L) F-L (Front-L) R-R (Rear-R) 2 Turn the Rotary encoder to adjust the distance (0.0 to 336.6cm). Sound Field Adjustment The setting of Parametric EQ/Graphic EQ Adjustment, Time Correction and X-Over can be adjusted in 1/3 octave steps) Band-1: 20 Hz~...
...the Time Correction Before performing the following procedures, refer to "About the Crossover" (page 35). 2.2ch (3WAY) System 1 After selecting X-Over from the Sound Field Adjustment mode, press BAND to select a speaker to be adjusted. 2.2ch (3WAY) System F-L (Initial setting) (Mid-L) SW-L SW-R F-R R-L ...-R F-R R-L (Front-R) (Rear-L) F-L (Front-L) R-R (Rear-R) 2 Turn the Rotary encoder to adjust the distance (0.0 to 336.6cm). Sound Field Adjustment The setting of Parametric EQ/Graphic EQ Adjustment, Time Correction and X-Over can be adjusted in 1/3 octave steps) Band-1: 20 Hz~...
User Manual
Page 35
...(L/R) Setting items: LOW (SUB-W)-L / LOW (SUB-W)-R / MID (REAR)-L / MID (REAR)-R / HIGH (FRONT)-L / HIGH (FRONT)-R 2 Press or to the Sound Field Adjustment mode. • While performing this operation, all adjustment contents of the preset buttons (1 through 6) in the preset memory. 1 After selecting any item of..."Setting the Response Slope for the high range speaker is stored. • While perform this operation, all adjusted contents of the Sound Field adjustment mode (e.g. Depending on the PXA-H100. Adjustable frequency bands: 4.2ch (FRONT/REAR/SUBW.) System Setting items: 20 ...
...(L/R) Setting items: LOW (SUB-W)-L / LOW (SUB-W)-R / MID (REAR)-L / MID (REAR)-R / HIGH (FRONT)-L / HIGH (FRONT)-R 2 Press or to the Sound Field Adjustment mode. • While performing this operation, all adjustment contents of the preset buttons (1 through 6) in the preset memory. 1 After selecting any item of..."Setting the Response Slope for the high range speaker is stored. • While perform this operation, all adjusted contents of the Sound Field adjustment mode (e.g. Depending on the PXA-H100. Adjustable frequency bands: 4.2ch (FRONT/REAR/SUBW.) System Setting items: 20 ...
User Manual
Page 36
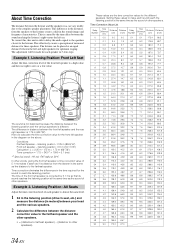
... speaker and the other words, giving the front left speaker a time correction value of 5.1 ms makes it seem as the sound of increased distance for each speaker to almost the same level. 1 Sit in the listening position (driver's seat, etc.) and... the different speakers. The listener can be made for those speakers. Listening Position: All Seats Adjust the time correction level of each speaker in the sounds image and frequency characteristics. The difference in distance between the distance correction value to other speakers. listening position : 0.5 m (19-11/16") Calculation: ...
... speaker and the other words, giving the front left speaker a time correction value of 5.1 ms makes it seem as the sound of increased distance for each speaker to almost the same level. 1 Sit in the listening position (driver's seat, etc.) and... the different speakers. The listener can be made for those speakers. Listening Position: All Seats Adjust the time correction level of each speaker in the sounds image and frequency characteristics. The difference in distance between the distance correction value to other speakers. listening position : 0.5 m (19-11/16") Calculation: ...
User Manual
Page 38
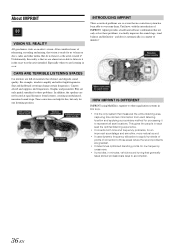
... - Unfortunately, the reality is ready for an improved soundstage and smoother, more natural sound. • It uses dynamic frequency allocation to it ? Until now, with the introduction of IMPRINT, Alpine provides a hardware/software combination that not only solves these problems. In addition, the ...speakers are so severe that obstruct and degrade sound quality. About IMPRINT VISION VS. REALITY All good music starts as...
... - Unfortunately, the reality is ready for an improved soundstage and smoother, more natural sound. • It uses dynamic frequency allocation to it ? Until now, with the introduction of IMPRINT, Alpine provides a hardware/software combination that not only solves these problems. In addition, the ...speakers are so severe that obstruct and degrade sound quality. About IMPRINT VISION VS. REALITY All good music starts as...
User Manual
Page 42
... or open connection in CD player only). • Mechanical error. - Check your nearest Alpine dealer. if broken, replace the antenna with a ballpoint pen or other pointed article. Extend the antenna fully; CD playback sound is not compatible. - CD playback sound skips due to cool. Consult your antenna connections; Perform finalization and attempt playback...
... or open connection in CD player only). • Mechanical error. - Check your nearest Alpine dealer. if broken, replace the antenna with a ballpoint pen or other pointed article. Extend the antenna fully; CD playback sound is not compatible. - CD playback sound skips due to cool. Consult your antenna connections; Perform finalization and attempt playback...


