
User Manual
Page 3
... Front Panel ........ 7 Initial System Start-Up 7 Adjusting Volume 8 Lowering Volume Quickly 8 Setting the Time and Calendar 8 Radio Listening to Radio 8 Presetting Stations Manually 9 Presetting Stations Automatically 9 Tuning to Preset Stations 9 Frequency Search Function 9 Receiving a Multicast Station (HD Radio mode only 9 CD/MP3/WMA/AAC Playback 10 Repeat Play 11 M.I.X. (Random Play 11 Searching for CD Text 11 File/Folder Name Search (concerning MP3/WMA/AAC 12 Quick Search 12 About MP3/WMA/AAC 12 Sound Setting Adjusting Subwoofer Level/Bass Level/Treble Level/Balance...
... Front Panel ........ 7 Initial System Start-Up 7 Adjusting Volume 8 Lowering Volume Quickly 8 Setting the Time and Calendar 8 Radio Listening to Radio 8 Presetting Stations Manually 9 Presetting Stations Automatically 9 Tuning to Preset Stations 9 Frequency Search Function 9 Receiving a Multicast Station (HD Radio mode only 9 CD/MP3/WMA/AAC Playback 10 Repeat Play 11 M.I.X. (Random Play 11 Searching for CD Text 11 File/Folder Name Search (concerning MP3/WMA/AAC 12 Quick Search 12 About MP3/WMA/AAC 12 Sound Setting Adjusting Subwoofer Level/Bass Level/Treble Level/Balance...
User Manual
Page 4
... Repeat Play 29 Displaying the Text 29 IMPRINT Operation (Optional) Changing MultEQ mode 29 Adjusting Subwoofer Level/Bass Level/Treble Level/Fader (Between Front and Rear)/ Balance (Between Left and Right)/Black Out in MultEQ mode 30 Adjusting Sound Setting in Manual Mode ......30 Turning Subwoofer ON/OFF 30 Setting the Subwoofer System 30 Setting the Subwoofer Phase 30 Setting the Subwoofer Channel (SUBW. SAT Radio Receiver (Optional) Receiving Channels with the SAT Radio Receiver (Optional 22 Checking the SAT Radio ID Number 22 Storing Channel Presets 23 Receiving Stored Channels...
... Repeat Play 29 Displaying the Text 29 IMPRINT Operation (Optional) Changing MultEQ mode 29 Adjusting Subwoofer Level/Bass Level/Treble Level/Fader (Between Front and Rear)/ Balance (Between Left and Right)/Black Out in MultEQ mode 30 Adjusting Sound Setting in Manual Mode ......30 Turning Subwoofer ON/OFF 30 Setting the Subwoofer System 30 Setting the Subwoofer Phase 30 Setting the Subwoofer Channel (SUBW. SAT Radio Receiver (Optional) Receiving Channels with the SAT Radio Receiver (Optional 22 Checking the SAT Radio ID Number 22 Storing Channel Presets 23 Receiving Stored Channels...
User Manual
Page 7
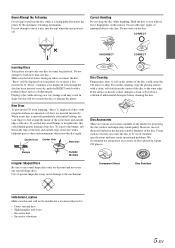
... unit power is off. "Error" will not be displayed even though the disc has been inserted correctly, push the RESET switch with irregular surfaces are inserted or if discs are various accessories available on the market for playback. Correct Handling Do not drop the disc while handling. Transparent Sheet Disc Stabilizer Installation Location Make sure this could cause the CD player to be installed in a location...
... unit power is off. "Error" will not be displayed even though the disc has been inserted correctly, push the RESET switch with irregular surfaces are inserted or if discs are various accessories available on the market for playback. Correct Handling Do not drop the disc while handling. Transparent Sheet Disc Stabilizer Installation Location Make sure this could cause the CD player to be installed in a location...
User Manual
Page 9
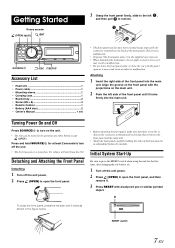
... level 12. SOURCE/ /ESC F/SETUP Accessory List • Head unit 1 • Power cable 1 • Mounting sleeve 1 • Carrying case 1 • Bracket key 2 • Screw (M5 × 8 4 • Remote Control 1 • Battery (AAA size 2 • Owner's Manual 1 set • The front panel may result in the figure below. Press and hold SOURCE/ for at least 2 seconds to press the RESET switch when using the unit for the first time, after changing the car battery, etc. 1 Turn...
... level 12. SOURCE/ /ESC F/SETUP Accessory List • Head unit 1 • Power cable 1 • Mounting sleeve 1 • Carrying case 1 • Bracket key 2 • Screw (M5 × 8 4 • Remote Control 1 • Battery (AAA size 2 • Owner's Manual 1 set • The front panel may result in the figure below. Press and hold SOURCE/ for at least 2 seconds to press the RESET switch when using the unit for the first time, after changing the car battery, etc. 1 Turn...
User Manual
Page 10
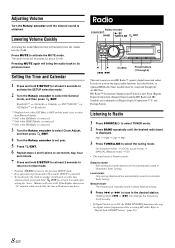
... Foreign Patents. Refer to select the tuning mode. Lowering Volume Quickly Activating the Audio Mute function will decrease by 20 dB. Bluetooth*1 HD Radio*4 General Display Bluetooth XM*2/SIRIUS*3 *1 Displayed only when INT Mute is OFF and the mode is set to other than Bluetooth Audio. *2 Only when XM Radio is connected. *3 Only when SIRIUS Radio is connected. *4 Only when HD Radio is canceled. • To synchronize the clock to another clock/watch or radio time announcement, press and...
... Foreign Patents. Refer to select the tuning mode. Lowering Volume Quickly Activating the Audio Mute function will decrease by 20 dB. Bluetooth*1 HD Radio*4 General Display Bluetooth XM*2/SIRIUS*3 *1 Displayed only when INT Mute is OFF and the mode is set to other than Bluetooth Audio. *2 Only when XM Radio is connected. *3 Only when SIRIUS Radio is connected. *4 Only when HD Radio is canceled. • To synchronize the clock to another clock/watch or radio time announcement, press and...
User Manual
Page 11
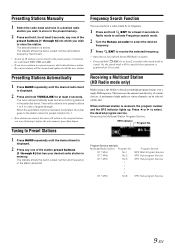
... the station preset buttons (1 through 6) into preset buttons 1 to 6 in order of 18 stations can be stored in the preset memory (6 stations for 10 seconds. Tuning to broadcast multiple program streams over a single FM frequency. This increases the amount and diversity of the station selected. Press or to the station stored in preset location No.1. • If no operation is received, the program number and the SPS indicator lights up. Program Service example: Multicast Radio Station Program...
... the station preset buttons (1 through 6) into preset buttons 1 to 6 in order of 18 stations can be stored in the preset memory (6 stations for 10 seconds. Tuning to broadcast multiple program streams over a single FM frequency. This increases the amount and diversity of the station selected. Press or to the station stored in preset location No.1. • If no operation is received, the program number and the SPS indicator lights up. Program Service example: Multicast Radio Station Program...

User Manual
Page 12
... front panel manually. Returning to eject the disc. • Do not remove a CD during its eject cycle. A malfunction may result from doing either. • If the CD does not eject, press and hold for information about display switching. 10-EN The front panel will be displayed as described below. TUNER XM/SIRIUS*1 DISC USB iPod*2/AUX+*3 Bluetooth Audio*4 CHANGER*5 TUNER *1 Only when XM Radio or SIRIUS Radio is connected. *2 Displayed only when the iPod is connected and AUX+ Setup is set...
... front panel manually. Returning to eject the disc. • Do not remove a CD during its eject cycle. A malfunction may result from doing either. • If the CD does not eject, press and hold for information about display switching. 10-EN The front panel will be displayed as described below. TUNER XM/SIRIUS*1 DISC USB iPod*2/AUX+*3 Bluetooth Audio*4 CHANGER*5 TUNER *1 Only when XM Radio or SIRIUS Radio is connected. *2 Displayed only when the iPod is connected and AUX+ Setup is set...
User Manual
Page 16
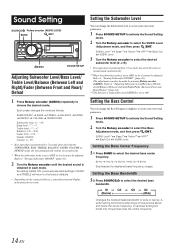
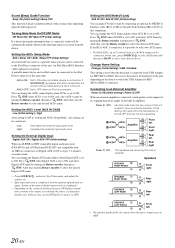
...; If no operation is set to normal mode automatically. *1 When the subwoofer mode is performed for 5 seconds after selecting the SUBWOOFER, BASS, TREBLE, BALANCE, FADER, VOLUME or DEFEAT mode, the unit automatically returns to the factory defaults. • Depending on the connected devices, some functions and display indications do not work. Setting the Subwoofer Level You can also be adjusted. SUBW. Setting the Bass Bandwidth 3-2 Press SOURCE/ to "Turning Subwoofer ON/OFF" (page 16). Level HPF*4 Setting the Bass Center Frequency 3-1 Press...
...; If no operation is set to normal mode automatically. *1 When the subwoofer mode is performed for 5 seconds after selecting the SUBWOOFER, BASS, TREBLE, BALANCE, FADER, VOLUME or DEFEAT mode, the unit automatically returns to the factory defaults. • Depending on the connected devices, some functions and display indications do not work. Setting the Subwoofer Level You can also be adjusted. SUBW. Setting the Bass Bandwidth 3-2 Press SOURCE/ to "Turning Subwoofer ON/OFF" (page 16). Level HPF*4 Setting the Bass Center Frequency 3-1 Press...
User Manual
Page 21
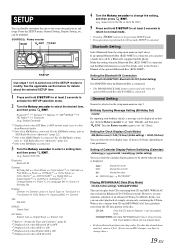
...Bluetooth*1 HD Radio*4 General Display Bluetooth (e.g. Select AUX IN) Bluetooth: Bluetooth IN General: Birthday Set Clock Mode Clock Adjust*5 Calendar Play Mode Beep INT Mute*6 AUX+ Setup AUX+ Name*7 AUX IN GAIN*7 Digital AUX D.AUX Name*8 AUX IN AUX Name*9 Changer Name Power IC Language Set Demo Birthday Set Display: Dimmer Dimmer Level Font Select BGV Select Scroll Type Text Scroll Opening MSG Dimmer XM: XM ADF SIRIUS: Game Alert HD Radio: Station Call Digital Seek Station Call *5 Refer to modify. For details, refer to the Owner's Manual of the SETUP modes to "Setting the Time...
...Bluetooth*1 HD Radio*4 General Display Bluetooth (e.g. Select AUX IN) Bluetooth: Bluetooth IN General: Birthday Set Clock Mode Clock Adjust*5 Calendar Play Mode Beep INT Mute*6 AUX+ Setup AUX+ Name*7 AUX IN GAIN*7 Digital AUX D.AUX Name*8 AUX IN AUX Name*9 Changer Name Power IC Language Set Demo Birthday Set Display: Dimmer Dimmer Level Font Select BGV Select Scroll Type Text Scroll Opening MSG Dimmer XM: XM ADF SIRIUS: Game Alert HD Radio: Station Call Digital Seek Station Call *5 Refer to modify. For details, refer to the Owner's Manual of the SETUP modes to "Setting the Time...
User Manual
Page 22
... SOURCE/ , and select the D.Aux mode, and adjust the volume, etc. • After input selection is set to the iPod Direct connector at the same time. Increases the external input audio level. Press /ENT when AUX+ is set to ON. Speakers SPEAKER RIGHT FRONT Front right SPEAKER RIGHT REAR SPEAKER LEFT REAR Rear right Rear left SPEAKER LEFT FRONT Front left Rear right Power IC ON : The speakers are connected, set to OFF. 20-EN Amplifier Amplifier Front left Front right Rear left • No sound...
... SOURCE/ , and select the D.Aux mode, and adjust the volume, etc. • After input selection is set to the iPod Direct connector at the same time. Increases the external input audio level. Press /ENT when AUX+ is set to ON. Speakers SPEAKER RIGHT FRONT Front right SPEAKER RIGHT REAR SPEAKER LEFT REAR Rear right Rear left SPEAKER LEFT FRONT Front left Rear right Power IC ON : The speakers are connected, set to OFF. 20-EN Amplifier Amplifier Front left Front right Rear left • No sound...

User Manual
Page 23
.... Dimmer Control Dimmer Auto (Initial setting) / Dimmer Manual Set the Dimmer control to Auto to Demo OFF. Language 1 : Language 2 : Normal Font European Font Demonstration Demo ON / Demo OFF (Initial setting) This unit has a demonstration feature for the display. • To quit Demo mode, set to right, a single character at a time, until all Radio Stations. 21-EN Dimmer Level Setting Lev1 (Initial setting) / Lev2 / Lev3 In the Dimmer Level setting, three levels are available, the highest level (Lev3) being the dimmest when the car...
.... Dimmer Control Dimmer Auto (Initial setting) / Dimmer Manual Set the Dimmer control to Auto to Demo OFF. Language 1 : Language 2 : Normal Font European Font Demonstration Demo ON / Demo OFF (Initial setting) This unit has a demonstration feature for the display. • To quit Demo mode, set to right, a single character at a time, until all Radio Stations. 21-EN Dimmer Level Setting Lev1 (Initial setting) / Lev2 / Lev3 In the Dimmer Level setting, three levels are available, the highest level (Lev3) being the dimmest when the car...
User Manual
Page 25
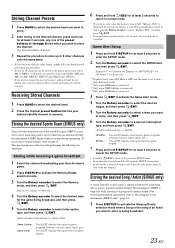
... preset memory for either XM or SIRIUS. 6 Channels are announced using the interruption ALERT display while receiving other bands, simply select the band desired and repeat the procedure. • A total of an Artist you want to store is found on another channel. Bluetooth*1 HD Radio*4 General Display Bluetooth XM*2/SIRIUS*3 *1 Displayed only when INT Mute is OFF and the mode is set to other than Bluetooth Audio. *2 Only when XM Radio...
... preset memory for either XM or SIRIUS. 6 Channels are announced using the interruption ALERT display while receiving other bands, simply select the band desired and repeat the procedure. • A total of an Artist you want to store is found on another channel. Bluetooth*1 HD Radio*4 General Display Bluetooth XM*2/SIRIUS*3 *1 Displayed only when INT Mute is OFF and the mode is set to other than Bluetooth Audio. *2 Only when XM Radio...
User Manual
Page 29
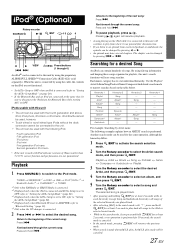
... the same time, be sure to disconnect the iPod from a selected podcast or audiobook, the episode can be changed by Artist name The following iPod. For example: Searching by pressing or . TUNER XM/SIRIUS*1 DISC USB iPod*2/AUX+*3 Bluetooth Audio*4 CHANGER*5 TUNER *1 Only when XM Radio or SIRIUS Radio is connected. *2 Displayed only when the iPod is connected and AUX+ Setup is set to OFF, refer to "Setting the AUX+ Setup Mode" (page 20). *3 Displayed only when the AUX+ Setup is set to...
... the same time, be sure to disconnect the iPod from a selected podcast or audiobook, the episode can be changed by Artist name The following iPod. For example: Searching by pressing or . TUNER XM/SIRIUS*1 DISC USB iPod*2/AUX+*3 Bluetooth Audio*4 CHANGER*5 TUNER *1 Only when XM Radio or SIRIUS Radio is connected. *2 Displayed only when the iPod is connected and AUX+ Setup is set to OFF, refer to "Setting the AUX+ Setup Mode" (page 20). *3 Displayed only when the AUX+ Setup is set to...
User Manual
Page 33
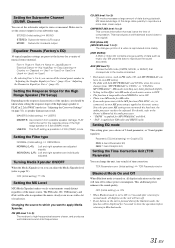
... the operation before returning to reduce power consumption. Setting the Filter type NORMAL (Initial setting) INDIVIDUAL NORMAL (L=R): Left and right speakers are individually adjusted. This reproduces a well-balanced sound close to FLAT in 5 seconds after returning to normal mode, all display indications on page 32), as music clip. STEREO (Initial setting) MONO STEREO: Subwoofer stereo (L/R) output MONO: Subwoofer monaural output Equalizer Presets (Factory's EQ) 10 typical equalizer settings are preset at the time of road noise. USER...
... the operation before returning to reduce power consumption. Setting the Filter type NORMAL (Initial setting) INDIVIDUAL NORMAL (L=R): Left and right speakers are individually adjusted. This reproduces a well-balanced sound close to FLAT in 5 seconds after returning to normal mode, all display indications on page 32), as music clip. STEREO (Initial setting) MONO STEREO: Subwoofer stereo (L/R) output MONO: Subwoofer monaural output Equalizer Presets (Factory's EQ) 10 typical equalizer settings are preset at the time of road noise. USER...
User Manual
Page 35
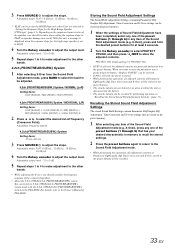
... SOURCE/ to adjust the output level. Storing the Sound Field Adjustment Settings The Sound Field Adjustment Settings containing Parametric EQ/ Graphic EQ Adjustment, Time Correction and X-Over settings can be recalled by performing operation in the preset memory. 1 After selecting any one of the preset buttons (1 through 6) that are protected and stored into a protected preset button, "Replace NO/YES" can be set to FLAT. 4 Turn the Rotary encoder to 2.2ch (3WAY)/4.2ch (FRONT/REAR/SUBW.) system mode with...
... SOURCE/ to adjust the output level. Storing the Sound Field Adjustment Settings The Sound Field Adjustment Settings containing Parametric EQ/ Graphic EQ Adjustment, Time Correction and X-Over settings can be recalled by performing operation in the preset memory. 1 After selecting any one of the preset buttons (1 through 6) that are protected and stored into a protected preset button, "Replace NO/YES" can be set to FLAT. 4 Turn the Rotary encoder to 2.2ch (3WAY)/4.2ch (FRONT/REAR/SUBW.) system mode with...
User Manual
Page 40
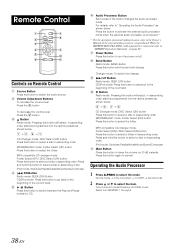
... to turn the power on/off. DN Button Radio mode: SEEK (DN) Button CD/iPod mode: Press this button to go back to the beginning of the button changes the audio processor mode. Press and hold this button to select the item. Time Correction mode/Crossover (X-OVER) mode: Select from MEMORY 1 through 6. 38-EN MP3/WMA/AAC mode: Folder Select (UP) button Press this button to select the audio source. Remote Control Controls on Remote Control Source Button Press this button to select the folder. Volume Adjustment Buttons To...
... to turn the power on/off. DN Button Radio mode: SEEK (DN) Button CD/iPod mode: Press this button to go back to the beginning of the button changes the audio processor mode. Press and hold this button to select the item. Time Correction mode/Crossover (X-OVER) mode: Select from MEMORY 1 through 6. 38-EN MP3/WMA/AAC mode: Folder Select (UP) button Press this button to select the audio source. Remote Control Controls on Remote Control Source Button Press this button to select the folder. Volume Adjustment Buttons To...
User Manual
Page 42
... replaced. if broken, replace the antenna with a ballpoint pen or other pointed article. CD CD Player/Changer not functioning. • Out of operating temperature range +50°C (+120°F) for the condensation to receive stations. • No antenna or open connection in cable. - Allow enough time for CD. - Make sure the CD is not played back. • Writing error occurred. Do not use a commercially available lens cleaner disc...
... replaced. if broken, replace the antenna with a ballpoint pen or other pointed article. CD CD Player/Changer not functioning. • Out of operating temperature range +50°C (+120°F) for the condensation to receive stations. • No antenna or open connection in cable. - Allow enough time for CD. - Make sure the CD is not played back. • Writing error occurred. Do not use a commercially available lens cleaner disc...
User Manual
Page 44
... not supported by the unit is connected. - Update the iPod Software Version to "Connections"). Indication for USB memory • The user has selected a channel number that time. - You can only play back non-copy-protected files. • Caused by the unit. • A copy-protected WMA file was played back. - No action needed. Change channels or consult your Alpine dealer. Device Error • A USB device that is supported by the iPod Software Version not being compatible with the unit is connected). Connect a USB device that...
... not supported by the unit is connected. - Update the iPod Software Version to "Connections"). Indication for USB memory • The user has selected a channel number that time. - You can only play back non-copy-protected files. • Caused by the unit. • A copy-protected WMA file was played back. - No action needed. Change channels or consult your Alpine dealer. Device Error • A USB device that is supported by the iPod Software Version not being compatible with the unit is connected). Connect a USB device that...
User Manual
Page 46
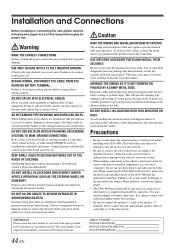
... CDA-9886 to the fuse box, make the proper connections may need an adaptor to connect other than designated parts may damage this unit may cause parts to other safety-related system), or tanks should NEVER be used for this product to the unit and/or the vehicle. BEFORE WIRING, DISCONNECT THE CABLE FROM THE NEGATIVE BATTERY TERMINAL. DO NOT INSTALL IN LOCATIONS WHICH MIGHT HINDER VEHICLE OPERATION...
... CDA-9886 to the fuse box, make the proper connections may need an adaptor to connect other than designated parts may damage this unit may cause parts to other safety-related system), or tanks should NEVER be used for this product to the unit and/or the vehicle. BEFORE WIRING, DISCONNECT THE CABLE FROM THE NEGATIVE BATTERY TERMINAL. DO NOT INSTALL IN LOCATIONS WHICH MIGHT HINDER VEHICLE OPERATION...
User Manual
Page 50
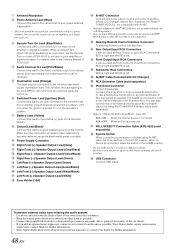
... Owner's Manual of your power antenna, if applicable. • This lead should be used only for use the Remote Turn-on the vehicle. Audio Interrupt In Lead (Pink/Black) Connect this lead to an external device (such as possible. Rear Output/Input RCA Connectors It can also connect this to an open terminal on lead of PXA-H100. Front Output/Input RCA Connectors It can input TV/video sound by using iPod Direct/RCA Interface cable...
... Owner's Manual of your power antenna, if applicable. • This lead should be used only for use the Remote Turn-on the vehicle. Audio Interrupt In Lead (Pink/Black) Connect this lead to an external device (such as possible. Rear Output/Input RCA Connectors It can also connect this to an open terminal on lead of PXA-H100. Front Output/Input RCA Connectors It can input TV/video sound by using iPod Direct/RCA Interface cable...


