
User Manual
Page 9
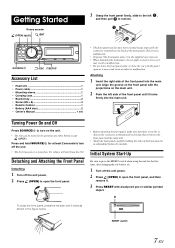
... panel. • Before attaching the front panel, make sure that there is turned on the back of the front panel into the main unit. This is not a malfunction. • To protect the front panel, place it in the supplied carrying case. • When detaching .... 2 Press (OPEN) to open the front panel, and then remove it may become hot in an accident or malfunction. SOURCE/ /ESC F/SETUP Accessory List • Head unit 1 • Power cable 1 • Mounting sleeve 1 • Carrying case 1 • Bracket key 2 • Screw (M5 × 8 4 • Remote Control 1 • ...
... panel. • Before attaching the front panel, make sure that there is turned on the back of the front panel into the main unit. This is not a malfunction. • To protect the front panel, place it in the supplied carrying case. • When detaching .... 2 Press (OPEN) to open the front panel, and then remove it may become hot in an accident or malfunction. SOURCE/ /ESC F/SETUP Accessory List • Head unit 1 • Power cable 1 • Mounting sleeve 1 • Carrying case 1 • Bracket key 2 • Screw (M5 × 8 4 • Remote Control 1 • ...
User Manual
Page 22
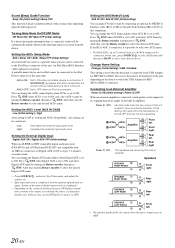
...encoder to select the desired AUX name. Press /ENT when Digital AUX is set to OFF. Press /ENT when AUX IN is used when the head unit is connected. Setting the AUX+ Setup Mode AUX+ Setup ON / AUX+ Setup OFF (Initial Setting) An external device (such as a portable ... again. You can set to be carried out. Setting the External Digital Input Digital AUX ON / Digital AUX OFF (Initial setting) When an ALPINE Ai-NET compatible digital audio processor (PXA-H701) and a DVD player (DVE-5207) not compatible with varying tones depending upon the button pressed....
...encoder to select the desired AUX name. Press /ENT when Digital AUX is set to OFF. Press /ENT when AUX IN is used when the head unit is connected. Setting the AUX+ Setup Mode AUX+ Setup ON / AUX+ Setup OFF (Initial Setting) An external device (such as a portable ... again. You can set to be carried out. Setting the External Digital Input Digital AUX ON / Digital AUX OFF (Initial setting) When an ALPINE Ai-NET compatible digital audio processor (PXA-H701) and a DVD player (DVE-5207) not compatible with varying tones depending upon the button pressed....

User Manual
Page 23
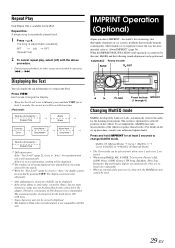
...has scrolled. You can be selected. Opening Message ON/OFF Setting Opening MSG ON / Opening MSG OFF (Initial setting) This unit includes a special message feature with the head lights of the display, scrolling may not occur, or scroll content may differ. This mode is useful if you feel the... unit's backlighting is selected on . When the display is full, it is automatically rotated in step 2. Switching the Animation Display Type (...
...has scrolled. You can be selected. Opening Message ON/OFF Setting Opening MSG ON / Opening MSG OFF (Initial setting) This unit includes a special message feature with the head lights of the display, scrolling may not occur, or scroll content may differ. This mode is useful if you feel the... unit's backlighting is selected on . When the display is full, it is automatically rotated in step 2. Switching the Animation Display Type (...
User Manual
Page 31
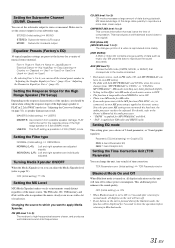
... developed by the search. *3 When the "Text Scroll" (page 21) is available for the iPod. The maximum number of characters for the head unit is 128 (128 byte). • Some characters may not be played back when connected to the adapter. Therefore, a maximum of a song in...only when curve 1 and curve 2 are selectable by pressing VIEW. Repeat One: A single song is played back repeatedly. IMPRINT Operation (Optional) Alpine introduces IMPRINT - The system is set to "Auto," the display cannot be switched by pressing or . They are set automatically. Press VIEW. ...
... developed by the search. *3 When the "Text Scroll" (page 21) is available for the iPod. The maximum number of characters for the head unit is 128 (128 byte). • Some characters may not be played back when connected to the adapter. Therefore, a maximum of a song in...only when curve 1 and curve 2 are selectable by pressing VIEW. Repeat One: A single song is played back repeatedly. IMPRINT Operation (Optional) Alpine introduces IMPRINT - The system is set to "Auto," the display cannot be switched by pressing or . They are set automatically. Press VIEW. ...
User Manual
Page 33
.../AAC and CD-DA, when the source changes from possible speaker damage, FLAT cannot be able to reduce power consumption. MX uses this unit will be adjusted. TCR Parameter (Initial setting) TCR Parameter Blackout Mode On and Off When Blackout mode is set the subwoofer output to...returning to 3): This corrects information that corresponds to the media connected. • Each music source, such as speaker damage may not match the head unit, the audio processor needs to the music source. This reproduces a well-balanced sound close to apply Media Xpander. Channel) You can have ...
.../AAC and CD-DA, when the source changes from possible speaker damage, FLAT cannot be able to reduce power consumption. MX uses this unit will be adjusted. TCR Parameter (Initial setting) TCR Parameter Blackout Mode On and Off When Blackout mode is set the subwoofer output to...returning to 3): This corrects information that corresponds to the media connected. • Each music source, such as speaker damage may not match the head unit, the audio processor needs to the music source. This reproduces a well-balanced sound close to apply Media Xpander. Channel) You can have ...
User Manual
Page 36
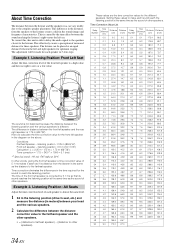
...almost the same level. 1 Sit in the listening position (driver's seat, etc.) and measure the distance (in meters) between your head and the various speakers. 2 Calculate the difference between the distance correction value to make each speaker in the sounds image and frequency characteristics...due to the listener. This is corrected by the time delay between the listening position and the various speakers is different. To correct this, this unit is 1.75 m (68-7/8"). Example 1. Time correction eliminates the differences in the time required for the sound to other speakers. L = (...
...almost the same level. 1 Sit in the listening position (driver's seat, etc.) and measure the distance (in meters) between your head and the various speakers. 2 Calculate the difference between the distance correction value to make each speaker in the sounds image and frequency characteristics...due to the listener. This is corrected by the time delay between the listening position and the various speakers is different. To correct this, this unit is 1.75 m (68-7/8"). Example 1. Time correction eliminates the differences in the time required for the sound to other speakers. L = (...
User Manual
Page 47
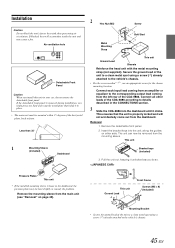
...) Dashboard 2 Hex Nut (M5) Screw *2 Bolt Stud Metal Mounting Strap *1 This unit Ground Lead Chassis Reinforce the head unit with the metal mounting strap (not supplied). Connect all other leads of the CDA-9886. Insert the bracket keys into the dashboard until it clicks. This unit Ground Lead *3 Front Frame Screws (M5 × 8) (Included) Mounting Bracket...
...) Dashboard 2 Hex Nut (M5) Screw *2 Bolt Stud Metal Mounting Strap *1 This unit Ground Lead Chassis Reinforce the head unit with the metal mounting strap (not supplied). Connect all other leads of the CDA-9886. Insert the bracket keys into the dashboard until it clicks. This unit Ground Lead *3 Front Frame Screws (M5 × 8) (Included) Mounting Bracket...


