
Owners Manual
Page 2
...Calendar (CDA-9855 only 7 Setting Time (CDA-9853 only 7 Opening and Closing the Movable Display ...... 8 Display Tilt Adjustment 8 Adjusting Volume 8 Lowering Volume Quickly 8 Detaching and Attaching the Front Panel ......... 8 Radio Changing the Radio Frequencies for each Country 9 Listening to Radio 9 ...CD Text 12 File/Folder Name Search (concerning MP3/ WMA 12 Sound Setting Adjusting Balance (Between Left and Right)/ Fader (Between Front and Rear)/Defeat ...... 15 Equalizer Presets 15 Setting User's EQ mode 15 Adjusting and Storing the Parametric Equalizer Curve 16 Adjusting...
...Calendar (CDA-9855 only 7 Setting Time (CDA-9853 only 7 Opening and Closing the Movable Display ...... 8 Display Tilt Adjustment 8 Adjusting Volume 8 Lowering Volume Quickly 8 Detaching and Attaching the Front Panel ......... 8 Radio Changing the Radio Frequencies for each Country 9 Listening to Radio 9 ...CD Text 12 File/Folder Name Search (concerning MP3/ WMA 12 Sound Setting Adjusting Balance (Between Left and Right)/ Fader (Between Front and Rear)/Defeat ...... 15 Equalizer Presets 15 Setting User's EQ mode 15 Adjusting and Storing the Parametric Equalizer Curve 16 Adjusting...
Owners Manual
Page 16
...47) to 3WAY, you can recall the stored preset number in "Adjusting and Storing the Graphic Equalizer Curve." (page 16) or "Adjusting and Storing the Parametric Equalizer Curve" (page 16) . 4 Press and hold MENU for a variety of EQ will return to the factory defaults and MX is turned off. &#...to return to normal mode. • If MENU is obtained in each mode. By setting Defeat ON, previously adjusted settings of musical source material. 1 Press MENU. 2 Select the Factory's EQ mode by sliding your finger on the GlideTouch bar to the normal mode. The main SETUP menu is displayed. 4...
...47) to 3WAY, you can recall the stored preset number in "Adjusting and Storing the Graphic Equalizer Curve." (page 16) or "Adjusting and Storing the Parametric Equalizer Curve" (page 16) . 4 Press and hold MENU for a variety of EQ will return to the factory defaults and MX is turned off. &#...to return to normal mode. • If MENU is obtained in each mode. By setting Defeat ON, previously adjusted settings of musical source material. 1 Press MENU. 2 Select the Factory's EQ mode by sliding your finger on the GlideTouch bar to the normal mode. The main SETUP menu is displayed. 4...
Owners Manual
Page 17
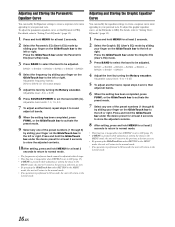
... by sliding your finger on the GlideTouch bar to the left or right. Press the GlideTouch bar under the Parametric EQ (User's EQ) mode. 3 Press BAND to select the band to be adjusted. or the GlideTouch bar to activate the preset mode. 9 Select any one of the preset numbers (1 through 6) by ...the GlideTouch bar under RETURN in the MENU mode, the unit will return to the normal mode. • If no peration is set the EQ mode to PEQ. Adjusting and Storing the Parametric Equalizer Curve You can modify the equalizer settings to create a response curve more appealing to your personal taste...
... by sliding your finger on the GlideTouch bar to the left or right. Press the GlideTouch bar under the Parametric EQ (User's EQ) mode. 3 Press BAND to select the band to be adjusted. or the GlideTouch bar to activate the preset mode. 9 Select any one of the preset numbers (1 through 6) by ...the GlideTouch bar under RETURN in the MENU mode, the unit will return to the normal mode. • If no peration is set the EQ mode to PEQ. Adjusting and Storing the Parametric Equalizer Curve You can modify the equalizer settings to create a response curve more appealing to your personal taste...
Owners Manual
Page 18
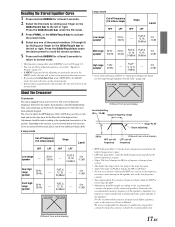
...Recalling the Stored Equalizer Curve 1 Press and hold MENU for at least 2 seconds. 2 Select the EQ mode by the frequencies for which they have been optimally designed. The crossover adjusts the HPF (high pass filter) or LPF (low pass filter) of each speaker pair can recall ...network may cause damage to the left or right. Press the GlideTouch bar under the EQ mode. 3 Press FUNC. Each channel is equipped with an active crossover. Adjustments should be driven by sliding your authorized Alpine dealer. 2 way mode Cut-off frequency (1/3 octave steps) Slope HPF LPF HPF ...
...Recalling the Stored Equalizer Curve 1 Press and hold MENU for at least 2 seconds. 2 Select the EQ mode by the frequencies for which they have been optimally designed. The crossover adjusts the HPF (high pass filter) or LPF (low pass filter) of each speaker pair can recall ...network may cause damage to the left or right. Press the GlideTouch bar under the EQ mode. 3 Press FUNC. Each channel is equipped with an active crossover. Adjustments should be driven by sliding your authorized Alpine dealer. 2 way mode Cut-off frequency (1/3 octave steps) Slope HPF LPF HPF ...

Owners Manual
Page 27
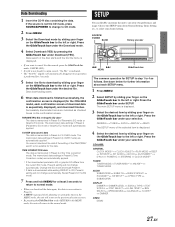
...If MENU is memorized in Preset 6 of the Parametric EQ mode or Graphic EQ mode. Data is performed in the USER'S presets ...adjusting or setting the itmes in the MENU mode, the unit will return to the normal mode. 26-EN i-Personalize™ Operation SOURCE/POWER MENU GlideTouch bar About i-Personalize™ You can download data (from Alpine's website) to a CD...adjustment. Data is downloaded by the "Data Downloading" operation to the calendar message. Press the GlideTouch bar under RETURN in the hard disc is set to CDA-9855/ CDA-9853. Setting the Multicolor Illumination (CDA...
...If MENU is memorized in Preset 6 of the Parametric EQ mode or Graphic EQ mode. Data is performed in the USER'S presets ...adjusting or setting the itmes in the MENU mode, the unit will return to the normal mode. 26-EN i-Personalize™ Operation SOURCE/POWER MENU GlideTouch bar About i-Personalize™ You can download data (from Alpine's website) to a CD...adjustment. Data is downloaded by the "Data Downloading" operation to the calendar message. Press the GlideTouch bar under RETURN in the hard disc is set to CDA-9855/ CDA-9853. Setting the Multicolor Illumination (CDA...
Owners Manual
Page 28
...) data The data is memorized in Preset 6 of the 2WAY/3WAY switch is not the CD mode, press SOURCE/POWER to change automatically. If the source is not suitable for the CDA-9853 model, each SETUP menu. 1 Press MENU. 2 Select SETUP by sliding your own preferences ...ADJUST ↔ PLAY MODE ↔ BEEP ↔ INT MUTE ↔ INT AUDIO ↔ AUX IN ↔ (AUX NAME)*2 ↔ D-AUX ↔ POWER IC ↔ STEERING ↔ CLOCK MODE*1 TUNER TUNER MODE ↔ TUNER AREA*3 ↔ XM ADF*4 ↔ TUNER MODE AUDIO SUBWOOFER ↔ SUBW CH ↔ SUBW SYSTEM*5 ↔ EQ...
...) data The data is memorized in Preset 6 of the 2WAY/3WAY switch is not the CD mode, press SOURCE/POWER to change automatically. If the source is not suitable for the CDA-9853 model, each SETUP menu. 1 Press MENU. 2 Select SETUP by sliding your own preferences ...ADJUST ↔ PLAY MODE ↔ BEEP ↔ INT MUTE ↔ INT AUDIO ↔ AUX IN ↔ (AUX NAME)*2 ↔ D-AUX ↔ POWER IC ↔ STEERING ↔ CLOCK MODE*1 TUNER TUNER MODE ↔ TUNER AREA*3 ↔ XM ADF*4 ↔ TUNER MODE AUDIO SUBWOOFER ↔ SUBW CH ↔ SUBW SYSTEM*5 ↔ EQ...
Owners Manual
Page 29
...adjust the volume, etc. • Depending on will be played back. • Perform this component. Turning Mute Mode On/Off INT MUTE ON (Initial setting) / INT MUTE OFF If a device having the interrupt feature is connected, audio will bypass EQ...CDs), playback may continue to be difficult. Then press the GlideTouch bar. For the CDA-9853 model, refer to "Setting Time (CDA-9853 only)" (page 7). *2 Displayed only when AUX is ON. *3 Refer to "Changing the Radio... Input D-AUX ON / D-AUX OFF (Initial setting) When an ALPINE Ai-NET compatible digital audio processor (PXAH510, PXA-H701) and a...
...adjust the volume, etc. • Depending on will be played back. • Perform this component. Turning Mute Mode On/Off INT MUTE ON (Initial setting) / INT MUTE OFF If a device having the interrupt feature is connected, audio will bypass EQ...CDs), playback may continue to be difficult. Then press the GlideTouch bar. For the CDA-9853 model, refer to "Setting Time (CDA-9853 only)" (page 7). *2 Displayed only when AUX is ON. *3 Refer to "Changing the Radio... Input D-AUX ON / D-AUX OFF (Initial setting) When an ALPINE Ai-NET compatible digital audio processor (PXAH510, PXA-H701) and a...

Owners Manual
Page 39
...the power on Remote Control 1 Source Button Press this button to the beginning of the button changes the audio processor mode. Normal mode → EQ mode (Equalizer Presets) → Time Correction mode (Recalling the Stored Time Correction) → Crossover mode (Recalling the Stored Crossover) → Normal... and hold this button to select a disc in ascending order. 4 g DN Button Radio mode: SEEK (DN) Button CD mode: Press this button to go back to select the audio source. 2 Volume Adjustment Buttons To increase the volume level: Press the L button To decrease the volume level:...
...the power on Remote Control 1 Source Button Press this button to the beginning of the button changes the audio processor mode. Normal mode → EQ mode (Equalizer Presets) → Time Correction mode (Recalling the Stored Time Correction) → Crossover mode (Recalling the Stored Crossover) → Normal... and hold this button to select a disc in ascending order. 4 g DN Button Radio mode: SEEK (DN) Button CD mode: Press this button to go back to select the audio source. 2 Volume Adjustment Buttons To increase the volume level: Press the L button To decrease the volume level:...


