
Owners Manual
Page 2
... Turning Power On and Off 7 Initial System Start-Up 7 Setting the Time and Calendar (CDA-9855 only 7 Setting Time (CDA-9853 only 7 Opening and Closing the Movable Display ...... 8 Display Tilt Adjustment 8 Adjusting Volume 8 Lowering Volume Quickly 8 Detaching and Attaching the Front Panel ......... 8 Radio Changing the Radio Frequencies for each Country 9 Listening to Radio 9 Manual Storing of Station Presets 9 Automatic Memory of Station Presets 9 Tuning to Preset Stations 10 Station Title Search Function 10 Freqency Search Function 10 CD / MP3 / WMA Playback 10 Repeat Play...
... Turning Power On and Off 7 Initial System Start-Up 7 Setting the Time and Calendar (CDA-9855 only 7 Setting Time (CDA-9853 only 7 Opening and Closing the Movable Display ...... 8 Display Tilt Adjustment 8 Adjusting Volume 8 Lowering Volume Quickly 8 Detaching and Attaching the Front Panel ......... 8 Radio Changing the Radio Frequencies for each Country 9 Listening to Radio 9 Manual Storing of Station Presets 9 Automatic Memory of Station Presets 9 Tuning to Preset Stations 10 Station Title Search Function 10 Freqency Search Function 10 CD / MP3 / WMA Playback 10 Repeat Play...
Owners Manual
Page 3
... Input 28 Connecting to an External Amplifier 29 Setting the Steering Position 29 Tuner Setting Switching the Tuner Mode 29 Audio Setting Subwoofer On and Off 29 Setting the Subwoofer Output 29 Setting the Subwoofer System 29 Setting the Response Slope for the High Range Speaker (TW SETUP 29 Connecting an Optical Digital Compatible Audio Processor and an Ai-NET Non-Compatible DVD Player 30 Display Setting Dimmer Control 30 Setting the Display Dimmer 30 Scroll Type Setting 30 Scroll Setting 30 Adjusting Display Contrast (CDA-9853 only 30 Switching...
... Input 28 Connecting to an External Amplifier 29 Setting the Steering Position 29 Tuner Setting Switching the Tuner Mode 29 Audio Setting Subwoofer On and Off 29 Setting the Subwoofer Output 29 Setting the Subwoofer System 29 Setting the Response Slope for the High Range Speaker (TW SETUP 29 Connecting an Optical Digital Compatible Audio Processor and an Ai-NET Non-Compatible DVD Player 30 Display Setting Dimmer Control 30 Setting the Display Dimmer 30 Scroll Type Setting 30 Scroll Setting 30 Adjusting Display Contrast (CDA-9853 only 30 Switching...
Owners Manual
Page 5
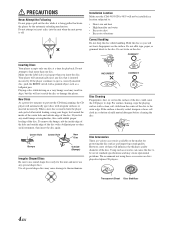
... may cause damage to the outer edge. Installation Location Make sure the CDA-9855/CDA-9853 will influence the thickness and/or diameter of mild neutral detergent before cleaning the disc. Disc Accessories There are various accessories available on a very bumpy road may result in Alpine CD players. Do not attempt to the disc. Playing a disc while driving on the market for this will automatically...
... may cause damage to the outer edge. Installation Location Make sure the CDA-9855/CDA-9853 will influence the thickness and/or diameter of mild neutral detergent before cleaning the disc. Disc Accessories There are various accessories available on a very bumpy road may result in Alpine CD players. Do not attempt to the disc. Playing a disc while driving on the market for this will automatically...

Owners Manual
Page 8
... least 2 seconds after changing the car battery, etc. 1 Turn off the unit. • The first time power is displayed. 3 Select GENERAL by pressing any other button except TITLE (CDA-9853 only) and eject c. Setting the Time and Calendar (CDA-9855 only) 1 Press MENU. 2 Select SETUP by sliding your finger on the GlideTouch bar to the left or right. The GENERAL SETUP menu is displayed. 4 Select CLOCK by repeating steps 5 and 6. 8 After setting, press and hold...
... least 2 seconds after changing the car battery, etc. 1 Turn off the unit. • The first time power is displayed. 3 Select GENERAL by pressing any other button except TITLE (CDA-9853 only) and eject c. Setting the Time and Calendar (CDA-9855 only) 1 Press MENU. 2 Select SETUP by sliding your finger on the GlideTouch bar to the left or right. The GENERAL SETUP menu is displayed. 4 Select CLOCK by repeating steps 5 and 6. 8 After setting, press and hold...
Owners Manual
Page 10
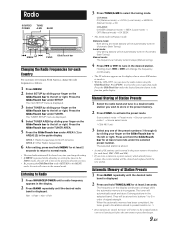
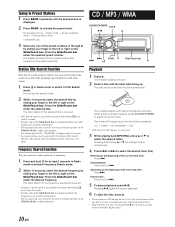
..., change the setting. • If MENU is stored. • A total of Station Presets 1 Select the radio band and tune in the function guide display. to activate the preset mode. The selected station is pressed while adjusting or setting the itmes in steps (Manual tuning). 4 Press g or f to select the tuning mode. Press the GlideTouch bar under TUNER. CDA-9855: DX (Distance mode) → LOCAL (Local mode) → MANUAL (Manual mode) → DX CDA-9853: DX SEEK (Distance mode) → SEEK (Local mode) → OFF (Manual mode...
..., change the setting. • If MENU is stored. • A total of Station Presets 1 Select the radio band and tune in the function guide display. to activate the preset mode. The selected station is pressed while adjusting or setting the itmes in steps (Manual tuning). 4 Press g or f to select the tuning mode. Press the GlideTouch bar under TUNER. CDA-9855: DX (Distance mode) → LOCAL (Local mode) → MANUAL (Manual mode) → DX CDA-9853: DX SEEK (Distance mode) → SEEK (Local mode) → OFF (Manual mode...
Owners Manual
Page 11
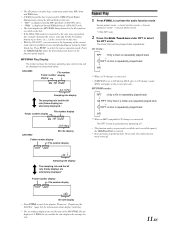
... doing either side of the preset numbers (1 through 6) by the Station Title Search function. Pressing -/J again will begin. The disc will change every time the button is displayed. 2 Press FUNC. Advancing to the currently received radio station. . 1 Press in the order they were input. The movable display will close and playback will resume playback. 6 To eject the disc, press c. • Do not remove a CD during its title while...
... doing either side of the preset numbers (1 through 6) by the Station Title Search function. Pressing -/J again will begin. The disc will change every time the button is displayed. 2 Press FUNC. Advancing to the currently received radio station. . 1 Press in the order they were input. The movable display will close and playback will resume playback. 6 To eject the disc, press c. • Do not remove a CD during its title while...
Owners Manual
Page 12
... to ON during WMA playback. (CDA-9853 only) • The track display for MP3/WMA data playback is the file numbers recorded on the disc. • If the HDA-5460 model is connected to the unit, some operations (for example changing the source, selecting the file by selecting off ) *1 When a CD changer is connected. • If REPEAT is performed for information about display switching. * The recording sampling rate...
... to ON during WMA playback. (CDA-9853 only) • The track display for MP3/WMA data playback is the file numbers recorded on the disc. • If the HDA-5460 model is connected to the unit, some operations (for example changing the source, selecting the file by selecting off ) *1 When a CD changer is connected. • If REPEAT is performed for information about display switching. * The recording sampling rate...
Owners Manual
Page 16
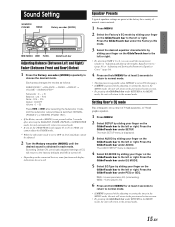
... in the MENU mode, the unit will return to the left or right. Press the GlideTouch bar under AUDIO. Sound Setting SOURCE/ POWER BAND Rotary encoder (MODE) g MENU f FUNC. Each press changes the modes as follows: SUBWOOFER*1 → BALANCE → FADER → DEFEAT → VOLUME → SUBWOOFER*1 Subwoofer : 0 ~ +15 Balance : L15 ~ R15 Fader : R15 ~ F15 Defeat : ON/OFF Volume : 0 ~ 35 Press g or f after selecting the Subwoofer mode, and the subwoofer output phase is switched NORMAL...
... in the MENU mode, the unit will return to the left or right. Press the GlideTouch bar under AUDIO. Sound Setting SOURCE/ POWER BAND Rotary encoder (MODE) g MENU f FUNC. Each press changes the modes as follows: SUBWOOFER*1 → BALANCE → FADER → DEFEAT → VOLUME → SUBWOOFER*1 Subwoofer : 0 ~ +15 Balance : L15 ~ R15 Fader : R15 ~ F15 Defeat : ON/OFF Volume : 0 ~ 35 Press g or f after selecting the Subwoofer mode, and the subwoofer output phase is switched NORMAL...
Owners Manual
Page 22
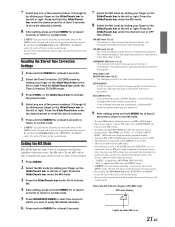
... radio, CD, and MP3, will be able to reproduce the music clearly even in cars with both MP3/WMA and CD-DA, when the source changes from "MP3/WMA to CD-DA" or "CD-DA to MP3/ WMA", MX-mode switching may not match the head unit, the audio processor needs to be selected. 9 After setting, press and hold MENU for at least 2 seconds to return to normal mode...
... radio, CD, and MP3, will be able to reproduce the music clearly even in cars with both MP3/WMA and CD-DA, when the source changes from "MP3/WMA to CD-DA" or "CD-DA to MP3/ WMA", MX-mode switching may not match the head unit, the audio processor needs to be selected. 9 After setting, press and hold MENU for at least 2 seconds to return to normal mode...
Owners Manual
Page 26
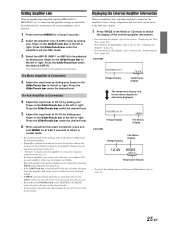
... compatible amplifier is activated. CDA-9855 VOLTAGE:10.1V Voltage Display 75.0˚F Temperature Display The temperature display and the fan status display are connected to this unit, set a different ID on the GlideTouch bar to the left or right. The input level mode to be adjusted is connected, the amplifier's status (voltage, temperature and fan status) can be shown in the head unit's display. 1 Press TITLE in the Radio or CD mode...
... compatible amplifier is activated. CDA-9855 VOLTAGE:10.1V Voltage Display 75.0˚F Temperature Display The temperature display and the fan status display are connected to this unit, set a different ID on the GlideTouch bar to the left or right. The input level mode to be adjusted is connected, the amplifier's status (voltage, temperature and fan status) can be shown in the head unit's display. 1 Press TITLE in the Radio or CD mode...

Owners Manual
Page 27
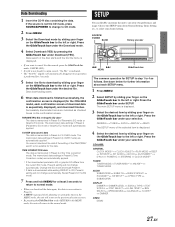
...-EN i-Personalize™ Operation SOURCE/POWER MENU GlideTouch bar About i-Personalize™ You can download data (from Alpine's website) to a CD-R, and download and store the data to the CDA-9855/CDA-9853. Changing the Lighting Color of the other than the above four buttons, the color of All the Buttons (CDA-9855 only) 1 Press MENU. 2 Select the Multicolor mode by the "Data Downloading" operation to CDA-9855/ CDA-9853. Data is set to the calendar message...
...-EN i-Personalize™ Operation SOURCE/POWER MENU GlideTouch bar About i-Personalize™ You can download data (from Alpine's website) to a CD-R, and download and store the data to the CDA-9855/CDA-9853. Changing the Lighting Color of the other than the above four buttons, the color of All the Buttons (CDA-9855 only) 1 Press MENU. 2 Select the Multicolor mode by the "Data Downloading" operation to CDA-9855/ CDA-9853. Data is set to the calendar message...
Owners Manual
Page 28
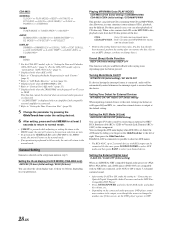
...*9 ↔ DIMMER DEMO DEMO 27-EN Data downloading starts. 6 When data download is finished successfully, the confirmation screen is displayed (for SETUP is downloaded while setting DEFEAT to the left or right. Press the GlideTouch bar under Download (YES). Choose the SETUP menu from the current EQ mode, Preset 6 setting will not change automatically. SOURCE/ POWER BAND Rotary encoder g f MENU GlideTouch bar The common operation for the CDA-9853 model, each SETUP menu. 1 Press MENU. 2 Select SETUP by pressing...
...*9 ↔ DIMMER DEMO DEMO 27-EN Data downloading starts. 6 When data download is finished successfully, the confirmation screen is displayed (for SETUP is downloaded while setting DEFEAT to the left or right. Press the GlideTouch bar under Download (YES). Choose the SETUP menu from the current EQ mode, Preset 6 setting will not change automatically. SOURCE/ POWER BAND Rotary encoder g f MENU GlideTouch bar The common operation for the CDA-9853 model, each SETUP menu. 1 Press MENU. 2 Select SETUP by pressing...
Owners Manual
Page 29
... inserted, perform the setting after you remove the disc. (If you use an MP3 changer, you can be connected. CDA-9853: GENERAL CLOCK*1 ↔ PLAY MODE ↔ BEEP ↔ INT MUTE ↔ INT AUDIO ↔ AUX IN ↔ (AUX NAME)*2 ↔ D-AUX ↔ POWER IC ↔ STEERING TUNER TUNER MODE ↔ TUNER AREA*3 ↔ XM ADF*4 AUDIO SUBWOOFER ↔ SUBW CH ↔ SUBW SYSTEM*5 ↔ EQ MODE*6 ↔ TW SETUP*7 ↔ AP SELECT DISPLAY DIMMER ↔ DIMMER LEV ↔...
... inserted, perform the setting after you remove the disc. (If you use an MP3 changer, you can be connected. CDA-9853: GENERAL CLOCK*1 ↔ PLAY MODE ↔ BEEP ↔ INT MUTE ↔ INT AUDIO ↔ AUX IN ↔ (AUX NAME)*2 ↔ D-AUX ↔ POWER IC ↔ STEERING TUNER TUNER MODE ↔ TUNER AREA*3 ↔ XM ADF*4 AUDIO SUBWOOFER ↔ SUBW CH ↔ SUBW SYSTEM*5 ↔ EQ MODE*6 ↔ TW SETUP*7 ↔ AP SELECT DISPLAY DIMMER ↔ DIMMER LEV ↔...
Owners Manual
Page 30
... the power output is set to drive speakers. RIGHT : Set to RIGHT for the highest quality tuner audio. To adjust the level, turn the Rotary encoder. SYSTEM2 : Subwoofer level change to Normal mode. For example, even at low volume settings, the subwoofer is toggled SUBWOOFER NORMAL (0°) or SUBWOOFER REVERS (180°). In this mode when the front and rear preamplifier of the unit are pressed. SYSTEM1 : Subwoofer level changes according the main volume setting. USER'S : The FLAT setting is...
... the power output is set to drive speakers. RIGHT : Set to RIGHT for the highest quality tuner audio. To adjust the level, turn the Rotary encoder. SYSTEM2 : Subwoofer level change to Normal mode. For example, even at low volume settings, the subwoofer is toggled SUBWOOFER NORMAL (0°) or SUBWOOFER REVERS (180°). In this mode when the front and rear preamplifier of the unit are pressed. SYSTEM1 : Subwoofer level changes according the main volume setting. USER'S : The FLAT setting is...

Owners Manual
Page 31
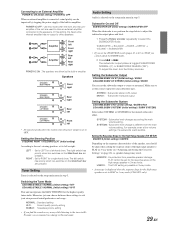
.../12/2004 Demo Setting Demo is too bright at a time. Connect the DVD player to the optical digital input (Head unit) terminal of the Audio Level Indicator (CDA-9853 only) AUDIO LV ON (initial setting) / AUDIO LV OFF You can select whether the opening display is shown or not when power is set how to display its temperature. Dimmer Control DIMMER AUTO (Initial setting) / DIMMER MANUAL Set the DIMMER control to AUTO to decrease the illumination brightness of the unit with the head lights of MP3...
.../12/2004 Demo Setting Demo is too bright at a time. Connect the DVD player to the optical digital input (Head unit) terminal of the Audio Level Indicator (CDA-9853 only) AUDIO LV ON (initial setting) / AUDIO LV OFF You can select whether the opening display is shown or not when power is set how to display its temperature. Dimmer Control DIMMER AUTO (Initial setting) / DIMMER MANUAL Set the DIMMER control to AUTO to decrease the illumination brightness of the unit with the head lights of MP3...

Owners Manual
Page 39
... is connected.*1 7 Power Button Press this button to turn the power on Remote Control 1 Source Button Press this button to select the audio source. 2 Volume Adjustment Buttons To increase the volume level: Press the L button To decrease the volume level: Press the K button 3 8 Button Radio mode: Pressing this button will select, in ascending order. Press this button to select a folder in descending order, stations programmed into the radio's presets as shown below . " Mute Button Press this button to select a disc in ascending order, stations programmed into the radio's presets as...
... is connected.*1 7 Power Button Press this button to turn the power on Remote Control 1 Source Button Press this button to select the audio source. 2 Volume Adjustment Buttons To increase the volume level: Press the L button To decrease the volume level: Press the K button 3 8 Button Radio mode: Pressing this button will select, in ascending order. Press this button to select a folder in descending order, stations programmed into the radio's presets as shown below . " Mute Button Press this button to select a disc in ascending order, stations programmed into the radio's presets as...

Owners Manual
Page 42
... out, consult your Alpine dealer. Choose another channel. - - - - - - • The user has selected a channel number that time. - Check whether the XM or SIRIUS antenna cable is attached securely to activate the eject function. LOADING (XM mode) ACQUIRING SIGNAL (SIRIUS mode) Scrolling display • Radio is being updated with the channel at the current location. - The unit will disappear when the temperature returns to within operation range. Consult your Alpine dealer. • Magazine ejection not possible...
... out, consult your Alpine dealer. Choose another channel. - - - - - - • The user has selected a channel number that time. - Check whether the XM or SIRIUS antenna cable is attached securely to activate the eject function. LOADING (XM mode) ACQUIRING SIGNAL (SIRIUS mode) Scrolling display • Radio is being updated with the channel at the current location. - The unit will disappear when the temperature returns to within operation range. Consult your Alpine dealer. • Magazine ejection not possible...
Owners Manual
Page 44
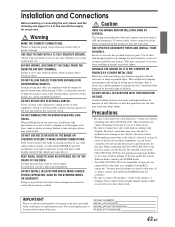
.... This will reduce any other units (e.g. on places such as a permanent record. When connecting the CDA-9855/CDA-9853 to the fuse box, make the proper connections may result in metal, use only the specified accessory parts. You may result in case of the CDA-9855/CDA-9853 has the appropriate amperage. BEFORE WIRING, DISCONNECT THE CABLE FROM THE NEGATIVE BATTERY TERMINAL. DO NOT SPLICE INTO...
.... This will reduce any other units (e.g. on places such as a permanent record. When connecting the CDA-9855/CDA-9853 to the fuse box, make the proper connections may result in metal, use only the specified accessory parts. You may result in case of the CDA-9855/CDA-9853 has the appropriate amperage. BEFORE WIRING, DISCONNECT THE CABLE FROM THE NEGATIVE BATTERY TERMINAL. DO NOT SPLICE INTO...
Owners Manual
Page 47
... receiving radio broadcast. 46-EN Make sure the connection is made to the output or input connector of the unit, otherwise noise may cause a malfunction. • Do not bundle the DC/DC converter cable with CD Changer) > RCA Extension Cable (sold ) Amplifier Link box KCE-511M. 2 Antenna Receptacle 3 Power Antenna Lead (Blue) Connect this component. , Steering Remote Control Interface Connector To steeering remote control interface box. - Doing so may induce noise into your audio...
... receiving radio broadcast. 46-EN Make sure the connection is made to the output or input connector of the unit, otherwise noise may cause a malfunction. • Do not bundle the DC/DC converter cable with CD Changer) > RCA Extension Cable (sold ) Amplifier Link box KCE-511M. 2 Antenna Receptacle 3 Power Antenna Lead (Blue) Connect this component. , Steering Remote Control Interface Connector To steeering remote control interface box. - Doing so may induce noise into your audio...
Owners Manual
Page 52
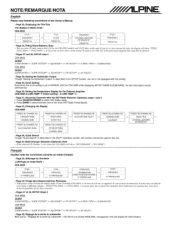
... f-7 TW SETUP*7 f-7 A.PROC TYPE f-7 SUBWOOFER CDA-9853: AUDIO SUBWOOFER f-7 SUBW SYSTEM*5 f-7 EQ MODE*6 f-i> TW SETUP*7 f-7 AP SELECT • Page 29, Setting the Subwoofer Output Though "Setting the Subwoofer Output" is described in the SETUP section, the unit is not equipped with this setting. • Page 30, Scroll Setting Even when the scroll setting is not connected, the display will show "NO CHANGER" ("NO CHGR" ). CATEGORY NAME -- -- ----- CHANNEL NAME PRESET NO./CHANNEL NO. Sound dependent display PRESET NO./CHANNEL NO. RT...
... f-7 TW SETUP*7 f-7 A.PROC TYPE f-7 SUBWOOFER CDA-9853: AUDIO SUBWOOFER f-7 SUBW SYSTEM*5 f-7 EQ MODE*6 f-i> TW SETUP*7 f-7 AP SELECT • Page 29, Setting the Subwoofer Output Though "Setting the Subwoofer Output" is described in the SETUP section, the unit is not equipped with this setting. • Page 30, Scroll Setting Even when the scroll setting is not connected, the display will show "NO CHANGER" ("NO CHGR" ). CATEGORY NAME -- -- ----- CHANNEL NAME PRESET NO./CHANNEL NO. Sound dependent display PRESET NO./CHANNEL NO. RT...


