User Manual
Page 2
... 6 CHAPTER 2 ...7 HARDWARE INSTALLATION 7 2.1 Installing the Wall Mount Kit 7 2.2 Connecting the Camera to LAN/WLAN 8 2.3 Applications of the Camera 8 CHAPTER 3 ...9 SOFTWARE INSTALLATION 9 3.1 Installing SkyIPCam Utility 9 3.2 Using SkyIPCam Utility 10 3.3 Viewing Images 16 3.4 Using SkyIPCam View 20 CHAPTER 4 ...34 CONFIGURATION ...34 4.1 Using the Web Configuration 34 4.2 Basic Setup ...34 4.3 Network Settings 37 4.4 Pan/Tilt Settings 42 4.5 Setting up Video & Audio 43 4.6 Event Server Configuration 47 4.7 Motion Detect ...50 4.8 Event Configuration 51 4.9 Tools...56...
... 6 CHAPTER 2 ...7 HARDWARE INSTALLATION 7 2.1 Installing the Wall Mount Kit 7 2.2 Connecting the Camera to LAN/WLAN 8 2.3 Applications of the Camera 8 CHAPTER 3 ...9 SOFTWARE INSTALLATION 9 3.1 Installing SkyIPCam Utility 9 3.2 Using SkyIPCam Utility 10 3.3 Viewing Images 16 3.4 Using SkyIPCam View 20 CHAPTER 4 ...34 CONFIGURATION ...34 4.1 Using the Web Configuration 34 4.2 Basic Setup ...34 4.3 Network Settings 37 4.4 Pan/Tilt Settings 42 4.5 Setting up Video & Audio 43 4.6 Event Server Configuration 47 4.7 Motion Detect ...50 4.8 Event Configuration 51 4.9 Tools...56...
User Manual
Page 4
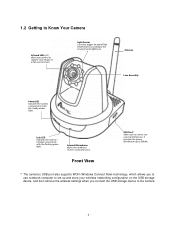
... the wireless settings when you to connect an external USB device. Front View USB Port* allows you connect the USB storage device to trigger on with the flashing green light. Light Sensor is powered on and off the Infrared LEDs according to receive sound and voice. Link LED indicates the camera's network connectivity with the steady amber light. Internal Microphone allows the camera to the environmental light level. Antenna Lens Assembly Power LED indicates the camera is used...
... the wireless settings when you to connect an external USB device. Front View USB Port* allows you connect the USB storage device to trigger on with the flashing green light. Light Sensor is powered on and off the Infrared LEDs according to receive sound and voice. Link LED indicates the camera's network connectivity with the steady amber light. Internal Microphone allows the camera to the environmental light level. Antenna Lens Assembly Power LED indicates the camera is used...
User Manual
Page 5
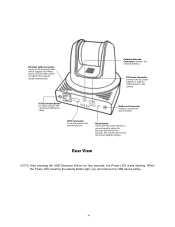
... connect the external devices. DC Power Connector connects the AC power adapter, in order to supply power to remove the connected USB device safely. USB Dismount Button is pressed and held for four seconds, the Power LED starts flashing. Audio-out Connector connects an external active speaker. GPIO Connectors is pressed quickly; When the Power LED resumes the steady amber light, you can detect the network speed automatically. External Antenna Connector connects the external antenna. Ethernet Cable Connector connects the network cable, which supports...
... connect the external devices. DC Power Connector connects the AC power adapter, in order to supply power to remove the connected USB device safely. USB Dismount Button is pressed and held for four seconds, the Power LED starts flashing. Audio-out Connector connects an external active speaker. GPIO Connectors is pressed quickly; When the Power LED resumes the steady amber light, you can detect the network speed automatically. External Antenna Connector connects the external antenna. Ethernet Cable Connector connects the network cable, which supports...

User Manual
Page 6
... on-the-spot audio via the Internet, allowing you can use the camera in a mixed operating system environment, such as Windows 2000 and Windows XP. „ Multiple Applications Supported Through the remote access technology, you to monitor the on-site voice. To view the real-time streaming image on your own purposes. The users are also allowed to monitor the image and take snapshots or record videos via the network. „ Supports Connection to External...
... on-the-spot audio via the Internet, allowing you can use the camera in a mixed operating system environment, such as Windows 2000 and Windows XP. „ Multiple Applications Supported Through the remote access technology, you to monitor the on-site voice. To view the real-time streaming image on your own purposes. The users are also allowed to monitor the image and take snapshots or record videos via the network. „ Supports Connection to External...

User Manual
Page 7
... Fast Ethernet. WLAN: IEEE 802.11b/g. „ Accessing the Camera by using Web Browser Platform: CPU: RAM: Resolution: User Interface: Microsoft® Windows® 2000/XP/Vista Intel Pentium III 800MHz or above 512MB 800x600 or above Microsoft® Internet Explorer 6.0 or above Apple Safari 2 or above Mozilla Firefox 2 or above „ Accessing the Camera by using SkyIPCam View Platform: Microsoft® Windows® 2000/XP/Vista Hardware Requirement: 1 camera connected...
... Fast Ethernet. WLAN: IEEE 802.11b/g. „ Accessing the Camera by using Web Browser Platform: CPU: RAM: Resolution: User Interface: Microsoft® Windows® 2000/XP/Vista Intel Pentium III 800MHz or above 512MB 800x600 or above Microsoft® Internet Explorer 6.0 or above Apple Safari 2 or above Mozilla Firefox 2 or above „ Accessing the Camera by using SkyIPCam View Platform: Microsoft® Windows® 2000/XP/Vista Hardware Requirement: 1 camera connected...

User Manual
Page 9
... you connect the AC power adapter, the camera is powered on standby and ready for use a wireless network in multiple applications, including: „ Monitor local and remote places and objects via Internet or Intranet. „ Capture still images and video clips remotely. „ Upload images or send email messages with "default" SSID. When the camera is on automatically. Connecting the External Antenna 2.3 Applications of the Camera The camera can verify the power status from the Power LED...
... you connect the AC power adapter, the camera is powered on standby and ready for use a wireless network in multiple applications, including: „ Monitor local and remote places and objects via Internet or Intranet. „ Capture still images and video clips remotely. „ Upload images or send email messages with "default" SSID. When the camera is on automatically. Connecting the External Antenna 2.3 Applications of the Camera The camera can verify the power status from the Power LED...

User Manual
Page 17
Access from Web Browser Step 1 If you may open the Web Browser on your camera (the default IP is 192.168.1.240) in the Address bar, and then press [Enter]. Step 2 Type the IP address of your network camera, you know the IP address of your computer. 3.3 Viewing Images Method 1 --- Step 3 Enter "admin" for both the User name and Password, and click OK. - 16 -
Access from Web Browser Step 1 If you may open the Web Browser on your camera (the default IP is 192.168.1.240) in the Address bar, and then press [Enter]. Step 2 Type the IP address of your network camera, you know the IP address of your computer. 3.3 Viewing Images Method 1 --- Step 3 Enter "admin" for both the User name and Password, and click OK. - 16 -
User Manual
Page 23
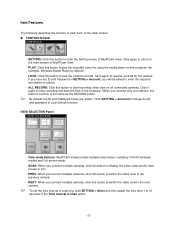
.... View mode buttons: SkyIPCam View provides multiple view modes, including 1/4/9/16 windows modes and Full screen mode. - VIEW SELECTION Panel - PREV: When you will be asked to enter the required information to display the video views as the RECORD button. LOCK: Click this button to unlock. - Click it again to stop recording and save the files in SETTING > Account, you connect multiple cameras, click this button to change the ID and password of SkyIPCam View. Click SETTING > Account to play the recorded video file using...
.... View mode buttons: SkyIPCam View provides multiple view modes, including 1/4/9/16 windows modes and Full screen mode. - VIEW SELECTION Panel - PREV: When you will be asked to enter the required information to display the video views as the RECORD button. LOCK: Click this button to unlock. - Click it again to stop recording and save the files in SETTING > Account, you connect multiple cameras, click this button to change the ID and password of SkyIPCam View. Click SETTING > Account to play the recorded video file using...

User Manual
Page 24
... the connected camera supports audio function. „ SYSTEM Panel This panel displays the current date and time. „ PAN-TILT CONTROL Panel When you connect a pan/tilt camera, the system will detect the camera's function automatically and the PAN-TILT CONTROL buttons will become functional. SNAPSHOT: Click this button to start recording a video clip using the selected camera and save the file in the computer. - „ CAMERA Panel - TALK: Click this button to the default position. - 23 - Direction/Home buttons...
... the connected camera supports audio function. „ SYSTEM Panel This panel displays the current date and time. „ PAN-TILT CONTROL Panel When you connect a pan/tilt camera, the system will detect the camera's function automatically and the PAN-TILT CONTROL buttons will become functional. SNAPSHOT: Click this button to start recording a video clip using the selected camera and save the file in the computer. - „ CAMERA Panel - TALK: Click this button to the default position. - 23 - Direction/Home buttons...

User Manual
Page 26
... displayed now. Enter the User name and Password for the camera, and then click OK. 3. z Select the Input tab to the Video View Window. Click SETTING to return to add a camera by entering its IP address directly. Click Search to update the latest information of camera. - 25 - SkyIPCam View might display the incorrect information or unauthorized error. Click SETTING > Refresh to search the available camera within the network.
... displayed now. Enter the User name and Password for the camera, and then click OK. 3. z Select the Input tab to the Video View Window. Click SETTING to return to add a camera by entering its IP address directly. Click Search to update the latest information of camera. - 25 - SkyIPCam View might display the incorrect information or unauthorized error. Click SETTING > Refresh to search the available camera within the network.

User Manual
Page 39
... services and listen for that enable the device-to be used if you are having problems, you are NOT using the camera with Bonjour will NOT use the DDNS function in your camera has a public IP address. Please note that are using a router, you are provided by visiting http://www.apple.com/bonjour/. „ Ports Number - DDNS function on the camera is ONLY used is anything from Apple's web...
... services and listen for that enable the device-to be used if you are having problems, you are NOT using the camera with Bonjour will NOT use the DDNS function in your camera has a public IP address. Please note that are using a router, you are provided by visiting http://www.apple.com/bonjour/. „ Ports Number - DDNS function on the camera is ONLY used is anything from Apple's web...
User Manual
Page 41
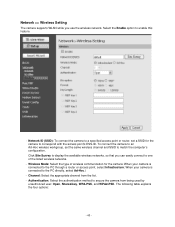
... camera is connected to match the computer's configuration. Channel: Select the appropriate channel from being used by unauthorized user: Open, Shared-key, WPA-PSK, and WPA2-PSK. Wireless Mode: Select the type of the listed wireless networks. - Select the Enable option to secure the camera from the list. - The following table explains the four options: - 40 - Network ID (SSID): To connect the camera to a specified access point or router, set...
... camera is connected to match the computer's configuration. Channel: Select the appropriate channel from being used by unauthorized user: Open, Shared-key, WPA-PSK, and WPA2-PSK. Wireless Mode: Select the type of the listed wireless networks. - Select the Enable option to secure the camera from the list. - The following table explains the four options: - 40 - Network ID (SSID): To connect the camera to a specified access point or router, set...

User Manual
Page 46
... Time Streaming Protocol (RTSP); Select the Disable option to disable this function. - 45 - NOTE: Your 3G mobile phone must support QuickTimeTM, RealPlayerTM, or VLC Media Player. Please contact your service provider when you fail to transfer the video clips without or with the default player on the phone) by entering the RTSP link: rtsp://(IP address of the camera)/3gp. Otherwise, select 3GPP Without Audio or 3GPP With Audio to use a mobile phone...
... Time Streaming Protocol (RTSP); Select the Disable option to disable this function. - 45 - NOTE: Your 3G mobile phone must support QuickTimeTM, RealPlayerTM, or VLC Media Player. Please contact your service provider when you fail to transfer the video clips without or with the default player on the phone) by entering the RTSP link: rtsp://(IP address of the camera)/3gp. Otherwise, select 3GPP Without Audio or 3GPP With Audio to use a mobile phone...

User Manual
Page 52
NAS Recording Time Per Event: Set up the retention time of the GPIO Trigger Out function. - 51 - Otherwise, leave this option blank to save the captured image/video files. GPIO Trigger Out Retention Time Per Event: Set up the recording time while you are using the NAS solution. - Event Configuration >> General Setting - Snapshot/Recording Subfolder: You can assign a descriptive name for the subfolder to use the default setting. - 4.8 Event Configuration The Event Config menu contains five sub-menus that provide the commands to configure event profiles.
NAS Recording Time Per Event: Set up the retention time of the GPIO Trigger Out function. - 51 - Otherwise, leave this option blank to save the captured image/video files. GPIO Trigger Out Retention Time Per Event: Set up the recording time while you are using the NAS solution. - Event Configuration >> General Setting - Snapshot/Recording Subfolder: You can assign a descriptive name for the subfolder to use the default setting. - 4.8 Event Configuration The Event Config menu contains five sub-menus that provide the commands to configure event profiles.

User Manual
Page 57
...; Factory Reset Click Reset to the power source during the process of the failure in upgrading firmware. - 56 - Restore: Click Browse to locate the new firmware file and then click Update. NOTE: Make sure to keep the camera connected to restore all factory default settings for your camera once you has obtained a latest version of the camera. - Otherwise, the camera might be retained after rebooting. „ Configuration You can save...
...; Factory Reset Click Reset to the power source during the process of the failure in upgrading firmware. - 56 - Restore: Click Browse to locate the new firmware file and then click Update. NOTE: Make sure to keep the camera connected to restore all factory default settings for your camera once you has obtained a latest version of the camera. - Otherwise, the camera might be retained after rebooting. „ Configuration You can save...
User Manual
Page 62
... IP addresses every time you use is an Internet protocol that can automatically configure a network device in an HTML page. AMR (Adaptive Multi-Rate) is adopted as 8-bit sequences of binary numbers, allowing a maximum of IP addresses rather than requiring an administrator to each other over media. E Enterprise network An enterprise network consists of collections of manually assigning it is a Windows platform audio and video file type, a common...
... IP addresses every time you use is an Internet protocol that can automatically configure a network device in an HTML page. AMR (Adaptive Multi-Rate) is adopted as 8-bit sequences of binary numbers, allowing a maximum of IP addresses rather than requiring an administrator to each other over media. E Enterprise network An enterprise network consists of collections of manually assigning it is a Windows platform audio and video file type, a common...

User Manual
Page 63
... - A gateway links computers that operates in packets across the Internet. Short for internal usage only. For example, the decimal number 15 is used to F. Most Ethernet networks use different data formats together. The only difference is that IP address. All Internet addresses are frequently used to carry information, in the form of CSMA/CD that use Category 5 cabling to prevent unauthorized Internet users from a private network. Your Internet service...
... - A gateway links computers that operates in packets across the Internet. Short for internal usage only. For example, the decimal number 15 is used to F. Most Ethernet networks use different data formats together. The only difference is that IP address. All Internet addresses are frequently used to carry information, in the form of CSMA/CD that use Category 5 cabling to prevent unauthorized Internet users from a private network. Your Internet service...

User Manual
Page 64
...) protocol or the Internet Protocol (IP). - 63 - MJPEG (Motion JPEG) composes a moving picture. They are responsible for a network operating system are in different geographic locations and are forwarded to -Point Protocol over the Ethernet share a common connection. Communication on an internal network appear to determine whether a specific IP address is transferred across the medium, and how servers respond to the specified address and waits for...
...) protocol or the Internet Protocol (IP). - 63 - MJPEG (Motion JPEG) composes a moving picture. They are responsible for a network operating system are in different geographic locations and are forwarded to -Point Protocol over the Ethernet share a common connection. Communication on an internal network appear to determine whether a specific IP address is transferred across the medium, and how servers respond to the specified address and waits for...

User Manual
Page 65
... real-time communication for Voice over IP (VoIP), which defines the transmission of video and audio files in an unshielded sheath. - 64 - Simple Network Management Protocol. Unshielded twisted-pair. Transceivers also can also be used for Internet mail. Transmission Control Protocol/Internet Protocol is the standard used transport protocol that connects diverse computers of various transmission methods. R RJ-45 Router RTP RTSP S Server SIP SMTP SNMP...
... real-time communication for Voice over IP (VoIP), which defines the transmission of video and audio files in an unshielded sheath. - 64 - Simple Network Management Protocol. Unshielded twisted-pair. Transceivers also can also be used for Internet mail. Transmission Control Protocol/Internet Protocol is the standard used transport protocol that connects diverse computers of various transmission methods. R RJ-45 Router RTP RTSP S Server SIP SMTP SNMP...

Quick Installation Guide
Page 11
Step 2 Type the IP address of your network camera, you may open the Web Browser on your camera (the default IP is 192.168.1.240) in the Address bar, and then press [Enter]. Access from "Web Browser" Step 1 If you know the IP address of your computer. Step 3 Enter "admin" for both the User name and Password, and click OK. Section 4 Viewing Images Method 1 ---
Step 2 Type the IP address of your network camera, you may open the Web Browser on your camera (the default IP is 192.168.1.240) in the Address bar, and then press [Enter]. Access from "Web Browser" Step 1 If you know the IP address of your computer. Step 3 Enter "admin" for both the User name and Password, and click OK. Section 4 Viewing Images Method 1 ---


