Airlink AICAP650 Support and Manuals
Get Help and Manuals for this Airlink item
View All Support Options Below
Free Airlink AICAP650 manuals!
Problems with Airlink AICAP650?
Ask a Question
Free Airlink AICAP650 manuals!
Problems with Airlink AICAP650?
Ask a Question
Most Recent Airlink AICAP650 Questions

Camera Does Not Save The Ip Settings And Ssid Value For Wireless Operation
After setting up the IP and the gateway correctly I save the settings but it does not save those val...
After setting up the IP and the gateway correctly I save the settings but it does not save those val...
(Posted by Anonymous-146701 9 years ago)
Airlink AICAP650 Videos

Airlink AICAP650
Duration: 1:49
Total Views: 84
Duration: 1:49
Total Views: 84
Popular Airlink AICAP650 Manual Pages
User Manual - Page 2
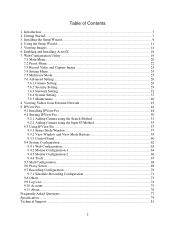
... ActiveX 16 7. Installing the Setup Wizard...9 4. Table of Contents
1. Using the Setup Wizard ...11 5. Web Configuration Utility ...19
7.1 Main Menu...20 7.2 Preset Menu ...22 7.3 Record Video and Capture Image 23 7.4 Setting Menu...24 7.5 Multiview Mode...25 7.6 Advanced Setting ...26
7.6.1 Camera Setting...26 7.6.2 Security Setting...29 7.6.3 Network Setting ...32 7.6.4 System Setting ...37...
User Manual - Page 3
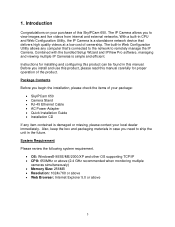
... of your purchase of the product. Introduction
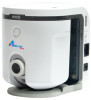
Congratulations on your package:
• SkyIPCam 650 • Camera Stand • RJ-45 Ethernet Cable • AC Power Adapter • Quick Installation Guide • Installation CD
If any computer that's connected to the network to remotely manage the IP Camera. Instructions for proper operation of this manual. With a built-in this...
User Manual - Page 5
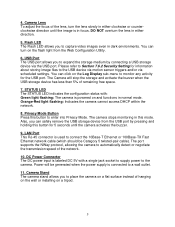
...holding this button for information about storing image files to the camera. The port supports the NWay protocol, allowing the camera to capture video images even in either direction.
5. STATUS ...installing on and functions in focus. LAN Port This RJ-45 connector is connected to Section 7.6.2 Security Setting for 5 seconds until the image is in normal mode. Camera Stand The camera...
User Manual - Page 7

... to perform the following tasks: 1. Connect the IP Camera to ensure proper setup of the camera. When operating in this Manual carefully to your network. 2. Install the Setup Wizard. 3. Caution: The IP Camera is recommended to protect the IP Camera. 2. Then, secure the camera stand with the bottom part of the IP Camera. Please follow the steps in extremely bright environment...
User Manual - Page 14
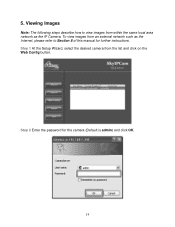
Step 1 At the Setup Wizard, select the desired camera from within the same local area network as the IP Camera. Step 2 Enter the password for further instructions.
5. Viewing Images
Note: The following steps describe how to Section 8 of this manual for the camera (Default is admin) and click OK.
14 To view images from an external network such as the...
User Manual - Page 27
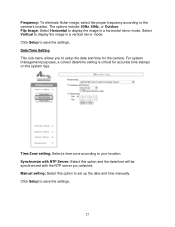
... this option to display the image in a horizontal mirror mode. For system management purposes, a correct date/time setting is critical for the camera. Select Vertical to set up the date and time manually.
Frequency: To eliminate flicker image, select the proper frequency according to save the settings.
27 Click Setup to your location. Time Zone setting: Select a time zone...
User Manual - Page 29
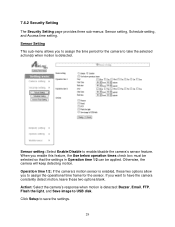
... Operation time 1/2 can be applied. Click Setup to enable/disable the camera's sensor feature. Sensor Setting This sub-menu allows you to assign the operational time frame for the camera to take the selected action(s) when motion is detected: Buzzer, Email, FTP, Flash the light, and Save image to assign the time period for the...
User Manual - Page 30
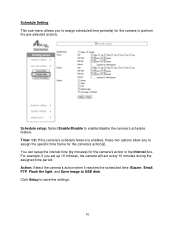
For example, if you to assign the specific time frame for the camera's action(s). Click Setup to enable/disable the camera's schedule feature. Schedule setup: Select Enable/Disable to save the settings.
30 Timer 1/2: If the camera's schedule feature is enabled, these two options allow you set up 10 minutes, the camera will act every 10 minutes during the assigned...
User Manual - Page 31
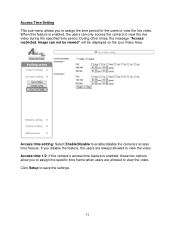
... the specific time frame when users are always allowed to view the video. Access time 1/2: If the camera's access time feature is enabled, the users can not be viewed" will be displayed on the Live Video Area.
During other times, the message "Access restricted. Click Setup to enable/disable the camera's access time feature. Access Time Setting...
User Manual - Page 32
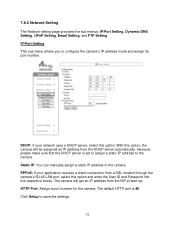
... network uses a DHCP server, select this option and enter the User ID and Password into the respective boxes. Click Setup to the camera. 7.6.3 Network Setting
The Network setting page provides five sub-menus: IP/Port Setting, Dynamic DNS Setting, UPnP Setting, Email Setting, and FTP Setting. With this option, the camera will get an IP address from the ISP at start up...
User Manual - Page 33
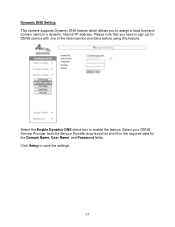
... for DDNS service with one of the listed service providers before using this feature. Click Setup to a dynamic Internet IP address.
Dynamic DNS Setting This camera supports Dynamic DNS feature which allows you have to enable the feature. Select the Enable Dynamic DNS check box to sign up for the Domain Name, User Name, and Password fields. Please...
User Manual - Page 36
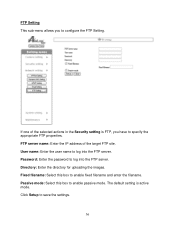
... the password to log into the FTP server. If one of the target FTP site. Directory: Enter the directory for uploading the images. Fixed filename: Select this box to enable passive mode.
The default setting is FTP, you to configure the FTP Setting. User name: Enter the user name to log into the FTP server. Click Setup...
User Manual - Page 42
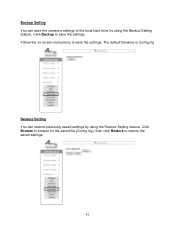
... click Restore to save the settings. Backup Setting You can restore previously saved settings by using the Restore Setting feature. Click Backup to the local hard drive by using the Backup Setting feature. The default filename is Config.cfg
Restore Setting You can save the camera's settings to save the settings. Follow the on-screen instructions to restore the saved...
User Manual - Page 67
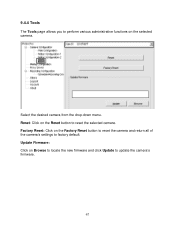
... Browse to locate the new firmware and click Update to perform various administrative functions on the selected camera. 9.4.4 Tools
The Tools page allows you to update the camera's firmware.
67
Reset: Click on the Factory Reset button to reset the camera and return all of the camera's settings to reset the selected camera. Factory Reset: Click on the Reset button...
User Manual - Page 78

... and port-forwarding settings.
Q: There is in the image.
78 A: A likely issue is that is behind a router, you 'll need to reposition the camera to sunlight or halogen light.
Q: Why does the camera work locally but not externally? A1: A probable cause might be the incorrect display settings for details. Troubleshooting
Q: I cannot access the camera from External Network...
Airlink AICAP650 Reviews
We have not received any reviews for Airlink yet.