User Manual
Page 2
Viewing Videos from External Network 45 9. Getting Started ...7 3. Enabling and Installing ActiveX 16 7. Using the Setup Wizard ...11 5. Table of Contents 1. Web Configuration Utility ...19 7.1 Main Menu...20 7.2 Preset Menu ...22 7.3 Record Video and Capture Image 23 7.4 Setting Menu...24 7.5 Multiview Mode...25 7.6 Advanced Setting ...26 7.6.1 Camera Setting...26 7.6.2 Security Setting...29 7.6.3 Network Setting ...32 7.6.4 System Setting ...37 7.6.5 Maintenance...40 8. Viewing Images ...14 6. IPView Pro...48 9.1 Installing IPView Pro...48 9.2 Starting IPView Pro ...50 9.2.1...
Viewing Videos from External Network 45 9. Getting Started ...7 3. Enabling and Installing ActiveX 16 7. Using the Setup Wizard ...11 5. Table of Contents 1. Web Configuration Utility ...19 7.1 Main Menu...20 7.2 Preset Menu ...22 7.3 Record Video and Capture Image 23 7.4 Setting Menu...24 7.5 Multiview Mode...25 7.6 Advanced Setting ...26 7.6.1 Camera Setting...26 7.6.2 Security Setting...29 7.6.3 Network Setting ...32 7.6.4 System Setting ...37 7.6.5 Maintenance...40 8. Viewing Images ...14 6. IPView Pro...48 9.1 Installing IPView Pro...48 9.2 Starting IPView Pro ...50 9.2.1...
User Manual
Page 3
...-in CPU and Web Configuration Utility, the IP Camera is simple and efficient. Combined with the bundled Setup Wizard and IPView Pro software, managing and viewing multiple IP Cameras is a standalone network device that 's connected to the network to view images and live videos from internal and external networks. Before you need to ship the unit in case you install and use this product, please read this manual carefully for installing and configuring this product can...
...-in CPU and Web Configuration Utility, the IP Camera is simple and efficient. Combined with the bundled Setup Wizard and IPView Pro software, managing and viewing multiple IP Cameras is a standalone network device that 's connected to the network to view images and live videos from internal and external networks. Before you need to ship the unit in case you install and use this product, please read this manual carefully for installing and configuring this product can...

User Manual
Page 4
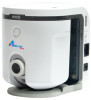
Front and Side View 1. ACCESS LED The ACCESS LED indicates the system status with: Green light on: The camera is sending/receiving data to/from the Web Configuration Utility. 4 Internal MIC The built-in Privacy Mode. 3. Green light flashing: The camera is powered on. Components Guide This section explains the function of an infrared emitting source which allows you have to enable the sensor from the LAN port. PIR Sensor The Passive...
Front and Side View 1. ACCESS LED The ACCESS LED indicates the system status with: Green light on: The camera is sending/receiving data to/from the Web Configuration Utility. 4 Internal MIC The built-in Privacy Mode. 3. Green light flashing: The camera is powered on. Components Guide This section explains the function of an infrared emitting source which allows you have to enable the sensor from the LAN port. PIR Sensor The Passive...
User Manual
Page 5
... in this button for 5 seconds until the image is used to capture video images even in focus. Flash LED The Flash LED allows you can safely remove the USB storage device from the Web Configuration Utility. 6. Also, you to connect the 10Base-T Ethernet or 100Base-TX Fast Ethernet network cable (which should be generated when the power supply is powered on the flash light from the USB port by connecting a USB storage device via scheduled settings. You can...
... in this button for 5 seconds until the image is used to capture video images even in focus. Flash LED The Flash LED allows you can safely remove the USB storage device from the Web Configuration Utility. 6. Also, you to connect the 10Base-T Ethernet or 100Base-TX Fast Ethernet network cable (which should be generated when the power supply is powered on the flash light from the USB port by connecting a USB storage device via scheduled settings. You can...

User Manual
Page 6
Press and hold the button for 5 seconds will reset the camera' settings to reboot the camera. Hanging Hole These two holes allow you can perform reboot or factory reset from the Web Configuration Utility. 3. Reset Button Press the button to the factory default. Screw Hole The screw hole is used to attach the camera to hang the camera on a wall. 6 Alternatively, you to a stand or tripod. 2. Rear and Bottom View 1.
Press and hold the button for 5 seconds will reset the camera' settings to reboot the camera. Hanging Hole These two holes allow you can perform reboot or factory reset from the Web Configuration Utility. 3. Reset Button Press the button to the factory default. Screw Hole The screw hole is used to attach the camera to hang the camera on a wall. 6 Alternatively, you to a stand or tripod. 2. Rear and Bottom View 1.

User Manual
Page 7
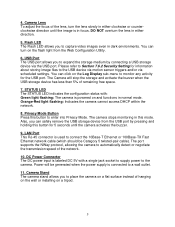
2. Install the Setup Wizard. 3. Configure the IP Camera using the IP Camera, you'll need to perform the following tasks: 1. Please follow the steps in extremely bright environment, an iris lens or sun visor is designed for indoor use only. When operating in this Manual carefully to the CMOS sensor. Then, secure the camera stand with the bottom part of the IP Camera. Caution: The IP...
2. Install the Setup Wizard. 3. Configure the IP Camera using the IP Camera, you'll need to perform the following tasks: 1. Please follow the steps in extremely bright environment, an iris lens or sun visor is designed for indoor use only. When operating in this Manual carefully to the CMOS sensor. Then, secure the camera stand with the bottom part of the IP Camera. Caution: The IP...

User Manual
Page 15
The IP camera is ready for use now. If you did not change the default password, you can view the live video appears on your Web Browser (Internet Explorer) before accessing the camera. Step 3 The welcome page appears. Step 4 The Main menu along with the live videos. For more information, please refer to do so before you will be installed and enabled on screen. Note: ActiveX must be prompted to the next section. 15
The IP camera is ready for use now. If you did not change the default password, you can view the live video appears on your Web Browser (Internet Explorer) before accessing the camera. Step 3 The welcome page appears. Step 4 The Main menu along with the live videos. For more information, please refer to do so before you will be installed and enabled on screen. Note: ActiveX must be prompted to the next section. 15

User Manual
Page 21
... mode button ( ) to enter into privacy mode. PIR Sensor On/Off The Sensor button ( ) turns on/off the camera's motion detection feature which allows you to capture clear images in Buzzer setting of the camera. Adjust the Camera Lens Position You can control the camera lens position by clicking the Up/Down/Left/Right arrow buttons in the area of the live video to change the position of the camera. Clicking the Home button...
... mode button ( ) to enter into privacy mode. PIR Sensor On/Off The Sensor button ( ) turns on/off the camera's motion detection feature which allows you to capture clear images in Buzzer setting of the camera. Adjust the Camera Lens Position You can control the camera lens position by clicking the Up/Down/Left/Right arrow buttons in the area of the live video to change the position of the camera. Clicking the Home button...
User Manual
Page 31
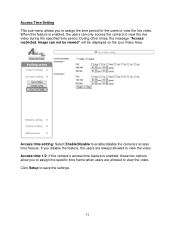
Image can only access the camera to view the live video. Click Setup to enable/disable the camera's access time feature. Access time setting: Select Enable/Disable to save the settings. 31 Access Time Setting This sub-menu allows you to assign the time period for the users to view the live video during the specified time period. Access time 1/2: If the camera's access time feature is enabled, the users can not be viewed" will be displayed on the Live Video Area. When this feature is enabled, these two options...
Image can only access the camera to view the live video. Click Setup to enable/disable the camera's access time feature. Access time setting: Select Enable/Disable to save the settings. 31 Access Time Setting This sub-menu allows you to assign the time period for the users to view the live video during the specified time period. Access time 1/2: If the camera's access time feature is enabled, the users can not be viewed" will be displayed on the Live Video Area. When this feature is enabled, these two options...
User Manual
Page 32
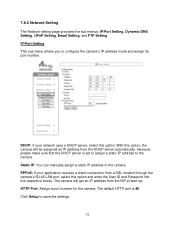
... network uses a DHCP server, select this option and enter the User ID and Password into the respective boxes. Click Setup to the camera. DHCP: If your application requires a direct connection from the ISP at start up. Static IP: You can manually assign a static IP address to save the settings. 32 The default HTTP port is set to assign a static IP address to configure the camera's IP address mode and assign its port number. HTTP Port: Assign a port number...
... network uses a DHCP server, select this option and enter the User ID and Password into the respective boxes. Click Setup to the camera. DHCP: If your application requires a direct connection from the ISP at start up. Static IP: You can manually assign a static IP address to save the settings. 32 The default HTTP port is set to assign a static IP address to configure the camera's IP address mode and assign its port number. HTTP Port: Assign a port number...
User Manual
Page 33
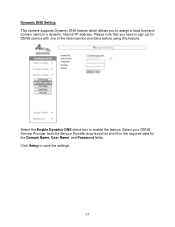
Dynamic DNS Setting This camera supports Dynamic DNS feature which allows you have to sign up for the Domain Name, User Name, and Password fields. Please note that you to assign a fixed host and domain name to a dynamic Internet IP address. Select the Enable Dynamic DNS check box to save the settings. 33 Select your DDNS Service Provider from the Service Provider drop-down list and fill in the required data for DDNS service with one of the listed service providers before using this feature. Click Setup to enable the feature.
Dynamic DNS Setting This camera supports Dynamic DNS feature which allows you have to sign up for the Domain Name, User Name, and Password fields. Please note that you to assign a fixed host and domain name to a dynamic Internet IP address. Select the Enable Dynamic DNS check box to save the settings. 33 Select your DDNS Service Provider from the Service Provider drop-down list and fill in the required data for DDNS service with one of the listed service providers before using this feature. Click Setup to enable the feature.

User Manual
Page 35
... to log into the mail server. Password: Enter the password to log into the mail server. Click Setup to your network configuration. SMTP/POP server: Enter the mail server in the Security setting is set to specify the appropriate Email properties. Authentication mode: Select the correct authentication mode according to configure the Email setting. Sender: Enter the e-mail address of the user who will send the e-mail. Email Setting This sub-menu allows you...
... to log into the mail server. Password: Enter the password to log into the mail server. Click Setup to your network configuration. SMTP/POP server: Enter the mail server in the Security setting is set to specify the appropriate Email properties. Authentication mode: Select the correct authentication mode according to configure the Email setting. Sender: Enter the e-mail address of the user who will send the e-mail. Email Setting This sub-menu allows you...

User Manual
Page 38
... setup page, you can directly access the camera as a Power user without entering the username and password; The newly added user will appear under the User list. 38 When the option is enabled, you to configure user-level access to the camera. User authentication: When this feature is disabled, you will be a Power or Guest user and click Add Update button. User add/update: To add or modify a user, complete the required settings in the login window to access the camera. User Setting...
... setup page, you can directly access the camera as a Power user without entering the username and password; The newly added user will appear under the User list. 38 When the option is enabled, you to configure user-level access to the camera. User authentication: When this feature is disabled, you will be a Power or Guest user and click Add Update button. User add/update: To add or modify a user, complete the required settings in the login window to access the camera. User Setting...
User Manual
Page 42
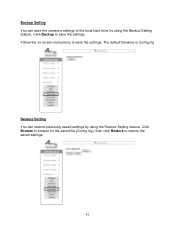
The default filename is Config.cfg Restore Setting You can save the camera's settings to save the settings. Click Backup to restore the saved settings. 42 Click Browse to browse for the saved file (Config.cfg), then click Restore to save the settings. Backup Setting You can restore previously saved settings by using the Restore Setting feature. Follow the on-screen instructions to the local hard drive by using the Backup Setting feature.
The default filename is Config.cfg Restore Setting You can save the camera's settings to save the settings. Click Backup to restore the saved settings. 42 Click Browse to browse for the saved file (Config.cfg), then click Restore to save the settings. Backup Setting You can restore previously saved settings by using the Restore Setting feature. Follow the on-screen instructions to the local hard drive by using the Backup Setting feature.

User Manual
Page 45
... your router's web configuration utility. Network A's router has an Internet IP Address (WAN IP) of the computers in Network A, open the web browser (Internet Explorer or Netscape), enter the Camera's IP Address 192.168.1.240 in the Address Bar and press Enter. Before you begin, you'll need to access the Camera. Example: Network A = Location of the Camera Camera's IP Address is 10.0.0.1 and 10.0.0.2 Network B = Location of your ISP for the camera. 45 The ISP's DNS IP Address is...
... your router's web configuration utility. Network A's router has an Internet IP Address (WAN IP) of the computers in Network A, open the web browser (Internet Explorer or Netscape), enter the Camera's IP Address 192.168.1.240 in the Address Bar and press Enter. Before you begin, you'll need to access the Camera. Example: Network A = Location of the Camera Camera's IP Address is 10.0.0.1 and 10.0.0.2 Network B = Location of your ISP for the camera. 45 The ISP's DNS IP Address is...

User Manual
Page 56
Step 4 You should see your camera added to apply the changes. Step 5 Click Save to the Camera List. Step 6 Click on the System Configuration button to close the System Configuration Window. 56 Step 2b For remote camera, enter the Internet IP Address (WAN IP) of the remote router and the port number of the open HTTP Port of the remote camera and click Add Camera. Step 3 Enter the User Name and Password for the camera. (Default is admin for both).
Step 4 You should see your camera added to apply the changes. Step 5 Click Save to the Camera List. Step 6 Click on the System Configuration button to close the System Configuration Window. 56 Step 2b For remote camera, enter the Internet IP Address (WAN IP) of the remote router and the port number of the open HTTP Port of the remote camera and click Add Camera. Step 3 Enter the User Name and Password for the camera. (Default is admin for both).

User Manual
Page 59
The view window can use the Up/Down Arrow Buttons to view the videos from the currently selected camera. View Modes: Select the desired view mode. Scan Mode: Scans through each camera. Use the View Mode Buttons to 16 cameras simultaneously. From left to right: Up/Down Arrows: If you can display up to select the desired viewing mode. 9.3.2 View Window and View Mode Buttons The View Window displays video from each camera at a set interval (in seconds). 59 Full-Screen Mode: Displays the video in your network, you have more than one camera in full-screen.
The view window can use the Up/Down Arrow Buttons to view the videos from the currently selected camera. View Modes: Select the desired view mode. Scan Mode: Scans through each camera. Use the View Mode Buttons to 16 cameras simultaneously. From left to right: Up/Down Arrows: If you can display up to select the desired viewing mode. 9.3.2 View Window and View Mode Buttons The View Window displays video from each camera at a set interval (in seconds). 59 Full-Screen Mode: Displays the video in your network, you have more than one camera in full-screen.
User Manual
Page 67
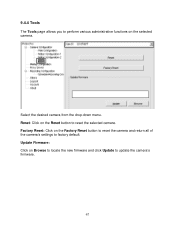
Select the desired camera from the drop-down menu. Reset: Click on Browse to locate the new firmware and click Update to update the camera's firmware. 67 Update Firmware: Click on the Reset button to reset the selected camera. 9.4.4 Tools The Tools page allows you to perform various administrative functions on the Factory Reset button to reset the camera and return all of the camera's settings to factory default. Factory Reset: Click on the selected camera.
Select the desired camera from the drop-down menu. Reset: Click on Browse to locate the new firmware and click Update to update the camera's firmware. 67 Update Firmware: Click on the Reset button to reset the selected camera. 9.4.4 Tools The Tools page allows you to perform various administrative functions on the Factory Reset button to reset the camera and return all of the camera's settings to factory default. Factory Reset: Click on the selected camera.

User Manual
Page 78
... 8 Viewing Videos from a web browser. If there is behind a router, you 'll need to configure the router to change one of broad vertical white lines appear throughout the image? A1: If the camera is an IP address conflict, you 'll need to open up the appropriate port and port-forwarding settings. Q: How can I improve the image? Try a different network cable. Troubleshooting Q: I cannot access the camera from External Network for details. A: You can adjust the camera's focus manually...
... 8 Viewing Videos from a web browser. If there is behind a router, you 'll need to configure the router to change one of broad vertical white lines appear throughout the image? A1: If the camera is an IP address conflict, you 'll need to open up the appropriate port and port-forwarding settings. Q: How can I improve the image? Try a different network cable. Troubleshooting Q: I cannot access the camera from External Network for details. A: You can adjust the camera's focus manually...

User Manual
Page 79
... are viewing the images through the web browser? If your web browser does not support ActiveX, you can use the bundled IPView Pro software instead. Sensitivity @ -42dB +/- 3dB Compression : PCM Hardware CPU: ADMtek 5120 RAM: 32MB Flash ROM: 4MB OS: Linux PIR Sensor: Sensor distance @ 5 m (max.); Tilt @ +45° ~ -5° LED: One bi-color Access LED (green/orange); Area @ X: +/- 15°, Y: +/- 15 ° Buzzer: Internal alarm buzzer USB Port: Standard USB TypeA connector, USB 2.0/1.1 support Pan...
... are viewing the images through the web browser? If your web browser does not support ActiveX, you can use the bundled IPView Pro software instead. Sensitivity @ -42dB +/- 3dB Compression : PCM Hardware CPU: ADMtek 5120 RAM: 32MB Flash ROM: 4MB OS: Linux PIR Sensor: Sensor distance @ 5 m (max.); Tilt @ +45° ~ -5° LED: One bi-color Access LED (green/orange); Area @ X: +/- 15°, Y: +/- 15 ° Buzzer: Internal alarm buzzer USB Port: Standard USB TypeA connector, USB 2.0/1.1 support Pan...


