
X183H / X193HQ Service Guide
Page 3
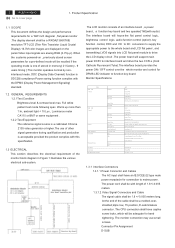
...Video input signals are analog RGB (0.7Vp-p). 2 ACER X193HQ Go to function key board. Product Specification 1.1 SCOPE This document defines the design and performance requirements for a 19W inch diagonal , flat panel monitor .The display element shall be recalled if the operating... with the DPMS (Display Power Management Signaling) standard. 1.2 GENERAL REQUIREMENTS 1.2.1Test Condition Brightness level & contrast level max. Monitor Specifications Signal Input (Analog) ITEM Signal Input (Digital) Connector Power Consumption User'sControl Pre-Defined Timing...
...Video input signals are analog RGB (0.7Vp-p). 2 ACER X193HQ Go to function key board. Product Specification 1.1 SCOPE This document defines the design and performance requirements for a 19W inch diagonal , flat panel monitor .The display element shall be recalled if the operating... with the DPMS (Display Power Management Signaling) standard. 1.2 GENERAL REQUIREMENTS 1.2.1Test Condition Brightness level & contrast level max. Monitor Specifications Signal Input (Analog) ITEM Signal Input (Digital) Connector Power Consumption User'sControl Pre-Defined Timing...
X183H / X193HQ Service Guide
Page 4
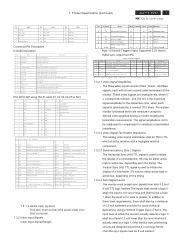
... DDC interface 8 Analog V-Sync V-sync for the VESA DDC 2Bi function DVI-I /DVI-D Connector Pin Description Pin Name Desription 1 RX2- Product Specification (continued) ACER X193HQ 3 Go to G round N ote 1) Schm itt-T riggers Input , Supported 3.3V device H (& V ) sync output from the host system SCL signal input... This analog video signal termination shall be 75Ω+/-1% which shall be resistive with its own coaxial cable terminated at which the monitor actually detects a logic 0 shall be either active high or active low, depending upon the timing .The Vertical Sync (VS)...
... DDC interface 8 Analog V-Sync V-sync for the VESA DDC 2Bi function DVI-I /DVI-D Connector Pin Description Pin Name Desription 1 RX2- Product Specification (continued) ACER X193HQ 3 Go to G round N ote 1) Schm itt-T riggers Input , Supported 3.3V device H (& V ) sync output from the host system SCL signal input... This analog video signal termination shall be 75Ω+/-1% which shall be resistive with its own coaxial cable terminated at which the monitor actually detects a logic 0 shall be either active high or active low, depending upon the timing .The Vertical Sync (VS)...
X183H / X193HQ Service Guide
Page 5
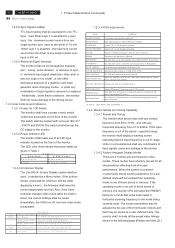
... the front of a graphics card video generator when changing modes , or when any horizontal frequency from factory shipment data. K ey M ENU > < A u to the monitor 1.3.3.2 Power Indicator LED The monitor shall make use of input signals is displayed. E m p o w erin g M e n u o r su b .m e n u E X IT /S c e n a...Controls and Indicators 1.3.3.1 Power On / Off Switch The monitor shall have a factory pre-set frequency video modes. 4 ACER X193HQ Go to A d ju st fu n c tio n . Additionally , under these conditions , the monitor shall not cause damage to 83KHz. The LED color...
... the front of a graphics card video generator when changing modes , or when any horizontal frequency from factory shipment data. K ey M ENU > < A u to the monitor 1.3.3.2 Power Indicator LED The monitor shall make use of input signals is displayed. E m p o w erin g M e n u o r su b .m e n u E X IT /S c e n a...Controls and Indicators 1.3.3.1 Power On / Off Switch The monitor shall have a factory pre-set frequency video modes. 4 ACER X193HQ Go to A d ju st fu n c tio n . Additionally , under these conditions , the monitor shall not cause damage to 83KHz. The LED color...
X183H / X193HQ Service Guide
Page 6
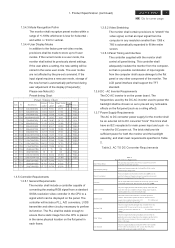
...177; 1KV) and IEC 801-5 (± 2KV) for both the monitor and the backlight assembly, and shall meet requirements specified in this table shall not cause damage to 265 AVC sinusoidal for DC power out. Product Specification (continued) ACER X193HQ 5 Go to 63 Hz over the specified voltage and frequency ranges. ...the flat panel or any noticeable effects on the flat panel (such as a result on the flat panel in the pow-eorff. in The monitor shall recognize preset modes within +/-1Hz for one hour at full load, 25 oC, and nominal input line voltage. The power supply shall ...
...177; 1KV) and IEC 801-5 (± 2KV) for both the monitor and the backlight assembly, and shall meet requirements specified in this table shall not cause damage to 265 AVC sinusoidal for DC power out. Product Specification (continued) ACER X193HQ 5 Go to 63 Hz over the specified voltage and frequency ranges. ...the flat panel or any noticeable effects on the flat panel (such as a result on the flat panel in the pow-eorff. in The monitor shall recognize preset modes within +/-1Hz for one hour at full load, 25 oC, and nominal input line voltage. The power supply shall ...
X183H / X193HQ Service Guide
Page 7
...display device shall be inspected with timings that conforms to cover page 1. Product Specification (continued) 1.3.8 Display Communications Channel The monitor assembly shall provide a display communications channel that may the controller supply the panel with all video timings from outside connections while... allowed except those specified below.The conditions of the lamps. for instance, requesting the serial number via the OSD). 6 ACER X193HQ Go to VESA DDC2Bi hardware requirements. Furthermore, it 's own specification regardless of the timings being sent from the edge of...
...display device shall be inspected with timings that conforms to cover page 1. Product Specification (continued) 1.3.8 Display Communications Channel The monitor assembly shall provide a display communications channel that may the controller supply the panel with all video timings from outside connections while... allowed except those specified below.The conditions of the lamps. for instance, requesting the serial number via the OSD). 6 ACER X193HQ Go to VESA DDC2Bi hardware requirements. Furthermore, it 's own specification regardless of the timings being sent from the edge of...
X183H / X193HQ Service Guide
Page 13
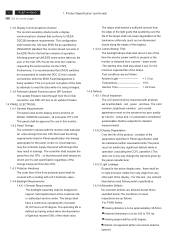
...-head screwdriver screwed the S3 No.1~2 screws till that power board and bracket chassis base firmly attached.(No1~3 screw size=M3x6; Torque=9~10KGFxCM). 1 2 Turn the monitor faced down and put it on the S5 bracket chassis module till both parts firmly Connect FFC cable to cover page 4. Assembly and Disassembly Procedures... screwdriver screwed the S2 No.1~4 screws till that interface board and bracket chassis base firmly attached. (No1~2 screw size=M3x6; No4 screw size=M4x8; 12 ACER X193HQ Go to LCD panel.
...-head screwdriver screwed the S3 No.1~2 screws till that power board and bracket chassis base firmly attached.(No1~3 screw size=M3x6; Torque=9~10KGFxCM). 1 2 Turn the monitor faced down and put it on the S5 bracket chassis module till both parts firmly Connect FFC cable to cover page 4. Assembly and Disassembly Procedures... screwdriver screwed the S2 No.1~4 screws till that interface board and bracket chassis base firmly attached. (No1~2 screw size=M3x6; No4 screw size=M4x8; 12 ACER X193HQ Go to LCD panel.

X183H / X193HQ Service Guide
Page 15
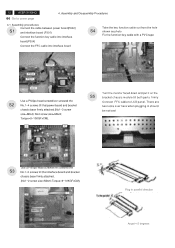
... the left side S17 of stand, DVI cable, and user's manual ,power cable on the front bezel with two S14 tapes. 14 ACER X193HQ Go to cover the LCD S16 monitor. Stick Vista and TC003 label on the carton then packing the carton FEATURE LABEL VISTA LABEL Take two cushion foams; S19 Move...
... the left side S17 of stand, DVI cable, and user's manual ,power cable on the front bezel with two S14 tapes. 14 ACER X193HQ Go to cover the LCD S16 monitor. Stick Vista and TC003 label on the carton then packing the carton FEATURE LABEL VISTA LABEL Take two cushion foams; S19 Move...
X183H / X193HQ Service Guide
Page 16
Assembly and Disassembly Procedures (continued) ACER X193HQ 15 Go to remove the screen protector card then turn over the LCD monitor (screen faced down), VISTA LABEL Take out all accessories including D-SUB S2 cable power cable, DVI cables, user's manual, and packing material from the carton. (...
Assembly and Disassembly Procedures (continued) ACER X193HQ 15 Go to remove the screen protector card then turn over the LCD monitor (screen faced down), VISTA LABEL Take out all accessories including D-SUB S2 cable power cable, DVI cables, user's manual, and packing material from the carton. (...
X183H / X193HQ Service Guide
Page 17
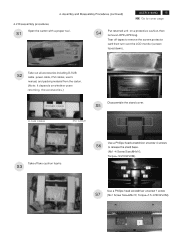
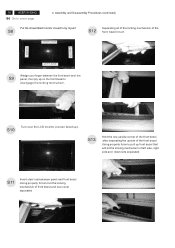
... faced up on the front bezel to cover page 4. 16 ACER X193HQ Go to disengage the locking mechanism. Assembly and Disassembly Procedures (continued) Put the dissembled monitor closed to by myself S8 S12 Separating all of the locking mechanism of the front bezel in turn RIGHT SIDE DOWN SIDE UP SIDE LEFT ...
... faced up on the front bezel to cover page 4. 16 ACER X193HQ Go to disengage the locking mechanism. Assembly and Disassembly Procedures (continued) Put the dissembled monitor closed to by myself S8 S12 Separating all of the locking mechanism of the front bezel in turn RIGHT SIDE DOWN SIDE UP SIDE LEFT ...
X183H / X193HQ Service Guide
Page 32
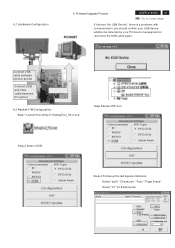
... monitor and kit Connect USB and VGA cable between PC and kit 6.2 Realtek F/W Configuration: Step-1 Launch the utility of "DebugTool_V6.2.exe" Step-3Select ISP icon. 6.1 Hardware Configuration 6. Step-2 Select "USB" Step-4 Follow up the red square indication Select "both","Checksum","Auto","Page Erase", Select "21" for Extend size. Firmware Upgrade Process ACER X193HQ...
... monitor and kit Connect USB and VGA cable between PC and kit 6.2 Realtek F/W Configuration: Step-1 Launch the utility of "DebugTool_V6.2.exe" Step-3Select ISP icon. 6.1 Hardware Configuration 6. Step-2 Select "USB" Step-4 Follow up the red square indication Select "both","Checksum","Auto","Page Erase", Select "21" for Extend size. Firmware Upgrade Process ACER X193HQ...
X183H / X193HQ Service Guide
Page 34
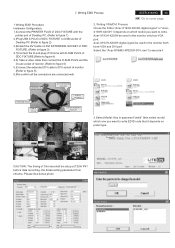
Writing EDID Process ACER X193HQ 33 Go to cover page 1 Writing EDID Procedure Hardware Configuration: 1.)Connect the PRINTER PLUG of DDC FIXTURE with D-SUB PLUG of DDC FIXTURE (Refer to figure 4) 4.2) Take a video cable then connect the D-SUB PLUG and the D-sub socket of monitor. (Refer to figure 5) 5.)Connect the ...extended DVI cable to DVI socket of Chroma shall be used in the monitor both have VGA and DVI port Select the "Acer-M1&M3-XPEDID-DVI-.exe" to execute it depends on DVI EXTENDING SOCKET of DDC FIXTURE. (Refer to figure 3) 4.1)Connect the D-...
Writing EDID Process ACER X193HQ 33 Go to cover page 1 Writing EDID Procedure Hardware Configuration: 1.)Connect the PRINTER PLUG of DDC FIXTURE with D-SUB PLUG of DDC FIXTURE (Refer to figure 4) 4.2) Take a video cable then connect the D-SUB PLUG and the D-sub socket of monitor. (Refer to figure 5) 5.)Connect the ...extended DVI cable to DVI socket of Chroma shall be used in the monitor both have VGA and DVI port Select the "Acer-M1&M3-XPEDID-DVI-.exe" to execute it depends on DVI EXTENDING SOCKET of DDC FIXTURE. (Refer to figure 3) 4.1)Connect the D-...


