
X1160 User's Guide EN
Page 2
... specifically disclaims the implied warranties of this publication without the prior written permission of such revisions or changes. Acer Projector X1160/X1260 Series Model number Serial number Date of purchase Place of purchase Acer and the Acer logo are registered trademarks of purchase information in this manual or supplementary documents and publications. This company makes...
... specifically disclaims the implied warranties of this publication without the prior written permission of such revisions or changes. Acer Projector X1160/X1260 Series Model number Serial number Date of purchase Place of purchase Acer and the Acer logo are registered trademarks of purchase information in this manual or supplementary documents and publications. This company makes...

X1160 User's Guide EN
Page 3
... to ensure reliable operation of the product and to unplug the power cord from the wall outlet before removing the power supply unit from the projector. • If the system has multiple sources of any kind into the product. These openings must not be seriously damaged. • Slots and openings are...
... to ensure reliable operation of the product and to unplug the power cord from the wall outlet before removing the power supply unit from the projector. • If the system has multiple sources of any kind into the product. These openings must not be seriously damaged. • Slots and openings are...

X1160 User's Guide EN
Page 5
... a need for purchase options. v Product servicing Do not attempt to service this product from walls and free flow of air around the projector is necessary. • Locations where temperatures may become excessively high, such as opening or removing covers may expose you to dangerous voltage points...eyes. • Turn on . The bright may result in following the operating instructions Note: Adjust only those controls that is on the projector first and then signal sources • Do not place the product in damage and will often require extensive work by a qualified technician to...
... a need for purchase options. v Product servicing Do not attempt to service this product from walls and free flow of air around the projector is necessary. • Locations where temperatures may become excessively high, such as opening or removing covers may expose you to dangerous voltage points...eyes. • Turn on . The bright may result in following the operating instructions Note: Adjust only those controls that is on the projector first and then signal sources • Do not place the product in damage and will often require extensive work by a qualified technician to...
X1160 User's Guide EN
Page 6
... rare occasions. • Never replace the lamp assembly or any object when the projector is unplugged. • The product will detect the life of displaying inverted images for the fan to the sun. Only use acer ceiling mount kit for replacement. • Do not operate lamps beyond the rated ... lamp, press HIDE on end vertically. The only user serviceable part is securely installed. It can lead to fire. • When switching the projector off, sugges to become heated and deformed or even cause a fire. vi might cause fire or electric shock. To temporarily turn off the main...
... rare occasions. • Never replace the lamp assembly or any object when the projector is unplugged. • The product will detect the life of displaying inverted images for the fan to the sun. Only use acer ceiling mount kit for replacement. • Do not operate lamps beyond the rated ... lamp, press HIDE on end vertically. The only user serviceable part is securely installed. It can lead to fire. • When switching the projector off, sugges to become heated and deformed or even cause a fire. vi might cause fire or electric shock. To temporarily turn off the main...

X1160 User's Guide EN
Page 9
... disposed of the global environment, please recycle. For more information on the Waste from Electrical and Electronics Equipment (WEEE) regulations, visit http://global.acer.com/about/ sustainability.htm Mercury advisory For projectors or electronic products containing an LCD/CRT monitor or display: Lamp(s) inside this electronic device into the trash when discarding.
... disposed of the global environment, please recycle. For more information on the Waste from Electrical and Electronics Equipment (WEEE) regulations, visit http://global.acer.com/about/ sustainability.htm Mercury advisory For projectors or electronic products containing an LCD/CRT monitor or display: Lamp(s) inside this electronic device into the trash when discarding.
X1160 User's Guide EN
Page 10
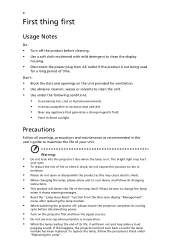
... for a long period of time. Warning: • Do not look into the projector's lens when the lamp is on the projector first and then the signal sources. • Do not use lens cap when projector is not being used for ventilation. • Use abrasive cleaners, waxes or solvents .... • Disconnect the power plug from the Onscreen display "Management" menu after replacing the lamp module. • When switching the projector off, please ensure the projector completes its life, it shows warning messages. • Reset the "Lamp Hour Reset" function from AC outlet if the product is ...
... for a long period of time. Warning: • Do not look into the projector's lens when the lamp is on the projector first and then the signal sources. • Do not use lens cap when projector is not being used for ventilation. • Use abrasive cleaners, waxes or solvents .... • Disconnect the power plug from the Onscreen display "Management" menu after replacing the lamp module. • When switching the projector off, please ensure the projector completes its life, it shows warning messages. • Reset the "Lamp Hour Reset" function from AC outlet if the product is ...
X1160 User's Guide EN
Page 11
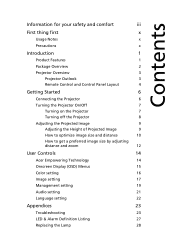
... Started 6 Connecting the Projector 6 Turning the Projector On/Off 7 Turning on the Projector 7 Turning off the Projector 8 Adjusting the Projected Image 9 Adjusting the Height of Projected Image 9 How to optimize image size and distance 10 How to get a preferred image size by adjusting distance and zoom 12 User Controls 14 Acer Empowering Technology 14 Onscreen...
... Started 6 Connecting the Projector 6 Turning the Projector On/Off 7 Turning on the Projector 7 Turning off the Projector 8 Adjusting the Projected Image 9 Adjusting the Height of Projected Image 9 How to optimize image size and distance 10 How to get a preferred image size by adjusting distance and zoom 12 User Controls 14 Acer Empowering Technology 14 Onscreen...
X1160 User's Guide EN
Page 13
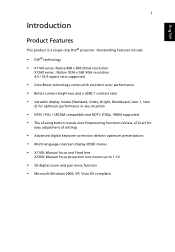
English 1 Introduction Product Features This product is a single-chip DLP® projector. Outstanding features include: • DLP® technology • X1160 series: Native 800 x 600 SVGA resolution X1260 series : Native 1024 x 768 XGA resolution 4:3 / 16:9 aspect ratio supported • ... in any situation • NTSC / PAL / SECAM compatible and HDTV (720p, 1080i) supported • The eCaring button reveals Acer Empowering functions (eView, eTimer) for easy adjustment of settings • Advanced digital keystone correction delivers optimum presentations • Multi-language ...
English 1 Introduction Product Features This product is a single-chip DLP® projector. Outstanding features include: • DLP® technology • X1160 series: Native 800 x 600 SVGA resolution X1260 series : Native 1024 x 768 XGA resolution 4:3 / 16:9 aspect ratio supported • ... in any situation • NTSC / PAL / SECAM compatible and HDTV (720p, 1080i) supported • The eCaring button reveals Acer Empowering functions (eView, eTimer) for easy adjustment of settings • Advanced digital keystone correction delivers optimum presentations • Multi-language ...

X1160 User's Guide EN
Page 14
Contact your unit is missing. English 2 Package Overview This projector comes with lens cap Power cord CR2025 3V Composite video cable Battery User's guide Remote control VGA cable Security card Acer Projector Quick Start Guide Quick start guide Check to make sure your dealer immediately if any thing is complete. Projector with all the items shown below.
Contact your unit is missing. English 2 Package Overview This projector comes with lens cap Power cord CR2025 3V Composite video cable Battery User's guide Remote control VGA cable Security card Acer Projector Quick Start Guide Quick start guide Check to make sure your dealer immediately if any thing is complete. Projector with all the items shown below.

X1160 User's Guide EN
Page 15
English 3 Projector Overview Projector Outlook Front / upper side 1 2 3 4 # Description 1 Zoom ring (X1260 series) 2 Focus ring 3 Zoom lens 4 Lens cap Rear side 5 6 7 # Description 5 Power button and Power Indicator LED 6 Remote control 7 Remote control receiver 1 237 4 8 9 5 # Description... input connector 2 S-Video input connector 3 Composite video input connector 4 USB connector 5 Power socket 6 # Description 6 KensingtonTM lock port Below items are for X1260 series only: 7 RS232 connector 8 Monitor loop-through output connector (VGA-Out) 9 Audio input connector
English 3 Projector Overview Projector Outlook Front / upper side 1 2 3 4 # Description 1 Zoom ring (X1260 series) 2 Focus ring 3 Zoom lens 4 Lens cap Rear side 5 6 7 # Description 5 Power button and Power Indicator LED 6 Remote control 7 Remote control receiver 1 237 4 8 9 5 # Description... input connector 2 S-Video input connector 3 Composite video input connector 4 USB connector 5 Power socket 6 # Description 6 KensingtonTM lock port Below items are for X1260 series only: 7 RS232 connector 8 Monitor loop-through output connector (VGA-Out) 9 Audio input connector
X1160 User's Guide EN
Page 16
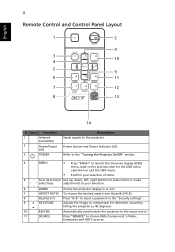
...Description Sends signals to choose RGB, Component, S-Video, Composite and HDTV sources. Power button and Power Indicator LED. Refer to the "Turning the Projector On/Off" section. 4 MENU • Press "MENU" to launch the Onscreen display (OSD) menu, back to the previous step for the...of items. 5 Four directional Use up, down, left, right buttons to select items or make select keys adjustments to your selection. 6 ZOOM Zooms the projector display in or out. 7 ASPECT RATIO To choose the desired aspect ratio (Auto/4:3/16:9). 8 KeyPad 0~9 Press "0~9" to input a password in the ...
...Description Sends signals to choose RGB, Component, S-Video, Composite and HDTV sources. Power button and Power Indicator LED. Refer to the "Turning the Projector On/Off" section. 4 MENU • Press "MENU" to launch the Onscreen display (OSD) menu, back to the previous step for the...of items. 5 Four directional Use up, down, left, right buttons to select items or make select keys adjustments to your selection. 6 ZOOM Zooms the projector display in or out. 7 ASPECT RATIO To choose the desired aspect ratio (Auto/4:3/16:9). 8 KeyPad 0~9 Press "0~9" to input a password in the ...
X1160 User's Guide EN
Page 17
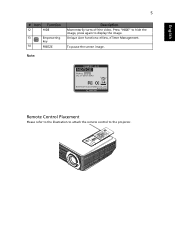
To pause the screen image. Press "HIDE" to hide the image, press again to the projector. Note: Remote Control Placement Please refer to the illustration to attach the remote control to display the image. Unique Acer functions: eView, eTimer Management. English 5 # Icon Function 12 HIDE 13 Empowering key 14 FREEZE Description Momentarily turns off the video.
To pause the screen image. Press "HIDE" to hide the image, press again to the projector. Note: Remote Control Placement Please refer to the illustration to attach the remote control to display the image. Unique Acer functions: eView, eTimer Management. English 5 # Icon Function 12 HIDE 13 Empowering key 14 FREEZE Description Momentarily turns off the video.
X1160 User's Guide EN
Page 18
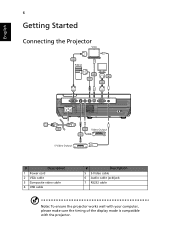
English RW USB 6 Getting Started Connecting the Projector VGA 2 RS232 RS232 4 7 D-Sub 6 2 D-Sub D-Sub USB Y D-Sub Y 1 3 Video Output 5 S-Video Output # Description 1 Power cord 2 VGA cable 3 Composite video cable 4 USB cable # Description 5 S-Video cable 6 Audio cable jack/jack 7 RS232 cable Note: To ensure the projector works well with your computer, please make sure the timing of the display mode is compatible with the projector.
English RW USB 6 Getting Started Connecting the Projector VGA 2 RS232 RS232 4 7 D-Sub 6 2 D-Sub D-Sub USB Y D-Sub Y 1 3 Video Output 5 S-Video Output # Description 1 Power cord 2 VGA cable 3 Composite video cable 4 USB cable # Description 5 S-Video cable 6 Audio cable jack/jack 7 RS232 cable Note: To ensure the projector works well with your computer, please make sure the timing of the display mode is compatible with the projector.
X1160 User's Guide EN
Page 19
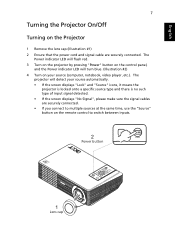
... turn blue. (Illustration #2) 4 Turn on your source automatically. • If the screen displays "Lock" and "Source" icons, it means the projector is locked onto a specific source type and there is no such type of input signal detected. • If the screen displays "No Signal", please ...make sure the signal cables are securely connected. The Power indicator LED will flash red. 3 Turn on the projector by pressing "Power" button on the control panel, and the Power indicator LED will detect your source (computer, notebook, video player ,etc.).
... turn blue. (Illustration #2) 4 Turn on your source automatically. • If the screen displays "Lock" and "Source" icons, it means the projector is locked onto a specific source type and there is no such type of input signal detected. • If the screen displays "No Signal", please ...make sure the signal cables are securely connected. The Power indicator LED will flash red. 3 Turn on the projector by pressing "Power" button on the control panel, and the Power indicator LED will detect your source (computer, notebook, video player ,etc.).

X1160 User's Guide EN
Page 20
...twice. Note: If you must wait for 60 seconds at least to press the "Power" button to happen: "Projector Overheated. Warning indicators: • If the projector automatically shuts down and the Power indicator quick flashing RED and steady BLUE by returns, please contact your local dealer or... service center: "Fan fail. This is to ensure that the projector has overheated. English 8 Turning off the Projector 1 To turn off soon." The message below is displayed onscreen, please contact your local reseller or service center. •...
...twice. Note: If you must wait for 60 seconds at least to press the "Power" button to happen: "Projector Overheated. Warning indicators: • If the projector automatically shuts down and the Power indicator quick flashing RED and steady BLUE by returns, please contact your local dealer or... service center: "Fan fail. This is to ensure that the projector has overheated. English 8 Turning off the Projector 1 To turn off soon." The message below is displayed onscreen, please contact your local reseller or service center. •...

X1160 User's Guide EN
Page 21
To raise/lower the image: 1 Use Tilt adjusting wheel (Illustration #1) to fine-tune the display angle. 1 Tilt adjusting wheel English 9 Adjusting the Projected Image Adjusting the Height of Projected Image The projector is equipped with elevator feet for adjusting the height of image.
To raise/lower the image: 1 Use Tilt adjusting wheel (Illustration #1) to fine-tune the display angle. 1 Tilt adjusting wheel English 9 Adjusting the Projected Image Adjusting the Height of Projected Image The projector is equipped with elevator feet for adjusting the height of image.
X1160 User's Guide EN
Page 22
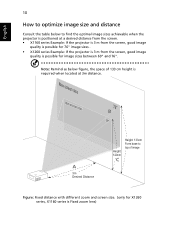
...the optimal image sizes achievable when the projector is positioned at a desired distance from the screen. • X1160 series Example: If the projector is 3 m from the screen, good image quality is possible for 76" image sizes . • X1260 series Example: If the projector is 3 m from the screen,... good image quality is possible for X1260 series, X1160 series is required when located at 3m...
...the optimal image sizes achievable when the projector is positioned at a desired distance from the screen. • X1160 series Example: If the projector is 3 m from the screen, good image quality is possible for 76" image sizes . • X1260 series Example: If the projector is 3 m from the screen,... good image quality is possible for X1260 series, X1160 series is required when located at 3m...

X1160 User's Guide EN
Page 24
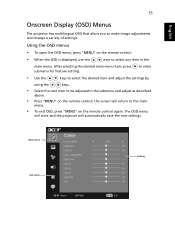
12 How to get a preferred image size by adjusting distance and zoom English A 50" iDmeasgireedsize D Height Form base to top of image 2.2 m C 2 m B Desired Distance The table below shows how to achieve a desired image size by adjusting either the position or the zoom ring. • X1160 series Example: to obtain an image size of 50" set the projector at 2 m distance from the screen. • X1260 series Example: to obtain an image size of 50" set the projector at a distance 2 m and 2.2 m from the screen and adjust the zoom level accordingly.
12 How to get a preferred image size by adjusting distance and zoom English A 50" iDmeasgireedsize D Height Form base to top of image 2.2 m C 2 m B Desired Distance The table below shows how to achieve a desired image size by adjusting either the position or the zoom ring. • X1160 series Example: to obtain an image size of 50" set the projector at 2 m distance from the screen. • X1260 series Example: to obtain an image size of 50" set the projector at a distance 2 m and 2.2 m from the screen and adjust the zoom level accordingly.
X1160 User's Guide EN
Page 27
.... • To exit OSD, press "MENU" on the remote control, the screen will automatically save the new settings. The OSD menu will close and the projector will return to select any item in the submenu and adjust as described above. • Press "MENU" on the remote control again. After selecting the... desired main menu item, press submenu for feature setting. English 15 Onscreen Display (OSD) Menus The projector has multilingual OSD that allow you to make image adjustments and change a variety of settings.
.... • To exit OSD, press "MENU" on the remote control, the screen will automatically save the new settings. The OSD menu will close and the projector will return to select any item in the submenu and adjust as described above. • Press "MENU" on the remote control again. After selecting the... desired main menu item, press submenu for feature setting. English 15 Onscreen Display (OSD) Menus The projector has multilingual OSD that allow you to make image adjustments and change a variety of settings.

X1160 User's Guide EN
Page 29
... computer mode or DVI mode. Image setting Keystone Adjust image distortion caused by tilting projection. (±40 degrees) Aspect Ratio Projection Use this function, the projector inverts the image for ceiling-mounted projection. Front-Ceiling • When you select this function to choose your desired aspect ratio. • Auto: Keep the...
... computer mode or DVI mode. Image setting Keystone Adjust image distortion caused by tilting projection. (±40 degrees) Aspect Ratio Projection Use this function, the projector inverts the image for ceiling-mounted projection. Front-Ceiling • When you select this function to choose your desired aspect ratio. • Auto: Keep the...


