Quick Start Guide
Page 2
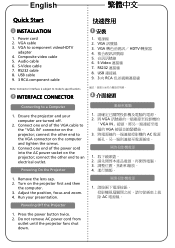
... then the computer. 3. Do not remove AC power cord from outlet until the projector fans shut down. USB 連接線 9. 3 向 RCA Note: Connector interface is subject to model's specifications 2 INTERFACE CONNECTOR 2 Connecting to component video/HDTV adapter 4. Remove the lens cap. 2. Press the power button twice. 2. English 繁體中文 Quick Start 快速啟用 1 INSTALLATION 1. Composite video cable 5. RS232 cable 8. VGA 訊號線 3. Adjust the position, focus and zoom. 4.
... then the computer. 3. Do not remove AC power cord from outlet until the projector fans shut down. USB 連接線 9. 3 向 RCA Note: Connector interface is subject to model's specifications 2 INTERFACE CONNECTOR 2 Connecting to component video/HDTV adapter 4. Remove the lens cap. 2. Press the power button twice. 2. English 繁體中文 Quick Start 快速啟用 1 INSTALLATION 1. Composite video cable 5. RS232 cable 8. VGA 訊號線 3. Adjust the position, focus and zoom. 4.
User Manual
Page 3
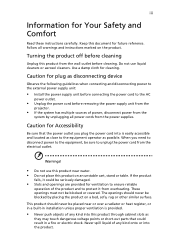
...; Install the power supply unit before connecting the power cord to the equipment operator as close to the AC power outlet. • Unplug the power cord before cleaning. Do not use this product near or over a radiator or heat register, or in a built-in a fire or electric shock. If the product falls, it from the wall outlet before removing the power supply unit from the projector...
...; Install the power supply unit before connecting the power cord to the equipment operator as close to the AC power outlet. • Unplug the power cord before cleaning. Do not use this product near or over a radiator or heat register, or in a built-in a fire or electric shock. If the product falls, it from the wall outlet before removing the power supply unit from the projector...
User Manual
Page 5
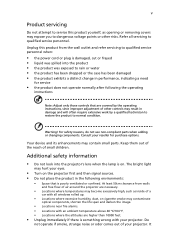
... to service this product from walls and free flow of air around the projector are necessary. • Locations where temperatures may become excessively high, such as opening or removing covers may expose you to dangerous voltage points or other controls may result in damage and will often require extensive work by the operating instructions, since improper adjustment of other risks. Warning! Consult your eyes. • Turn on...
... to service this product from walls and free flow of air around the projector are necessary. • Locations where temperatures may become excessively high, such as opening or removing covers may expose you to dangerous voltage points or other controls may result in damage and will often require extensive work by the operating instructions, since improper adjustment of other risks. Warning! Consult your eyes. • Turn on...

User Manual
Page 6
... touch the air outlet grille and bottom plate which has its cooling cycle before turning main power off the main power abruptly or unplug the projector during operation. Please be sure to change the lamp when warning messages display. • When changing the lamp, please allow the projector to cool down, and follow all changing instructions. • Reset the "Lamp Hour Reset" function from the Onscreen Display "Management" menu after replacing the lamp module...
... touch the air outlet grille and bottom plate which has its cooling cycle before turning main power off the main power abruptly or unplug the projector during operation. Please be sure to change the lamp when warning messages display. • When changing the lamp, please allow the projector to cool down, and follow all changing instructions. • Reset the "Lamp Hour Reset" function from the Onscreen Display "Management" menu after replacing the lamp module...

User Manual
Page 8
... from the Onscreen Display "Management" menu after replacing the lamp module. • When switching the projector off, please ensure the projector completes its cooling cycle before disconnecting power. • Turn on the projector first and then the signal sources. • Do not use lens cap when projector is in operation. • When the lamp reaches the end of its life, it shows warning messages. • Reset the "Lamp Hour Reset" function from AC outlet...
... from the Onscreen Display "Management" menu after replacing the lamp module. • When switching the projector off, please ensure the projector completes its cooling cycle before disconnecting power. • Turn on the projector first and then the signal sources. • Do not use lens cap when projector is in operation. • When the lamp reaches the end of its life, it shows warning messages. • Reset the "Lamp Hour Reset" function from AC outlet...
User Manual
Page 9
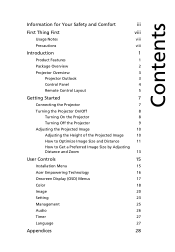
... Overview 3 Projector Outlook 3 Control Panel 4 Remote Control Layout 5 Getting Started 7 Connecting the Projector 7 Turning the Projector On/Off 8 Turning On the Projector 8 Turning Off the Projector 9 Adjusting the Projected Image 10 Adjusting the Height of the Projected Image 10 How to Optimize Image Size and Distance 11 How to Get a Preferred Image Size by Adjusting Distance and Zoom 13 User Controls 15 Installation Menu 15 Acer Empowering Technology 16 Onscreen Display (OSD) Menus 17 Color 18 Image 20 Setting 23 Management 25 Audio 26 Timer 27...
... Overview 3 Projector Outlook 3 Control Panel 4 Remote Control Layout 5 Getting Started 7 Connecting the Projector 7 Turning the Projector On/Off 8 Turning On the Projector 8 Turning Off the Projector 9 Adjusting the Projected Image 10 Adjusting the Height of the Projected Image 10 How to Optimize Image Size and Distance 11 How to Get a Preferred Image Size by Adjusting Distance and Zoom 13 User Controls 15 Installation Menu 15 Acer Empowering Technology 16 Onscreen Display (OSD) Menus 17 Color 18 Image 20 Setting 23 Management 25 Audio 26 Timer 27...

User Manual
Page 11
... product is a single-chip DLP® projector, including the following outstanding features: • DLP® technology • X1110/X1110A: Native 800 x 600 SVGA resolution X1210/X1210A/X1210K/X1210S/X1213/X1216: Native 1024 x 768 XGA resolution 4:3 / 16:9 aspect ratio supported • Acer ColorBoost technology delivers vivid, life-like images • High brightness and contrast ratio • Versatile display modes (Bright, Presentation, Standard, Video, Picture, Game, Education, User) enable optimum performance...
... product is a single-chip DLP® projector, including the following outstanding features: • DLP® technology • X1110/X1110A: Native 800 x 600 SVGA resolution X1210/X1210A/X1210K/X1210S/X1213/X1216: Native 1024 x 768 XGA resolution 4:3 / 16:9 aspect ratio supported • Acer ColorBoost technology delivers vivid, life-like images • High brightness and contrast ratio • Versatile display modes (Bright, Presentation, Standard, Video, Picture, Game, Education, User) enable optimum performance...
User Manual
Page 15
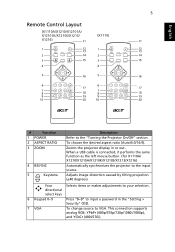
...). English 5 Remote Control Layout (X1110A/X1210/X12101A/ X12101K/X1210S/X1213/ X1216) (X1110) 123 PgUp 456 PgDn 7890 123 PgUp 456 PgDn 7890 # Function 1 POWER 2 ASPECT RATIO 3 ZOOM 4 RESYNC 5 Keystone Description Refer to VGA. directional select keys 6 Keypad 0~9 Press "0~9" to input a password in or out. Zooms the projector display in the "Setting > Security" OSD. 7 VGA To change source to the "Turning the Projector On/Off" section. When a USB cable is connected, it performs...
...). English 5 Remote Control Layout (X1110A/X1210/X12101A/ X12101K/X1210S/X1213/ X1216) (X1110) 123 PgUp 456 PgDn 7890 123 PgUp 456 PgDn 7890 # Function 1 POWER 2 ASPECT RATIO 3 ZOOM 4 RESYNC 5 Keystone Description Refer to VGA. directional select keys 6 Keypad 0~9 Press "0~9" to input a password in or out. Zooms the projector display in the "Setting > Security" OSD. 7 VGA To change source to the "Turning the Projector On/Off" section. When a USB cable is connected, it performs...

User Manual
Page 16
... hide screen image; Enables unique Acer functions: eView, eTimer, ePower Management. When a USB cable is only available when connected to a computer via the "Acer eProjection Management" utility. (for the OSD menu operation or exits the OSD menu. • Confirms your selection of items. For computer mode only. Use this button to the previous step for wireless models) (X1110A/X1210/X12101A/ X12101K/X1210S/X1213/X1216) (X1110) This connection supports YPbPr...
... hide screen image; Enables unique Acer functions: eView, eTimer, ePower Management. When a USB cable is only available when connected to a computer via the "Acer eProjection Management" utility. (for the OSD menu operation or exits the OSD menu. • Confirms your selection of items. For computer mode only. Use this button to the previous step for wireless models) (X1110A/X1210/X12101A/ X12101K/X1210S/X1213/X1216) (X1110) This connection supports YPbPr...

User Manual
Page 18
... screen displays "Lock" & "Source" icons, it means the projector is locked onto a specific source type and there is no such type of input signal detected. • If the screen displays "No Signal", please make sure the signal cables are securely connected. LAMP TEMP IR 2&3 1 Lens cap The Power LED will light red. 3 Turn on the projector by pressing (POWER) on the control panel or remote control, and the Power indicator LED will detect your source (computer, notebook, video player, etc.). The projector will turn blue. 4 Turn on the remote control to switch...
... screen displays "Lock" & "Source" icons, it means the projector is locked onto a specific source type and there is no such type of input signal detected. • If the screen displays "No Signal", please make sure the signal cables are securely connected. LAMP TEMP IR 2&3 1 Lens cap The Power LED will light red. 3 Turn on the projector by pressing (POWER) on the control panel or remote control, and the Power indicator LED will detect your source (computer, notebook, video player, etc.). The projector will turn blue. 4 Turn on the remote control to switch...

User Manual
Page 21
... image 3 m Desired distance Minimum Screen Size (Min zoom) Maximum Screen Size (Max zoom) Desired Distance (m) < A > Diagonal (inch) < B > From base to W (cm) x H (cm) top of image (cm) < C > Diagonal (inch) W (cm) x H (cm) < B > From base to top of 126 cm height is required when the projector is located at a desired distance from the screen. • X1110/X1110A/X1210/X1210A/X1210K/X1213/X1216 If the projector is 3 m from the screen, good image...
... image 3 m Desired distance Minimum Screen Size (Min zoom) Maximum Screen Size (Max zoom) Desired Distance (m) < A > Diagonal (inch) < B > From base to W (cm) x H (cm) top of image (cm) < C > Diagonal (inch) W (cm) x H (cm) < B > From base to top of 126 cm height is required when the projector is located at a desired distance from the screen. • X1110/X1110A/X1210/X1210A/X1210K/X1213/X1216 If the projector is 3 m from the screen, good image...
User Manual
Page 25
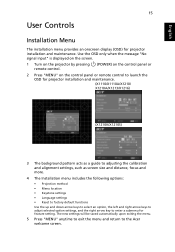
... pressing remote control. (POWER) on the control panel or 2 Press "MENU" on the control panel or remote control to launch the OSD for projector installation and maintenance. (X1110/X1110A/X1210/ X1210A/X1213/X1216) (X1210K/X1210S) 3 The background pattern acts as a guide to adjusting the calibration and alignment settings, such as screen size and distance, focus and more. 4 The Installation menu includes the following options: • Projection method • Menu location • Keystone settings • Language settings • Reset to factory default functions Use...
... pressing remote control. (POWER) on the control panel or 2 Press "MENU" on the control panel or remote control to launch the OSD for projector installation and maintenance. (X1110/X1110A/X1210/ X1210A/X1213/X1216) (X1210K/X1210S) 3 The background pattern acts as a guide to adjusting the calibration and alignment settings, such as screen size and distance, focus and more. 4 The Installation menu includes the following options: • Projection method • Menu location • Keystone settings • Language settings • Reset to factory default functions Use...
User Manual
Page 28
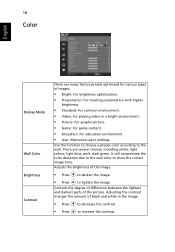
... many factory presets optimized for various types of the picture. 18 Color English Display Mode Wall Color Brightness Contrast There are several choices, including white, light yellow, light blue, pink, dark green. Adjusts the brightness of black and white in a bright environment. • Picture: For graphic picture. • Game: For game content. • Education: For education environment. • User: Memorize user's settings. Adjusting the contrast changes the amount of the image. •...
... many factory presets optimized for various types of the picture. 18 Color English Display Mode Wall Color Brightness Contrast There are several choices, including white, light yellow, light blue, pink, dark green. Adjusts the brightness of black and white in a bright environment. • Picture: For graphic picture. • Game: For game content. • Education: For education environment. • User: Memorize user's settings. Adjusting the contrast changes the amount of the image. •...
User Manual
Page 34
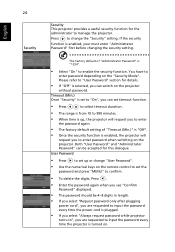
... time is turned on. Both "User Password" and "Administrator Password" can switch on ", you to "User Password" section for details. • If "Off" is enabled, your must enter "Administrator Password" first before changing the security setting. Press to change "User Password". • Use the numerical keys on the remote control to set up , the projector will request you to enter the password again. • The factory default setting of "Administrator Password" is enabled, the projector...
... time is turned on. Both "User Password" and "Administrator Password" can switch on ", you to "User Password" section for details. • If "Off" is enabled, your must enter "Administrator Password" first before changing the security setting. Press to change "User Password". • Use the numerical keys on the remote control to set up , the projector will request you to enter the password again. • The factory default setting of "Administrator Password" is enabled, the projector...

User Manual
Page 35
Reset Press after choosing "Yes" to return the display parameters on the Security Card that came with your local Acer service center. Choose "Off" to return to the factory default settings. X1210/X1210A/ X1210K/X1210S/ X1213/X1216) Enabling this function slightly increases the standby power consumption. This unique password will also lower the power consumption, reduce noise, and extend the lamp life. If you forget your...
Reset Press after choosing "Yes" to return the display parameters on the Security Card that came with your local Acer service center. Choose "Off" to return to the factory default settings. X1210/X1210A/ X1210K/X1210S/ X1213/X1216) Enabling this function slightly increases the standby power consumption. This unique password will also lower the power consumption, reduce noise, and extend the lamp life. If you forget your...

User Manual
Page 38
...). 28 Appendices English Troubleshooting If you experience a problem with your Acer projector, refer to UXGA (1600 x 1200). • Click the "Advanced Properties" button. If the problem still appears, change the monitor display you need under the SP box, and choose the resolution mode you are bent or broken. • Check if the projection lamp has been securely installed. Image Problems and Solutions # Problem Solution 1 No image appears •...
...). 28 Appendices English Troubleshooting If you experience a problem with your Acer projector, refer to UXGA (1600 x 1200). • Click the "Advanced Properties" button. If the problem still appears, change the monitor display you need under the SP box, and choose the resolution mode you are bent or broken. • Check if the projection lamp has been securely installed. Image Problems and Solutions # Problem Solution 1 No image appears •...

User Manual
Page 39
... X1210S projector. Refer to your computer's manual for more information. • Check and reconfigure the display mode of your monitor freezes, restart all equipment including the projector. 4 The screen of the • If you experience difficulty changing resolutions or your graphics card to be reactivated. Refer to flickering bar the "Image" section for more information. • Change the display color setting on the control panel or remote or incorrectly control...
... X1210S projector. Refer to your computer's manual for more information. • Check and reconfigure the display mode of your monitor freezes, restart all equipment including the projector. 4 The screen of the • If you experience difficulty changing resolutions or your graphics card to be reactivated. Refer to flickering bar the "Image" section for more information. • Change the display color setting on the control panel or remote or incorrectly control...

User Manual
Page 40
... screen. • Press the Keystone correction keys on the control panel or remote control until the lamp module has been replaced. Go to "Image > Aspect Ratio" and try different settings. 10 Image has slanted • If possible, reposition the projector so that it will burn out and may need to open the OSD menu. Problems with the projector OSD. • If the image is reversed • Select "Image > Projection Mode", "Image > Projection Location...
... screen. • Press the Keystone correction keys on the control panel or remote control until the lamp module has been replaced. Go to "Image > Aspect Ratio" and try different settings. 10 Image has slanted • If possible, reposition the projector so that it will burn out and may need to open the OSD menu. Problems with the projector OSD. • If the image is reversed • Select "Image > Projection Mode", "Image > Projection Location...
User Manual
Page 41
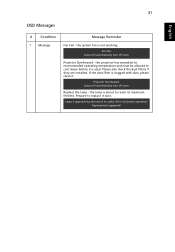
... are installed. Replace the lamp - Projector Overheated - Projector Overheated. Lamp will automatically turn off soon. the projector has exceeded its recommended operating temperature and must be allowed to reach its useful life in full power operation. the lamp is about to cool down before it is approaching the end of its maximum lifetime. Prepare to replace it . If the dust filter is not working. Lamp will automatically turn off soon. Replacement suggested! Lamp is used...
... are installed. Replace the lamp - Projector Overheated - Projector Overheated. Lamp will automatically turn off soon. the projector has exceeded its recommended operating temperature and must be allowed to reach its useful life in full power operation. the lamp is about to cool down before it is approaching the end of its maximum lifetime. Prepare to replace it . If the dust filter is not working. Lamp will automatically turn off soon. Replacement suggested! Lamp is used...
User Manual
Page 42
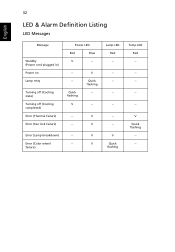
Error (Lamp breakdown) -- Error (Color wheel -- V Quick flashing --- 32 English LED & Alarm Definition Listing LED Messages Message Standby (Power cord plugged in) Power on Lamp retry Turning off (Cooling state) Turning off (Cooling completed) Error (Thermal failure) Error (Fan lock failure) Power LED Red Blue V -- --- Quick flashing V V Quick flashing -- -- -- V Lamp LED Red -- ---- -- --- V -- failure) V V V Quick flashing Temp LED Red -- --- -- --
Error (Lamp breakdown) -- Error (Color wheel -- V Quick flashing --- 32 English LED & Alarm Definition Listing LED Messages Message Standby (Power cord plugged in) Power on Lamp retry Turning off (Cooling state) Turning off (Cooling completed) Error (Thermal failure) Error (Fan lock failure) Power LED Red Blue V -- --- Quick flashing V V Quick flashing -- -- -- V Lamp LED Red -- ---- -- --- V -- failure) V V V Quick flashing Temp LED Red -- --- -- --


