
User Manual
Page 3
... may flicker during initial use . • The LCD screen has 99.99% or more effective pixels. Special notes on the product. It may include blemishes of the fluorescent light, the screen may find slightly uneven brightness on the screen depending on the desktop pattern you use . English Information for hours. Keep this case, the screen is displayed for your monitor Please carefully follow these instructions carefully. Cleaning...
... may flicker during initial use . • The LCD screen has 99.99% or more effective pixels. Special notes on the product. It may include blemishes of the fluorescent light, the screen may find slightly uneven brightness on the screen depending on the desktop pattern you use . English Information for hours. Keep this case, the screen is displayed for your monitor Please carefully follow these instructions carefully. Cleaning...

User Manual
Page 4
...the equipment operator as they may touch dangerous voltage points or short-out parts that could be used for this monitor, do not increase it after your ears have adjusted. • Limit the amount of power indicated on a vibrating surface. • Never use this product near or over a...the power cord. These openings must not be blocked or covered. Safe listening To protect your dealer or local power company. • Do not allow anything to rest on a bed, sofa, rug or other purposes. English Accessibility Be sure that the power outlet you plug the power cord into is only used ...
...the equipment operator as they may touch dangerous voltage points or short-out parts that could be used for this monitor, do not increase it after your ears have adjusted. • Limit the amount of power indicated on a vibrating surface. • Never use this product near or over a...the power cord. These openings must not be blocked or covered. Safe listening To protect your dealer or local power company. • Do not allow anything to rest on a bed, sofa, rug or other purposes. English Accessibility Be sure that the power outlet you plug the power cord into is only used ...

User Manual
Page 5
... change in a grounded power outlet. Do not insert the plug into the extension cord does not exceed the extension cord ampere rating. English • If an extension cord is used , the load should not exceed 80% of the power strip's input rating. • This product's power cord is equipped with this product yourself, as opening or removing covers may result in too many devices. If power strips are used...
... change in a grounded power outlet. Do not insert the plug into the extension cord does not exceed the extension cord ampere rating. English • If an extension cord is used , the load should not exceed 80% of the power strip's input rating. • This product's power cord is equipped with this product yourself, as opening or removing covers may result in too many devices. If power strips are used...

User Manual
Page 6
...in the form of salvaging and disposal of used equipment, as grain, dust or metal powders. Potentially explosive environments Switch off your vehicle engine. Switch off your device in progress. They include ...Acer are in any area with a potentially explosive atmosphere are covered by the operating instructions, since improper adjustment of our other controls may contain small parts. or where blasting operations are very conscious of the environmental effects of our business and strive to identify and provide the best working procedures to environmental protection and views...
...in the form of salvaging and disposal of used equipment, as grain, dust or metal powders. Potentially explosive environments Switch off your vehicle engine. Switch off your device in progress. They include ...Acer are in any area with a potentially explosive atmosphere are covered by the operating instructions, since improper adjustment of our other controls may contain small parts. or where blasting operations are very conscious of the environmental effects of our business and strive to identify and provide the best working procedures to environmental protection and views...

User Manual
Page 7
...black or red dots. Nevertheless, some pixels may lead to remove the strain on the recorded image and does not constitute a malfunction. Users are also at risk of physical injury after prolonged use , consult a physician immediately and inform your company's health and safety department. Finding your comfort zone Find your comfort zone by adjusting the viewing angle of the monitor, using..., or any keyboard key. English LCD pixel statement The LCD unit is in one fixed posture • avoid slouching forward and/or leaning backward • stand up and walk around regularly ...
...black or red dots. Nevertheless, some pixels may lead to remove the strain on the recorded image and does not constitute a malfunction. Users are also at risk of physical injury after prolonged use , consult a physician immediately and inform your company's health and safety department. Finding your comfort zone Find your comfort zone by adjusting the viewing angle of the monitor, using..., or any keyboard key. English LCD pixel statement The LCD unit is in one fixed posture • avoid slouching forward and/or leaning backward • stand up and walk around regularly ...

User Manual
Page 8
... on how to reduce eyestrain. Acer monitor is purposed for extended periods of time. English Taking care of your vision Long viewing hours, wearing incorrect glasses or contact lenses, glare, excessive room lighting, poorly focused screens, very small typefaces and low-contrast displays could stress your display to an awkward viewing angle. • Avoid looking at bright light sources, such as possible. •...
... on how to reduce eyestrain. Acer monitor is purposed for extended periods of time. English Taking care of your vision Long viewing hours, wearing incorrect glasses or contact lenses, glare, excessive room lighting, poorly focused screens, very small typefaces and low-contrast displays could stress your display to an awkward viewing angle. • Avoid looking at bright light sources, such as possible. •...

User Manual
Page 11
...viii Developing good work habits viii Declaration of Conformity ix Federal Communications Commission Declaration of Conformity x Unpacking 1 Attaching the base (for selected models) 2 Screen position adjustment 3 Connecting the adapter and AC Power cord 3 Power saving Display Data Channel (DDC) Connector pin assignment 4 19-pin color display signal cable 4 20-pin color display signal cable 5 Standard timing table 6 Installation 7 Users controls 8 Panel controls 8 Using the Shortcut Menu 9 The Function page 10 Troubleshooting 15 VGA/HDMI Mode (Optional) 15
...viii Developing good work habits viii Declaration of Conformity ix Federal Communications Commission Declaration of Conformity x Unpacking 1 Attaching the base (for selected models) 2 Screen position adjustment 3 Connecting the adapter and AC Power cord 3 Power saving Display Data Channel (DDC) Connector pin assignment 4 19-pin color display signal cable 4 20-pin color display signal cable 5 Standard timing table 6 Installation 7 Users controls 8 Panel controls 8 Using the Shortcut Menu 9 The Function page 10 Troubleshooting 15 VGA/HDMI Mode (Optional) 15

User Manual
Page 12
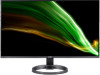
LCD monitor Quick start guide VGA Cable (Optional) AC Adapter 272 HDMI cable (Optional) AC Power cord Audio Cable (Optional) "This specification is for universal use and real spec may vary by regions and countries" English Unpacking Please check that the following items are present when you unpack the box, and save the packing materials in case you need to ship or transport the monitor in the future.
LCD monitor Quick start guide VGA Cable (Optional) AC Adapter 272 HDMI cable (Optional) AC Power cord Audio Cable (Optional) "This specification is for universal use and real spec may vary by regions and countries" English Unpacking Please check that the following items are present when you unpack the box, and save the packing materials in case you need to ship or transport the monitor in the future.

User Manual
Page 13
English • Screen position adjustment To optimize the viewing position, you can be adjusted to 25 degrees up or 5 degrees down on a stable surface -- use a cloth to hold the edges of your hands to avoid scratching the screen. The monitor can adjust the monitor tilt by using both of the monitor as shown below. Carefully place the monitor face-down . -5° 25° • Attaching the Base Note: Remove the monitor and monitor base from its packaging.
English • Screen position adjustment To optimize the viewing position, you can be adjusted to 25 degrees up or 5 degrees down on a stable surface -- use a cloth to hold the edges of your hands to avoid scratching the screen. The monitor can adjust the monitor tilt by using both of the monitor as shown below. Carefully place the monitor face-down . -5° 25° • Attaching the Base Note: Remove the monitor and monitor base from its packaging.

User Manual
Page 14
State ON Power Saving Mode LED Light Blue Amber The power saving states will be kept until a control signal has been detected or the keyboard or mouse is required. • Plug one end of H05VV-F cord and plug rated 10 A/250 V. The recovery time from the display controller, as indicated by the amber-color power LED. English Connecting the adapter and AC Power cord • Check first to ON state is around 3 seconds. Power saving The monitor will be...
State ON Power Saving Mode LED Light Blue Amber The power saving states will be kept until a control signal has been detected or the keyboard or mouse is required. • Plug one end of H05VV-F cord and plug rated 10 A/250 V. The recovery time from the display controller, as indicated by the amber-color power LED. English Connecting the adapter and AC Power cord • Check first to ON state is around 3 seconds. Power saving The monitor will be...

User Manual
Page 17
... audio cable. 4. Insert the monitor power cable into the power port at the back of the graphics card on the computer. Please check user manual for audio output model. Connect the signal cable to a properly grounded AC outlet. ptional: Connect the audio input socket (AUDIO IN) of the LCD monitor and the line-out port on the signal cable connector. 3. Note: Audio output is only for more instruction. English Installation 1. Connect the power adapter and power cord to the monitor, then to the VGA and /or HDMI (optional) input...
... audio cable. 4. Insert the monitor power cable into the power port at the back of the graphics card on the computer. Please check user manual for audio output model. Connect the signal cable to a properly grounded AC outlet. ptional: Connect the audio input socket (AUDIO IN) of the LCD monitor and the line-out port on the signal cable connector. 3. Note: Audio output is only for more instruction. English Installation 1. Connect the power adapter and power cord to the monitor, then to the VGA and /or HDMI (optional) input...

User Manual
Page 18
... enter next function in the OSD. b. Press again to dynamically adjust display refresh rate based on typical content frame rates for power efficient, virtually stutter free and lowlatency display update. b. When the Function Menu is active, press this button selected or move to view Main page. Brightness a. Free-Sync(HDMI): It can allow a Free-Sync supported graphics source to enter Input select function. Icon 1 2 3 4 or 5 6 Item Description Power button/indicator Turns the monitor on . When the Function...
... enter next function in the OSD. b. Press again to dynamically adjust display refresh rate based on typical content frame rates for power efficient, virtually stutter free and lowlatency display update. b. When the Function Menu is active, press this button selected or move to view Main page. Brightness a. Free-Sync(HDMI): It can allow a Free-Sync supported graphics source to enter Input select function. Icon 1 2 3 4 or 5 6 Item Description Power button/indicator Turns the monitor on . When the Function...
User Manual
Page 19
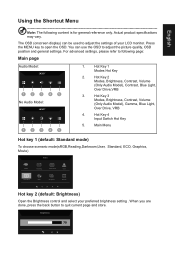
... button to adjust the picture quality, OSD position and general settings. English Using the Shortcut Menu Note: The following page: Main page Audio Model: 12345 No Audio Model: 12345 1. Hot Key 2 Modes, Brightness, Contrast, Volume (Only Audio Model), Contrast, Blue Light, Over Drive,VRB 3. Main Menu Hot key 1 (default: Standard mode) To choose scenario mode(sRGB,Reading,Darkroom,User, Standard, ECO, Graphics, Movie) Modes sRGB Reading Darkroom User Standard ECO Graphics Movie Hot key 2 (default: Brightness) Open the Brightness control and select your LCD monitor...
... button to adjust the picture quality, OSD position and general settings. English Using the Shortcut Menu Note: The following page: Main page Audio Model: 12345 No Audio Model: 12345 1. Hot Key 2 Modes, Brightness, Contrast, Volume (Only Audio Model), Contrast, Blue Light, Over Drive,VRB 3. Main Menu Hot key 1 (default: Standard mode) To choose scenario mode(sRGB,Reading,Darkroom,User, Standard, ECO, Graphics, Movie) Modes sRGB Reading Darkroom User Standard ECO Graphics Movie Hot key 2 (default: Brightness) Open the Brightness control and select your LCD monitor...
User Manual
Page 20
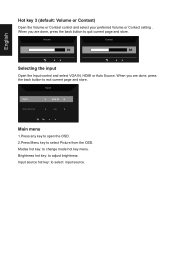
..., HDMI or Auto Source. Input Input Auto Source VGA IN On Main menu 1.Press any key to open the OSD. 2.Press Menu key to quit current page and store. English Hot key 3 (default: Volume or Contast) Open the Volume or Contast control and select your preferred Volume or Contact setting . When you are done, press the back button to select Picture from the OSD. Modes hot key: to select input source. Input source hot key: to change mode hot key menu. Brightness...
..., HDMI or Auto Source. Input Input Auto Source VGA IN On Main menu 1.Press any key to open the OSD. 2.Press Menu key to quit current page and store. English Hot key 3 (default: Volume or Contast) Open the Volume or Contast control and select your preferred Volume or Contact setting . When you are done, press the back button to select Picture from the OSD. Modes hot key: to select input source. Input source hot key: to change mode hot key menu. Brightness...
User Manual
Page 21
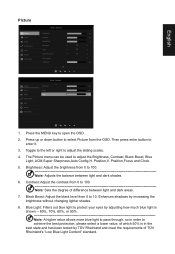
.... 7. Position,V. Press the MENU key to adjust the sliding scales. 4. The Picture menu can be used to enter it. 3. Then press enter button to adjust the Brightness, Contrast, Black Boost, Blue Light, ACM,Super Sharpness,Auto Config,H. Brightness: Adjust the brightness from 0 to 10. English Picture Picture Color Audio Performance OSD System Informa�on Mode - Contrast: Adjust the contrast from 0 to achieve the best protection, please select a lower value, of difference between light and dark shades. 6. Blue Light: Filters out blue light...
.... 7. Position,V. Press the MENU key to adjust the sliding scales. 4. The Picture menu can be used to enter it. 3. Then press enter button to adjust the Brightness, Contrast, Black Boost, Blue Light, ACM,Super Sharpness,Auto Config,H. Brightness: Adjust the brightness from 0 to 10. English Picture Picture Color Audio Performance OSD System Informa�on Mode - Contrast: Adjust the contrast from 0 to achieve the best protection, please select a lower value, of difference between light and dark shades. 6. Blue Light: Filters out blue light...
User Manual
Page 22
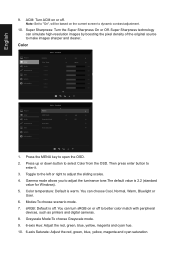
... to open the OSD. 2. Super Sharpness: Turn the Super Sharpness On or Off. Color Picture Color Audio Performance OSD System Informa�on 1. Modes:To choose scenario mode. 7. Stamdard Gamma Color Temp. R Gain G Gain B Gain R Bias G Bias B Bias 2.2 Warm 50 50 50 50 50 50 Mode - Toggle to the left or right to dynamic contrast adjustment. 10. Grayscale Mode:To choose Grayscale mode. 9. 6-axis Hue: Adjust the red, green, blue...
... to open the OSD. 2. Super Sharpness: Turn the Super Sharpness On or Off. Color Picture Color Audio Performance OSD System Informa�on 1. Modes:To choose scenario mode. 7. Stamdard Gamma Color Temp. R Gain G Gain B Gain R Bias G Bias B Bias 2.2 Warm 50 50 50 50 50 50 Mode - Toggle to the left or right to dynamic contrast adjustment. 10. Grayscale Mode:To choose Grayscale mode. 9. 6-axis Hue: Adjust the red, green, blue...
User Manual
Page 23
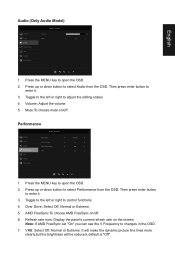
..., default is "Off". English Audio (Only Audio Model) Picture Color Audio Performance OSD System Informa�on the screen. Stardard Volume Mute 70 Off 1. Press the MENU key to control functions. 4. Then press enter button to open the OSD. 2. Press the MENU key to enter it . 3. Over Drive: Select Off, Normal or Extreme. 5. Mute:To choose mute on Mode - VRB: Select Off, Normal or Extreme. Refresh rate num: Display the panel's current refresh rate...
..., default is "Off". English Audio (Only Audio Model) Picture Color Audio Performance OSD System Informa�on the screen. Stardard Volume Mute 70 Off 1. Press the MENU key to control functions. 4. Then press enter button to open the OSD. 2. Press the MENU key to enter it . 3. Over Drive: Select Off, Normal or Extreme. 5. Mute:To choose mute on Mode - VRB: Select Off, Normal or Extreme. Refresh rate num: Display the panel's current refresh rate...
User Manual
Page 24
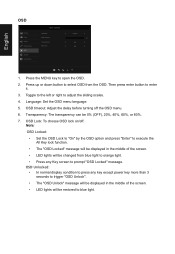
... OSD lock on Mode - Toggle to the left or right to enter it. 3. Press up or down button to select OSD from blue light to orange light. • Press any key except power key more than 3 seconds to blue light. Language: Set the OSD menu language. 5. Transparency: The transparency can be changed from the OSD. Standard Language OSD Timeout Transparency OSD Lock English 10 Off Off 1. Press the MENU key to prompt "OSD Locked" message. English OSD Picture Color Audio Performance OSD...
... OSD lock on Mode - Toggle to the left or right to enter it. 3. Press up or down button to select OSD from blue light to orange light. • Press any key except power key more than 3 seconds to blue light. Language: Set the OSD menu language. 5. Transparency: The transparency can be changed from the OSD. Standard Language OSD Timeout Transparency OSD Lock English 10 Off Off 1. Press the MENU key to prompt "OSD Locked" message. English OSD Picture Color Audio Performance OSD...
User Manual
Page 25
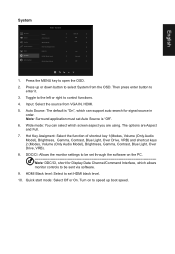
... from VGA IN, HDMI. 5. Turn on to speed up or down button to be sent via software. 9. Wide mode: You can support auto search for signal source in order. Then press enter button to control functions. 4. Hot Key Assigment: Select the function of shortcut key 1(Modes, Volume (Only Audio Model), Brightness, Gamma, Contrast, Blue Light, Over Drive, VRB) and shortcut keys 2 (Modes, Volume (Only Audio Model), Brightness, Gamma, Contrast, Blue Light, Over Drive, VRB). 8. Quick start mode: Select Off or On. Auto Source: The default...
... from VGA IN, HDMI. 5. Turn on to speed up or down button to be sent via software. 9. Wide mode: You can support auto search for signal source in order. Then press enter button to control functions. 4. Hot Key Assigment: Select the function of shortcut key 1(Modes, Volume (Only Audio Model), Brightness, Gamma, Contrast, Blue Light, Over Drive, VRB) and shortcut keys 2 (Modes, Volume (Only Audio Model), Brightness, Gamma, Contrast, Blue Light, Over Drive, VRB). 8. Quick start mode: Select Off or On. Auto Source: The default...
User Manual
Page 27
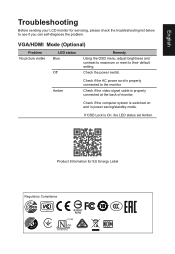
... Information for servicing, please check the troubleshooting list below to their default setting. English Troubleshooting Before sending your LCD monitor for EU Energy Label Regulatory Compliance Check the power switch. Check if the video signal cable is switched on and in power saving/standby mode. Check if the computer system is properly connected at the back of monitor. If OSD Lock is properly connected to the monitor. VGA/HDMI Mode (Optional) Problem No picture visible LED status Blue Off Remedy Using the OSD menu, adjust brightness and contrast to maximum...
... Information for servicing, please check the troubleshooting list below to their default setting. English Troubleshooting Before sending your LCD monitor for EU Energy Label Regulatory Compliance Check the power switch. Check if the video signal cable is switched on and in power saving/standby mode. Check if the computer system is properly connected at the back of monitor. If OSD Lock is properly connected to the monitor. VGA/HDMI Mode (Optional) Problem No picture visible LED status Blue Off Remedy Using the OSD menu, adjust brightness and contrast to maximum...

