
PD113P Service Guide
Page 14
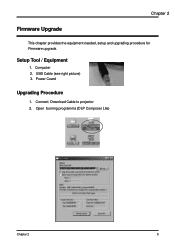
Computer 2. Connect Download Cable to projector 2. Power Coard Upgrading Procedure 1. Chapter 2 Firmware Upgrade This chapter provides the equipment needed, setup and upgrading procedure for Firmware upgrade. USB Cable (see right picture) 3. Open burning programma (DLP Composer Lite) Chapter 2 8 Setup Tool / Equipment 1.
Computer 2. Connect Download Cable to projector 2. Power Coard Upgrading Procedure 1. Chapter 2 Firmware Upgrade This chapter provides the equipment needed, setup and upgrading procedure for Firmware upgrade. USB Cable (see right picture) 3. Open burning programma (DLP Composer Lite) Chapter 2 8 Setup Tool / Equipment 1.
PD113P Service Guide
Page 16
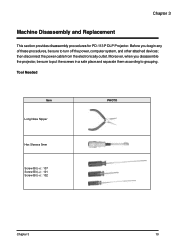
Tool Needed Item Long Nose Nipper Hex Sleeves 5mm Screw Bit (+) : 107 Screw Bit (+) : 101 Screw Bit (+) : 102 PHOTO Chapter 3 10 Moreover, when you begin any of these procedures, be sure to put the screws in a safe place and separate them according to turn off the power, computer system, and other attached devices; then disconnect the power cable from the electronically outlet. Chapter 3 Machine Disassembly and Replacement This section provides disassembly procedures for PD-113 P DLP Projector. Before you disassemble the projector, be sure to grouping.
Tool Needed Item Long Nose Nipper Hex Sleeves 5mm Screw Bit (+) : 107 Screw Bit (+) : 101 Screw Bit (+) : 102 PHOTO Chapter 3 10 Moreover, when you begin any of these procedures, be sure to put the screws in a safe place and separate them according to turn off the power, computer system, and other attached devices; then disconnect the power cable from the electronically outlet. Chapter 3 Machine Disassembly and Replacement This section provides disassembly procedures for PD-113 P DLP Projector. Before you disassemble the projector, be sure to grouping.


