
PD113P Service Guide
Page 4
... a DIFFER ENT part number code to the BASIC CONFIGURATION decided for Acer's "global" product offering. Please note WHEN ORDERING FRU PARTS, that you should check the most upto-date information available on card, modem, or extra memory capability). These LOCALIZED FEATURES will not be covered in this generic service guide. If, for repair and service of a machine (e.g. You MUST use the list...
... a DIFFER ENT part number code to the BASIC CONFIGURATION decided for Acer's "global" product offering. Please note WHEN ORDERING FRU PARTS, that you should check the most upto-date information available on card, modem, or extra memory capability). These LOCALIZED FEATURES will not be covered in this generic service guide. If, for repair and service of a machine (e.g. You MUST use the list...

PD113P Service Guide
Page 5
... Contents Chapter 1 System Introduction 1 Technical Specification ...1 Lamp Specification...2 System Block Diagram ...6 Optics Conceptual Drawing 7 Chapter 2 Firmware Update 8 Setup Tool / Equipment...8 Upgrading Procedure ...8 Chapter 3 Machine Dissassembly and Replacement 10 General Information ...11 Disassemble Lamp Module 12 Disassemble IO Cover & Top Cover 13 Disassemble Speaker & Front Cover 14 Disassemble Front Fan...15 Disassemble Front IR Board & IR Cover 16 Disassemble Video IO ...17 Dissassemble Main Board 18...
... Contents Chapter 1 System Introduction 1 Technical Specification ...1 Lamp Specification...2 System Block Diagram ...6 Optics Conceptual Drawing 7 Chapter 2 Firmware Update 8 Setup Tool / Equipment...8 Upgrading Procedure ...8 Chapter 3 Machine Dissassembly and Replacement 10 General Information ...11 Disassemble Lamp Module 12 Disassemble IO Cover & Top Cover 13 Disassemble Speaker & Front Cover 14 Disassemble Front Fan...15 Disassemble Front IR Board & IR Cover 16 Disassemble Video IO ...17 Dissassemble Main Board 18...

PD113P Service Guide
Page 6
Table of Contents Chapter 4 Trouble shooting 30 Video Signal troubleshooting 31 Operation FunctionTroubleshooting 34 Power SourceTroubleshooting 35 Function Test and Alignment 36 Equipment Needed 36 Test Condition...36 Test Display Modes and Patterns 37 Compatible Modes 37 Function Test Display Pattern 38 Chapter 5 Connector Information 40 Introduction...40 Main Board...40 Power Board ...46 Ballast Board ...48 Chapter 6 FRU(FieldReplaceable Unit) List 49 FRU List...50
Table of Contents Chapter 4 Trouble shooting 30 Video Signal troubleshooting 31 Operation FunctionTroubleshooting 34 Power SourceTroubleshooting 35 Function Test and Alignment 36 Equipment Needed 36 Test Condition...36 Test Display Modes and Patterns 37 Compatible Modes 37 Function Test Display Pattern 38 Chapter 5 Connector Information 40 Introduction...40 Main Board...40 Power Board ...46 Ballast Board ...48 Chapter 6 FRU(FieldReplaceable Unit) List 49 FRU List...50
PD113P Service Guide
Page 10
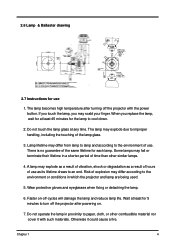
... when fixing or detaching the lamp. 6. The lamp becomes high temperature after powering on -off the projector with such materials. Some lamps may fail or terminate their lifetime in a shorter period of use as a result of hours of time than other combustible material nor cover it could cause a fire. A lamp may differ according to an end. Risk of the lamp glass. 3. Do not operate the lamp...
... when fixing or detaching the lamp. 6. The lamp becomes high temperature after powering on -off the projector with such materials. Some lamps may fail or terminate their lifetime in a shorter period of use as a result of hours of time than other combustible material nor cover it could cause a fire. A lamp may differ according to an end. Risk of the lamp glass. 3. Do not operate the lamp...
PD113P Service Guide
Page 11
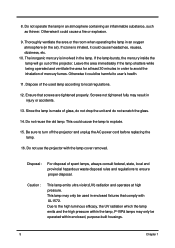
... inside the lamp will go out of spent lamps, always consult federal, state, local and provincial hazardous waste disposal rules and regulations to explode. 15. Do not use the projector with UL1572. Due to turn off the projector and unplug the AC power cord before replacing the lamp. 16. Leave the area immediately if the lamp shatters while being operated and ventilate...
... inside the lamp will go out of spent lamps, always consult federal, state, local and provincial hazardous waste disposal rules and regulations to explode. 15. Do not use the projector with UL1572. Due to turn off the projector and unplug the AC power cord before replacing the lamp. 16. Leave the area immediately if the lamp shatters while being operated and ventilate...
PD113P Service Guide
Page 14
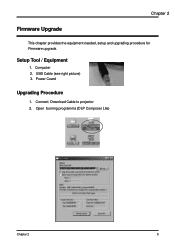
Open burning programma (DLP Composer Lite) Chapter 2 8 USB Cable (see right picture) 3. Power Coard Upgrading Procedure 1. Computer 2. Connect Download Cable to projector 2. Setup Tool / Equipment 1. Chapter 2 Firmware Upgrade This chapter provides the equipment needed, setup and upgrading procedure for Firmware upgrade.
Open burning programma (DLP Composer Lite) Chapter 2 8 USB Cable (see right picture) 3. Power Coard Upgrading Procedure 1. Computer 2. Connect Download Cable to projector 2. Setup Tool / Equipment 1. Chapter 2 Firmware Upgrade This chapter provides the equipment needed, setup and upgrading procedure for Firmware upgrade.

PD113P Service Guide
Page 40
Power Source: No Power Source After Turning On Fan failure After Turning On Check Lamp Cover Switch OK Check Power Cord OK Check Top Cover (key cable..) NG Replace Lamp Cover or Reassembly NG Replace Power Cord NG Replace cable or key Check Fan Connector OK Check Inner Wires OK Check Fan NG Fan Connector Become loose NG Replace Inner Wires NG Replace Fan OK Check Main Board OK Check Power Board NG Replace Main Board OK Check Main Board OK NG Replace Main Board NG Replace Power Board Replace Power Baord OK Replace Standby Signal cable NG 35 Chapter 4
Power Source: No Power Source After Turning On Fan failure After Turning On Check Lamp Cover Switch OK Check Power Cord OK Check Top Cover (key cable..) NG Replace Lamp Cover or Reassembly NG Replace Power Cord NG Replace cable or key Check Fan Connector OK Check Inner Wires OK Check Fan NG Fan Connector Become loose NG Replace Inner Wires NG Replace Fan OK Check Main Board OK Check Power Board NG Replace Main Board OK Check Main Board OK NG Replace Main Board NG Replace Power Board Replace Power Baord OK Replace Standby Signal cable NG 35 Chapter 4

PD113P User's Guide EN
Page 1
... Connection Ports ...8 Remote Control with Laser Pointer 9 Installation ...10 Connecting the Projector 10 Powering On/Off the Projector 11 Powering On the Projector 11 Powering Off the projector 12 Warning Indicator ...12 Adjusting the Projected Image 13 Adjusting the Projector Image Height 13 Adjusting the Projector Zoom / Focus 14 Adjusting Projected Image Size 14 User Controls...15 Control Panel & Remote Control 15 On-Screen Display Menus 17 How to operate ...17 Language ...18 Color (Computer/Video Mode 19 Image (Computer Mode 21 Image (Video Mode 22 Audio (Computer/Video Mode...
... Connection Ports ...8 Remote Control with Laser Pointer 9 Installation ...10 Connecting the Projector 10 Powering On/Off the Projector 11 Powering On the Projector 11 Powering Off the projector 12 Warning Indicator ...12 Adjusting the Projected Image 13 Adjusting the Projector Image Height 13 Adjusting the Projector Zoom / Focus 14 Adjusting Projected Image Size 14 User Controls...15 Control Panel & Remote Control 15 On-Screen Display Menus 17 How to operate ...17 Language ...18 Color (Computer/Video Mode 19 Image (Computer Mode 21 Image (Video Mode 22 Audio (Computer/Video Mode...
PD113P User's Guide EN
Page 2
... page 25). Reset the "Lamp Hour Reset" function from the On Screen Display "Management" menu after replacing the lamp module (refer to change the lamp when it will burn out and may make a loud popping sound. When switching the projector off, please ensure the projector completes its life, it shows warning messages. Do not use lens cap when projector is on until the lamp module has been replaced. To replace the lamp, follow all changing instructions. WarningWarningWarningWarningWarning...
... page 25). Reset the "Lamp Hour Reset" function from the On Screen Display "Management" menu after replacing the lamp module (refer to change the lamp when it will burn out and may make a loud popping sound. When switching the projector off, please ensure the projector completes its life, it shows warning messages. Do not use lens cap when projector is on until the lamp module has been replaced. To replace the lamp, follow all changing instructions. WarningWarningWarningWarningWarning...
PD113P User's Guide EN
Page 11
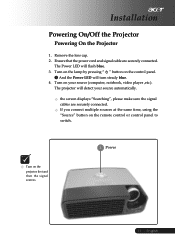
... Power LED will flash blue. 3. the screen displays "Searching", please make sure the signal cables are securely connected. If you connect multiple sources at the same time, using the "Source" button on the projector first and then the signal sources. 1 Power 11 ... Ensure that the power cord and signal cable are securely connected. NOTE Turn on the remote control or control panel to switch. Turn on the lamp by pressing " " button on your source automatically. English The projector will detect your source (computer, notebook, video player ,etc.). Installation Powering...
... Power LED will flash blue. 3. the screen displays "Searching", please make sure the signal cables are securely connected. If you connect multiple sources at the same time, using the "Source" button on the projector first and then the signal sources. 1 Power 11 ... Ensure that the power cord and signal cable are securely connected. NOTE Turn on the remote control or control panel to switch. Turn on the lamp by pressing " " button on your source automatically. English The projector will detect your source (computer, notebook, video player ,etc.). Installation Powering...
PD113P User's Guide EN
Page 12
... message will automatically shut itself down. Installation Powering Off the Projector 1. Warning: DO NOT unplug while the projector fan is still running." Press the " " button again to operate for about 60 seconds for cooling cycle and the Power LED will automatically shut itself down . Do not turn off procedure. The projector will keep blue. Press the " " button to restart the projector. 3. Warning Indicator When the "LAMP" indicator lights solid red, the projector will disappear after it indicates...
... message will automatically shut itself down. Installation Powering Off the Projector 1. Warning: DO NOT unplug while the projector fan is still running." Press the " " button again to operate for about 60 seconds for cooling cycle and the Power LED will automatically shut itself down . Do not turn off procedure. The projector will keep blue. Press the " " button to restart the projector. 3. Warning Indicator When the "LAMP" indicator lights solid red, the projector will disappear after it indicates...

PD113P User's Guide EN
Page 16
...-Sync Automatically synchronizes the projector to choose RGB, Component-p, Component-i, S-Video, Composite Video and HDTV sources. Source Press "Source" to the input source. User Controls English...16 Using the Remote Control Power Refer to the "Power On/Off the Projector" section on screen display menu. Page Up (Computer mode only) Use this button to activate the laser pointer. Hide Momentarily turns off the audio. Laser Button Aim the remote at the viewing screen, press and hold this button to restore display...
...-Sync Automatically synchronizes the projector to choose RGB, Component-p, Component-i, S-Video, Composite Video and HDTV sources. Source Press "Source" to the input source. User Controls English...16 Using the Remote Control Power Refer to the "Power On/Off the Projector" section on screen display menu. Page Up (Computer mode only) Use this button to activate the laser pointer. Hide Momentarily turns off the audio. Laser Button Aim the remote at the viewing screen, press and hold this button to restore display...

PD113P User's Guide EN
Page 19
... PC standard color. White Segment Use the white Segment control to set the white peaking level of images. User : Memorize user's settings. Press the to darken image. At higher temperature, the screen looks colder; English User Controls Color (Computer / Video Mode) Display Mode There are many factory presets optimized for various types of DMD 19 ... Adjust the color temperature. Brightness Adjust the brightness of black and white in the image. Color Temp. Adjusting the contrast changes the amount of the image. Movie : For home theater...
... PC standard color. White Segment Use the white Segment control to set the white peaking level of images. User : Memorize user's settings. Press the to darken image. At higher temperature, the screen looks colder; English User Controls Color (Computer / Video Mode) Display Mode There are many factory presets optimized for various types of DMD 19 ... Adjust the color temperature. Brightness Adjust the brightness of black and white in the image. Color Temp. Adjusting the contrast changes the amount of the image. Movie : For home theater...

PD113P User's Guide EN
Page 20
... the amount of red and green. Tint Adjusts the color balance of color in the image. Color G Adjusts the green color. Color B Adjusts the blue color. User Controls Color (Computer / Video Mode) NOTE "Saturation" and"Tint" functions are not supported under computer mode. Degamma Effects the represent of color in the image. Saturation Adjusts a video image from black and white to increase the amount of red in the image. Color R Adjusts the red color. If you prefer a stronger image, adjust towards the minimum setting. With greater...
... the amount of red and green. Tint Adjusts the color balance of color in the image. Color G Adjusts the green color. Color B Adjusts the blue color. User Controls Color (Computer / Video Mode) NOTE "Saturation" and"Tint" functions are not supported under computer mode. Degamma Effects the represent of color in the image. Saturation Adjusts a video image from black and white to increase the amount of red in the image. Color R Adjusts the red color. If you prefer a stronger image, adjust towards the minimum setting. With greater...
PD113P User's Guide EN
Page 24
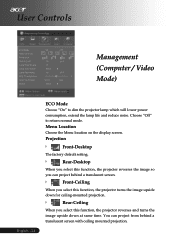
... you select this function, the projector turns the image upside down at same time. You can project behind a translucent screen with ceiling mounted projection. Projection Front-Desktop The factory default setting. Menu Location Choose the Menu location on the display screen. Rear-Ceiling When you can project from behind a translucent screen. Front-Ceiling When you select this function, the projector reverses and turns the image upside down for ceiling-mounted projection. User Controls Management (Computer / Video Mode) English...24 ECO Mode Choose "On" to return normal...
... you select this function, the projector turns the image upside down at same time. You can project behind a translucent screen with ceiling mounted projection. Projection Front-Desktop The factory default setting. Menu Location Choose the Menu location on the display screen. Rear-Ceiling When you can project from behind a translucent screen. Front-Ceiling When you select this function, the projector reverses and turns the image upside down for ceiling-mounted projection. User Controls Management (Computer / Video Mode) English...24 ECO Mode Choose "On" to return normal...

PD113P User's Guide EN
Page 27
... the factory default settings. 27 ... If the projector was turned on, press power button twice to turn on all the fan of Acer projector to return the display parameters on again, release both buttons, projector enters download mode. 6. Reset Press the button and then choose "Yes" to their desired image. User Controls Management (Computer / Video Mode) Acer My Start-up Screen is blinking. 4. Connect the projector to your PC with the bundled USB cable then execute My Start-up Screen utility to enter "Download Mode". 1.
... the factory default settings. 27 ... If the projector was turned on, press power button twice to turn on all the fan of Acer projector to return the display parameters on again, release both buttons, projector enters download mode. 6. Reset Press the button and then choose "Yes" to their desired image. User Controls Management (Computer / Video Mode) Acer My Start-up Screen is blinking. 4. Connect the projector to your PC with the bundled USB cable then execute My Start-up Screen utility to enter "Download Mode". 1.
PD113P User's Guide EN
Page 28
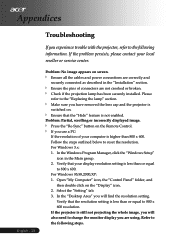
... projector is still not projecting the whole image, you will find the resolution setting. Ensure the pins of your computer is not enabled. Please refer to reset the resolution. For Windows 3.x: 1. Open "My Computer" icon, the "Control Panel" folder, and then double click on the Remote Control. In the "Desktop Area" you are using. Check if the projection lamp has been securely installed. Problem: Partial, scrolling or incorrectly displayed image. For Windows...
... projector is still not projecting the whole image, you will find the resolution setting. Ensure the pins of your computer is not enabled. Please refer to reset the resolution. For Windows 3.x: 1. Open "My Computer" icon, the "Control Panel" folder, and then double click on the Remote Control. In the "Desktop Area" you are using. Check if the projection lamp has been securely installed. Problem: Partial, scrolling or incorrectly displayed image. For Windows...
PD113P User's Guide EN
Page 29
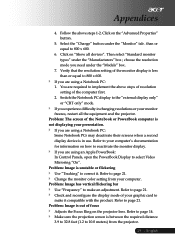
... only" mode. Make sure the projection screen is not displaying your computer. than or equal to 10.0 meters) from your presentation. Problem: Image is in changing resolutions or your graphic card to make it . English Problem: Image has vertical flickering bar Use "Frequency" to make an adjustment. Select the "Change" button under the "Manufacturers" box ; If you are using an Apple PowerBook: In Control Panels, open the PowerBook Display to...
... only" mode. Make sure the projection screen is not displaying your computer. than or equal to 10.0 meters) from your presentation. Problem: Image is in changing resolutions or your graphic card to make it . English Problem: Image has vertical flickering bar Use "Frequency" to make an adjustment. Select the "Change" button under the "Manufacturers" box ; If you are using an Apple PowerBook: In Control Panels, open the PowerBook Display to...
PD113P User's Guide EN
Page 30
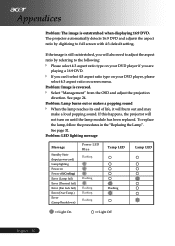
... player if you can't select 4:3 aspect ratio type on your DVD player, please select 4:3 aspect ratio on Power off (Cooling) Error (Lamp fail) Error (Thermal fail) Error (Fan lock fail) Error (Over Temp.) Error (Lamp Breakdown) Power LED Blue Flashing Flashing Flashing Flashing Flashing Temp LED Flashing Lamp LED =>Light On =>Light Off English...30 The projector automatically detects 16:9 DVD and adjusts the aspect ratio by referring to full screen with 4:3 default setting. To replace the lamp, follow the procedures in the...
... player if you can't select 4:3 aspect ratio type on your DVD player, please select 4:3 aspect ratio on Power off (Cooling) Error (Lamp fail) Error (Thermal fail) Error (Fan lock fail) Error (Over Temp.) Error (Lamp Breakdown) Power LED Blue Flashing Flashing Flashing Flashing Flashing Temp LED Flashing Lamp LED =>Light On =>Light Off English...30 The projector automatically detects 16:9 DVD and adjusts the aspect ratio by referring to full screen with 4:3 default setting. To replace the lamp, follow the procedures in the...
PD113P User's Guide EN
Page 34
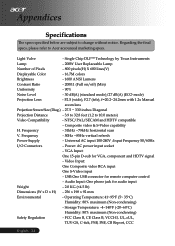
... change without notice. Appendices Specifications The specs specified below are subject to Acer accounced marketing specs. Frequency - 31kHz ~79kHz horizontal scan V. Audio Input: One phone jack for remote computer control - USB:One USB connector for audio input Weight - 2.0 KG ( Light Valve - Universal AC input 100-240V ; Power: AC power input socket - Video Input: One Composite video RCA input One S-Video input - Single Chip DLPTM Technology by Texas Instruments Lamp - 200W User Replaceable Lamp Number of Pixels - 800 pixels(H) X 600 lines(V) Displayable Color...
... change without notice. Appendices Specifications The specs specified below are subject to Acer accounced marketing specs. Frequency - 31kHz ~79kHz horizontal scan V. Audio Input: One phone jack for remote computer control - USB:One USB connector for audio input Weight - 2.0 KG ( Light Valve - Universal AC input 100-240V ; Power: AC power input socket - Video Input: One Composite video RCA input One S-Video input - Single Chip DLPTM Technology by Texas Instruments Lamp - 200W User Replaceable Lamp Number of Pixels - 800 pixels(H) X 600 lines(V) Displayable Color...


